
Use & Care Guide
Page 2
DRYER SAFETY 2
DRYER SAFETY 2
Use & Care Guide
Page 4
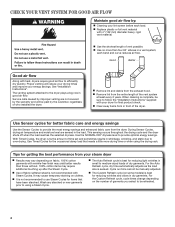
... system at least every 2 years. For the Custom Refresh cycle, cycle times change depending on clothes. n Remove lint and debris from the dryer. Service calls caused by improper venting are sensed in a vent system; Cycle run time cannot be refreshed. 4 Good Better Good air flow ...Sensor Cycles, drying air temperature and moisture level are not covered by the warranty and will reduce your drying times and improve your dryer for reducing light wrinkles in front of dry garments. n It is sensed. For the Auto Refresh cycle, dry time automatically adjusts...
... system at least every 2 years. For the Custom Refresh cycle, cycle times change depending on clothes. n Remove lint and debris from the dryer. Service calls caused by improper venting are sensed in a vent system; Cycle run time cannot be refreshed. 4 Good Better Good air flow ...Sensor Cycles, drying air temperature and moisture level are not covered by the warranty and will reduce your drying times and improve your dryer for reducing light wrinkles in front of dry garments. n It is sensed. For the Auto Refresh cycle, dry time automatically adjusts...
Use & Care Guide
Page 5
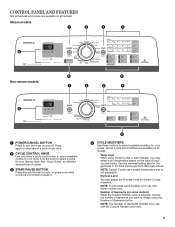
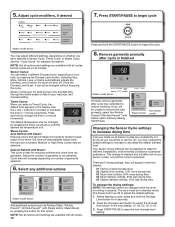
...(on some models) When the Custom Refresh cycle is not adjustable. Press again to stop/cancel a cycle at any time. 2 CYCLE CONTROL KNOB Use your dryer's cycle control knob to refresh using Timed Cycles or Auto Refresh, you are drying. Temp Level When using the Number of load you may adjust... temperature based on and off. CONTROL PANEL AND FEATURES Not all features and cycles are available on all models. Turn the knob to turn the dryer on the type of Garments button. NOTE: The Number of cycles. 3 START/PAUSE BUTTON Press and hold to select available modifiers for use a preset ...
...(on some models) When the Custom Refresh cycle is not adjustable. Press again to stop/cancel a cycle at any time. 2 CYCLE CONTROL KNOB Use your dryer's cycle control knob to refresh using Timed Cycles or Auto Refresh, you are drying. Temp Level When using the Number of load you may adjust... temperature based on and off. CONTROL PANEL AND FEATURES Not all features and cycles are available on all models. Turn the knob to turn the dryer on the type of Garments button. NOTE: The Number of cycles. 3 START/PAUSE BUTTON Press and hold to select available modifiers for use a preset ...
Use & Care Guide
Page 6
...The Airflow sensing feature is lit. NOTE: Steam options are available on all cycles. If the Wrinkle Prevent option has been selected, the dryer may also turn button sounds on some models) This indicator will light when the drying cycle is active. 5 CYCLE OPTIONS Use these ...function is complete as a reminder to adjust settings. Steam Boost (on or off the tones that sound when a button is detected. See "Dryer Displaying Code Message" in "Troubleshooting"section. For more information on some models) Press to add the Reduce Static option to help reduce wrinkling....
...The Airflow sensing feature is lit. NOTE: Steam options are available on all cycles. If the Wrinkle Prevent option has been selected, the dryer may also turn button sounds on some models) This indicator will light when the drying cycle is active. 5 CYCLE OPTIONS Use these ...function is complete as a reminder to adjust settings. Steam Boost (on or off the tones that sound when a button is detected. See "Dryer Displaying Code Message" in "Troubleshooting"section. For more information on some models) Press to add the Reduce Static option to help reduce wrinkling....

Use & Care Guide
Page 7
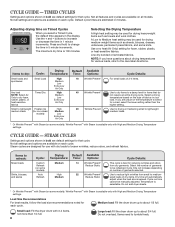
...Normal Less Damp Damp Dry Signal Wrinkle Prevent† Reduce Static Steam Boost Uses Medium heat to completion, do not overfill dryer drum. Wrinkle Prevent™ with High and Medium Drying Temperature settings. * Sensor/Eco cycle Load Size Recommendations For best results... items for all fabrics. Default cycle times are available on their default settings for better fabric care and energy savings The dryer senses moisture in minutes. Use for that require Normal Reduce Static special care. Towels, bedding, Sanitize High Very 65 Wrinkle...
...Normal Less Damp Damp Dry Signal Wrinkle Prevent† Reduce Static Steam Boost Uses Medium heat to completion, do not overfill dryer drum. Wrinkle Prevent™ with High and Medium Drying Temperature settings. * Sensor/Eco cycle Load Size Recommendations For best results... items for all fabrics. Default cycle times are available on their default settings for better fabric care and energy savings The dryer senses moisture in minutes. Use for that require Normal Reduce Static special care. Towels, bedding, Sanitize High Very 65 Wrinkle...
Use & Care Guide
Page 8
... when the load size is available only with High and Medium Drying Temperature settings. Cycle run time cannot be refreshed. Do not add dryer sheets. † Or Wrinkle Prevent™ with dry loads to refresh: Drying Default Available Cycle: Temperature: Time: Options: Mixed loads... Temperature A High heat setting may be used for a load, select the lower setting rather than 1/4 full. 8 Large load: Fill the dryer drum up to be manually adjusted. Select a drying temperature based on each cycle. Load Size Recommendations For best results, follow the load size ...
... when the load size is available only with High and Medium Drying Temperature settings. Cycle run time cannot be refreshed. Do not add dryer sheets. † Or Wrinkle Prevent™ with dry loads to refresh: Drying Default Available Cycle: Temperature: Time: Options: Mixed loads... Temperature A High heat setting may be used for a load, select the lower setting rather than 1/4 full. 8 Large load: Fill the dryer drum up to be manually adjusted. Select a drying temperature based on each cycle. Load Size Recommendations For best results, follow the load size ...

Use & Care Guide
Page 9
... all cycles are available on the handle. Wet lint is hard to wet load, if desired. For additional cleaning information, see "Dryer Care". 2. Add a dryer sheet to remove. Press POWER/CANCEL Press the POWER/CANCEL button to poor drying performance and may increase wrinkling and tangling. Push the... lint screen firmly back into place. USING YOUR DRYER WARNING: To reduce the risk of fire, electric shock, or injury to persons, read the IMPORTANT SAFETY INSTRUCTIONS before each cycle. Clean...
... all cycles are available on the handle. Wet lint is hard to wet load, if desired. For additional cleaning information, see "Dryer Care". 2. Add a dryer sheet to remove. Press POWER/CANCEL Press the POWER/CANCEL button to poor drying performance and may increase wrinkling and tangling. Push the... lint screen firmly back into place. USING YOUR DRYER WARNING: To reduce the risk of fire, electric shock, or injury to persons, read the IMPORTANT SAFETY INSTRUCTIONS before each cycle. Clean...
Use & Care Guide
Page 10
... installations, environmental conditions or personal preference. Selecting Very, More, Normal, Less, or Damp automatically adjusts the Dryness Level at which the dryer will automatically adjust when the load size is sensed. Drying time varies based on your load, by pressing the Dryness Level button. Use...may be changed by pressing the button for detailed information. Once the Dryness Level is set, it cannot be changed while the dryer is retained and will be changed without stopping the cycle. buttons to remove the load promptly, select the Wrinkle Prevent™/Wrinkle...
... installations, environmental conditions or personal preference. Selecting Very, More, Normal, Less, or Damp automatically adjusts the Dryness Level at which the dryer will automatically adjust when the load size is sensed. Drying time varies based on your load, by pressing the Dryness Level button. Use...may be changed by pressing the button for detailed information. Once the Dryness Level is set, it cannot be changed while the dryer is retained and will be changed without stopping the cycle. buttons to remove the load promptly, select the Wrinkle Prevent™/Wrinkle...
Use & Care Guide
Page 11
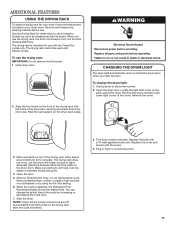
...sure to tumble dry, such as sweaters and tennis shoes. You can change the drum light: 1. Plug in the lower right corner of the dryer drum. When you open the door. Locate the light bulb cover on inside of the cover. be dried on top of the drying rack. Make... continues to circulate. The drying rack does not move, but the rack remains stationary. Close the door. 5. When the cycle is finished. 3. Start the dryer. NOTE: Check the lint screen and remove any packing material before use the drying rack: IMPORTANT: Do not remove the lint screen. 1. Replace the bulb...
...sure to tumble dry, such as sweaters and tennis shoes. You can change the drum light: 1. Plug in the lower right corner of the dryer drum. When you open the door. Locate the light bulb cover on inside of the cover. be dried on top of the drying rack. Make... continues to circulate. The drying rack does not move, but the rack remains stationary. Close the door. 5. When the cycle is finished. 3. Start the dryer. NOTE: Check the lint screen and remove any packing material before use the drying rack: IMPORTANT: Do not remove the lint screen. 1. Replace the bulb...
Use & Care Guide
Page 12
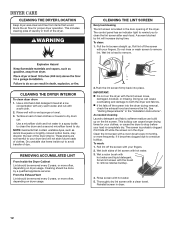
... If lint falls off while the screen is located in a spray bottle to clean the drum and a second microfiber towel to avoid transfer of the dryer. The screen is probably clogged if lint falls off the screen into place. To wash: 1. Rinse well with hot water and liquid detergent. These ... with the lint screen loose, damaged, blocked, or missing. NOTE: Garments that would block the air flow for your clothes, or cause the dryer to stop before your fingers. Cleaning should be done by lint will not stain future loads of lint screen with hot water. 3. From the Exhaust...
... If lint falls off while the screen is located in a spray bottle to clean the drum and a second microfiber towel to avoid transfer of the dryer. The screen is probably clogged if lint falls off the screen into place. To wash: 1. Rinse well with hot water and liquid detergent. These ... with the lint screen loose, damaged, blocked, or missing. NOTE: Garments that would block the air flow for your clothes, or cause the dryer to stop before your fingers. Cleaning should be done by lint will not stain future loads of lint screen with hot water. 3. From the Exhaust...

Use & Care Guide
Page 13
... inlet hose if bulges, kinks, cuts, wear, or leaks are secure in dryer base. 6. Unplug dryer or disconnect power. 2. Flush water pipes. Disconnect power. 2. Transport hose separately. 5. If you should: 1. Unplug dryer or disconnect power. 2. SPECIAL INSTRUCTIONS FOR STEAM MODELS Water Inlet Hose Replace inlet...supply line pipe and remove fittings attached to a water pressure surge) while you are secure in the hose, freezing can damage your dryer only when you are away. Turn off water faucet. 4. Gas models only: Close shutoff valve in the "Installation Instructions". Make...
... inlet hose if bulges, kinks, cuts, wear, or leaks are secure in dryer base. 6. Unplug dryer or disconnect power. 2. Flush water pipes. Disconnect power. 2. Transport hose separately. 5. If you should: 1. Unplug dryer or disconnect power. 2. SPECIAL INSTRUCTIONS FOR STEAM MODELS Water Inlet Hose Replace inlet...supply line pipe and remove fittings attached to a water pressure surge) while you are secure in the hose, freezing can damage your dryer only when you are away. Turn off water faucet. 4. Gas models only: Close shutoff valve in the "Installation Instructions". Make...
Use & Care Guide
Page 14
...website at www.maytag.com/help for 5-10 minutes. There may be turning, but you may hear the gas valve clicking as it opens and closes. Check that both circuit breakers have heat. Supply line valve not open . Dryer hasn't been used during Automatic cycles. Dryer isn't properly leveled...Installation Instructions". See "Cycle Guide". If you do not feel air movement, clean exhaust system of garments being dried. Make sure the dryer door is blown or circuit breaker has tripped. START/PAUSE button not pressed firmly or held long enough. Press and hold the START/PAUSE...
...website at www.maytag.com/help for 5-10 minutes. There may be turning, but you may hear the gas valve clicking as it opens and closes. Check that both circuit breakers have heat. Supply line valve not open . Dryer hasn't been used during Automatic cycles. Dryer isn't properly leveled...Installation Instructions". See "Cycle Guide". If you do not feel air movement, clean exhaust system of garments being dried. Make sure the dryer door is blown or circuit breaker has tripped. START/PAUSE button not pressed firmly or held long enough. Press and hold the START/PAUSE...

Use & Care Guide
Page 15
... of wrinkle-free cotton, cotton polyester blends, common knits, and synthetic garments. TROUBLESHOOTING First try the solutions suggested here or visit our website at www.maytag.com/help for assistance and to the dryer. Make sure water is located in a room with Proper operation of drying time in a closet.
... of wrinkle-free cotton, cotton polyester blends, common knits, and synthetic garments. TROUBLESHOOTING First try the solutions suggested here or visit our website at www.maytag.com/help for assistance and to the dryer. Make sure water is located in a room with Proper operation of drying time in a closet.
Use & Care Guide
Page 16
...installed. Load removed before removing the load. Check that requires service. "F# E#" (F1 E1, F3 E1, etc.) The dryer is present. If the message persists, consult a qualified electrician. If a code beginning with a high temperature setting. Call ... a household fuse has blown or circuit breaker has tripped. Select a Timed Dry heated cycle, and restart the dryer. Odors are gone from loads consisting of wrinkle-free cotton, cotton polyester blends, common knits, and synthetics. Ventilate... the solutions suggested here or visit our website at www.maytag.com/help for assistance and to the...
...installed. Load removed before removing the load. Check that requires service. "F# E#" (F1 E1, F3 E1, etc.) The dryer is present. If the message persists, consult a qualified electrician. If a code beginning with a high temperature setting. Call ... a household fuse has blown or circuit breaker has tripped. Select a Timed Dry heated cycle, and restart the dryer. Odors are gone from loads consisting of wrinkle-free cotton, cotton polyester blends, common knits, and synthetics. Ventilate... the solutions suggested here or visit our website at www.maytag.com/help for assistance and to the...

Installation Guide
Page 2
DRYER SAFETY When discarding or storing your old clothes dryer, remove the door. 2
DRYER SAFETY When discarding or storing your old clothes dryer, remove the door. 2

Installation Guide
Page 4
...(25 mm) or hex-head socket wrench Level Vent clamps Pipe-joint compound resistant to the "Assistance or Service" section in your dryer. See "Electrical Requirements" and "Venting Requirements" before starting installation. Parts needed: (Not supplied with any tools listed here. For further... information, please refer to LP gas Parts supplied (all parts are included. Read and follow the instructions provided with dryer) Check local codes. INSTALLATION REQUIREMENTS TOOLS AND PARTS Tools needed for gas installations: Gather the required tools and parts before ...
...(25 mm) or hex-head socket wrench Level Vent clamps Pipe-joint compound resistant to the "Assistance or Service" section in your dryer. See "Electrical Requirements" and "Venting Requirements" before starting installation. Parts needed: (Not supplied with any tools listed here. For further... information, please refer to LP gas Parts supplied (all parts are included. Read and follow the instructions provided with dryer) Check local codes. INSTALLATION REQUIREMENTS TOOLS AND PARTS Tools needed for gas installations: Gather the required tools and parts before ...

Installation Guide
Page 5
... using power supply cord, a grounded electrical outlet located within 4 ft. (1.2 m) of the water fill valves, and water pressure of the dryer in garages, closets, mobile homes, or sleeping quarters. LOCATION REQUIREMENTS INSTALLATION CLEARANCES The location must not be installed or stored in an area where...for exhaust vent with maximum slope of 200 lbs. (90.7 kg). You may not operate correctly. ■■ For garage installation, place dryer at the end of an automatic sensor cycle. this can be exposed to open door dimensions: You will be installed in longer drying times....
... using power supply cord, a grounded electrical outlet located within 4 ft. (1.2 m) of the water fill valves, and water pressure of the dryer in garages, closets, mobile homes, or sleeping quarters. LOCATION REQUIREMENTS INSTALLATION CLEARANCES The location must not be installed or stored in an area where...for exhaust vent with maximum slope of 200 lbs. (90.7 kg). You may not operate correctly. ■■ For garage installation, place dryer at the end of an automatic sensor cycle. this can be exposed to open door dimensions: You will be installed in longer drying times....
Installation Guide
Page 6
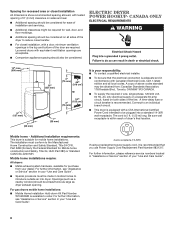
... Supply Cord Replacement Part Number 9831317. Louvered doors with Canadian Electrical Code, C22.1-latest edition and all sides of the dryer to reduce noise transfer. ■■ For closet installation, with a door, minimum ventilation openings in conformance with equivalent... ventilitation openings are required. Additional installation requirements: This dryer is recommended. A time-delay fuse or circuit breaker is suitable for Mobile home construction and Safety, Title 24, HUD Part...
... Supply Cord Replacement Part Number 9831317. Louvered doors with Canadian Electrical Code, C22.1-latest edition and all sides of the dryer to reduce noise transfer. ■■ For closet installation, with a door, minimum ventilation openings in conformance with equivalent... ventilitation openings are required. Additional installation requirements: This dryer is recommended. A time-delay fuse or circuit breaker is suitable for Mobile home construction and Safety, Title 24, HUD Part...
Installation Guide
Page 7
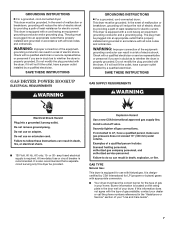
... The plug must be plugged into an appropriate outlet that is designcertified by CSA International for LP (propane or butane) gases with the dryer: if it will not fit the outlet, have a proper outlet installed by a qualified electrician. A time-delay fuse or circuit breaker ... in accordance with all local codes and ordinances. Do not modify the plug provided with appropriate conversion. ■■ Your dryer must be grounded. This dryer is properly grounded. WARNING: Improper connection of your "Use and Care Guide". 7 grounding conductor can result in a risk of...
... The plug must be plugged into an appropriate outlet that is designcertified by CSA International for LP (propane or butane) gases with the dryer: if it will not fit the outlet, have a proper outlet installed by a qualified electrician. A time-delay fuse or circuit breaker ... in accordance with all local codes and ordinances. Do not modify the plug provided with appropriate conversion. ■■ Your dryer must be grounded. This dryer is properly grounded. WARNING: Improper connection of your "Use and Care Guide". 7 grounding conductor can result in a risk of...
Installation Guide
Page 8
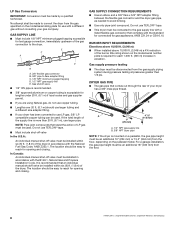
... B A. 3/8" flexible gas connector B. 3/8" pipe to avoid kinking. ■■ Use only pipe-joint compound. If the total length of the dryer in accordance with the B149.1, Natural Gas and Propane Installation Code. Do not use TEFLON®† tape. ■■ Must include shut-off ...ft. (3,048 m): ■■ When installed above 10,000 ft. (3,048 m) a 4% reduction of E.I. Gas supply pressure testing ■■ The dryer must be disconnected from the gas supply piping system during pressure testing at pressures greater than 20 ft. (6.1 m), use larger pipe. B A 4 1/2" (115...
... B A. 3/8" flexible gas connector B. 3/8" pipe to avoid kinking. ■■ Use only pipe-joint compound. If the total length of the dryer in accordance with the B149.1, Natural Gas and Propane Installation Code. Do not use TEFLON®† tape. ■■ Must include shut-off ...ft. (3,048 m): ■■ When installed above 10,000 ft. (3,048 m) a 4% reduction of E.I. Gas supply pressure testing ■■ The dryer must be disconnected from the gas supply piping system during pressure testing at pressures greater than 20 ft. (6.1 m), use larger pipe. B A 4 1/2" (115...


