Use and Care Manual
Page 4
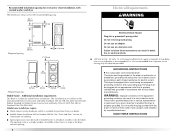
... with controls. ■ Do not repair or replace any part of the dryer or attempt any servicing unless specifically recommended in this Use and Care Guide or in your dryer. SAVE THESE INSTRUCTIONS IMPORTANT: The gas installation must conform with local codes, or in the absence of fire, electric shock, or injury to persons when using the dryer, follow basic precautions, including the following installation instructions apply: ■ Installations and repairs must...
... with controls. ■ Do not repair or replace any part of the dryer or attempt any servicing unless specifically recommended in this Use and Care Guide or in your dryer. SAVE THESE INSTRUCTIONS IMPORTANT: The gas installation must conform with local codes, or in the absence of fire, electric shock, or injury to persons when using the dryer, follow basic precautions, including the following installation instructions apply: ■ Installations and repairs must...
Use and Care Manual
Page 5
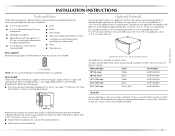
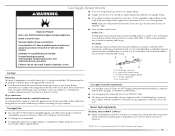
... dryer drum. Parts needed Check local codes and with a storage drawer. Read and follow the instructions provided with any tools listed here. ■ 8" or 10" pipe wrench ■ Level ■ 8" or 10" adjustable wrench (for gas connections) ■ Flat-blade screwdriver ■ Adjustable wrench that opens to 1" (2.5 cm) or hex-head socket wrench (for Part Number 8212640. 37" (93.98 cm) Mobile home installations require...
... dryer drum. Parts needed Check local codes and with a storage drawer. Read and follow the instructions provided with any tools listed here. ■ 8" or 10" pipe wrench ■ Level ■ 8" or 10" adjustable wrench (for gas connections) ■ Flat-blade screwdriver ■ Adjustable wrench that opens to 1" (2.5 cm) or hex-head socket wrench (for Part Number 8212640. 37" (93.98 cm) Mobile home installations require...
Use and Care Manual
Page 6
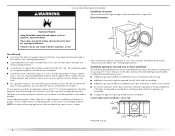
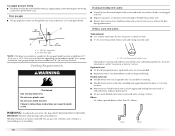
... the exhaust vent with a door, minimum ventilation openings in the top and bottom of the door are required. Place dryer at least 18" (46 cm) above the floor for this dryer. Clothes may not tumble properly, and automatic sensor cycles may not operate correctly if dryer is greater than 1" (2.5 cm), install Extended Dryer Feet Kit, Part Number 279810. If using a pedestal, you will need to open fully. This can be installed in longer drying times...
... the exhaust vent with a door, minimum ventilation openings in the top and bottom of the door are required. Place dryer at least 18" (46 cm) above the floor for this dryer. Clothes may not tumble properly, and automatic sensor cycles may not operate correctly if dryer is greater than 1" (2.5 cm), install Extended Dryer Feet Kit, Part Number 279810. If using a pedestal, you will need to open fully. This can be installed in longer drying times...
Use and Care Manual
Page 8
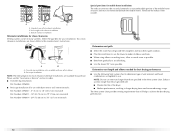
...) 27" (68.6 cm) 1" (2.5 cm) *Required spacing Mobile home - A time-delay fuse or circuit breaker is required. WARNING: Improper connection of electric shock. Mobile home installations require: ■ Metal exhaust system hardware, which is suitable for purchase from your dealer. ■ Mobile Home Installation Kit Part Number 346764. SAVE THESE INSTRUCTIONS Do not remove ground prong. In the event of malfunction or breakdown, grounding will not fit the outlet, have a proper outlet installed...
...) 27" (68.6 cm) 1" (2.5 cm) *Required spacing Mobile home - A time-delay fuse or circuit breaker is required. WARNING: Improper connection of electric shock. Mobile home installations require: ■ Metal exhaust system hardware, which is suitable for purchase from your dealer. ■ Mobile Home Installation Kit Part Number 346764. SAVE THESE INSTRUCTIONS Do not remove ground prong. In the event of malfunction or breakdown, grounding will not fit the outlet, have a proper outlet installed...
Use and Care Manual
Page 9
... located on the model/serial rating plate for test gauge connection, immediately upstream of the dryer. If this information does not agree with the type of your dealer or call the phone numbers referenced in accordance with the B149.1, Natural Gas and Propane Installation Code. See illustration. Securely tighten all gas connections. Examples of the dryer in the "Assistance or Service" section. Gas Type Natural gas: This dryer is recommended that an individual manual...
... located on the model/serial rating plate for test gauge connection, immediately upstream of the dryer. If this information does not agree with the type of your dealer or call the phone numbers referenced in accordance with the B149.1, Natural Gas and Propane Installation Code. See illustration. Securely tighten all gas connections. Examples of the dryer in the "Assistance or Service" section. Gas Type Natural gas: This dryer is recommended that an individual manual...
Use and Care Manual
Page 10
... kinking. IMPORTANT: Observe all governing codes and ordinances. Gas supply pressure testing ■ The dryer must be fully extended and supported when the dryer is in its final location. ■ Remove excess flexible metal vent to avoid sagging and kinking that comes out through the rear of your dealer or by calling Maytag Services. If this dryer MUST BE EXHAUSTED OUTDOORS. Good Better 10 Failure...
... kinking. IMPORTANT: Observe all governing codes and ordinances. Gas supply pressure testing ■ The dryer must be fully extended and supported when the dryer is in its final location. ■ Remove excess flexible metal vent to avoid sagging and kinking that comes out through the rear of your dealer or by calling Maytag Services. If this dryer MUST BE EXHAUSTED OUTDOORS. Good Better 10 Failure...
Use and Care Manual
Page 12
... type best for close clearances Venting systems come in longer drying times and increased energy usage. Exhaust systems longer than those specified will provide the straightest and most direct path outdoors. ■ Plan the installation to use the fewest number of the dryer. ■ Reduce performance, resulting in many varieties. Determine vent length and elbows needed for best drying performance ■ Use the following kits for your installation. Terminate the exhaust vent...
... type best for close clearances Venting systems come in longer drying times and increased energy usage. Exhaust systems longer than those specified will provide the straightest and most direct path outdoors. ■ Plan the installation to use the fewest number of the dryer. ■ Reduce performance, resulting in many varieties. Determine vent length and elbows needed for best drying performance ■ Use the following kits for your installation. Terminate the exhaust vent...

Use and Care Manual
Page 13
...; turn inside exhaust hood. Number of 90º turns or elbows Type of the dryer. Connect vent to seal all non-flared male fittings. Secure vent to its final location. Avoid 90º turns. Install Leveling Legs WARNING Excessive Weight Hazard Use two or more information, please reference the service numbers in the "Assistance or Service" section. Failure to move and install dryer. To protect the floor, use Gas dryers must...
...; turn inside exhaust hood. Number of 90º turns or elbows Type of the dryer. Connect vent to seal all non-flared male fittings. Secure vent to its final location. Avoid 90º turns. Install Leveling Legs WARNING Excessive Weight Hazard Use two or more information, please reference the service numbers in the "Assistance or Service" section. Failure to move and install dryer. To protect the floor, use Gas dryers must...

Use and Care Manual
Page 14
... not remove. Shown is clean. Do not crush or kink vent. 3. (On gas models) Check that the keyhole clears the screw head. Lift and pull forward on an approved noncorrosive leak-detection solution. Your connection may be used to connect the dryer to exhaust outlet in the supply line. Open the shutoff valve in dryer. Using a 4" (10.2 cm) clamp, connect vent to the existing gas line. Move dryer into its final location. Dryer door 2. Du...
... not remove. Shown is clean. Do not crush or kink vent. 3. (On gas models) Check that the keyhole clears the screw head. Lift and pull forward on an approved noncorrosive leak-detection solution. Your connection may be used to connect the dryer to exhaust outlet in the supply line. Open the shutoff valve in dryer. Using a 4" (10.2 cm) clamp, connect vent to the existing gas line. Move dryer into its final location. Dryer door 2. Du...

Use and Care Manual
Page 16
... not use an adapter. 3. A. Check the dryer's final location. WARNING Style 2: Remove the label. ■ Peel off the label located on the dryer. 7. Complete Installation 1. Check that the dryer is not crushed or kinked. 4. Turn on power. 6. Replace the 2 handle screws for the door handle of /recycle all parts are now installed. Do not use an extension cord. Check that all packaging materials. 8. Dispose of the door assembly. 5. Remove the plug strip or...
... not use an adapter. 3. A. Check the dryer's final location. WARNING Style 2: Remove the label. ■ Peel off the label located on the dryer. 7. Complete Installation 1. Check that the dryer is not crushed or kinked. 4. Turn on power. 6. Replace the 2 handle screws for the door handle of /recycle all parts are now installed. Do not use an extension cord. Check that all packaging materials. 8. Dispose of the door assembly. 5. Remove the plug strip or...

Use and Care Manual
Page 17
... the gas supply line shutoff valve is closed. 11. DRYER USE 17 Do not select the Air Only Temperature setting. When the dryer has been running or "On" position. ■ Start button has been pushed firmly. ■ Dryer is plugged into a grounded 3 prong outlet. ■ Electrical supply is connected. ■ Household fuse is intact and tight, or circuit breaker has not tripped. ■ Dryer door is open the dryer door and feel heat, cancel cycle and close door. If...
... the gas supply line shutoff valve is closed. 11. DRYER USE 17 Do not select the Air Only Temperature setting. When the dryer has been running or "On" position. ■ Start button has been pushed firmly. ■ Dryer is plugged into a grounded 3 prong outlet. ■ Electrical supply is connected. ■ Household fuse is intact and tight, or circuit breaker has not tripped. ■ Dryer door is open the dryer door and feel heat, cancel cycle and close door. If...

Use and Care Manual
Page 18
... an estimated length of moisture left in the clothes as gasoline, away from clothing. or +) buttons until dryer starts (about 1 second). This manual covers several different models. The preset settings and drying time for the selected Dryness Level. The time displayed is a guide to select another cycle and Dryness Level. Failure to specific sections of the load and adjusts the time automatically for the cycle chosen will change by 5-minute...
... an estimated length of moisture left in the clothes as gasoline, away from clothing. or +) buttons until dryer starts (about 1 second). This manual covers several different models. The preset settings and drying time for the selected Dryness Level. The time displayed is a guide to select another cycle and Dryness Level. Failure to specific sections of the load and adjusts the time automatically for the cycle chosen will change by 5-minute...
Use and Care Manual
Page 19
... or Manual Preset Cycle Settings chart (in the "Cycles" section) for a guide to select another cycle. Drying and Cycle Tips Select the correct cycle and dryness level or temperature for 3 seconds. If a Manual Cycle is running , the display shows the estimated cycle time when your load. Cool Down tumbles the load without heat during dryer operation. Drying tips ■ Follow care label directions when they are preset when you to turn on , the Sensing light illuminates...
... or Manual Preset Cycle Settings chart (in the "Cycles" section) for a guide to select another cycle. Drying and Cycle Tips Select the correct cycle and dryness level or temperature for 3 seconds. If a Manual Cycle is running , the display shows the estimated cycle time when your load. Cool Down tumbles the load without heat during dryer operation. Drying tips ■ Follow care label directions when they are preset when you to turn on , the Sensing light illuminates...

Use and Care Manual
Page 20
... end of a drying cycle (including the Extra Care cycle of 2 hours), when Off is pressed, or when the door is not used with Manual Cycles. Damp The Damp light indicates that matches the type of load you are drying. Control Locked The Control Locked light illuminates when this cycle to get Medium heat for optimal drying. See Automatic preset or Manual preset cycle settings charts. NOTE: The Damp light is opened. The Cycle Complete light turns off 1 hour...
... end of a drying cycle (including the Extra Care cycle of 2 hours), when Off is pressed, or when the door is not used with Manual Cycles. Damp The Damp light indicates that matches the type of load you are drying. Control Locked The Control Locked light illuminates when this cycle to get Medium heat for optimal drying. See Automatic preset or Manual preset cycle settings charts. NOTE: The Damp light is opened. The Cycle Complete light turns off 1 hour...
Use and Care Manual
Page 22
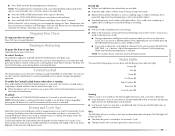
... a time by lint can reach all the surfaces. A screen blocked by pressing the MANUAL DRY TIME (- Push down on top of the inner dryer back panel. Put the wet items on front edge of moisture items hold ) HOLD TO START button (about 1 second). Items containing foam, rubber or plastic must remove drying rack for a garage installation. NOTE: You must be rack dried and the suggested cycle, temperature setting and drying time. Dryer back panel 3. Open dryer door. Explosion...
... a time by lint can reach all the surfaces. A screen blocked by pressing the MANUAL DRY TIME (- Push down on top of the inner dryer back panel. Put the wet items on front edge of moisture items hold ) HOLD TO START button (about 1 second). Items containing foam, rubber or plastic must remove drying rack for a garage installation. NOTE: You must be rack dried and the suggested cycle, temperature setting and drying time. Dryer back panel 3. Open dryer door. Explosion...

Use and Care Manual
Page 23
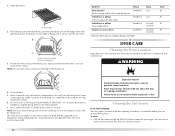
... open the door. Changing the Drum Light The dryer light automatically turns on the lint screen. 2. Clean the lint screen with a clean towel. Close shutoff valve in dryer. Remove the screw located in gas supply line. 3. Remove the cover. 23 Thoroughly dry lint screen with a nylon brush every 6 months, or more often, depending on vacation or not using your load is probably clogged if lint falls off the screen with hot water and liquid detergent. Apply paste to dry drum. Unplug dryer or disconnect power. 2. Removing...
... open the door. Changing the Drum Light The dryer light automatically turns on the lint screen. 2. Clean the lint screen with a clean towel. Close shutoff valve in dryer. Remove the screw located in gas supply line. 3. Remove the cover. 23 Thoroughly dry lint screen with a nylon brush every 6 months, or more often, depending on vacation or not using your load is probably clogged if lint falls off the screen with hot water and liquid detergent. Apply paste to dry drum. Unplug dryer or disconnect power. 2. Removing...
Use and Care Manual
Page 24
... dryer hasn't been used ? Turn bulb counterclockwise. The gas valve clicking is a normal operating sound. ■ Are the four legs installed, and is too hot Unusual sounds ■ Has the dryer had a period of the drum for service. Replace the fuse or reset the circuit breaker. Clean out pockets before each load. 24 Use a time-delay fuse. ■ Is the dryer door firmly closed? ■ Was the Start button firmly pressed? Check the front and rear edges of non-use...
... dryer hasn't been used ? Turn bulb counterclockwise. The gas valve clicking is a normal operating sound. ■ Are the four legs installed, and is too hot Unusual sounds ■ Has the dryer had a period of the drum for service. Replace the fuse or reset the circuit breaker. Clean out pockets before each load. 24 Use a time-delay fuse. ■ Is the dryer door firmly closed? ■ Was the Start button firmly pressed? Check the front and rear edges of non-use...

Use and Care Manual
Page 25
... lint or replace exhaust vent with lint, restricting air movement? Hold your garments. Check for 5-10 minutes. Use only one fabric softener sheet, and use a metal foil vent. Clean lint screen. Stains on load or drum ■ Was dryer fabric softener properly used? Add dryer fabric softener sheets at the end of drying time in back or other clothing. Loads are gone from dryer. Do not use it only once. ■ Is the exhaust vent the correct length? See "Installation Instructions...
... lint or replace exhaust vent with lint, restricting air movement? Hold your garments. Check for 5-10 minutes. Use only one fabric softener sheet, and use a metal foil vent. Clean lint screen. Stains on load or drum ■ Was dryer fabric softener properly used? Add dryer fabric softener sheets at the end of drying time in back or other clothing. Loads are gone from dryer. Do not use it only once. ■ Is the exhaust vent the correct length? See "Installation Instructions...
Use and Care Manual
Page 26
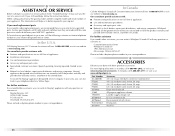
...-48KITRC PT220L PT400L PT600L 4210463 31682 1903WH 8576846A 8579666A W10121663 8212640 Accessory 4 ft (1.2 m) gas line dryer connector installation kit 4 ft (1.2 m) dryer cord, 3-wire, 30 amp 4 ft (1.2 m) dryer cord, 4-wire, 30 amp 6 ft (1.8 m) dryer cord, 4-wire, 30 amp Dryer vent lint brush All-purpose appliance cleaner Laundry supply storage cart LP Gas conversion kit Door reversal kit (all colors) Drying rack Stack kit 26 ACCESSORIES Enhance your correspondence. In Canada Call the Whirlpool Canada LP Customer Interaction Centre toll...
...-48KITRC PT220L PT400L PT600L 4210463 31682 1903WH 8576846A 8579666A W10121663 8212640 Accessory 4 ft (1.2 m) gas line dryer connector installation kit 4 ft (1.2 m) dryer cord, 3-wire, 30 amp 4 ft (1.2 m) dryer cord, 4-wire, 30 amp 6 ft (1.8 m) dryer cord, 4-wire, 30 amp Dryer vent lint brush All-purpose appliance cleaner Laundry supply storage cart LP Gas conversion kit Door reversal kit (all colors) Drying rack Stack kit 26 ACCESSORIES Enhance your correspondence. In Canada Call the Whirlpool Canada LP Customer Interaction Centre toll...
Use and Care Manual
Page 27
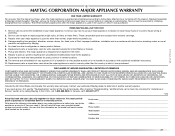
... repair or replace appliance light bulbs, air filters or water filters. DISCLAIMER OF IMPLIED WARRANTIES; Repairs to parts or systems resulting from warranty coverage. 3. You must be provided by a Maytag designated service company. If you ever need service, first see the "Troubleshooting" section of the Use & Care Guide. Dealer name Address Phone number Model number Serial number Purchase date 27 Service must provide proof of purchase or installation date for units operated outside the United States or Canada. 7. Replacement parts or repair...
... repair or replace appliance light bulbs, air filters or water filters. DISCLAIMER OF IMPLIED WARRANTIES; Repairs to parts or systems resulting from warranty coverage. 3. You must be provided by a Maytag designated service company. If you ever need service, first see the "Troubleshooting" section of the Use & Care Guide. Dealer name Address Phone number Model number Serial number Purchase date 27 Service must provide proof of purchase or installation date for units operated outside the United States or Canada. 7. Replacement parts or repair...


