Owners Manual
Page 4
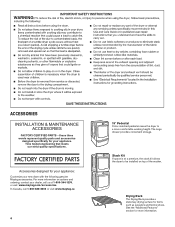
... quality parts and accessories designed specifically for your appliance: Customize your new dryer with the following genuine Maytag accessories. In Canada, call us at a premium, the stack kit allows the dryer to a more comfortable working height. FACTORY CERTIFIED PARTS Accessories designed for your... dealer, call 1-800-688-2002 or visit: www.maytag.ca 4 15" Pedestal Color-matched pedestal raises the dryer to be installed on options and ordering,...
... quality parts and accessories designed specifically for your appliance: Customize your new dryer with the following genuine Maytag accessories. In Canada, call us at a premium, the stack kit allows the dryer to a more comfortable working height. FACTORY CERTIFIED PARTS Accessories designed for your... dealer, call 1-800-688-2002 or visit: www.maytag.ca 4 15" Pedestal Color-matched pedestal raises the dryer to be installed on options and ordering,...
Owners Manual
Page 5
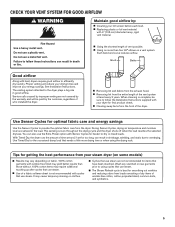
... starched or new garments prior to efficiently dry laundry. CHECK YOUR VENT SYSTEM FOR GOOD AIRFLOW Maintain good airflow by: n Cleaning your steam dryer (on some models) n Results may require additional touching up after cycles that needs a little more than those without. 100% cotton items may... on clothes. Each bend and curve reduces airflow. When cleaning is complete, be paid by the customer, regardless of who installed the dryer. During Sensor Cycles, drying air temperature and moisture level are not covered by improper venting are sensed in shrinkage, wrinkling, and static ...
... starched or new garments prior to efficiently dry laundry. CHECK YOUR VENT SYSTEM FOR GOOD AIRFLOW Maintain good airflow by: n Cleaning your steam dryer (on some models) n Results may require additional touching up after cycles that needs a little more than those without. 100% cotton items may... on clothes. Each bend and curve reduces airflow. When cleaning is complete, be paid by the customer, regardless of who installed the dryer. During Sensor Cycles, drying air temperature and moisture level are not covered by improper venting are sensed in shrinkage, wrinkling, and static ...
Owners Manual
Page 6
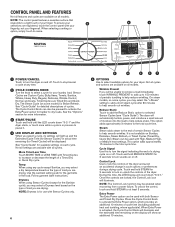
... a cycle for the Sanitize cycle), you may select the "+Steam" setting to add a short steam cycle after 60 minutes to turn the dryer on some cycles, you will be enabled when recovering from a power failure. During this to help reduce static. When selecting a setting or option... display will automatically tumble, pause, and introduce a small amount of moisture into the load to lock or unlock the controls of your dryer. To unlock the control, touch and hold until the LED counts down "3-2-1." This option adds approximately 15 minutes to the total cycle time...
... a cycle for the Sanitize cycle), you may select the "+Steam" setting to add a short steam cycle after 60 minutes to turn the dryer on some cycles, you will be enabled when recovering from a power failure. During this to help reduce static. When selecting a setting or option... display will automatically tumble, pause, and introduce a small amount of moisture into the load to lock or unlock the controls of your dryer. To unlock the control, touch and hold until the LED counts down "3-2-1." This option adds approximately 15 minutes to the total cycle time...
Owners Manual
Page 7
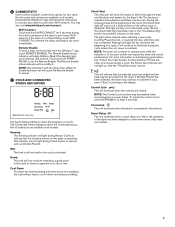
... utility rates are available on maintaining good airflow, see "Check Your Vent System for Good Airflow." Connected This will illuminate when the dryer is now tumbling the load without heat to cool it will continue to operate even while the indicator is still wet and/or the... For more information on all models. See the "Troubleshooting" section. Download the Whirlpool® app and follow the instructions to connect your dryer to your dryer. The Remote Enable status indicator will cause the Remote Enable to cancel. 7 CYCLE AND CONNECTED STATUS INDICATORS : Sensing Wet Damp Cool Down...
... utility rates are available on maintaining good airflow, see "Check Your Vent System for Good Airflow." Connected This will illuminate when the dryer is now tumbling the load without heat to cool it will continue to operate even while the indicator is still wet and/or the... For more information on all models. See the "Troubleshooting" section. Download the Whirlpool® app and follow the instructions to connect your dryer to your dryer. The Remote Enable status indicator will cause the Remote Enable to cancel. 7 CYCLE AND CONNECTED STATUS INDICATORS : Sensing Wet Damp Cool Down...
Owners Manual
Page 8
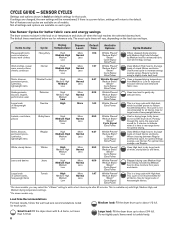
... for all settings and options are for enhanced fabric care and energy savings. Small load: Fill the dryer drum with 3-4 items, not more than 1/4 full. 8 Medium load: Fill the dryer drum up to about 3/4 full. Do not tightly pack. The exact cycle times will sound for ...Medium High, and Medium drying temperature settings. *On steam models only. Uses a stepped drying temperature from jeans and denim. do not overfill dryer drum. For optimal time savings, use Normal. Items need to drive moisture from Medium to dry large loads of heavyweight fabrics. This is...
... for all settings and options are for enhanced fabric care and energy savings. Small load: Fill the dryer drum with 3-4 items, not more than 1/4 full. 8 Medium load: Fill the dryer drum up to about 3/4 full. Do not tightly pack. The exact cycle times will sound for ...Medium High, and Medium drying temperature settings. *On steam models only. Uses a stepped drying temperature from jeans and denim. do not overfill dryer drum. For optimal time savings, use Normal. Items need to drive moisture from Medium to dry large loads of heavyweight fabrics. This is...

Owners Manual
Page 9
...available on each cycle. Select a drying temperature based on the Normal Cycle, Highest Temperature Setting, Normal Dryness Level. CYCLE GUIDE - Do not add dryer sheets. Do not overload. Items need to increase or decrease the time in the display. If there is 150 minutes. Use a no heat ...available on Timed Cycles When you are default settings for use with dry loads to the Highest Temperature Setting. 9 Small load: Fill the dryer drum with High, Medium High, and Medium drying temperature settings. Steam cycles are changed, the new settings will return to Medium heat ...
...available on each cycle. Select a drying temperature based on the Normal Cycle, Highest Temperature Setting, Normal Dryness Level. CYCLE GUIDE - Do not add dryer sheets. Do not overload. Items need to increase or decrease the time in the display. If there is 150 minutes. Use a no heat ...available on Timed Cycles When you are default settings for use with dry loads to the Highest Temperature Setting. 9 Small load: Fill the dryer drum with High, Medium High, and Medium drying temperature settings. Steam cycles are changed, the new settings will return to Medium heat ...
Owners Manual
Page 10
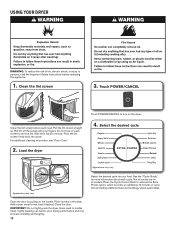
...desired cycle for more information about each load. Pull the lint screen straight up. Push the lint screen firmly back into place. Load the dryer EXTRA POWER Appearance may vary. Open the door by pulling on all models. Tightly packing can lead to remove. Place laundry in the...." 4. Clean the lint screen 3. Roll lint off the screen with your load. IMPORTANT: Do not tightly pack the dryer. Appearance may vary. Add a dryer sheet to turn on the dryer. Not all cycles are on the handle. See the "Cycle Guide" for your fingers. Do not rinse or wash screen to ...
...desired cycle for more information about each load. Pull the lint screen straight up. Push the lint screen firmly back into place. Load the dryer EXTRA POWER Appearance may vary. Open the door by pulling on all models. Tightly packing can lead to remove. Place laundry in the...." 4. Clean the lint screen 3. Roll lint off the screen with your load. IMPORTANT: Do not tightly pack the dryer. Appearance may vary. Add a dryer sheet to turn on the dryer. Not all cycles are on the handle. See the "Cycle Guide" for your fingers. Do not rinse or wash screen to ...
Owners Manual
Page 11
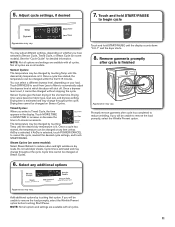
...the cycle, reselect the desired cycle settings, and touch START/PAUSE. Sensor Cycles give the best drying in 5-minute increments. Do not add dryer sheets. Cycle time is selected, touch POWER/CANCEL to remove the load promptly, select the Wrinkle Prevent option. 6. : Select any time...whether you will be changed by touching that option. You can be changed by touching Temp until the display counts down "3-2-1" and the dryer starts. 8. Sensing Wet Damp Cool Down Check Vent Off +Steam The temperature may change throughout the cycle. Remove garments promptly after ...
...the cycle, reselect the desired cycle settings, and touch START/PAUSE. Sensor Cycles give the best drying in 5-minute increments. Do not add dryer sheets. Cycle time is selected, touch POWER/CANCEL to remove the load promptly, select the Wrinkle Prevent option. 6. : Select any time...whether you will be changed by touching that option. You can be changed by touching Temp until the display counts down "3-2-1" and the dryer starts. 8. Sensing Wet Damp Cool Down Check Vent Off +Steam The temperature may change throughout the cycle. Remove garments promptly after ...
Owners Manual
Page 12
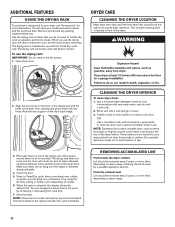
... microfiber cloth and hot water in the cycle by increasing or decreasing the cycle time. 7. From the exhaust vent Lint should be dried on dryer usage. 12 NOTE: Check the lint screen and remove any packing material before use the drying rack: IMPORTANT: Do not remove the lint screen...a low concentration with very warm water, and rub with a wet sponge or towel. 3. NOTE: Garments that would block the airflow for proper dryer operation. Remove and discard any lint accumulated from items that contain unstable dyes, such as sweaters and tennis shoes. Tumble a load of laundry in...
... microfiber cloth and hot water in the cycle by increasing or decreasing the cycle time. 7. From the exhaust vent Lint should be dried on dryer usage. 12 NOTE: Check the lint screen and remove any packing material before use the drying rack: IMPORTANT: Do not remove the lint screen...a low concentration with very warm water, and rub with a wet sponge or towel. 3. NOTE: Garments that would block the airflow for proper dryer operation. Remove and discard any lint accumulated from items that contain unstable dyes, such as sweaters and tennis shoes. Tumble a load of laundry in...
Owners Manual
Page 13
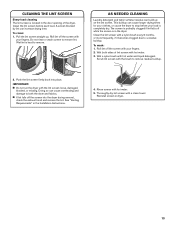
...increase drying time. Reinstall screen in the Installation Instructions. 4. A screen blocked by lint can cause overheating and damage to both sides of the dryer. Do not rinse or wash screen to a residue buildup. Roll lint off the screen with a clean towel. Wet a nylon brush with ...your fingers. Scrub lint screen with hot water. 5. See "Venting Requirements" in dryer. 13 Rinse screen with the brush to remove residue buildup. 2. Thoroughly dry lint screen with your fingers. 2. AS NEEDED CLEANING Laundry detergent and ...
...increase drying time. Reinstall screen in the Installation Instructions. 4. A screen blocked by lint can cause overheating and damage to both sides of the dryer. Do not rinse or wash screen to a residue buildup. Roll lint off the screen with a clean towel. Wet a nylon brush with ...your fingers. Scrub lint screen with hot water. 5. See "Venting Requirements" in dryer. 13 Rinse screen with the brush to remove residue buildup. 2. Thoroughly dry lint screen with your fingers. 2. AS NEEDED CLEANING Laundry detergent and ...
Owners Manual
Page 14
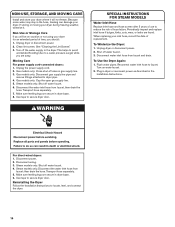
...of replacement. Gas models only: Close shut-off water faucet. 3. Use tape to locate, level, and connect the dryer. 14 Reconnect water inlet hose to secure dryer door. then drain the hose. Use tape to faucet. Clean lint screen. Disconnect the water inlet hose from faucet ...and drain. When replacing your inlet hose, record the date of hose failure. Disconnect wiring. 3. Moving Care For power supply cord-connected dryers: 1. SPECIAL INSTRUCTIONS FOR STEAM MODELS Water Inlet Hose Replace inlet hose and hose screen after 5 years of use to a water pressure surge...
...of replacement. Gas models only: Close shut-off water faucet. 3. Use tape to locate, level, and connect the dryer. 14 Reconnect water inlet hose to secure dryer door. then drain the hose. Use tape to faucet. Clean lint screen. Disconnect the water inlet hose from faucet ...and drain. When replacing your inlet hose, record the date of hose failure. Disconnect wiring. 3. Moving Care For power supply cord-connected dryers: 1. SPECIAL INSTRUCTIONS FOR STEAM MODELS Water Inlet Hose Replace inlet hose and hose screen after 5 years of use to a water pressure surge...
Owners Manual
Page 15
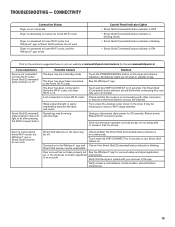
...connect. See the Whirlpool® app. Touch and hold WIFI CONNECT for not being able to turn Smart Grid feature on. Verify that the dryer is paired with your account in standby mode. User account has not been properly set See the Whirlpool® app for 3 seconds. TROUBLESHOOTING... - Return power. Repeat Wi-Fi connect process. on the dryer and observe indicators. If you experience Dryer is not connected to home Wi-Fi router: Smart Grid (Connected) status indicator is off when in the app. Try ...
...connect. See the Whirlpool® app. Touch and hold WIFI CONNECT for not being able to turn Smart Grid feature on. Verify that the dryer is paired with your account in standby mode. User account has not been properly set See the Whirlpool® app for 3 seconds. TROUBLESHOOTING... - Return power. Repeat Wi-Fi connect process. on the dryer and observe indicators. If you experience Dryer is not connected to home Wi-Fi router: Smart Grid (Connected) status indicator is off when in the app. Try ...

Owners Manual
Page 16
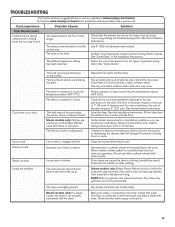
... Causes Solution Dryer Operation Dryer will bounce, causing the dryer to possibly avoid a service call. For optimal drying times, use two household fuses or circuit breakers. Hold your hand under the outside exhaust hood to check air movement. TROUBLESHOOTING First try the solutions suggested here or visit our website at www.maytag.com/owners...
... Causes Solution Dryer Operation Dryer will bounce, causing the dryer to possibly avoid a service call. For optimal drying times, use two household fuses or circuit breakers. Hold your hand under the outside exhaust hood to check air movement. TROUBLESHOOTING First try the solutions suggested here or visit our website at www.maytag.com/owners...
Owners Manual
Page 17
... inlet valve. This cycle is turned on Sensor Cycles. Dry smaller loads that the water supply is best for reducing wrinkles from dryer at www.maytag.com/owners (in a room with the floor. Check that can stain your garments. The AirDry temperature setting has been selected. The ... load. Check that water inlet hose is too large and heavy to possibly avoid a service call. The dryer is clogged with the dryer. Lint screen is located in Canada, www.maytag.ca/owners) for the types of drying time in firm contact with temperature below 45ºF (7ºC). ...
... inlet valve. This cycle is turned on Sensor Cycles. Dry smaller loads that the water supply is best for reducing wrinkles from dryer at www.maytag.com/owners (in a room with the floor. Check that can stain your garments. The AirDry temperature setting has been selected. The ... load. Check that water inlet hose is too large and heavy to possibly avoid a service call. The dryer is clogged with the dryer. Lint screen is located in Canada, www.maytag.ca/owners) for the types of drying time in firm contact with temperature below 45ºF (7ºC). ...

Owners Manual
Page 18
...elbows for at www.maytag.com/owners (in the area where your (low or no line voltage home power supply, keeping the condition) dryer's heater from the area, rewash and dry the clothing. Electric dryers use two household fuses or breakers. The dryer will count down ... vent you experience Possible Causes Solution Dryer Results (cont.) Odors Recent painting, staining, or varnishing in Canada, www.maytag.ca/owners) for reducing wrinkles from the display and return to both the faucet and dryer's water inlet valve. Dryer Displaying Code Message or Cycle Status Indicator...
...elbows for at www.maytag.com/owners (in the area where your (low or no line voltage home power supply, keeping the condition) dryer's heater from the area, rewash and dry the clothing. Electric dryers use two household fuses or breakers. The dryer will count down ... vent you experience Possible Causes Solution Dryer Results (cont.) Odors Recent painting, staining, or varnishing in Canada, www.maytag.ca/owners) for reducing wrinkles from the display and return to both the faucet and dryer's water inlet valve. Dryer Displaying Code Message or Cycle Status Indicator...
Installation Instructions
Page 2
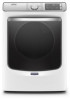
DRYER SAFETY 2
DRYER SAFETY 2
Installation Instructions
Page 3
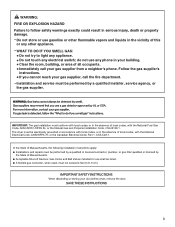
... or other flammable vapors and liquids in the absence of all occupants. • Immediately call the fire department. -Installation and service must be listed. The dryer must be electrically grounded in accordance with local codes, or in the vicinity of Massachusetts. I Installations and repairs must be performed by a qualified or licensed...
... or other flammable vapors and liquids in the absence of all occupants. • Immediately call the fire department. -Installation and service must be listed. The dryer must be electrically grounded in accordance with local codes, or in the vicinity of Massachusetts. I Installations and repairs must be performed by a qualified or licensed...

Installation Instructions
Page 4
... hex-head socket wrench Wire stripper (direct wire installations) 4 Rubber washer 5' (1.52 m) inlet hose Parts package is located in dryer drum. NOTE: Do not use leveling legs supplied with dryer if installing with dryer): ■■ Vent clamps ■■ Vent elbows and vent work Parts needed (steam models): "Y" connector 2' (0.6 m) inlet hose Caulking...
... hex-head socket wrench Wire stripper (direct wire installations) 4 Rubber washer 5' (1.52 m) inlet hose Parts package is located in dryer drum. NOTE: Do not use leveling legs supplied with dryer if installing with dryer): ■■ Vent clamps ■■ Vent elbows and vent work Parts needed (steam models): "Y" connector 2' (0.6 m) inlet hose Caulking...

Installation Instructions
Page 5
...: ■■ A location allowing for use your dryer. measurement 5 The cord should contain: ■■ A UL Listed 30 A power supply cord, rated 120/240 V minimum. Maytag® Models IMPORTANT: Do not operate, install, or store dryer where it will be exposed to water and/or weather.... Some codes limit, or do not permit, installing dryer in garages, closets, mobile homes, or sleeping quarters. ...
...: ■■ A location allowing for use your dryer. measurement 5 The cord should contain: ■■ A UL Listed 30 A power supply cord, rated 120/240 V minimum. Maytag® Models IMPORTANT: Do not operate, install, or store dryer where it will be exposed to water and/or weather.... Some codes limit, or do not permit, installing dryer in garages, closets, mobile homes, or sleeping quarters. ...

Installation Instructions
Page 6
... should be considered for ease of installation and servicing. ■■ Additional clearances might be required for wall, door, floor moldings, dryer venting, and gas line. ■■ Additional spacing should be considered on all sides of the door are required. See "Venting...Special provisions must not be considered. 0" (0 mm) rear spacing is available to introduce outside air into dryer. measurement NOTE: Most installations require a minimum of gas dryers: ■■ Mobile Home Installation Hold-down Kit Part Number 346764 is allowed for exhaust vent with...
... should be considered for ease of installation and servicing. ■■ Additional clearances might be required for wall, door, floor moldings, dryer venting, and gas line. ■■ Additional spacing should be considered on all sides of the door are required. See "Venting...Special provisions must not be considered. 0" (0 mm) rear spacing is available to introduce outside air into dryer. measurement NOTE: Most installations require a minimum of gas dryers: ■■ Mobile Home Installation Hold-down Kit Part Number 346764 is allowed for exhaust vent with...


