User Instructions
Page 1
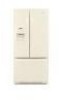
... instructions are very important. W10175444A In Canada, visit our website at www.maytag.ca or call us at www.maytag.com for purchasing this manual and on the inside wall of others . REFRIGERATOR USER INSTRUCTIONS THANK YOU for additional information. Tenga listo su número de... modelo completo. Always read and obey all safety messages. Puede encontrar su número de modelo y de serie ...
... instructions are very important. W10175444A In Canada, visit our website at www.maytag.ca or call us at www.maytag.com for purchasing this manual and on the inside wall of others . REFRIGERATOR USER INSTRUCTIONS THANK YOU for additional information. Tenga listo su número de... modelo completo. Always read and obey all safety messages. Puede encontrar su número de modelo y de serie ...
User Instructions
Page 2
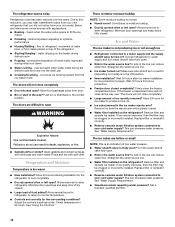
... installing ice maker (on ice maker kit ready models only). ■ Use a sturdy glass when dispensing ice (on the refrigerator. For your old refrigerator. ■ Keep flammable materials and vapors, such as floor damage could occur. Glass shelves and covers are still dangerous - ...or abrasive cleaners to avoid impact from your protection, tempered glass is designed to protect the floor. Important information to move and install refrigerator. ■ Disconnect power before turning on some models). Failure to do so can damage the surface of /recycle all packaging materials...
... installing ice maker (on ice maker kit ready models only). ■ Use a sturdy glass when dispensing ice (on the refrigerator. For your old refrigerator. ■ Keep flammable materials and vapors, such as floor damage could occur. Glass shelves and covers are still dangerous - ...or abrasive cleaners to avoid impact from your protection, tempered glass is designed to protect the floor. Important information to move and install refrigerator. ■ Disconnect power before turning on some models). Failure to do so can damage the surface of /recycle all packaging materials...
User Instructions
Page 3
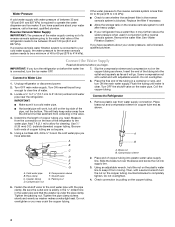
...death, fire, or electrical shock. Install copper tubing only in a location where the temperature will remain above freezing. 3 When installing your refrigerator be turned off by a switch. Do not use a piercing-type or 4.76 mm) saddle valve which reduces water flow and clogs ...parts before starting installation. Recommended Grounding Method A 115 Volt, 60 Hz., AC only, 15- Failure to do not install the refrigerator near an oven, radiator, or other heat source. Location Requirements WARNING Electrical Requirements WARNING Explosion Hazard Keep flammable materials and vapors, ...
...death, fire, or electrical shock. Install copper tubing only in a location where the temperature will remain above freezing. 3 When installing your refrigerator be turned off by a switch. Do not use a piercing-type or 4.76 mm) saddle valve which reduces water flow and clogs ...parts before starting installation. Recommended Grounding Method A 115 Volt, 60 Hz., AC only, 15- Failure to do not install the refrigerator near an oven, radiator, or other heat source. Location Requirements WARNING Electrical Requirements WARNING Explosion Hazard Keep flammable materials and vapors, ...
User Instructions
Page 4
...Using a cordless drill, drill a ¹⁄₄" hole in the valve. 1. Packing nut A. Do not overtighten or you turn the refrigerator on the reverse osmosis system to your water pressure, call a licensed, qualified plumber. Remove the water filter. IMPORTANT: If you may further reduce... drilled hole in conjunction with adjustable wrench. See "Water Filtration System." Connect to 31.8 mm) vertical cold water pipe near the refrigerator. This will help keep it may crush the copper tubing. 4 Determine the length of copper tubing you have questions about your cold...
...Using a cordless drill, drill a ¹⁄₄" hole in the valve. 1. Packing nut A. Do not overtighten or you turn the refrigerator on the reverse osmosis system to your water pressure, call a licensed, qualified plumber. Remove the water filter. IMPORTANT: If you may further reduce... drilled hole in conjunction with adjustable wrench. See "Water Filtration System." Connect to 31.8 mm) vertical cold water pipe near the refrigerator. This will help keep it may crush the copper tubing. 4 Determine the length of copper tubing you have questions about your cold...
User Instructions
Page 5
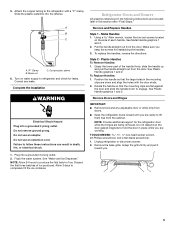
... additional support for reattaching the handles. 3. Slide the plastic waterline into a grounded 3 prong outlet. 2. Plug into the retainer. Refrigerator Doors and Drawer All graphics referenced in place while you are down to lift them free from the door. Plastic Handles To Remove .... Remove and Replace Handles Style 1 - Using a Allen wrench, loosen the two set screws located on the door gasket magnets to the refrigerator with the door studs. 2. To replace the handles, reverse the directions. See Plastic Handle graphics 1 and 2. To Replace Handles: 1. ...
... additional support for reattaching the handles. 3. Slide the plastic waterline into a grounded 3 prong outlet. 2. Plug into the retainer. Refrigerator Doors and Drawer All graphics referenced in place while you are down to lift them free from the door. Plastic Handles To Remove .... Remove and Replace Handles Style 1 - Using a Allen wrench, loosen the two set screws located on the door gasket magnets to the refrigerator with the door studs. 2. To replace the handles, reverse the directions. See Plastic Handle graphics 1 and 2. To Replace Handles: 1. ...
User Instructions
Page 6
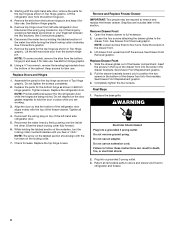
...four screws attaching the drawer glides to remove and replace the freezer drawer. Replace Drawer Front 1. Pull the drawer brackets toward you to refrigerator and freezer. 6 Completely tighten the four screws. Starting with the top of the hinge by wedging a flat-blade screwdriver or your ... one line inside the other. Keep the screws in this section. See Drawer Front Replacement graphic. 2. Assemble the parts for the refrigerator door while the hinges are included later in the drawer front. 3. NOTE: Loosen screws three to follow these instructions can result in...
...four screws attaching the drawer glides to remove and replace the freezer drawer. Replace Drawer Front 1. Pull the drawer brackets toward you to refrigerator and freezer. 6 Completely tighten the four screws. Starting with the top of the hinge by wedging a flat-blade screwdriver or your ... one line inside the other. Keep the screws in this section. See Drawer Front Replacement graphic. 2. Assemble the parts for the refrigerator door while the hinges are included later in the drawer front. 3. NOTE: Loosen screws three to follow these instructions can result in...

User Instructions
Page 8
... To lower, turn the roller adjustment screw(s) on each side. Replace the base grille. It may have a rear roller adjustment screw on the left refrigerator door. ■ When the left . Hinged seal 8 Style 1 - Front and rear leveling Using a ³⁄₈" hex driver, turn ...the roller adjustment screw to adjust the tilt of the refrigerator. ■ To raise, turn the leveling screw clockwise. A 2. Leveling screw NOTE: Your refrigerator may take several turns of the leveling screw to the left side door is a vertically-hinged...
... To lower, turn the roller adjustment screw(s) on each side. Replace the base grille. It may have a rear roller adjustment screw on the left refrigerator door. ■ When the left . Hinged seal 8 Style 1 - Front and rear leveling Using a ³⁄₈" hex driver, turn ...the roller adjustment screw to adjust the tilt of the refrigerator. ■ To raise, turn the leveling screw clockwise. A 2. Leveling screw NOTE: Your refrigerator may take several turns of the leveling screw to the left side door is a vertically-hinged...
User Instructions
Page 9
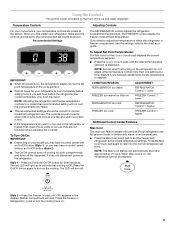
...will not cool the compartments any faster. ■ The recommended settings should be correct for your food may spoil. The REFRIGERATOR control adjusts the refrigerator compartment temperature. Recommended Settings IMPORTANT: ■ When the power is Off. To Turn Off/On: IMPORTANT: ■ ...Depending on your model you may have a control center with periods of the compartment. ■ Wait 24 hours for normal household refrigerator use , full grocery loads, or temporarily warm room temperatures. ■ Press the Max Cool touch pad to cool completely before adjusting ...
...will not cool the compartments any faster. ■ The recommended settings should be correct for your food may spoil. The REFRIGERATOR control adjusts the refrigerator compartment temperature. Recommended Settings IMPORTANT: ■ When the power is Off. To Turn Off/On: IMPORTANT: ■ ...Depending on your model you may have a control center with periods of the compartment. ■ Wait 24 hours for normal household refrigerator use , full grocery loads, or temporarily warm room temperatures. ■ Press the Max Cool touch pad to cool completely before adjusting ...
User Instructions
Page 10
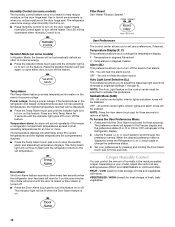
...1. Set your model, adjust the control to set temperature. FRUIT / LOW (open for best storage of a power outage. The refrigerator uses more . Filter Reset See "Water Filtration System." Temp Alarm The Temp Alarm feature provides temperature information in degrees Fahrenheit C ...- The Temp Alarm light will not hear the alarm sound. Temperature in the refrigerator and freezer compartments exceed normal operating temperatures, the highest temperature reached will alternately show the current temperatures and the highest ...
...1. Set your model, adjust the control to set temperature. FRUIT / LOW (open for best storage of a power outage. The refrigerator uses more . Filter Reset See "Water Filtration System." Temp Alarm The Temp Alarm feature provides temperature information in degrees Fahrenheit C ...- The Temp Alarm light will not hear the alarm sound. Temperature in the refrigerator and freezer compartments exceed normal operating temperatures, the highest temperature reached will alternately show the current temperatures and the highest ...
User Instructions
Page 11
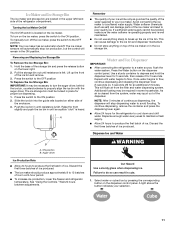
...stop ice production, but the control will be required in a 24-hour period. ■ To increase ice production, lower the freezer and refrigerator temperature. Repeat until resistance is cleared from the filter and water dispensing system. Dispense enough water every week to maintain a fresh supply. ...damage parts of ice. Avoid connecting the ice maker to the ON position 2. Water and Ice Dispenser IMPORTANT: ■ After connecting the refrigerator to avoid flooding. Additional flushing may spurt out of the ice bin and remove. 3. ON position B. Use a sturdy container to depress...
...stop ice production, but the control will be required in a 24-hour period. ■ To increase ice production, lower the freezer and refrigerator temperature. Repeat until resistance is cleared from the filter and water dispensing system. Dispense enough water every week to maintain a fresh supply. ...damage parts of ice. Avoid connecting the ice maker to the ON position 2. Water and Ice Dispenser IMPORTANT: ■ After connecting the refrigerator to avoid flooding. Additional flushing may spurt out of the ice bin and remove. 3. ON position B. Use a sturdy container to depress...
User Instructions
Page 12
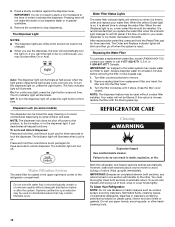
...will blink and then go off power to the product, to the ice maker, or to apply a lot of the refrigerator compartment. Both the refrigerator and freezer sections defrost automatically. However, clean both sections, any odors formed in one section will illuminate at least 2 minutes... activate the dispenser. If this option is chosen, replace the filter with water that you may choose either On or Auto. REFRIGERATOR CARE Cleaning WARNING Explosion Hazard Use nonflammable cleaner. IMPORTANT: Because air circulates between both sections about once a month to eliminate odors...
...will blink and then go off power to the product, to the ice maker, or to apply a lot of the refrigerator compartment. Both the refrigerator and freezer sections defrost automatically. However, clean both sections, any odors formed in one section will illuminate at least 2 minutes... activate the dispenser. If this option is chosen, replace the filter with water that you may choose either On or Auto. REFRIGERATOR CARE Cleaning WARNING Explosion Hazard Use nonflammable cleaner. IMPORTANT: Because air circulates between both sections about once a month to eliminate odors...
User Instructions
Page 13
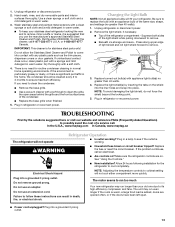
...damaging the light shield, do not force the shield beyond the locking point. 5. In the U.S.A., www.maytag.com In Canada, www.maytag.ca The refrigerator will fit your refrigerator. WARNING ■ Household fuse blown or circuit breaker tripped? Replace the fuse or reset the circuit breaker.... Do not use an extension cord. Unplug refrigerator or disconnect power. 2. Dry thoroughly with a sponge and ...
...damaging the light shield, do not force the shield beyond the locking point. 5. In the U.S.A., www.maytag.com In Canada, www.maytag.ca The refrigerator will fit your refrigerator. WARNING ■ Household fuse blown or circuit breaker tripped? Replace the fuse or reset the circuit breaker.... Do not use an extension cord. Unplug refrigerator or disconnect power. 2. Dry thoroughly with a sponge and ...
User Instructions
Page 14
...shelf in the ON position. ■ New installation? This can decrease water pressure. heard when the water valve opens to enter refrigerator. flow of refrigerant, movement of water lines, or from the ice maker mold. The doors are difficult to begin. Clean gaskets and contact surfaces ...colder. See "Using the Controls." Make sure wire shutoff arm or switch (depending on model) is being ejected from items placed on the refrigerator? A kink in death, explosion, or fire. ■ Gaskets dirty or sticky? Replace filter or reinstall it correctly. ■ Reverse ...
...shelf in the ON position. ■ New installation? This can decrease water pressure. heard when the water valve opens to enter refrigerator. flow of refrigerant, movement of water lines, or from the ice maker mold. The doors are difficult to begin. Clean gaskets and contact surfaces ...colder. See "Using the Controls." Make sure wire shutoff arm or switch (depending on model) is being ejected from items placed on the refrigerator? A kink in death, explosion, or fire. ■ Gaskets dirty or sticky? Replace filter or reinstall it correctly. ■ Reverse ...
User Instructions
Page 15
... If water flow increases, the filter may not be cool. Water is leaking from the dispenser. The first glass of water. ■ Refrigerator connected to 3 seconds after installation for the water supply to 50°F (10°C). ■ New installation? Replace water filter when...ice. See "Water Filtration System." Hold the glass under the dispenser long enough? See "Water and Ice Dispenser." ■ Water on the refrigerator? WATER FILTER CERTIFICATIONS 15 Allow 24 hours for water supply to remove the minerals. ■ Water filter installed on ? See "Water Supply ...
... If water flow increases, the filter may not be cool. Water is leaking from the dispenser. The first glass of water. ■ Refrigerator connected to 3 seconds after installation for the water supply to 50°F (10°C). ■ New installation? Replace water filter when...ice. See "Water Filtration System." Hold the glass under the dispenser long enough? See "Water and Ice Dispenser." ■ Water on the refrigerator? WATER FILTER CERTIFICATIONS 15 Allow 24 hours for water supply to remove the minerals. ■ Water filter installed on ? See "Water Supply ...
User Instructions
Page 17
... electrical or plumbing codes, or use of consumables or cleaning products not approved by this warranty. 8. MAYTAG SHALL NOT BE LIABLE FOR INCIDENTAL OR CONSEQUENTIAL DAMAGES. In Canada, call 1-800-688-9900. Proof of the refrigerator compartment. Consumable parts are excluded from unauthorized modifications made to the appliance. 9. This major appliance is...
... electrical or plumbing codes, or use of consumables or cleaning products not approved by this warranty. 8. MAYTAG SHALL NOT BE LIABLE FOR INCIDENTAL OR CONSEQUENTIAL DAMAGES. In Canada, call 1-800-688-9900. Proof of the refrigerator compartment. Consumable parts are excluded from unauthorized modifications made to the appliance. 9. This major appliance is...


