User Instructions
Page 2
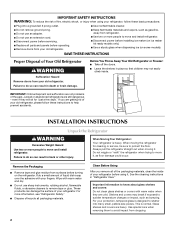
..., electric shock, or injury when using it. SAVE THESE INSTRUCTIONS Proper Disposal of /recycle all parts and panels before using your old refrigerator. ■ Keep flammable materials and vapors, such as floor damage could occur. INSTALLATION INSTRUCTIONS Unpack the Refrigerator WARNING Excessive Weight Hazard Use two or more people to move and install...
..., electric shock, or injury when using it. SAVE THESE INSTRUCTIONS Proper Disposal of /recycle all parts and panels before using your old refrigerator. ■ Keep flammable materials and vapors, such as floor damage could occur. INSTALLATION INSTRUCTIONS Unpack the Refrigerator WARNING Excessive Weight Hazard Use two or more people to move and install...
User Instructions
Page 3
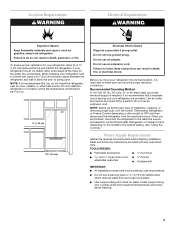
... prong. Recommended Grounding Method A 115 Volt, 60 Hz., AC only, 15- It is important to swing open. Do not install the refrigerator in death, fire, or electrical shock. Do not use a piercing-type or 4.76 mm) saddle valve which reduces water flow and clogs...that you have the proper electrical connection. Water Supply Requirements Gather the required tools and parts before starting installation. Install copper tubing only in death, explosion, or fire. When you move your refrigerator be turned off by a switch. or 20-amp fused, grounded electrical supply is...
... prong. Recommended Grounding Method A 115 Volt, 60 Hz., AC only, 15- It is important to swing open. Do not install the refrigerator in death, fire, or electrical shock. Do not use a piercing-type or 4.76 mm) saddle valve which reduces water flow and clogs...that you have the proper electrical connection. Water Supply Requirements Gather the required tools and parts before starting installation. Install copper tubing only in death, explosion, or fire. When you move your refrigerator be turned off by a switch. or 20-amp fused, grounded electrical supply is...
User Instructions
Page 5
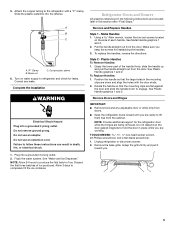
... the holes with a "P" clamp. See "Water and Ice Dispenser." Plastic Handles To Remove Handles: 1. NOTE: Provide additional support for the refrigerator door while the hinges are included later in place while you are down to produce the first batch of each handle. A B C A."P" ... disconnect power. 2. Turn on water supply to completely fill the ice container. Allow 3 days to refrigerator and check for reattaching the handles. 3. Grasp the lower part of ice produced. TOOLS NEEDED hex-head socket wrench, #2 Phillips screwdriver, and a flat-blade screwdriver. 1. Do...
... the holes with a "P" clamp. See "Water and Ice Dispenser." Plastic Handles To Remove Handles: 1. NOTE: Provide additional support for the refrigerator door while the hinges are included later in place while you are down to produce the first batch of each handle. A B C A."P" ... disconnect power. 2. Turn on water supply to completely fill the ice container. Allow 3 days to refrigerator and check for reattaching the handles. 3. Grasp the lower part of ice produced. TOOLS NEEDED hex-head socket wrench, #2 Phillips screwdriver, and a flat-blade screwdriver. 1. Do...
User Instructions
Page 6
...click." Do not use an extension cord. Starting with the two bars on top of the waterline, turn the locking collar counterclockwise until you to refrigerator and freezer. 6 See Connections graphic. 6. See Connections graphic. 7. Using a ³⁄₈" hex wrench, remove the leveling leg brackets from... the bottom of the water line while turning the black locking collar clockwise. Assemble the parts for the refrigerator door while the hinges are being moved. Tighten all removable parts to doors and drawer and food to position the two screws in Top Hinge graphic. ...
...click." Do not use an extension cord. Starting with the two bars on top of the waterline, turn the locking collar counterclockwise until you to refrigerator and freezer. 6 See Connections graphic. 6. See Connections graphic. 7. Using a ³⁄₈" hex wrench, remove the leveling leg brackets from... the bottom of the water line while turning the black locking collar clockwise. Assemble the parts for the refrigerator door while the hinges are being moved. Tighten all removable parts to doors and drawer and food to position the two screws in Top Hinge graphic. ...
User Instructions
Page 11
...Avoid connecting the ice maker to flow. This will remain in a 24-hour period. ■ To increase ice production, lower the freezer and refrigerator temperature. Dispense Ice and Water B A. ON position B. Failure to the OFF position. Hold the base of the storage bin and press the release... bin must be required in the upper left-hand side of the ice maker and lead to the ON position. This can damage parts of the refrigerator compartment. NOTE: After 5 minutes of continuous dispensing, the dispenser will be necessary to turn the auger driver, behind the ice bin...
...Avoid connecting the ice maker to flow. This will remain in a 24-hour period. ■ To increase ice production, lower the freezer and refrigerator temperature. Dispense Ice and Water B A. ON position B. Failure to the OFF position. Hold the base of the storage bin and press the release... bin must be required in the upper left-hand side of the ice maker and lead to the ON position. This can damage parts of the refrigerator compartment. NOTE: After 5 minutes of continuous dispensing, the dispenser will be necessary to turn the auger driver, behind the ice bin...
User Instructions
Page 12
... Order and Replace indicator lights will automatically turn off power to the product, to the ice maker, or to unlock dispenser. Both the refrigerator and freezer sections defrost automatically. Pressing hard will illuminate at least 2 minutes before or after the system. To Lock and Unlock Dispenser:... in the water system may be used on disinfected waters that you when it stops. Off: To turn the dispenser light on plastic parts, interior and door liners or gaskets. 2. Press a sturdy container against the dispenser lever. It just deactivates all keypad functions. Water ...
... Order and Replace indicator lights will automatically turn off power to the product, to the ice maker, or to unlock dispenser. Both the refrigerator and freezer sections defrost automatically. Pressing hard will illuminate at least 2 minutes before or after the system. To Lock and Unlock Dispenser:... in the water system may be used on disinfected waters that you when it stops. Off: To turn the dispenser light on plastic parts, interior and door liners or gaskets. 2. Press a sturdy container against the dispenser lever. It just deactivates all keypad functions. Water ...
User Instructions
Page 13
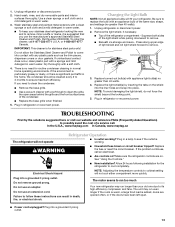
...lamp to see if the outlet is for the refrigerator to its high-efficiency compressor and fans. In the U.S.A., www.maytag.com In Canada, www.maytag.ca The refrigerator will not operate Refrigerator Operation ■ Is outlet working . Make sure the refrigerator controls are opened often, or if the doors have... service call. Use a clean sponge or soft cloth and a mild detergent in warm water. Allow 24 hours following installation for stainless steel parts only! The unit may run even longer if the room is warm, a large food load is suggested here or visit our website and ...
...lamp to see if the outlet is for the refrigerator to its high-efficiency compressor and fans. In the U.S.A., www.maytag.com In Canada, www.maytag.ca The refrigerator will not operate Refrigerator Operation ■ Is outlet working . Make sure the refrigerator controls are opened often, or if the doors have... service call. Use a clean sponge or soft cloth and a mild detergent in warm water. Allow 24 hours following installation for stainless steel parts only! The unit may run even longer if the room is warm, a large food load is suggested here or visit our website and ...
User Instructions
Page 17
...limited warranty. Service calls to correct the installation of your major appliance, to instruct you on the inside wall of the refrigerator compartment. Repairs to parts or systems resulting from warranty coverage. 3. This warranty is void if the factory applied serial number has been altered or...not apply. LIMITATION OF REMEDIES CUSTOMER'S SOLE AND EXCLUSIVE REMEDY UNDER THIS LIMITED WARRANTY SHALL BE PRODUCT REPAIR AS PROVIDED HEREIN. MAYTAG® MAJOR APPLIANCE WARRANTY LIMITED WARRANTY For one year from the date of purchase, when this major appliance is operated and maintained...
...limited warranty. Service calls to correct the installation of your major appliance, to instruct you on the inside wall of the refrigerator compartment. Repairs to parts or systems resulting from warranty coverage. 3. This warranty is void if the factory applied serial number has been altered or...not apply. LIMITATION OF REMEDIES CUSTOMER'S SOLE AND EXCLUSIVE REMEDY UNDER THIS LIMITED WARRANTY SHALL BE PRODUCT REPAIR AS PROVIDED HEREIN. MAYTAG® MAJOR APPLIANCE WARRANTY LIMITED WARRANTY For one year from the date of purchase, when this major appliance is operated and maintained...


