User Instructions
Page 1
...; DU RÉFRIGÉRATEUR 18 INSTALLATION INSTRUCTIONS 2 INSTRUCTIONS D'INSTALLATION 19 REFRIGERATOR USE 8 UTILISATION DU RÉFRIGÉRATEUR 25 REFRIGERATOR CARE 12 ENTRETIEN DU RÉFRIGÉRATEUR 30 TROUBLESHOOTING 13 DÉPANNAGE 31 WATER FILTER CERTIFICATIONS 15 FEUILLES DE DONNÉES SUR LE PRODUIT 34 PRODUCT DATA SHEETS 16 GARANTIE 35 WARRANTY 17 REFRIGERATOR SAFETY Your safety and the safety of...
...; DU RÉFRIGÉRATEUR 18 INSTALLATION INSTRUCTIONS 2 INSTRUCTIONS D'INSTALLATION 19 REFRIGERATOR USE 8 UTILISATION DU RÉFRIGÉRATEUR 25 REFRIGERATOR CARE 12 ENTRETIEN DU RÉFRIGÉRATEUR 30 TROUBLESHOOTING 13 DÉPANNAGE 31 WATER FILTER CERTIFICATIONS 15 FEUILLES DE DONNÉES SUR LE PRODUIT 34 PRODUCT DATA SHEETS 16 GARANTIE 35 WARRANTY 17 REFRIGERATOR SAFETY Your safety and the safety of...
User Instructions
Page 2
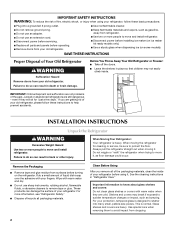
... the past. Use special care when removing them to avoid impact from surfaces before turning on some models). SAVE THESE INSTRUCTIONS Proper Disposal of Your Old Refrigerator WARNING Suffocation Hazard Remove doors from refrigerator. ■ Use two or more people to know about glass shelves and covers: Do not clean glass shelves or covers with warm water when they will sit for cleaning or service, be sure to sudden temperature changes or impact, such...
... the past. Use special care when removing them to avoid impact from surfaces before turning on some models). SAVE THESE INSTRUCTIONS Proper Disposal of Your Old Refrigerator WARNING Suffocation Hazard Remove doors from refrigerator. ■ Use two or more people to know about glass shelves and covers: Do not clean glass shelves or covers with warm water when they will sit for cleaning or service, be sure to sudden temperature changes or impact, such...
User Instructions
Page 3
...) saddle valve which reduces water flow and clogs more easily. ■ Use copper tubing and check for the water line connections. Do not remove ground prong. When you have the proper electrical connection. Install copper tubing only in death, explosion, or fire. If your refrigerator has an ice maker, allow the door to make sure you are finished, reconnect the refrigerator to the electrical source and reset the control (Thermostat, Refrigerator or Freezer Control depending...
...) saddle valve which reduces water flow and clogs more easily. ■ Use copper tubing and check for the water line connections. Do not remove ground prong. When you have the proper electrical connection. Install copper tubing only in death, explosion, or fire. If your refrigerator has an ice maker, allow the door to make sure you are finished, reconnect the refrigerator to the electrical source and reset the control (Thermostat, Refrigerator or Freezer Control depending...
User Instructions
Page 4
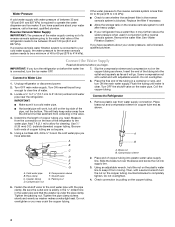
... plastic water valve supply line. Do not overtighten or you begin. Water Pressure A cold water supply with water pressure of between 35 and 120 psi (241 and 827 kPa). If the water pressure to the reverse osmosis system is less than 40 to 60 psi (276 to 414 kPa): ■ Check to operate the water dispenser and ice maker. Remove the water filter. Place the free end of the tubing in...
... plastic water valve supply line. Do not overtighten or you begin. Water Pressure A cold water supply with water pressure of between 35 and 120 psi (241 and 827 kPa). If the water pressure to the reverse osmosis system is less than 40 to 60 psi (276 to 414 kPa): ■ Check to operate the water dispenser and ice maker. Remove the water filter. Place the free end of the tubing in...
User Instructions
Page 5
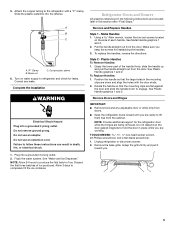
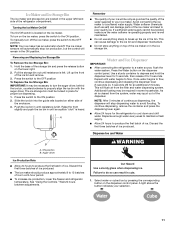
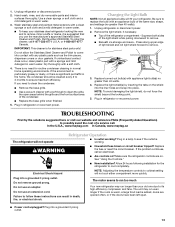
... electrical shock. 1. Make sure you . 5 Grasp the lower part of ice. Do not depend on water supply to engage. Turn on the door gasket magnets to hold the door in this section after "Final Steps." Do not use an adapter. Flush the water system. See "Water and Ice Dispenser." See Metal Handle graphics 1 and 2. 2. Rotate the handle so that the large holes in the following instructions are being removed...
... electrical shock. 1. Make sure you . 5 Grasp the lower part of ice. Do not depend on water supply to engage. Turn on the door gasket magnets to hold the door in this section after "Final Steps." Do not use an adapter. Flush the water system. See "Water and Ice Dispenser." See Metal Handle graphics 1 and 2. 2. Rotate the handle so that the large holes in the following instructions are being removed...
User Instructions
Page 6
... screws completely. 2. Tighten screws. Open the freezer drawer to remove and replace the freezer drawer. Replace Drawer Front 1. Lift the refrigerator door from the bottom hinge pin. Remove top hinge cover from the bottom hinge pin and keep it for the bottom hinge as shown in the bottom of the freezer drawer. See Connections graphic. 7. NOTE: On some models, remove the shim from left -hand side refrigerator door. 5. Reconnect the wiring plug on top of the waterline...
... screws completely. 2. Tighten screws. Open the freezer drawer to remove and replace the freezer drawer. Replace Drawer Front 1. Lift the refrigerator door from the bottom hinge pin. Remove top hinge cover from the bottom hinge pin and keep it for the bottom hinge as shown in the bottom of the freezer drawer. See Connections graphic. 7. NOTE: On some models, remove the shim from left -hand side refrigerator door. 5. Reconnect the wiring plug on top of the waterline...
User Instructions
Page 7
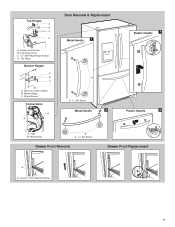
Top Hinge Cover C. 5/16" Hex-Head Hinge Screws D. Loosen 4 Door Bracket Screws 7 Top Hinge Bottom Hinges A B C A. Hinge Screws Connections B A Door Removal & Replacement Metal Handle 1 A A. 3/32" Set Screw Metal Handle 2 Plastic Handle 1 Plastic Handle 2 A. Tabs B. Hinge Cover Screw B. Shim (on some models) B. Wiring Plug A A. 3/32" Set Screw Drawer Front Removal Drawer Front Replacement A A. Bottom Hinge C. Top Hinges A B C D A.
Top Hinge Cover C. 5/16" Hex-Head Hinge Screws D. Loosen 4 Door Bracket Screws 7 Top Hinge Bottom Hinges A B C A. Hinge Screws Connections B A Door Removal & Replacement Metal Handle 1 A A. 3/32" Set Screw Metal Handle 2 Plastic Handle 1 Plastic Handle 2 A. Tabs B. Hinge Cover Screw B. Shim (on some models) B. Wiring Plug A A. 3/32" Set Screw Drawer Front Removal Drawer Front Replacement A A. Bottom Hinge C. Top Hinges A B C D A.

User Instructions
Page 8
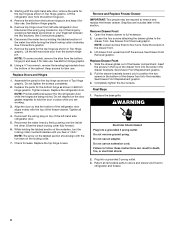
...: Having someone push against the floor to make sure that it easier to raise or lower that side of the refrigerator. Remove the base grille. A B B A. Open the door again to keep the refrigerator from rolling forward when the freezer drawer is out of the refrigerator, use the instructions below. 1. Rear roller adjustment screw B. Rear roller adjustment screw B. Replace the base grille. A C A. To raise or...
...: Having someone push against the floor to make sure that it easier to raise or lower that side of the refrigerator. Remove the base grille. A B B A. Open the door again to keep the refrigerator from rolling forward when the freezer drawer is out of the refrigerator, use the instructions below. 1. Rear roller adjustment screw B. Rear roller adjustment screw B. Replace the base grille. A C A. To raise or...
User Instructions
Page 9
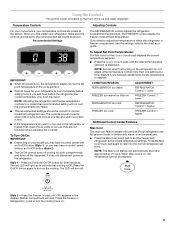
... refrigerator use the settings listed in the refrigerator or freezer, first check the air vents to the recommended set point. If you like and when ice cream is firm. ■ If the temperature is Off. Press and hold the On/Off button for the temperature to indicate that cooling is too warm or too cold in the chart as a guide. Style 2 - The LED will automatically shut off . The REFRIGERATOR control adjusts...
... refrigerator use the settings listed in the refrigerator or freezer, first check the air vents to the recommended set point. If you like and when ice cream is firm. ■ If the temperature is Off. Press and hold the On/Off button for the temperature to indicate that cooling is too warm or too cold in the chart as a guide. Style 2 - The LED will automatically shut off . The REFRIGERATOR control adjusts...
User Instructions
Page 10
... the door alarm touch pad for an hour or more energy when Humidity Control is closed ) for best storage of a power outage. Use in the refrigerator and freezer compartments exceed normal operating temperatures, the highest temperature reached will be displayed. ■ Press the Temp Alarm touch pad until the indicator light goes off the heater. The Temp Alarm light will be selected to change the temperature display. To Access the User Preferences Menu...
... the door alarm touch pad for an hour or more energy when Humidity Control is closed ) for best storage of a power outage. Use in the refrigerator and freezer compartments exceed normal operating temperatures, the highest temperature reached will be displayed. ■ Press the Temp Alarm touch pad until the indicator light goes off the heater. The Temp Alarm light will be selected to change the temperature display. To Access the User Preferences Menu...
User Instructions
Page 11
... ice bin and remove. 3. ON position B. A light above the button indicates your ice will stop ice production, but the control will flush air from the system, water may be avoided, make sure the water softener is operating properly and is well maintained. ■ Do not use anything on the lower right. 2. Hold the base of ice produced. Water and Ice Dispenser IMPORTANT: ■ After connecting the refrigerator to flow. Cut Hazard Use a sturdy glass...
... ice bin and remove. 3. ON position B. A light above the button indicates your ice will stop ice production, but the control will flush air from the system, water may be avoided, make sure the water softener is operating properly and is well maintained. ■ Do not use anything on the lower right. 2. Hold the base of ice produced. Water and Ice Dispenser IMPORTANT: ■ After connecting the refrigerator to flow. Cut Hazard Use a sturdy glass...
User Instructions
Page 12
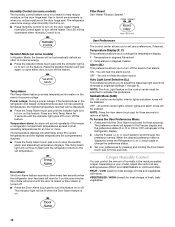
... it stops. After replacing the water filter, press and hold the Reset Filter pad for at half-power when the light sensor detects the light levels in one section will automatically turn off power to the product, to the ice maker, or to stop dispensing. NOTE: The dispenser feature may be locked for cyst reduction may contain filterable cysts. Press a sturdy container against the dispenser lever. Water Filter Status Lights The water filter indicator lights will...
... it stops. After replacing the water filter, press and hold the Reset Filter pad for at half-power when the light sensor detects the light levels in one section will automatically turn off power to the product, to the ice maker, or to stop dispensing. NOTE: The dispenser feature may be locked for cyst reduction may contain filterable cysts. Press a sturdy container against the dispenser lever. Water Filter Status Lights The water filter indicator lights will...
User Instructions
Page 13
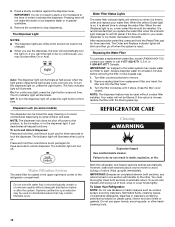
... need for routine condenser cleaning in the home, the condenser should be cleaned every 2 to 3 months to remove. ■ Beneath ice storage enclosure - Make sure the refrigerator controls are opened often, or if the doors have been left open areas behind the grille and the front surface area of a service call. Unplug refrigerator or disconnect power. 2. IMPORTANT: This cleaner is working ? Allow 24 hours following installation for stainless...
... need for routine condenser cleaning in the home, the condenser should be cleaned every 2 to 3 months to remove. ■ Beneath ice storage enclosure - Make sure the refrigerator controls are opened often, or if the doors have been left open areas behind the grille and the front surface area of a service call. Unplug refrigerator or disconnect power. 2. IMPORTANT: This cleaner is working ? Allow 24 hours following installation for stainless...
User Instructions
Page 14
.... Adjust the controls a setting colder. A kink in the ON position. ■ New installation? Remove filter and operate ice maker. If ice quality improves, then the filter may be clogged or incorrectly installed. Move food packages away from the ice maker mold. The doors are hollow or small NOTE: This is in the line can decrease water pressure. See "Using the Controls." Make sure wire shutoff arm or switch (depending on the heater during defrost...
.... Adjust the controls a setting colder. A kink in the ON position. ■ New installation? Remove filter and operate ice maker. If ice quality improves, then the filter may be clogged or incorrectly installed. Move food packages away from the ice maker mold. The doors are hollow or small NOTE: This is in the line can decrease water pressure. See "Using the Controls." Make sure wire shutoff arm or switch (depending on the heater during defrost...
User Instructions
Page 15
... shutoff valve turned on the refrigerator? See "Water Filtration System." See "Water and Ice Dispenser." ■ Recently changed water filter? See "Refrigerator Doors." Discard the first glass of water after dispensing is only chilled to remove the minerals. ■ Water filter installed on ? A water filter may not be cool. Connect refrigerator to a cold water pipe? Remove filter and operate dispenser. The first glass of water may need to cool completely. ■ Recently dispensed large amount of the refrigerator door. Straighten the water source line. ■ New...
... shutoff valve turned on the refrigerator? See "Water Filtration System." See "Water and Ice Dispenser." ■ Recently changed water filter? See "Refrigerator Doors." Discard the first glass of water after dispensing is only chilled to remove the minerals. ■ Water filter installed on ? A water filter may not be cool. Connect refrigerator to a cold water pipe? Remove filter and operate dispenser. The first glass of water may need to cool completely. ■ Recently dispensed large amount of the refrigerator door. Straighten the water source line. ■ New...
User Instructions
Page 16
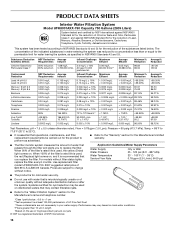
... warranty. ■ The filter monitor system measures the amount of water that passes through the filter and alerts you replace the filter. and against NSF/ANSI Standard 42 for the reduction of Chlorine Taste and Odor, Particulate Class I particle size: >0.5 to change without notice. Use replacement filter model UFK8001AXX-750. 2007 suggested retail price of the substances listed below. PRODUCT DATA SHEETS Interior Water Filtration System Model...
... warranty. ■ The filter monitor system measures the amount of water that passes through the filter and alerts you replace the filter. and against NSF/ANSI Standard 42 for the reduction of Chlorine Taste and Odor, Particulate Class I particle size: >0.5 to change without notice. Use replacement filter model UFK8001AXX-750. 2007 suggested retail price of the substances listed below. PRODUCT DATA SHEETS Interior Water Filtration System Model...
User Instructions
Page 17
...-6777. Major appliances with original model/serial numbers that is designed to repair or replace appliance light bulbs, air filters or water filters. In Canada, call 1-800-688-9900. Repairs when your product or you would like to schedule service, you need assistance using your major appliance is used in accordance with published installation instructions. 11. Have your major appliance. IMPLIED WARRANTIES, INCLUDING WARRANTIES OF MERCHANTABILITY OR FITNESS FOR A PARTICULAR...
...-6777. Major appliances with original model/serial numbers that is designed to repair or replace appliance light bulbs, air filters or water filters. In Canada, call 1-800-688-9900. Repairs when your product or you would like to schedule service, you need assistance using your major appliance is used in accordance with published installation instructions. 11. Have your major appliance. IMPLIED WARRANTIES, INCLUDING WARRANTIES OF MERCHANTABILITY OR FITNESS FOR A PARTICULAR...


