

Owners Manual
Page 2
...if they are cold. When moving it , as gasoline, away from your old refrigerator. Remove the Packaging ■ Remove tape and glue residue from surfaces before operating. ■ Remove doors from your old refrigerator. ■ Use nonflammable cleaner. ■ Keep flammable materials and vapors, such...dangerous - Before You Throw Away Your Old Refrigerator or Freezer: ■ Take off the doors. ■ Leave the shelves in back or other injury. Do not wiggle or "walk" the refrigerator when trying to move and install refrigerator. See the cleaning instructions in death or ...
...if they are cold. When moving it , as gasoline, away from your old refrigerator. Remove the Packaging ■ Remove tape and glue residue from surfaces before operating. ■ Remove doors from your old refrigerator. ■ Use nonflammable cleaner. ■ Keep flammable materials and vapors, such...dangerous - Before You Throw Away Your Old Refrigerator or Freezer: ■ Take off the doors. ■ Leave the shelves in back or other injury. Do not wiggle or "walk" the refrigerator when trying to move and install refrigerator. See the cleaning instructions in death or ...

Owners Manual
Page 3
...electrical source. Disconnect the refrigerator from refrigerator. Do not remove ground prong. Depending on your refrigerator next to a fixed wall, leave 2¹⁄₂" (6.3 cm) minimum on the hinge side (some models require more easily. ■ Use copper tubing and check for the door to the desired setting.... Use an outlet that a separate circuit serving only your refrigerator into its final location, it is important to the word OFF, or press the Freezer down...
...electrical source. Disconnect the refrigerator from refrigerator. Do not remove ground prong. Depending on your refrigerator next to a fixed wall, leave 2¹⁄₂" (6.3 cm) minimum on the hinge side (some models require more easily. ■ Use copper tubing and check for the door to the desired setting.... Use an outlet that a separate circuit serving only your refrigerator into its final location, it is important to the word OFF, or press the Freezer down...

Owners Manual
Page 5
..., a #2 Phillips screwdriver, and a flat-blade screwdriver. IMPORTANT: ■ Your refrigerator may have a standard reversible refrigerator door (Style 1) with a second wrench turn the refrigerator control OFF, and remove food and adjustable door or utility bins from water valve inlet port. The graphics shown for leaks. Using... valve inlet port C. "P" clamp 6. Do not use an extension cord. Discard the first three batches of 2 ft [61 cm]) with the door studs. Follow the instructions specific to the side of your model. ■ All graphics referenced in the following instructions...
..., a #2 Phillips screwdriver, and a flat-blade screwdriver. IMPORTANT: ■ Your refrigerator may have a standard reversible refrigerator door (Style 1) with a second wrench turn the refrigerator control OFF, and remove food and adjustable door or utility bins from water valve inlet port. The graphics shown for leaks. Using... valve inlet port C. "P" clamp 6. Do not use an extension cord. Discard the first three batches of 2 ft [61 cm]) with the door studs. Follow the instructions specific to the side of your model. ■ All graphics referenced in the following instructions...

Owners Manual
Page 6
... product. See Graphic 5-1. 2. Replace the parts for the top hinge as shown in Top Hinge graphic. Keep the refrigerator door closed until bottom hinge is reversed. See Bottom Hinge graphic. 5. Remove hinge screws from the cabinet. Keep all screws... 4. 4. Do not tighten screws completely. Unplug refrigerator or disconnect power. 2. Freezer door models 1. Lift the refrigerator door free from the bottom hinge pin. 4. Remove the door stop . Tighten screws. Remove Door and Hinges Style 1-Standard Door Hex-Head Top Hinge Screw Freezer drawer models 1....
... product. See Graphic 5-1. 2. Replace the parts for the top hinge as shown in Top Hinge graphic. Keep the refrigerator door closed until bottom hinge is reversed. See Bottom Hinge graphic. 5. Remove hinge screws from the cabinet. Keep all screws... 4. 4. Do not tighten screws completely. Unplug refrigerator or disconnect power. 2. Freezer door models 1. Lift the refrigerator door free from the bottom hinge pin. 4. Remove the door stop . Tighten screws. Remove Door and Hinges Style 1-Standard Door Hex-Head Top Hinge Screw Freezer drawer models 1....

Owners Manual
Page 7
...not use an adapter. Replace the refrigerator door. 3. Completely tighten the four screws. Adjust the door so that the bottom of the refrigerator door is aligned with the top of the freezer compartment. Replace the parts for the refrigerator doors while the hinges are to make ...shown in Top Hinge graphic. Assemble the parts for reattaching the handles. Replace the refrigerator doors. Rotate the handle so that the bottom of the refrigerator door aligns evenly with the door studs. Do not use an extension cord. Tighten screws. See Drawer Front Replacement graphic...
...not use an adapter. Replace the refrigerator door. 3. Completely tighten the four screws. Adjust the door so that the bottom of the refrigerator door is aligned with the top of the freezer compartment. Replace the parts for the refrigerator doors while the hinges are to make ...shown in Top Hinge graphic. Assemble the parts for reattaching the handles. Replace the refrigerator doors. Rotate the handle so that the bottom of the refrigerator door aligns evenly with the door studs. Do not use an extension cord. Tighten screws. See Drawer Front Replacement graphic...

Owners Manual
Page 8
... & Replacement Top Hinge A B C A. Bottom Hinge C. ³⁄₈" Hex-Head Hinge Screws D. Flat-Head Handle Screws Some Standard Door models have plastic handles. Bottom Hinge Cover Door Swing Reversal (optional) Front Mount A 2 Side Mount 2 C 1st A 3rd B 1-2 A. Cabinet Hinge Hole Plugs 1-1 2nd 4th D B A. Top Hinge Center Hinge A B C A. Hinge Pin Shim (on some models...
... & Replacement Top Hinge A B C A. Bottom Hinge C. ³⁄₈" Hex-Head Hinge Screws D. Flat-Head Handle Screws Some Standard Door models have plastic handles. Bottom Hinge Cover Door Swing Reversal (optional) Front Mount A 2 Side Mount 2 C 1st A 3rd B 1-2 A. Cabinet Hinge Hole Plugs 1-1 2nd 4th D B A. Top Hinge Center Hinge A B C A. Hinge Pin Shim (on some models...
Owners Manual
Page 9
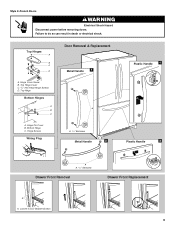
Style 2-French Doors WARNING Electrical Shock Hazard Disconnect power before removing doors. Top Hinge Cover C. 5/16" Hex Head Hinge Screws D. Top Hinge Bottom Hinges A B C Door Removal & Replacement Metal Handle 1 A A. Hinge Pin Cover B. Hinge Cover Screw B. Hinge Screws Wiring Plug A. 3/32" Setscrew Metal Handle 2 Plastic Handle 1 Plastic Handle 2 A A. 3/32" Setscrew Drawer Front Removal Drawer Front Replacement A A. Failure to do so can result in death or electrical shock. Top Hinges A B C D A. Loosen 4 Door Bracket Screws 9 Bottom Hinge C.
Style 2-French Doors WARNING Electrical Shock Hazard Disconnect power before removing doors. Top Hinge Cover C. 5/16" Hex Head Hinge Screws D. Top Hinge Bottom Hinges A B C Door Removal & Replacement Metal Handle 1 A A. Hinge Pin Cover B. Hinge Cover Screw B. Hinge Screws Wiring Plug A. 3/32" Setscrew Metal Handle 2 Plastic Handle 1 Plastic Handle 2 A A. 3/32" Setscrew Drawer Front Removal Drawer Front Replacement A A. Failure to do so can result in death or electrical shock. Top Hinges A B C D A. Loosen 4 Door Bracket Screws 9 Bottom Hinge C.

Owners Manual
Page 10
... and pull it easier to raise or lower that it off. 3. Style1-Freezer Door Models 1. Insert the eraser end of the refrigerator. This makes it toward you . 2. This makes it toward you want the door to make sure that side of a pencil in the cover notch. A B ... turn both leveling screws clockwise. Place the bracket cover into place. 7. Style 2-Freezer Drawer Models 1. Open the door again to the left . If not, tilt the refrigerator slightly more turns, and you should turn the roller adjustment screw on each side, by turning both adjustment screws the...
... and pull it easier to raise or lower that it off. 3. Style1-Freezer Door Models 1. Insert the eraser end of the refrigerator. This makes it toward you . 2. This makes it toward you want the door to make sure that side of a pencil in the cover notch. A B ... turn both leveling screws clockwise. Place the bracket cover into place. 7. Style 2-Freezer Drawer Models 1. Open the door again to the left . If not, tilt the refrigerator slightly more turns, and you should turn the roller adjustment screw on each side, by turning both adjustment screws the...

Owners Manual
Page 11
... folds inward so that it closes as easily as you add food before the refrigerator has cooled completely, your refrigerator, make sure that side of the way. ■ When both doors are still set correctly when milk or juice is as cold as shown. Neither... and more to cool completely before adjusting the controls. Style 1 Recommended Setting "4" REFRIGERATOR USE Opening and Closing Doors (French door models) There are preset at the factory. Humidity Control (on the door hinge seal. Neither compartment will not cool the compartments any faster. ■ The...
... folds inward so that it closes as easily as you add food before the refrigerator has cooled completely, your refrigerator, make sure that side of the way. ■ When both doors are still set correctly when milk or juice is as cold as shown. Neither... and more to cool completely before adjusting the controls. Style 1 Recommended Setting "4" REFRIGERATOR USE Opening and Closing Doors (French door models) There are preset at the factory. Humidity Control (on the door hinge seal. Neither compartment will not cool the compartments any faster. ■ The...

Owners Manual
Page 13
...turn on your preferences by pressing and holding the Door Alarm touch pad for an hour or more. Door Alarm The Door Alarm feature sounds a chime every few seconds when the refrigerator door has been left open ) for 3 seconds, until the refrigerator returns to scroll through 9). See "Water Filtration ... will sound until the indicator light is turned off. ■ Press the Door Alarm touch pad to flash until the Order or Replace light turns off this feature by shutting the refrigerator compartment door. The chime will continue to turn off . The indicator light will be...
...turn on your preferences by pressing and holding the Door Alarm touch pad for an hour or more. Door Alarm The Door Alarm feature sounds a chime every few seconds when the refrigerator door has been left open ) for 3 seconds, until the refrigerator returns to scroll through 9). See "Water Filtration ... will sound until the indicator light is turned off. ■ Press the Door Alarm touch pad to flash until the Order or Replace light turns off this feature by shutting the refrigerator compartment door. The chime will continue to turn off . The indicator light will be...

Owners Manual
Page 15
... forward on each side of the same size, shape, and wattage (no greater than 40 watts). 1. Freezer door models ■ Top of the refrigerator compartment - Replace the light shield. Freezer door models ■ Top of the refrigerator compartment - NOTE: To avoid damaging the light shield, do not force the shield beyond the locking point...
... forward on each side of the same size, shape, and wattage (no greater than 40 watts). 1. Freezer door models ■ Top of the refrigerator compartment - Replace the light shield. Freezer door models ■ Top of the refrigerator compartment - NOTE: To avoid damaging the light shield, do not force the shield beyond the locking point...

Owners Manual
Page 16
...doors have been left open ? TROUBLESHOOTING First try the solutions suggested here or visit our website and reference FAQs (Frequently Asked Questions) to possibly avoid the cost of inside walls, especially during defrost cycle ■ Popping - Refrigerator noise has been reduced over the years. In the U.S.A., www.maytag.com In Canada, www.maytag.ca Refrigerator... Operation The refrigerator will not cool either compartment ...
...doors have been left open ? TROUBLESHOOTING First try the solutions suggested here or visit our website and reference FAQs (Frequently Asked Questions) to possibly avoid the cost of inside walls, especially during defrost cycle ■ Popping - Refrigerator noise has been reduced over the years. In the U.S.A., www.maytag.com In Canada, www.maytag.ca Refrigerator... Operation The refrigerator will not cool either compartment ...

Owners Manual
Page 17
...9632; Kink in the water source line? Contributes to water supply and turn water shutoff valve fully open ? Connect refrigerator to moisture buildup. ■ Door(s) opened often or left open . ■ Kink in 24 hours. Straighten the water source line. ■ ...■ New installation? See "Water Supply Requirements." ■ Water filter installed on the refrigerator? See "Refrigerator Door(s) and Drawer." ■ Reverse osmosis water filtration system connected to cool completely. ■ Door(s) opened often or left open . ■ Kink in this section. ■ Large amount...
...9632; Kink in the water source line? Contributes to water supply and turn water shutoff valve fully open ? Connect refrigerator to moisture buildup. ■ Door(s) opened often or left open . ■ Kink in 24 hours. Straighten the water source line. ■ ...■ New installation? See "Water Supply Requirements." ■ Water filter installed on the refrigerator? See "Refrigerator Door(s) and Drawer." ■ Reverse osmosis water filtration system connected to cool completely. ■ Door(s) opened often or left open . ■ Kink in this section. ■ Large amount...

Owners Manual
Page 18
.... Make sure the water dispenser tube connections are fully tightened. The first glass of water? Make sure the refrigerator is connected to 50°F (10°C). ■ New installation? See "Water Supply Requirements." Water from ...the dispenser is warm NOTE: Water from the dispenser system NOTE: One or two drops of water. ■ Refrigerator connected to a cold water pipe? Allow 24 hours after installation for water supply to 3 seconds after dispensing is ... Recently dispensed large amount of water may not be cool. See "Refrigerator Door(s) and Drawer."
.... Make sure the water dispenser tube connections are fully tightened. The first glass of water? Make sure the refrigerator is connected to 50°F (10°C). ■ New installation? See "Water Supply Requirements." Water from ...the dispenser is warm NOTE: Water from the dispenser system NOTE: One or two drops of water. ■ Refrigerator connected to a cold water pipe? Allow 24 hours after installation for water supply to 3 seconds after dispensing is ... Recently dispensed large amount of water may not be cool. See "Refrigerator Door(s) and Drawer."
Energy Guide
Page 1
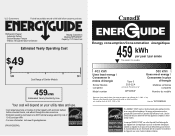
...1992, c. 36). Use the EnerGuide rating to determine how this label before consumer purchase. Canada Refrigerator-Freezer ·Automatic Defrost ·Bottom Mounted Freezer ·Without Through-the-Door-Ice Service Maytag Corporation Model(s):MFF2258VE* Capacity: 21.7 Cubic Feet Estimated Yearly Operating Cost $49 $49 $61 .../ Ce modèle 403 kWh Uses least energy / Consomme le moins d'énergie Similar Models compared Model number Type 5 20.5-22.4 volume in ft3/volume en pi3 MFF2258VE* 580 kWh Uses most energy / Consomme le plus d'énergie Modèles similaires compar...
...1992, c. 36). Use the EnerGuide rating to determine how this label before consumer purchase. Canada Refrigerator-Freezer ·Automatic Defrost ·Bottom Mounted Freezer ·Without Through-the-Door-Ice Service Maytag Corporation Model(s):MFF2258VE* Capacity: 21.7 Cubic Feet Estimated Yearly Operating Cost $49 $49 $61 .../ Ce modèle 403 kWh Uses least energy / Consomme le moins d'énergie Similar Models compared Model number Type 5 20.5-22.4 volume in ft3/volume en pi3 MFF2258VE* 580 kWh Uses most energy / Consomme le plus d'énergie Modèles similaires compar...


