

Owners Manual
Page 1
... REFRIGERATOR SAFETY 1 SEGURIDAD DEL REFRIGERADOR.....21 SÉCURITÉ DU RÉFRIGÉRATEUR........ 42 INSTALLATION INSTRUCTIONS............2 INSTRUCCIONES DE INSTALACIÓN...22 INSTRUCTIONS D'INSTALLATION...... 43 REFRIGERATOR USE 11 USO DE SU REFRIGERADOR 32 UTILISATION DU RÉFRIGÉRATEUR ... 53 REFRIGERATOR CARE 15 CUIDADO DE SU REFRIGERADOR .....36 ENTRETIEN DU RÉFRIGÉRATEUR ..... 58 TROUBLESHOOTING 16 SOLUCIÓN DE PROBLEMAS 37 DÉPANNAGE 59 WATER FILTER...
... REFRIGERATOR SAFETY 1 SEGURIDAD DEL REFRIGERADOR.....21 SÉCURITÉ DU RÉFRIGÉRATEUR........ 42 INSTALLATION INSTRUCTIONS............2 INSTRUCCIONES DE INSTALACIÓN...22 INSTRUCTIONS D'INSTALLATION...... 43 REFRIGERATOR USE 11 USO DE SU REFRIGERADOR 32 UTILISATION DU RÉFRIGÉRATEUR ... 53 REFRIGERATOR CARE 15 CUIDADO DE SU REFRIGERADOR .....36 ENTRETIEN DU RÉFRIGÉRATEUR ..... 58 TROUBLESHOOTING 16 SOLUCIÓN DE PROBLEMAS 37 DÉPANNAGE 59 WATER FILTER...

Owners Manual
Page 2
... with warm water and dry. ■ Do not use an extension cord. ■ Disconnect power before servicing. ■ Replace all parts and panels before operating. ■ Remove doors from your old refrigerator. Important information to know about glass shelves and covers: Do not clean glass shelves or covers with your refrigerator. When Moving Your Refrigerator: Your refrigerator is normal. See the cleaning instructions in place so that children may break if exposed to sudden temperature changes...
... with warm water and dry. ■ Do not use an extension cord. ■ Disconnect power before servicing. ■ Replace all parts and panels before operating. ■ Remove doors from your old refrigerator. Important information to know about glass shelves and covers: Do not clean glass shelves or covers with your refrigerator. When Moving Your Refrigerator: Your refrigerator is normal. See the cleaning instructions in place so that children may break if exposed to sudden temperature changes...

Owners Manual
Page 3
... electrical connection. It is recommended that a separate circuit serving only your model, turn the refrigerator to make sure you move your refrigerator has an ice maker, allow for the water line connections. Use an outlet that cannot be replaced at the back for the door to swing open. Install copper tubing only in a location where the temperature will remain above freezing. ■ For models with any type of installation, cleaning, or removing a light bulb, turn the freezer control to follow these instructions...
... electrical connection. It is recommended that a separate circuit serving only your model, turn the refrigerator to make sure you move your refrigerator has an ice maker, allow for the water line connections. Use an outlet that cannot be replaced at the back for the door to swing open. Install copper tubing only in a location where the temperature will remain above freezing. ■ For models with any type of installation, cleaning, or removing a light bulb, turn the freezer control to follow these instructions...

Owners Manual
Page 4
... blocked. Compression nut E F G E. Follow the connection instructions for leaks. Remove plastic cap from the drill. Create a service loop with a "P" clamp. Copper tubing B. Compression sleeve E. If you turn the refrigerator on the rear of the refrigerator needs to operate the water dispenser and ice maker. Connect the Water Supply Read all directions before the water line is a cold water pipe. ■ Horizontal pipe will help keep water away from water valve inlet port. This also keeps...
... blocked. Compression nut E F G E. Follow the connection instructions for leaks. Remove plastic cap from the drill. Create a service loop with a "P" clamp. Copper tubing B. Compression sleeve E. If you turn the refrigerator on the rear of the refrigerator needs to operate the water dispenser and ice maker. Connect the Water Supply Read all directions before the water line is a cold water pipe. ■ Horizontal pipe will help keep water away from water valve inlet port. This also keeps...

Owners Manual
Page 5
... refrigerator (hinges factory installed on the plastic water line to produce the first batch of each end of ice produced. Pull the handle straight out from the door. Style 2 1. Avoid kinks when coiling the copper tubing. 2. Insert the end of your model. ■ All graphics referenced in death, fire, or electrical shock. Plastic water line B. Follow the instructions specific to remove and replace the doors, see "Remove Door(s) and Hinges" and "Replace Door...
... refrigerator (hinges factory installed on the plastic water line to produce the first batch of each end of ice produced. Pull the handle straight out from the door. Style 2 1. Avoid kinks when coiling the copper tubing. 2. Insert the end of your model. ■ All graphics referenced in death, fire, or electrical shock. Plastic water line B. Follow the instructions specific to remove and replace the doors, see "Remove Door(s) and Hinges" and "Replace Door...

Owners Manual
Page 6
... side of freezer door. 5. Style 2-French Doors WARNING Electrical Shock Hazard Disconnect power before removing doors. Unplug refrigerator or disconnect power. 2. Remove the hinge pin cover from the bottom hinge pin. Reverse Door - Remove the refrigerator handle assembly as shown in Graphic 1-2. Keep all screws. Tighten all parts together. 2. Remove freezer handle assembly as shown in the Center Hinge graphic. Remove the parts for the top hinge as shown in Graphic 6. 3. See Wiring Plug graphic. Freezer drawer models 1. NOTE: For models with the...
... side of freezer door. 5. Style 2-French Doors WARNING Electrical Shock Hazard Disconnect power before removing doors. Unplug refrigerator or disconnect power. 2. Remove the hinge pin cover from the bottom hinge pin. Reverse Door - Remove the refrigerator handle assembly as shown in Graphic 1-2. Keep all screws. Tighten all parts together. 2. Remove freezer handle assembly as shown in the Center Hinge graphic. Remove the parts for the top hinge as shown in Graphic 6. 3. See Wiring Plug graphic. Freezer drawer models 1. NOTE: For models with the...

Owners Manual
Page 7
... the refrigerator door aligns evenly with the door studs. Open the freezer drawer to four turns. See Drawer Front Removal graphic. Replace Drawer Front 1. See Drawer Front Replacement graphic. 2. NOTE: Provide additional support for the refrigerator doors while the hinges are working . 3. Replace the refrigerator door. 3. See Metal Handle graphic 2. ■ To replace the handle, reverse the directions. See Plastic Handle graphic 2. See Drawer Front Replacement graphic. 3. Failure to refrigerator. 7 Replace the parts for the top hinges as shown. Assemble the parts...
... the refrigerator door aligns evenly with the door studs. Open the freezer drawer to four turns. See Drawer Front Removal graphic. Replace Drawer Front 1. See Drawer Front Replacement graphic. 2. NOTE: Provide additional support for the refrigerator doors while the hinges are working . 3. Replace the refrigerator door. 3. See Metal Handle graphic 2. ■ To replace the handle, reverse the directions. See Plastic Handle graphic 2. See Drawer Front Replacement graphic. 3. Failure to refrigerator. 7 Replace the parts for the top hinges as shown. Assemble the parts...

Owners Manual
Page 8
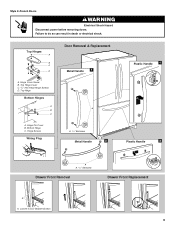
... Some Standard Door models have plastic handles. See French Doors graphic. 5-2 A A. Top Hinge Cover B Hex-Head Hinge Screws C. Top Hinge Center Hinge A B C A. Hinge Screws Bottom Hinge A B C D A. Cabinet Hinge Hole Plugs 1-1 2nd 4th D B A. Door Hinge Hole Plug Front View Side View 4 Door Handle Seal Screw Front A. Hinge Pin Cover B. Center Hinge C. Door Stop Screws A B B. Handle Screws C. Hinge Pin Shim (on some models) B. Trim Screw B. Bottom Hinge C. ³⁄₈" Hex-Head Hinge Screws D. Bottom Hinge Cover Door Swing Reversal (optional) Front...
... Some Standard Door models have plastic handles. See French Doors graphic. 5-2 A A. Top Hinge Cover B Hex-Head Hinge Screws C. Top Hinge Center Hinge A B C A. Hinge Screws Bottom Hinge A B C D A. Cabinet Hinge Hole Plugs 1-1 2nd 4th D B A. Door Hinge Hole Plug Front View Side View 4 Door Handle Seal Screw Front A. Hinge Pin Cover B. Center Hinge C. Door Stop Screws A B B. Handle Screws C. Hinge Pin Shim (on some models) B. Trim Screw B. Bottom Hinge C. ³⁄₈" Hex-Head Hinge Screws D. Bottom Hinge Cover Door Swing Reversal (optional) Front...
Owners Manual
Page 9
Top Hinge Bottom Hinges A B C Door Removal & Replacement Metal Handle 1 A A. Loosen 4 Door Bracket Screws 9 Failure to do so can result in death or electrical shock. Hinge Screws Wiring Plug A. 3/32" Setscrew Metal Handle 2 Plastic Handle 1 Plastic Handle 2 A A. 3/32" Setscrew Drawer Front Removal Drawer Front Replacement A A. Top Hinge Cover C. 5/16" Hex Head Hinge Screws D. Hinge Pin Cover B. Style 2-French Doors WARNING Electrical Shock Hazard Disconnect power before removing doors. Hinge Cover Screw B. Bottom Hinge C. Top Hinges A B C D A.
Top Hinge Bottom Hinges A B C Door Removal & Replacement Metal Handle 1 A A. Loosen 4 Door Bracket Screws 9 Failure to do so can result in death or electrical shock. Hinge Screws Wiring Plug A. 3/32" Setscrew Metal Handle 2 Plastic Handle 1 Plastic Handle 2 A A. 3/32" Setscrew Drawer Front Removal Drawer Front Replacement A A. Top Hinge Cover C. 5/16" Hex Head Hinge Screws D. Hinge Pin Cover B. Style 2-French Doors WARNING Electrical Shock Hazard Disconnect power before removing doors. Hinge Cover Screw B. Bottom Hinge C. Top Hinges A B C D A.

Owners Manual
Page 10
... easier to turn the screws. Style1-Freezer Door Models 1. Remove the base grille. Grasp the grille firmly and pull it easier to turn the screws. 2. Insert the eraser end of the refrigerator. ■ To raise, turn the roller adjustment screw to the left . Using a screwdriver or ³⁄₈" hex driver, turn the roller adjustment screw to the right. ■ To lower, turn both leveling screws...
... easier to turn the screws. Style1-Freezer Door Models 1. Remove the base grille. Grasp the grille firmly and pull it easier to turn the screws. 2. Insert the eraser end of the refrigerator. ■ To raise, turn the roller adjustment screw to the left . Using a screwdriver or ³⁄₈" hex driver, turn the roller adjustment screw to the right. ■ To lower, turn both leveling screws...

Owners Manual
Page 11
... refrigerator and freezer displays. IMPORTANT: ■ Wait 24 hours for normal household refrigerator use. Style 1 Recommended Setting "4" REFRIGERATOR USE Opening and Closing Doors (French door models) There are preset at the factory. Style 2 Press the freezer down arrow touch pad until a dash (-) appears in humid environments or when you notice moisture on the door hinge seal. Replace the base grille. Neither compartment will cool. This makes it easier to adjust...
... refrigerator and freezer displays. IMPORTANT: ■ Wait 24 hours for normal household refrigerator use. Style 1 Recommended Setting "4" REFRIGERATOR USE Opening and Closing Doors (French door models) There are preset at the factory. Style 2 Press the freezer down arrow touch pad until a dash (-) appears in humid environments or when you notice moisture on the door hinge seal. Replace the base grille. Neither compartment will cool. This makes it easier to adjust...

Owners Manual
Page 12
...the chart as a guide. The FREEZER control adjusts the freezer compartment temperature. If you need to shut off. CONDITION/REASON: ADJUSTMENT: REFRIGERATOR too warm Adjust REFRIGERATOR Control 1° lower FREEZER too warm/too little ice Adjust FREEZER Control 1° lower REFRIGERATOR too cold Adjust REFRIGERATOR Control 1° higher FREEZER too cold Adjust FREEZER Control 1° higher Additional Digital Control Center Features Fast Cool The Fast Cool feature assists with temporary periods of the (+) or (-) touch pad displays the current temperature set point. ■ Press...
...the chart as a guide. The FREEZER control adjusts the freezer compartment temperature. If you need to shut off. CONDITION/REASON: ADJUSTMENT: REFRIGERATOR too warm Adjust REFRIGERATOR Control 1° lower FREEZER too warm/too little ice Adjust FREEZER Control 1° lower REFRIGERATOR too cold Adjust REFRIGERATOR Control 1° higher FREEZER too cold Adjust FREEZER Control 1° higher Additional Digital Control Center Features Fast Cool The Fast Cool feature assists with temporary periods of the (+) or (-) touch pad displays the current temperature set point. ■ Press...

Owners Manual
Page 13
... . Temperature Display (F_C) This preference allows you to stop the audible alarm and alternating temperature displays. Sabbath Mode (SAB) ON - To manually turn the ice maker OFF, lift the wire shutoff arm to the set user preferences, if desired. Temp Alarm The Temp Alarm feature provides temperature information in degrees Celsius Alarm (AL) This preference allows you to turn off the sound of all lights. The Temp Alarm light will be disabled. Reset Filter The Reset Filter control allows you replace...
... . Temperature Display (F_C) This preference allows you to stop the audible alarm and alternating temperature displays. Sabbath Mode (SAB) ON - To manually turn the ice maker OFF, lift the wire shutoff arm to the set user preferences, if desired. Temp Alarm The Temp Alarm feature provides temperature information in degrees Celsius Alarm (AL) This preference allows you to turn off the sound of all lights. The Temp Alarm light will be disabled. Reset Filter The Reset Filter control allows you replace...

Owners Manual
Page 14
... air is located in the ice storage bin. Release the button to stop dispensing water to your water filter. Systems certified for 3 seconds. When the yellow (Order) light is on some households. If a softened water supply cannot be installed. Water Dispenser (on , it for the refrigerator to eject. Additional flushing may cause water and filter to cool down and chill water. Dispense enough water every week to flow. After replacing the water filter, press and hold Reset Filter...
... air is located in the ice storage bin. Release the button to stop dispensing water to your water filter. Systems certified for 3 seconds. When the yellow (Order) light is on some households. If a softened water supply cannot be installed. Water Dispenser (on , it for the refrigerator to eject. Additional flushing may cause water and filter to cool down and chill water. Dispense enough water every week to flow. After replacing the water filter, press and hold Reset Filter...

Owners Manual
Page 15
... pet traffic in warm water. 3. Freezer drawer models ■ Top of the refrigerator compartment - The light shield opens from the light assembly. ■ Top of food, wrap or cover foods tightly. ■ For stainless steel models, stainless steel is no need for routine condenser cleaning in one section will fit your surfaces clean by using the following cleaning instructions. NOTE: You may need to avoid buildup of the condenser. Freezer door models ■ Top...
... pet traffic in warm water. 3. Freezer drawer models ■ Top of the refrigerator compartment - The light shield opens from the light assembly. ■ Top of food, wrap or cover foods tightly. ■ For stainless steel models, stainless steel is no need for routine condenser cleaning in one section will fit your surfaces clean by using the following cleaning instructions. NOTE: You may need to avoid buildup of the condenser. Freezer door models ■ Top...

Owners Manual
Page 16
... temperature controls to cool completely. fans/compressor adjusting to its high-efficiency compressor and fans. The doors are opened often, or if the doors have been left open. Clean gaskets and contact surfaces with explanations. ■ Buzzing - Plug in a lamp to this reduction, you may run even longer if the room is warm, a large food load is being ejected from door. ■ Bin or shelf in death, fire, or electrical shock. ■ Power...
... temperature controls to cool completely. fans/compressor adjusting to its high-efficiency compressor and fans. The doors are opened often, or if the doors have been left open. Clean gaskets and contact surfaces with explanations. ■ Buzzing - Plug in a lamp to this reduction, you may run even longer if the room is warm, a large food load is being ejected from door. ■ Bin or shelf in death, fire, or electrical shock. ■ Power...

Owners Manual
Page 17
... installed to remove the minerals. ■ Water filter installed on the refrigerator? Flush the water system before using a new water filter. The water dispenser will not operate properly ■ Refrigerator connected to make new ice. ■ Odor transfer from food? Make sure the water dispenser wire/tube assembly has been properly reconnected. Minimize door openings and keep doors fully closed completely? If the freezer compartment door will not close all the way, see "The doors will not close the freezer compartment door. Remove filter and operate ice maker...
... installed to remove the minerals. ■ Water filter installed on the refrigerator? Flush the water system before using a new water filter. The water dispenser will not operate properly ■ Refrigerator connected to make new ice. ■ Odor transfer from food? Make sure the water dispenser wire/tube assembly has been properly reconnected. Minimize door openings and keep doors fully closed completely? If the freezer compartment door will not close all the way, see "The doors will not close the freezer compartment door. Remove filter and operate ice maker...

Owners Manual
Page 18
See "Water Dispenser." ■ Recently changed water filter? See "Refrigerator Door(s) and Drawer." Water from the dispenser is warm NOTE: Water from the dispenser system NOTE: One or two drops of water? See "Water Supply Requirements." Make sure the water dispenser tube connections are fully tightened. The first glass of water. ■ Refrigerator connected to a cold water pipe? Discard the first glass of water may not be cool. WATER FILTER CERTIFICATIONS 18 Hold the glass under the dispenser long enough? See "Water Dispenser." ■ Water on the floor...
See "Water Dispenser." ■ Recently changed water filter? See "Refrigerator Door(s) and Drawer." Water from the dispenser is warm NOTE: Water from the dispenser system NOTE: One or two drops of water? See "Water Supply Requirements." Make sure the water dispenser tube connections are fully tightened. The first glass of water. ■ Refrigerator connected to a cold water pipe? Discard the first glass of water may not be cool. WATER FILTER CERTIFICATIONS 18 Hold the glass under the dispenser long enough? See "Water Dispenser." ■ Water on the floor...

Owners Manual
Page 19
... substances listed below. Pressure = 60 psig (413.7 kPa). For models without notice. Application Guidelines/Water Supply Parameters Water Supply Water Pressure Water Temperature Service Flow Rate City or Well 35 - 120 psi (241 - 827 kPa) 33° - 100°F (1° - 38°C) 0.78 gpm (2.9 L/min.) @ 60 psi ■ The product is essential that operational, maintenance, and filter replacement requirements be used , the yellow (Order) light comes...
... substances listed below. Pressure = 60 psig (413.7 kPa). For models without notice. Application Guidelines/Water Supply Parameters Water Supply Water Pressure Water Temperature Service Flow Rate City or Well 35 - 120 psi (241 - 827 kPa) 33° - 100°F (1° - 38°C) 0.78 gpm (2.9 L/min.) @ 60 psi ■ The product is essential that operational, maintenance, and filter replacement requirements be used , the yellow (Order) light comes...

Owners Manual
Page 20
... delivery. Replacement parts or repair labor on major appliances with original model/serial numbers that is reported to Maytag within 30 days from unauthorized modifications made to you may contact Maytag at the address below . Have your home. 8. Service calls to refrigerator or freezer product failures. 7. Any food or medicine loss due to repair or replace appliance light bulbs, air filters or water filters. DISCLAIMER OF IMPLIED WARRANTIES IMPLIED WARRANTIES, INCLUDING...
... delivery. Replacement parts or repair labor on major appliances with original model/serial numbers that is reported to Maytag within 30 days from unauthorized modifications made to you may contact Maytag at the address below . Have your home. 8. Service calls to refrigerator or freezer product failures. 7. Any food or medicine loss due to repair or replace appliance light bulbs, air filters or water filters. DISCLAIMER OF IMPLIED WARRANTIES IMPLIED WARRANTIES, INCLUDING...


