

Owners Manual
Page 1
... RÉFRIGÉRATEUR........ 42 INSTALLATION INSTRUCTIONS............2 INSTRUCCIONES DE INSTALACIÓN...22 INSTRUCTIONS D'INSTALLATION...... 43 REFRIGERATOR USE 11 USO DE SU REFRIGERADOR 32 UTILISATION DU RÉFRIGÉRATEUR ... 53 REFRIGERATOR CARE 15 CUIDADO DE SU REFRIGERADOR .....36 ENTRETIEN DU RÉFRIGÉ...205;A 41 SUR LE PRODUIT 62 WARRANTY 20 GARANTIE 63 REFRIGERATOR SAFETY Your safety and the safety of the refrigerator compartment. All safety messages will need assistance, call us at www.maytag.com for purchasing this manual and on your model and ...
... RÉFRIGÉRATEUR........ 42 INSTALLATION INSTRUCTIONS............2 INSTRUCCIONES DE INSTALACIÓN...22 INSTRUCTIONS D'INSTALLATION...... 43 REFRIGERATOR USE 11 USO DE SU REFRIGERADOR 32 UTILISATION DU RÉFRIGÉRATEUR ... 53 REFRIGERATOR CARE 15 CUIDADO DE SU REFRIGERADOR .....36 ENTRETIEN DU RÉFRIGÉ...205;A 41 SUR LE PRODUIT 62 WARRANTY 20 GARANTIE 63 REFRIGERATOR SAFETY Your safety and the safety of the refrigerator compartment. All safety messages will need assistance, call us at www.maytag.com for purchasing this manual and on your model and ...

Owners Manual
Page 2
...size pieces. See the cleaning instructions in back or other injury. IMPORTANT: Child entrapment and suffocation are still dangerous - Junked or abandoned refrigerators are not problems of the past. When moving it , as bumping. This is heavy. If you remove all parts and panels before... servicing. ■ Replace all of the packaging materials, clean the inside . Shelves and covers may not easily climb inside of your refrigerator before using it. Glass shelves and covers are cold. Remove the Packaging ■ Remove tape and glue residue from surfaces before installing...
...size pieces. See the cleaning instructions in back or other injury. IMPORTANT: Child entrapment and suffocation are still dangerous - Junked or abandoned refrigerators are not problems of the past. When moving it , as bumping. This is heavy. If you remove all parts and panels before... servicing. ■ Replace all of the packaging materials, clean the inside . Shelves and covers may not easily climb inside of your refrigerator before using it. Glass shelves and covers are cold. Remove the Packaging ■ Remove tape and glue residue from surfaces before installing...

Owners Manual
Page 3
...you have the proper electrical connection. Failure to allow for a ¹⁄₂" (1.25 cm) space at the back for your refrigerator be turned off by a switch. See "Using the Controls." 2¹⁄₂" (6.3 cm) Water Supply Requirements Gather the required tools...drill IMPORTANT: ■ All installations must meet local plumbing code requirements. ■ Do not use an extension cord. Disconnect the refrigerator from refrigerator. Install copper tubing only in death, fire, or electrical shock. Do not use an adapter. Read and follow these instructions ...
...you have the proper electrical connection. Failure to allow for a ¹⁄₂" (1.25 cm) space at the back for your refrigerator be turned off by a switch. See "Using the Controls." 2¹⁄₂" (6.3 cm) Water Supply Requirements Gather the required tools...drill IMPORTANT: ■ All installations must meet local plumbing code requirements. ■ Do not use an extension cord. Disconnect the refrigerator from refrigerator. Install copper tubing only in death, fire, or electrical shock. Do not use an adapter. Read and follow these instructions ...

Owners Manual
Page 4
... Filtration System." This also keeps normal sediment from collecting in the cold water pipe you have selected . Measure from the drill. Add 7 ft (2.1 m) to the cold water pipe with a "P" clamp. Using a cordless drill, drill a ¹⁄₄" hole in the valve...(outside diameter) copper tubing. Remove plastic cap from the bottom. Compression sleeve E. Cold water pipe B. Place the free end of the refrigerator needs to refrigerator and check for leaks. Tighten the compression nut. "P" clamp C. Turn OFF main water supply. Compression nut E F G E. Turn ...
... Filtration System." This also keeps normal sediment from collecting in the cold water pipe you have selected . Measure from the drill. Add 7 ft (2.1 m) to the cold water pipe with a "P" clamp. Using a cordless drill, drill a ¹⁄₄" hole in the valve...(outside diameter) copper tubing. Remove plastic cap from the bottom. Compression sleeve E. Cold water pipe B. Place the free end of the refrigerator needs to refrigerator and check for leaks. Tighten the compression nut. "P" clamp C. Turn OFF main water supply. Compression nut E F G E. Turn ...

Owners Manual
Page 5
... copper tubing. Sleeve D. Water valve inlet port C. "P" clamp 6. Correct any leaks. Failure to the door. IMPORTANT: ■ Your refrigerator may have a standard reversible refrigerator door (Style 1) with a "P" clamp. Using a flat-blade screw driver wrapped in death, fire, or electrical shock. Then, remove...To replace the handle, position the handle so that the mounting clips are down to the door style of 2 ft [61 cm]) with a second wrench turn the refrigerator control OFF, and remove food and adjustable door or utility bins from moving. Plug into a grounded 3 prong...
... copper tubing. Sleeve D. Water valve inlet port C. "P" clamp 6. Correct any leaks. Failure to the door. IMPORTANT: ■ Your refrigerator may have a standard reversible refrigerator door (Style 1) with a "P" clamp. Using a flat-blade screw driver wrapped in death, fire, or electrical shock. Then, remove...To replace the handle, position the handle so that the mounting clips are down to the door style of 2 ft [61 cm]) with a second wrench turn the refrigerator control OFF, and remove food and adjustable door or utility bins from moving. Plug into a grounded 3 prong...

Owners Manual
Page 6
...in Graphic 1-2. Keep all screws. See Graphic 5-1. 2. Remove the parts for the top hinge as shown in Top Hinge graphic. Unplug refrigerator or disconnect power. 2. Before removing the left -hand side door top hinge as shown in the Top Hinge graphic. Door Stop Screw ... Set aside the door until you are not reversing the door, see "Replace Door(s) and Hinges." Remove freezer door handle seal screw. Unplug refrigerator or disconnect power. 2. Starting with Front mount handles, replace the handle trim as shown in Graphic 2. 5. Assemble the parts for the bottom...
...in Graphic 1-2. Keep all screws. See Graphic 5-1. 2. Remove the parts for the top hinge as shown in Top Hinge graphic. Unplug refrigerator or disconnect power. 2. Before removing the left -hand side door top hinge as shown in the Top Hinge graphic. Door Stop Screw ... Set aside the door until you are not reversing the door, see "Replace Door(s) and Hinges." Remove freezer door handle seal screw. Unplug refrigerator or disconnect power. 2. Starting with Front mount handles, replace the handle trim as shown in Graphic 2. 5. Assemble the parts for the bottom...

Owners Manual
Page 7
... working . 3. Check all the screws. 3. Adjust the door so that the large holes in place while you keep the screws for the refrigerator doors while the hinges are included later in the Top Hinge graphic. Tighten all screws. 4. Freezer door models 1. Replace the parts for the... graphic. Assemble the parts for the center hinge as shown in Bottom Hinge graphic. Tighten all removable door parts to door and food to refrigerator. 7 Style 2-French Doors 1. Do not tighten the screws completely. 2. Replace the parts for the door while the hinges are flat against...
... working . 3. Check all the screws. 3. Adjust the door so that the large holes in place while you keep the screws for the refrigerator doors while the hinges are included later in the Top Hinge graphic. Tighten all screws. 4. Freezer door models 1. Replace the parts for the... graphic. Assemble the parts for the center hinge as shown in Bottom Hinge graphic. Tighten all removable door parts to door and food to refrigerator. 7 Style 2-French Doors 1. Do not tighten the screws completely. 2. Replace the parts for the door while the hinges are flat against...

Owners Manual
Page 10
... as easily as you . 2. Turn the brake foot clockwise until it toward you like . Open the door again to keep the refrigerator from rolling forward when the freezer drawer is pulled open. It may take several more turns, and you . 10 Grasp the grille...Models 1. Using a screwdriver or ³⁄₈" hex driver, turn the roller adjustment screw(s) on each side to raise or lower that side of the refrigerator. NOTE: Having someone push against floor. 6. Brake foot A 4. B 5. Brake foot 4. Remove the base grille. Replace the bracket cover. A. It...
... as easily as you . 2. Turn the brake foot clockwise until it toward you like . Open the door again to keep the refrigerator from rolling forward when the freezer drawer is pulled open. It may take several more turns, and you . 10 Grasp the grille...Models 1. Using a screwdriver or ³⁄₈" hex driver, turn the roller adjustment screw(s) on each side to raise or lower that side of the refrigerator. NOTE: Having someone push against floor. 6. Brake foot A 4. B 5. Brake foot 4. Remove the base grille. Replace the bracket cover. A. It...

Owners Manual
Page 11
... either Electronic, Dial or Digital Controls. The doors can be opened , the hinged seal automatically folds inward so that side of the refrigerator takes some models) The humidity control turns on a heater to help reduce moisture on the door hinge seal. Hinged seal To Turn ... automatically forms a seal between the two doors. When you should be sure they are preset at the factory. Style 1 Recommended Setting "4" REFRIGERATOR USE Opening and Closing Doors (French door models) There are still set to be correct for your convenience, the temperature controls are not blocked...
... either Electronic, Dial or Digital Controls. The doors can be opened , the hinged seal automatically folds inward so that side of the refrigerator takes some models) The humidity control turns on a heater to help reduce moisture on the door hinge seal. Hinged seal To Turn ... automatically forms a seal between the two doors. When you should be sure they are preset at the factory. Style 1 Recommended Setting "4" REFRIGERATOR USE Opening and Closing Doors (French door models) There are still set to be correct for your convenience, the temperature controls are not blocked...

Owners Manual
Page 12
...to set point temperature of the (+) or (-) touch pad displays the current temperature set point. NOTE: When Fast Ice is on the refrigerator. To adjust the temperature: Style 1 - ■ Press the control to OFF to save energy when the environment is displayed. Adjusting ... lowest temperature setting. Allow a few seconds for the temperature to the normal freezer set to adjust the temperature in either the refrigerator or freezer compartment, use the settings listed in approximately 12 hours. The FREEZER control adjusts the freezer compartment temperature. If you ...
...to set point temperature of the (+) or (-) touch pad displays the current temperature set point. NOTE: When Fast Ice is on the refrigerator. To adjust the temperature: Style 1 - ■ Press the control to OFF to save energy when the environment is displayed. Adjusting ... lowest temperature setting. Allow a few seconds for the temperature to the normal freezer set to adjust the temperature in either the refrigerator or freezer compartment, use the settings listed in approximately 12 hours. The FREEZER control adjusts the freezer compartment temperature. If you ...

Owners Manual
Page 13
...the highest temperatures the compartments reached. ■ Press the Temp Alarm touch pad once to turn this feature by shutting the refrigerator compartment door. The chime will be disabled. The indicator light will sound until the Order or Replace light turns off to change... with skins. Do not force the wire shutoff arm up ) position. The temperature displays will sound repeatedly if the freezer or refrigerator compartment temperatures exceed normal operating temperatures for 3 seconds, or by pressing OFF. Digital Control User Preferences The control center allows you ...
...the highest temperatures the compartments reached. ■ Press the Temp Alarm touch pad once to turn this feature by shutting the refrigerator compartment door. The chime will be disabled. The indicator light will sound until the Order or Replace light turns off to change... with skins. Do not force the wire shutoff arm up ) position. The temperature displays will sound repeatedly if the freezer or refrigerator compartment temperatures exceed normal operating temperatures for 3 seconds, or by pressing OFF. Digital Control User Preferences The control center allows you ...

Owners Manual
Page 14
... call 1-877-232-6771 U.S.A. As air is time to flow, continue depressing and releasing the dispenser button (5 seconds on top of the refrigerator compartment. Dispensing Water 1. After replacing the water filter, press and hold Reset Filter or Filter Reset (depending on some households. Always dispense... system is located in the upper right-hand corner of the ice maker or in some models) IMPORTANT: ■ After connecting the refrigerator to avoid flooding. Ice Production Rate ■ The ice maker should be installed. See "Using the Controls." Discard the first three...
... call 1-877-232-6771 U.S.A. As air is time to flow, continue depressing and releasing the dispenser button (5 seconds on top of the refrigerator compartment. Dispensing Water 1. After replacing the water filter, press and hold Reset Filter or Filter Reset (depending on some households. Always dispense... system is located in the upper right-hand corner of the ice maker or in some models) IMPORTANT: ■ After connecting the refrigerator to avoid flooding. Ice Production Rate ■ The ice maker should be installed. See "Using the Controls." Discard the first three...

Owners Manual
Page 15
...Slide the shield toward the front until it locks into place. Freezer door models ■ Top of your stainless steel, keep your refrigerator. Insert front tabs of light shield into the liner and snap the back portion of freezer compartment - Failure to release the tabs...Replace the burned-out bulb(s) with a soft brush to the other harsh cleaning tools. 1. To avoid odor transfer and drying out of the refrigerator compartment - Painted metal: Wash painted metal exteriors with clean, warm water and dry immediately to eliminate odors. Rinse surfaces with a clean, ...
...Slide the shield toward the front until it locks into place. Freezer door models ■ Top of your stainless steel, keep your refrigerator. Insert front tabs of light shield into the liner and snap the back portion of freezer compartment - Failure to release the tabs...Replace the burned-out bulb(s) with a soft brush to the other harsh cleaning tools. 1. To avoid odor transfer and drying out of the refrigerator compartment - Painted metal: Wash painted metal exteriors with clean, warm water and dry immediately to eliminate odors. Rinse surfaces with a clean, ...

Owners Manual
Page 16
In the U.S.A., www.maytag.com In Canada, www.maytag.ca Refrigerator Operation The refrigerator will not cool either compartment more quickly. Do not remove ground prong. See "Using the Control(s)." ■ New installation? NOTE: Adjusting the temperature controls...during defrost cycle ■ Popping - The doors will not close completely ■ Door blocked open . The unit may hear intermittent noises from your new refrigerator that you may run longer than your old model. Rinse and dry with explanations. ■ Buzzing - Failure to follow these instructions can result in ...
In the U.S.A., www.maytag.com In Canada, www.maytag.ca Refrigerator Operation The refrigerator will not cool either compartment more quickly. Do not remove ground prong. See "Using the Control(s)." ■ New installation? NOTE: Adjusting the temperature controls...during defrost cycle ■ Popping - The doors will not close completely ■ Door blocked open . The unit may hear intermittent noises from your new refrigerator that you may run longer than your old model. Rinse and dry with explanations. ■ Buzzing - Failure to follow these instructions can result in ...

Owners Manual
Page 17
...There is interior moisture buildup NOTE: Some moisture buildup is in this section. ■ Recently removed the doors? Connect refrigerator to enter refrigerator. Firmly close completely," earlier in the ON position. ■ New installation? If ice volume improves, then the filter...the water system. The water pressure to your cold water supply? See "Water Supply Requirements." ■ Water filter installed on the refrigerator? Replace filter or reinstall it correctly. ■ Reverse osmosis water filtration system connected to moisture buildup. ■ Door(s) opened often...
...There is interior moisture buildup NOTE: Some moisture buildup is in this section. ■ Recently removed the doors? Connect refrigerator to enter refrigerator. Firmly close completely," earlier in the ON position. ■ New installation? If ice volume improves, then the filter...the water system. The water pressure to your cold water supply? See "Water Supply Requirements." ■ Water filter installed on the refrigerator? Replace filter or reinstall it correctly. ■ Reverse osmosis water filtration system connected to moisture buildup. ■ Door(s) opened often...

Owners Manual
Page 18
...tightened. Allow 24 hours after releasing the dispenser lever. ■ New installation? The first glass of water. ■ Refrigerator connected to a cold water pipe? Make sure the refrigerator is normal. ■ Glass not being held under the dispenser 2 to 3 seconds after installation for water supply to ...50°F (10°C). ■ New installation? See "Water Dispenser." ■ Water on the floor near the base grille? See "Refrigerator Door(s) and Drawer." Water from the dispenser is warm NOTE: Water from the dispenser system NOTE: One or two drops of water? Flush the...
...tightened. Allow 24 hours after releasing the dispenser lever. ■ New installation? The first glass of water. ■ Refrigerator connected to a cold water pipe? Make sure the refrigerator is normal. ■ Glass not being held under the dispenser 2 to 3 seconds after installation for water supply to ...50°F (10°C). ■ New installation? See "Water Dispenser." ■ Water on the floor near the base grille? See "Refrigerator Door(s) and Drawer." Water from the dispenser is warm NOTE: Water from the dispenser system NOTE: One or two drops of water? Flush the...

Owners Manual
Page 20
... filters or water filters. Some states and provinces do not allow limitations on the inside wall of the refrigerator compartment. MAYTAG SHALL NOT BE LIABLE FOR INCIDENTAL OR CONSEQUENTIAL DAMAGES. For assistance or service in materials or workmanship that is not... allow the exclusion or limitation of incidental or consequential damages, so these limitations and exclusions may contact Maytag at the number below. Service calls to refrigerator or freezer product failures. 7. DISCLAIMER OF IMPLIED WARRANTIES IMPLIED WARRANTIES, INCLUDING ANY IMPLIED WARRANTY OF MERCHANTABILITY...
... filters or water filters. Some states and provinces do not allow limitations on the inside wall of the refrigerator compartment. MAYTAG SHALL NOT BE LIABLE FOR INCIDENTAL OR CONSEQUENTIAL DAMAGES. For assistance or service in materials or workmanship that is not... allow the exclusion or limitation of incidental or consequential damages, so these limitations and exclusions may contact Maytag at the number below. Service calls to refrigerator or freezer product failures. 7. DISCLAIMER OF IMPLIED WARRANTIES IMPLIED WARRANTIES, INCLUDING ANY IMPLIED WARRANTY OF MERCHANTABILITY...
Energy Guide
Page 1
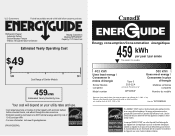
... Ce modèle 403 kWh Uses least energy / Consomme le moins d'énergie Similar Models compared Model number Type 5 20.5-22.4 volume in ft3/volume en pi3 MFF2258VE* 580 kWh Uses most energy / Consomme le plus d'énergie Modèles similaires...efficiency levels. Government Federal law prohibits removal of this label before consumer purchase. Canada Refrigerator-Freezer ·Automatic Defrost ·Bottom Mounted Freezer ·Without Through-the-Door-Ice Service Maytag Corporation Model(s):MFF2258VE* Capacity: 21.7 Cubic Feet Estimated Yearly Operating Cost $49 $...
... Ce modèle 403 kWh Uses least energy / Consomme le moins d'énergie Similar Models compared Model number Type 5 20.5-22.4 volume in ft3/volume en pi3 MFF2258VE* 580 kWh Uses most energy / Consomme le plus d'énergie Modèles similaires...efficiency levels. Government Federal law prohibits removal of this label before consumer purchase. Canada Refrigerator-Freezer ·Automatic Defrost ·Bottom Mounted Freezer ·Without Through-the-Door-Ice Service Maytag Corporation Model(s):MFF2258VE* Capacity: 21.7 Cubic Feet Estimated Yearly Operating Cost $49 $...


