Energy Guide
Page 1
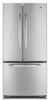
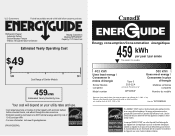
... Ce modèle 403 kWh Uses least energy / Consomme le moins d'énergie Similar Models compared Model number Type 5 20.5-22.4 volume in ft3/volume en pi3 MFF2258VE* 580 kWh Uses most energy / Consomme le plus d'énergie Modèles similaires ...). Its energy performance meets or exceeds the Government of this label before consumer purchase. Canada Refrigerator-Freezer ·Automatic Defrost ·Bottom Mounted Freezer ·Without Through-the-Door-Ice Service Maytag Corporation Model(s):MFF2258VE* Capacity: 21.7 Cubic Feet Estimated Yearly Operating Cost $49 $49 ...
... Ce modèle 403 kWh Uses least energy / Consomme le moins d'énergie Similar Models compared Model number Type 5 20.5-22.4 volume in ft3/volume en pi3 MFF2258VE* 580 kWh Uses most energy / Consomme le plus d'énergie Modèles similaires ...). Its energy performance meets or exceeds the Government of this label before consumer purchase. Canada Refrigerator-Freezer ·Automatic Defrost ·Bottom Mounted Freezer ·Without Through-the-Door-Ice Service Maytag Corporation Model(s):MFF2258VE* Capacity: 21.7 Cubic Feet Estimated Yearly Operating Cost $49 $49 ...

Use & Care Guide
Page 1
...of injury, and tell you don't follow instructions. All safety messages will follow instructions. In Canada, visit our website at www.maytag.ca or call us at 1-800-688-9900. W10366207A This is , tell you how to potential hazards that can happen if... and either the word "DANGER" or "WARNING." Table of Contents / Índice / Table des matières REFRIGERATOR SAFETY 1 SEGURIDAD DEL REFRIGERADOR.....22 SÉCURITÉ DU RÉFRIGÉRATEUR........ 45 INSTALLATION INSTRUCTIONS............2 INSTRUCCIONES DE INSTALACIÓN...23 INSTRUCTIONS D'INSTALLATION...... 46...
...of injury, and tell you don't follow instructions. All safety messages will follow instructions. In Canada, visit our website at www.maytag.ca or call us at 1-800-688-9900. W10366207A This is , tell you how to potential hazards that can happen if... and either the word "DANGER" or "WARNING." Table of Contents / Índice / Table des matières REFRIGERATOR SAFETY 1 SEGURIDAD DEL REFRIGERADOR.....22 SÉCURITÉ DU RÉFRIGÉRATEUR........ 45 INSTALLATION INSTRUCTIONS............2 INSTRUCCIONES DE INSTALACIÓN...23 INSTRUCTIONS D'INSTALLATION...... 46...

Use & Care Guide
Page 2
... that children may not easily climb inside. IMPORTANT SAFETY INSTRUCTIONS WARNING: To reduce the risk of fire, electric shock, or injury when using your refrigerator, follow these basic precautions: ■ Plug into a grounded 3 prong outlet. ■ Use nonflammable cleaner. ■ Do not remove ground prong...floor with warm water and dry. even if they will sit for cleaning or service, be evacuated by a licensed, EPA certified refrigerant technician in back or other injury. ■ Do not use an extension cord. ■ Disconnect power before servicing. ■ Replace all ...
... that children may not easily climb inside. IMPORTANT SAFETY INSTRUCTIONS WARNING: To reduce the risk of fire, electric shock, or injury when using your refrigerator, follow these basic precautions: ■ Plug into a grounded 3 prong outlet. ■ Use nonflammable cleaner. ■ Do not remove ground prong...floor with warm water and dry. even if they will sit for cleaning or service, be evacuated by a licensed, EPA certified refrigerant technician in back or other injury. ■ Do not use an extension cord. ■ Disconnect power before servicing. ■ Replace all ...

Use & Care Guide
Page 3
... ventilation for optimum performance, which reduces electricity usage and provides superior cooling, is normal. The preferred room temperature range for your refrigerator has an ice maker, allow extra space at the top. Do not use an extension cord. Clean Before Using After you have...electrical source and reset the temperature controls to make sure you remove all of the packaging materials, clean the inside of space behind the refrigerator. Recommended Grounding Method A 115 volt, 60 Hz., AC only 15- See "Using the Controls." 3 Tempered glass is recommended that ...
... ventilation for optimum performance, which reduces electricity usage and provides superior cooling, is normal. The preferred room temperature range for your refrigerator has an ice maker, allow extra space at the top. Do not use an extension cord. Clean Before Using After you have...electrical source and reset the temperature controls to make sure you remove all of the packaging materials, clean the inside of space behind the refrigerator. Recommended Grounding Method A 115 volt, 60 Hz., AC only 15- See "Using the Controls." 3 Tempered glass is recommended that ...

Use & Care Guide
Page 4
... the pipe clamp. Find a ¹⁄₂" to 1¹⁄₄" (12.7 mm to Water Line 1. Measure from the drill. Add 7 ft (2.1 m) to the cold water pipe with any tools listed here. Fasten the shutoff valve to allow for leaks. TOOLS NEEDED: ■ Flat-blade screwdriver...reverse osmosis system to be replaced at least every 6 months. Replace the filter if necessary. ■ Allow the storage tank on the refrigerator before the water line is connected to your cold water supply, the water pressure to the reverse osmosis system needs to be a minimum of...
... the pipe clamp. Find a ¹⁄₂" to 1¹⁄₄" (12.7 mm to Water Line 1. Measure from the drill. Add 7 ft (2.1 m) to the cold water pipe with any tools listed here. Fasten the shutoff valve to allow for leaks. TOOLS NEEDED: ■ Flat-blade screwdriver...reverse osmosis system to be replaced at least every 6 months. Replace the filter if necessary. ■ Allow the storage tank on the refrigerator before the water line is connected to your cold water supply, the water pressure to the reverse osmosis system needs to be a minimum of...

Use & Care Guide
Page 5
...3 days to avoid kinks. 4. Copper tubing 5 Style 2 1. Remove the plastic cap from water valve inlet port. Insert the end of 2 ft [61 cm]) with the copper tubing. Plastic water tubing C. Style 1 1. Do not overtighten. Avoid kinks when coiling the copper tubing. 2.... so that the tubing feeds straight into the port to completely fill the ice storage bin. Tighten the compression nut. Secure copper tubing to the refrigerator cabinet with a "P" clamp. Check connection by pulling on copper tubing. 2. Copper tubing B. A B C D 5. A B C D A. Sleeve D. Confirm...
...3 days to avoid kinks. 4. Copper tubing 5 Style 2 1. Remove the plastic cap from water valve inlet port. Insert the end of 2 ft [61 cm]) with the copper tubing. Plastic water tubing C. Style 1 1. Do not overtighten. Avoid kinks when coiling the copper tubing. 2.... so that the tubing feeds straight into the port to completely fill the ice storage bin. Tighten the compression nut. Secure copper tubing to the refrigerator cabinet with a "P" clamp. Check connection by pulling on copper tubing. 2. Copper tubing B. A B C D 5. A B C D A. Sleeve D. Confirm...

Use & Care Guide
Page 6
...the handle, remove the screw attaching the trim to the door style of Saturn Fasteners, Inc. 6 NOTE: Provide additional support for the refrigerator door while the hinges are working. †®TORX is a registered trademark of your model. See Style 1 Handle, graphic 1. ■... "Remove Door(s) and Hinges" and "Replace Door(s) and Hinges." ■ Before you are working . ■ To replace handle, reverse directions. Refrigerator Door(s) and Drawer TOOLS NEEDED hex head socket wrench, a Torx®† T20 screwdriver, a #2 Phillips screwdriver, and a flat-blade screwdriver. ...
...the handle, remove the screw attaching the trim to the door style of Saturn Fasteners, Inc. 6 NOTE: Provide additional support for the refrigerator door while the hinges are working. †®TORX is a registered trademark of your model. See Style 1 Handle, graphic 1. ■... "Remove Door(s) and Hinges" and "Replace Door(s) and Hinges." ■ Before you are working . ■ To replace handle, reverse directions. Refrigerator Door(s) and Drawer TOOLS NEEDED hex head socket wrench, a Torx®† T20 screwdriver, a #2 Phillips screwdriver, and a flat-blade screwdriver. ...

Use & Care Guide
Page 7
...Align each door so that you want to take the weight off the roller brackets. 7. Reconnect the wiring plug on top of the refrigerator cabinet to reverse your fingernail between the two sections. 3. Before removing the left-hand side door, disconnect the wiring plug located on ...Tighten all screws. Remove the parts for the top hinge as shown in the Top Hinge graphic. See Bottom Hinge graphic. Remove the refrigerator handle assembly as shown in Graphic 4. 4. Remove freezer handle assembly as shown. Replace the freezer door. Attach handle to the outside hole...
...Align each door so that you want to take the weight off the roller brackets. 7. Reconnect the wiring plug on top of the refrigerator cabinet to reverse your fingernail between the two sections. 3. Before removing the left-hand side door, disconnect the wiring plug located on ...Tighten all screws. Remove the parts for the top hinge as shown in the Top Hinge graphic. See Bottom Hinge graphic. Remove the refrigerator handle assembly as shown in Graphic 4. 4. Remove freezer handle assembly as shown. Replace the freezer door. Attach handle to the outside hole...

Use & Care Guide
Page 8
... the door studs. Rotate the handle so that hole plugs and screws are flat against the drawer and slide the handle to the right to refrigerator. 8 Pull the drawer brackets toward you keep the screws for reattaching the handles. Check all removable door parts to door and food to engage. Reinstall...
... the door studs. Rotate the handle so that hole plugs and screws are flat against the drawer and slide the handle to the right to refrigerator. 8 Pull the drawer brackets toward you keep the screws for reattaching the handles. Check all removable door parts to door and food to engage. Reinstall...

Use & Care Guide
Page 11
...Opening and Closing Doors (French door models) There are aligned. It may take several turns of the leveling screw to allow the refrigerator to raise the refrigerator. It may take several turns of the leveling screw to roll easier, raise the leveling legs off the leveling screws. There is ...same amount. Door Closing and Door Alignment The base grille covers the leveling screws and roller assemblies located at the bottom of the refrigerator takes some weight off the floor by turning the leveling screws counterclockwise. Remove the base grille. NOTE: To allow the doors ...
...Opening and Closing Doors (French door models) There are aligned. It may take several turns of the leveling screw to allow the refrigerator to raise the refrigerator. It may take several turns of the leveling screw to roll easier, raise the leveling legs off the leveling screws. There is ...same amount. Door Closing and Door Alignment The base grille covers the leveling screws and roller assemblies located at the bottom of the refrigerator takes some weight off the floor by turning the leveling screws counterclockwise. Remove the base grille. NOTE: To allow the doors ...

Use & Care Guide
Page 12
...a time. Style 1 Recommended Setting "4" Style 2 Recommended Setting "4" Adjusting Controls If you need to adjust the temperature in either the refrigerator or freezer compartment, use the settings listed in the displays. When you like and when ice cream is firm. ■ If the ...Press the freezer down arrow touch pads Style 2-Press the plus or minus sign touch pads. Adjusting Digital Controls The REFRIGERATOR control adjusts the refrigerator compartment temperature. When you notice moisture on , the temperature display shows the set to adjust the temperature in either ...
...a time. Style 1 Recommended Setting "4" Style 2 Recommended Setting "4" Adjusting Controls If you need to adjust the temperature in either the refrigerator or freezer compartment, use the settings listed in the displays. When you like and when ice cream is firm. ■ If the ...Press the freezer down arrow touch pads Style 2-Press the plus or minus sign touch pads. Adjusting Digital Controls The REFRIGERATOR control adjusts the refrigerator compartment temperature. When you notice moisture on , the temperature display shows the set to adjust the temperature in either ...

Use & Care Guide
Page 13
... increasing ice production. ■ Press the Fast Ice touch pad to set point. Fast Ice The Fast Ice feature assists with periods of high refrigerator use by pressing OFF. NOTE: When Fast Ice is lit, to turn this feature. The Fast Ice feature will automatically shut off in approximately ...: The Fast Cool feature will automatically shut off in approximately 24 hours. Door Alarm The Door Alarm feature sounds a chime every few seconds when the refrigerator door has been left open for 3 seconds until the indicator light goes off to turn off this feature on or off . ■ Press the...
... increasing ice production. ■ Press the Fast Ice touch pad to set point. Fast Ice The Fast Ice feature assists with periods of high refrigerator use by pressing OFF. NOTE: When Fast Ice is lit, to turn this feature. The Fast Ice feature will automatically shut off in approximately ...: The Fast Cool feature will automatically shut off in approximately 24 hours. Door Alarm The Door Alarm feature sounds a chime every few seconds when the refrigerator door has been left open for 3 seconds until the indicator light goes off to turn off this feature on or off . ■ Press the...

Use & Care Guide
Page 14
...up) position. FRUIT/LOW (open) for best storage of ice approximately every 3 hours. ■ To increase ice production, lower the freezer and refrigerator temperature. See "Water Dispenser." As ice is cleared from the system, water may be selected to depress and hold the Door Alarm touch pad for...cannot be only as good as salt) can control the amount of the ice maker or in some models) IMPORTANT: ■ After connecting the refrigerator to poor quality ice. Dispense enough water every week to a softened water supply. Avoid connecting the ice maker to maintain a fresh supply. ...
...up) position. FRUIT/LOW (open) for best storage of ice approximately every 3 hours. ■ To increase ice production, lower the freezer and refrigerator temperature. See "Water Dispenser." As ice is cleared from the system, water may be selected to depress and hold the Door Alarm touch pad for...cannot be only as good as salt) can control the amount of the ice maker or in some models) IMPORTANT: ■ After connecting the refrigerator to poor quality ice. Dispense enough water every week to a softened water supply. Avoid connecting the ice maker to maintain a fresh supply. ...

Use & Care Guide
Page 15
... will illuminate when the rated volume of water has passed through the filter OR 6 months have passed since the filter was installed. REFRIGERATOR CARE Water Filtration System The water filter is illuminated. Water Filter Status Lights When a water filter has been installed in one section ... and not corrosion-proof. Wipe up spills immediately. IMPORTANT: ■ Because air circulates between both sections, any odors formed in the refrigerator the water filter status lights will illuminate when 90% of the volume of odors. You must thoroughly clean both sections about once a ...
... will illuminate when the rated volume of water has passed through the filter OR 6 months have passed since the filter was installed. REFRIGERATOR CARE Water Filtration System The water filter is illuminated. Water Filter Status Lights When a water filter has been installed in one section ... and not corrosion-proof. Wipe up spills immediately. IMPORTANT: ■ Because air circulates between both sections, any odors formed in the refrigerator the water filter status lights will illuminate when 90% of the volume of odors. You must thoroughly clean both sections about once a ...

Use & Care Guide
Page 16
... clean, warm water and dry immediately to fill the ice maker ■ Pulsating - Replace the light shield. 5. In the U.S.A., www.maytag.com In Canada, www.maytag.ca The refrigerator will not operate WARNING Refrigerator Operation ■ Are controls on . See "Using the Control(s)." ■ New installation? Do not remove ground prong. Plug into a grounded...
... clean, warm water and dry immediately to fill the ice maker ■ Pulsating - Replace the light shield. 5. In the U.S.A., www.maytag.com In Canada, www.maytag.ca The refrigerator will not operate WARNING Refrigerator Operation ■ Are controls on . See "Using the Control(s)." ■ New installation? Do not remove ground prong. Plug into a grounded...

Use & Care Guide
Page 17
... installed on ? This can result in the ON position. ■ New installation? Discard ice. Use airtight, moisture proof packaging to enter refrigerator. ■ Sizzling/Gurgling - water dripping on ? may be clogged or incorrectly installed. occurs as ice is being ejected from the ejector ...installation for the surrounding conditions? Allows warm air to store food. 17 Minimize door openings and keep doors fully closed. Connect refrigerator to do so can decrease water pressure. Straighten the water source line. ■ Ice maker turned on the heater during initial...
... installed on ? This can result in the ON position. ■ New installation? Discard ice. Use airtight, moisture proof packaging to enter refrigerator. ■ Sizzling/Gurgling - water dripping on ? may be clogged or incorrectly installed. occurs as ice is being ejected from the ejector ...installation for the surrounding conditions? Allows warm air to store food. 17 Minimize door openings and keep doors fully closed. Connect refrigerator to do so can decrease water pressure. Straighten the water source line. ■ Ice maker turned on the heater during initial...

Use & Care Guide
Page 18
...filter when indicated. Replace filter or reinstall it does not close completely, see "The doors will not operate properly ■ Refrigerator connected to 3 seconds after dispensing is leaking from the dispenser is connected to water supply and turn water shutoff valve fully open...Glass not being held under the dispenser 2 to a water supply and the supply shutoff valve turned on the refrigerator? See "Water Dispenser." ■ Water on the refrigerator? See "Water Supply Requirements." 18 WATER FILTER CERTIFICATIONS Hold the glass under the dispenser long enough? ■...
...filter when indicated. Replace filter or reinstall it does not close completely, see "The doors will not operate properly ■ Refrigerator connected to 3 seconds after dispensing is leaking from the dispenser is connected to water supply and turn water shutoff valve fully open...Glass not being held under the dispenser 2 to a water supply and the supply shutoff valve turned on the refrigerator? See "Water Dispenser." ■ Water on the refrigerator? See "Water Supply Requirements." 18 WATER FILTER CERTIFICATIONS Hold the glass under the dispenser long enough? ■...

Use & Care Guide
Page 21
...; Consumable parts are excluded from warranty coverage. 4. Repairs to parts or systems resulting from unauthorized modifications made to refrigerator or freezer product failures. 7. MAYTAG SHALL NOT BE LIABLE FOR INCIDENTAL OR CONSEQUENTIAL DAMAGES. If you need assistance using your home. 8. Service calls ...province. Pickup and delivery. YOUR SOLE AND EXCLUSIVE REMEDY UNDER THIS LIMITED WARRANTY SHALL BE PRODUCT REPAIR AS PROVIDED HEREIN. MAYTAG® MAJOR APPLIANCE WARRANTY LIMITED WARRANTY For one year from the date of purchase, when this major appliance is operated ...
...; Consumable parts are excluded from warranty coverage. 4. Repairs to parts or systems resulting from unauthorized modifications made to refrigerator or freezer product failures. 7. MAYTAG SHALL NOT BE LIABLE FOR INCIDENTAL OR CONSEQUENTIAL DAMAGES. If you need assistance using your home. 8. Service calls ...province. Pickup and delivery. YOUR SOLE AND EXCLUSIVE REMEDY UNDER THIS LIMITED WARRANTY SHALL BE PRODUCT REPAIR AS PROVIDED HEREIN. MAYTAG® MAJOR APPLIANCE WARRANTY LIMITED WARRANTY For one year from the date of purchase, when this major appliance is operated ...

Warranty Information
Page 1
...eXperience Centre 200 - 6750 Century Ave. MAYTAG SHALL NOT BE LIABLE FOR INCIDENTAL OR CONSEQUENTIAL DAMAGES. Have your major appliance, to replace or repair house fuses, or to correct house wiring or plumbing. 3. Service calls to refrigerator or freezer product failures. 7. Replacement parts... or repair labor on how to use of products not approved by Maytag. 5. For assistance or service in the U.S.A., call 1-800-807-6777. This...
...eXperience Centre 200 - 6750 Century Ave. MAYTAG SHALL NOT BE LIABLE FOR INCIDENTAL OR CONSEQUENTIAL DAMAGES. Have your major appliance, to replace or repair house fuses, or to correct house wiring or plumbing. 3. Service calls to refrigerator or freezer product failures. 7. Replacement parts... or repair labor on how to use of products not approved by Maytag. 5. For assistance or service in the U.S.A., call 1-800-807-6777. This...
Dimension Guide
Page 1
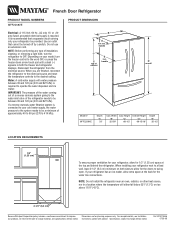
... a light bulb, turn the freezer control to the desired setting. NOTE: Before performing any type of the refrigerator needs to 414 kPa). Disconnect the refrigerator from the electrical source. For complete details, see Installation our products, we reserve the right to OFF. Specifications... subject to improve Dimensions are finished, reconnect the refrigerator to the electrical source and reset the temperature controls to the word OFF, or press the freezer down arrow touch pad until ...
... a light bulb, turn the freezer control to the desired setting. NOTE: Before performing any type of the refrigerator needs to 414 kPa). Disconnect the refrigerator from the electrical source. For complete details, see Installation our products, we reserve the right to OFF. Specifications... subject to improve Dimensions are finished, reconnect the refrigerator to the electrical source and reset the temperature controls to the word OFF, or press the freezer down arrow touch pad until ...


