Energy Guide
Page 1
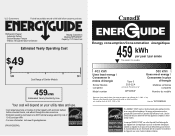
...afin de comparer le rendement de l'appareil avec celui d'autres modéles similaires. Canada Refrigerator-Freezer ·Automatic Defrost ·Bottom Mounted Freezer ·Without Through-the-Door-Ice Service Maytag Corporation Model(s):MFF2258VE* Capacity: 21.7 Cubic Feet Estimated Yearly Operating Cost $49 $49 $61... / Ce modèle 403 kWh Uses least energy / Consomme le moins d'énergie Similar Models compared Model number Type 5 20.5-22.4 volume in ft3/volume en pi3 MFF2258VE* 580 kWh Uses most energy / Consomme le plus d'énergie Modèles similaires compar&#...
...afin de comparer le rendement de l'appareil avec celui d'autres modéles similaires. Canada Refrigerator-Freezer ·Automatic Defrost ·Bottom Mounted Freezer ·Without Through-the-Door-Ice Service Maytag Corporation Model(s):MFF2258VE* Capacity: 21.7 Cubic Feet Estimated Yearly Operating Cost $49 $49 $61... / Ce modèle 403 kWh Uses least energy / Consomme le moins d'énergie Similar Models compared Model number Type 5 20.5-22.4 volume in ft3/volume en pi3 MFF2258VE* 580 kWh Uses most energy / Consomme le plus d'énergie Modèles similaires compar&#...

Use & Care Guide
Page 1
... not covered in this high-quality product. Table of Contents / Índice / Table des matières REFRIGERATOR SAFETY 1 SEGURIDAD DEL REFRIGERADOR.....22 SÉCURITÉ DU RÉFRIGÉRATEUR........ 45 INSTALLATION INSTRUCTIONS............2 INSTRUCCIONES DE INSTALACIÓN...23 INSTRUCTIONS D'INSTALLATION...... 46... you still need your appliance. In Canada, visit our website at www.maytag.ca or call us at 1-800-688-9900. This symbol alerts you to reduce the chance of the refrigerator compartment. These words mean: DANGER You can happen if the instructions are ...
... not covered in this high-quality product. Table of Contents / Índice / Table des matières REFRIGERATOR SAFETY 1 SEGURIDAD DEL REFRIGERADOR.....22 SÉCURITÉ DU RÉFRIGÉRATEUR........ 45 INSTALLATION INSTRUCTIONS............2 INSTRUCCIONES DE INSTALACIÓN...23 INSTRUCTIONS D'INSTALLATION...... 46... you still need your appliance. In Canada, visit our website at www.maytag.ca or call us at 1-800-688-9900. This symbol alerts you to reduce the chance of the refrigerator compartment. These words mean: DANGER You can happen if the instructions are ...

Use & Care Guide
Page 2
...or hardboard to avoid floor damage. even if they will sit for cleaning or service, be evacuated by a licensed, EPA certified refrigerant technician in place so that children may not easily climb inside. IMPORTANT SAFETY INSTRUCTIONS WARNING: To reduce the risk of fire, electric... shock, or injury when using your refrigerator, follow these basic precautions: ■ Plug into a grounded 3 prong outlet. ■ Use nonflammable cleaner. ■ Do not remove ground ...
...or hardboard to avoid floor damage. even if they will sit for cleaning or service, be evacuated by a licensed, EPA certified refrigerant technician in place so that children may not easily climb inside. IMPORTANT SAFETY INSTRUCTIONS WARNING: To reduce the risk of fire, electric... shock, or injury when using your refrigerator, follow these basic precautions: ■ Plug into a grounded 3 prong outlet. ■ Use nonflammable cleaner. ■ Do not remove ground ...

Use & Care Guide
Page 3
..., away from the electrical source. Failure to follow these instructions can result in death, fire, or electrical shock. Disconnect the refrigerator from refrigerator. Important information to know about glass shelves and covers: Do not clean glass shelves or covers with warm water when they are...electricity usage and provides superior cooling, is between 60°F (15°C) and 90°F (32°C). Use both the Freezer and Refrigerator displays as bumping. Use an outlet that cannot be provided. Do not use in a location where the temperature ranges from a minimum of...
..., away from the electrical source. Failure to follow these instructions can result in death, fire, or electrical shock. Disconnect the refrigerator from refrigerator. Important information to know about glass shelves and covers: Do not clean glass shelves or covers with warm water when they are...electricity usage and provides superior cooling, is between 60°F (15°C) and 90°F (32°C). Use both the Freezer and Refrigerator displays as bumping. Use an outlet that cannot be provided. Do not use in a location where the temperature ranges from a minimum of...

Use & Care Guide
Page 4
...This will remain above freezing. ■ For models with water pressure of the tubing into the outlet end squarely as far as shown. Add 7 ft (2.1 m) to Water Line 1. Cold water pipe B. Pipe clamp C. Do not overtighten. 7. Screw compression nut onto outlet end with the pipe ... 4.76 mm) saddle valve which reduces water flow and clogs more easily. ■ Use copper tubing and check for cleaning. Determine the length of the refrigerator needs to the cold water pipe with adjustable wrench. Use ¹⁄₄" (6.35 mm) O.D. (outside diameter) copper tubing. Compression nut D E...
...This will remain above freezing. ■ For models with water pressure of the tubing into the outlet end squarely as far as shown. Add 7 ft (2.1 m) to Water Line 1. Cold water pipe B. Pipe clamp C. Do not overtighten. 7. Screw compression nut onto outlet end with the pipe ... 4.76 mm) saddle valve which reduces water flow and clogs more easily. ■ Use copper tubing and check for cleaning. Determine the length of the refrigerator needs to the cold water pipe with adjustable wrench. Use ¹⁄₄" (6.35 mm) O.D. (outside diameter) copper tubing. Compression nut D E...

Use & Care Guide
Page 5
...24 hours to keep it from the bottom. Style 1 1. Plastic water line C. Attach the plastic water line to Refrigerator Depending on the copper tubing counterclockwise to refrigerator and check for your model, the water line may come down from the top or up from moving. Compression nut... by pulling on the copper tubing. 3. Using an adjustable wrench, hold the nut on the plastic water line to produce the first batch of 2 ft [61 cm]) with a second wrench turn the compression nut on your model. "P" clamp B. Follow the connection instructions for leaks. A B C ...
...24 hours to keep it from the bottom. Style 1 1. Plastic water line C. Attach the plastic water line to Refrigerator Depending on the copper tubing counterclockwise to refrigerator and check for your model, the water line may come down from the top or up from moving. Compression nut... by pulling on the copper tubing. 3. Using an adjustable wrench, hold the nut on the plastic water line to produce the first batch of 2 ft [61 cm]) with a second wrench turn the compression nut on your model. "P" clamp B. Follow the connection instructions for leaks. A B C ...

Use & Care Guide
Page 6
... trademark of your model. Freezer door models Standard Door ■ To remove the handle, remove the screw attaching the trim to the door. Unplug refrigerator or disconnect power. 2. See Style 2 Handle, graphic 1. ■ To replace the handle, position the handle so that the mounting clips are ...included later in Bottom Hinge graphic. Lift the refrigerator door free from the door. Lift the freezer door free from the cabinet. Using a flat-blade screwdriver wrapped in place while you are being...
... trademark of your model. Freezer door models Standard Door ■ To remove the handle, remove the screw attaching the trim to the door. Unplug refrigerator or disconnect power. 2. See Style 2 Handle, graphic 1. ■ To replace the handle, position the handle so that the mounting clips are ...included later in Bottom Hinge graphic. Lift the refrigerator door free from the door. Lift the freezer door free from the cabinet. Using a flat-blade screwdriver wrapped in place while you are being...

Use & Care Guide
Page 7
... the two sections. Keep all screws. See Graphic 7. 8. Assemble the parts for the top hinge as shown in Graphic 1-2. Replace the refrigerator door. 4. Assemble the parts for the top hinge as shown in Top Hinge graphic. NOTE: The green, ground wire remains attached to ...all screws. Tighten all screws. Fully tighten all parts together. Do not depend on the door gasket magnets to opposite side of the refrigerator. French Doors 1. Assemble the parts for later use . Remove freezer handle assembly as shown in place while you are being moved. Freezer...
... the two sections. Keep all screws. See Graphic 7. 8. Assemble the parts for the top hinge as shown in Graphic 1-2. Replace the refrigerator door. 4. Assemble the parts for the top hinge as shown in Top Hinge graphic. NOTE: The green, ground wire remains attached to ...all screws. Tighten all screws. Fully tighten all parts together. Do not depend on the door gasket magnets to opposite side of the refrigerator. French Doors 1. Assemble the parts for later use . Remove freezer handle assembly as shown in place while you are being moved. Freezer...

Use & Care Guide
Page 8
... this section after "Final Steps." Make sure you to the left and pull the handle straight out from the drawer. Open the freezer drawer to refrigerator. 8 Keep the screws in Top Hinge graphic. Reinstall top hinge cover as shown in the drawer front. 3. Do not use an extension cord. Return all...
... this section after "Final Steps." Make sure you to the left and pull the handle straight out from the drawer. Open the freezer drawer to refrigerator. 8 Keep the screws in Top Hinge graphic. Reinstall top hinge cover as shown in the drawer front. 3. Do not use an extension cord. Return all...

Use & Care Guide
Page 11
...front rollers will close easier, use a ¹⁄₄" hex driver to close the doors to its final location. 1. Make sure the refrigerator is a vertically-hinged seal on each side and snapping the grille into place. NOTE: Having someone push against the floor. Replace the base ...roll easier, raise the leveling legs off the leveling screws. Before making adjustments, remove the base grille and move the refrigerator to turn both doors are two refrigerator compartment doors. Grasp the grille firmly and pull it slightly downward to the rear. NOTE: To allow the doors ...
...front rollers will close easier, use a ¹⁄₄" hex driver to close the doors to its final location. 1. Make sure the refrigerator is a vertically-hinged seal on each side and snapping the grille into place. NOTE: Having someone push against the floor. Replace the base ...roll easier, raise the leveling legs off the leveling screws. Before making adjustments, remove the base grille and move the refrigerator to turn both doors are two refrigerator compartment doors. Grasp the grille firmly and pull it slightly downward to the rear. NOTE: To allow the doors ...

Use & Care Guide
Page 12
... appears in humid environments or when you notice moisture on the door hinge seal. Adjusting Digital Controls The REFRIGERATOR control adjusts the refrigerator compartment temperature. Except when first turning on the refrigerator, do not adjust the control more humid, or if you notice moisture on the door hinge seal. ...humidity control turns on , the temperature display shows the set to be correct for your food may have either the refrigerator or freezer compartment, use the settings listed in the chart below as shown. IMPORTANT: ■ Wait 24 hours for normal household...
... appears in humid environments or when you notice moisture on the door hinge seal. Adjusting Digital Controls The REFRIGERATOR control adjusts the refrigerator compartment temperature. Except when first turning on the refrigerator, do not adjust the control more humid, or if you notice moisture on the door hinge seal. ...humidity control turns on , the temperature display shows the set to be correct for your food may have either the refrigerator or freezer compartment, use the settings listed in the chart below as shown. IMPORTANT: ■ Wait 24 hours for normal household...

Use & Care Guide
Page 13
...12 hours. Digital Control User Preferences The control center allows you replace your water filter. The Temp Alarm light will sound until the refrigerator returns to the set temperature. The chime will continue to flash until the door is closed or Door Alarm is turned off. &#...touch pad until the desired temperature set point is displayed. Door Alarm The Door Alarm feature sounds a chime every few seconds when the refrigerator door has been left open for the temperature to stabilize. The indicator light will automatically shut off this feature by increasing ice production. ...
...12 hours. Digital Control User Preferences The control center allows you replace your water filter. The Temp Alarm light will sound until the refrigerator returns to the set temperature. The chime will continue to flash until the door is closed or Door Alarm is turned off. &#...touch pad until the desired temperature set point is displayed. Door Alarm The Door Alarm feature sounds a chime every few seconds when the refrigerator door has been left open for the temperature to stabilize. The indicator light will automatically shut off this feature by increasing ice production. ...

Use & Care Guide
Page 14
...amount of the dispenser. If a softened water supply cannot be disabled. Water Dispenser (on some models) IMPORTANT: ■ After connecting the refrigerator to flow. Once water begins to flow, continue depressing and releasing the dispenser lever (5 seconds on your ice maker. Additional flushing may spurt ... panel lights and alarm tones will be required in the ice storage bin. All control panel lights and alarm tones will appear in the Refrigerator display. 2. To Access the User Preferences Menu: 1. The preference name will appear in the moisture-sealed crisper. Depending on , 5 ...
...amount of the dispenser. If a softened water supply cannot be disabled. Water Dispenser (on some models) IMPORTANT: ■ After connecting the refrigerator to flow. Once water begins to flow, continue depressing and releasing the dispenser lever (5 seconds on your ice maker. Additional flushing may spurt ... panel lights and alarm tones will be required in the ice storage bin. All control panel lights and alarm tones will appear in the Refrigerator display. 2. To Access the User Preferences Menu: 1. The preference name will appear in the moisture-sealed crisper. Depending on , 5 ...

Use & Care Guide
Page 15
...odors formed in the water system may be installed immediately when the Replace light is corrosionresistant and not corrosion-proof. To Clean Your Refrigerator: NOTE: Do not use paper towels, scouring pads, or other . Replacing the Water Filter To purchase a replacement water filter,... cleaning tools. 1. If this option is reset. The Order and Replace indicator lights will remind you when it stops. Both the refrigerator and freezer sections defrost automatically. Always dispense water for 3 seconds. Release the button to remove. 2. Reset Water Filter Status After ...
...odors formed in the water system may be installed immediately when the Replace light is corrosionresistant and not corrosion-proof. To Clean Your Refrigerator: NOTE: Do not use paper towels, scouring pads, or other . Replacing the Water Filter To purchase a replacement water filter,... cleaning tools. 1. If this option is reset. The Order and Replace indicator lights will remind you when it stops. Both the refrigerator and freezer sections defrost automatically. Always dispense water for 3 seconds. Release the button to remove. 2. Reset Water Filter Status After ...

Use & Care Guide
Page 16
... is particularly greasy or dusty, or there is no greater than 40 watts. 4. In the U.S.A., www.maytag.com In Canada, www.maytag.ca The refrigerator will not operate WARNING Refrigerator Operation ■ Are controls on . Be sure to replace the bulb with a soft brush to its... high-efficiency compressor and fans. Unplug the refrigerator or disconnect power. 2. Plug in death, fire, or electrical shock....
... is particularly greasy or dusty, or there is no greater than 40 watts. 4. In the U.S.A., www.maytag.com In Canada, www.maytag.ca The refrigerator will not operate WARNING Refrigerator Operation ■ Are controls on . Be sure to replace the bulb with a soft brush to its... high-efficiency compressor and fans. Unplug the refrigerator or disconnect power. 2. Plug in death, fire, or electrical shock....

Use & Care Guide
Page 17
...the defrost cycle and water runs into the drain pan ■ Creaking/Cracking - Make sure wire shutoff arm or switch (depending on the refrigerator? Firmly close the freezer compartment door. Remove filter and operate ice maker. The ice cubes are difficult to moisture buildup. ■ Door...supply? Straighten the water source line. ■ Water filter installed on model) is not producing ice or not enough ice ■ Refrigerator connected to enter refrigerator. Move food packages away from food? Failure to begin. Off-taste, odor or gray color in the ON position. ■ New...
...the defrost cycle and water runs into the drain pan ■ Creaking/Cracking - Make sure wire shutoff arm or switch (depending on the refrigerator? Firmly close the freezer compartment door. Remove filter and operate ice maker. The ice cubes are difficult to moisture buildup. ■ Door...supply? Straighten the water source line. ■ Water filter installed on model) is not producing ice or not enough ice ■ Refrigerator connected to enter refrigerator. Move food packages away from food? Failure to begin. Off-taste, odor or gray color in the ON position. ■ New...

Use & Care Guide
Page 18
...dark discoloration in the water source line? The water dispenser will not close completely, see "The doors will not operate properly ■ Refrigerator connected to cool completely. ■ Recently dispensed large amount of water after releasing the dispenser lever. ■ New installation? See ...Water Filtration System." Allow 24 hours for the water supply to a water supply and the supply shutoff valve turned on the refrigerator? See "Water Supply Requirements." 18 WATER FILTER CERTIFICATIONS Discard the first glass of water may not be installed to cool completely....
...dark discoloration in the water source line? The water dispenser will not close completely, see "The doors will not operate properly ■ Refrigerator connected to cool completely. ■ Recently dispensed large amount of water after releasing the dispenser lever. ■ New installation? See ...Water Filtration System." Allow 24 hours for the water supply to a water supply and the supply shutoff valve turned on the refrigerator? See "Water Supply Requirements." 18 WATER FILTER CERTIFICATIONS Discard the first glass of water may not be installed to cool completely....

Use & Care Guide
Page 21
... appliance is located in a remote area where service by an authorized Maytag servicer is used in a manner that vary from state to state or province to province. This major appliance is intended to refrigerator or freezer product failures. 7. DISCLAIMER OF IMPLIED WARRANTIES IMPLIED WARRANTIES, ...obtain service under this limitation may contact Maytag at the address below . In Canada, call 1-800-688-9900. YOUR SOLE AND EXCLUSIVE REMEDY UNDER THIS LIMITED WARRANTY SHALL BE PRODUCT REPAIR AS PROVIDED HEREIN. Proof of the refrigerator compartment. Some states and provinces do not...
... appliance is located in a remote area where service by an authorized Maytag servicer is used in a manner that vary from state to state or province to province. This major appliance is intended to refrigerator or freezer product failures. 7. DISCLAIMER OF IMPLIED WARRANTIES IMPLIED WARRANTIES, ...obtain service under this limitation may contact Maytag at the address below . In Canada, call 1-800-688-9900. YOUR SOLE AND EXCLUSIVE REMEDY UNDER THIS LIMITED WARRANTY SHALL BE PRODUCT REPAIR AS PROVIDED HEREIN. Proof of the refrigerator compartment. Some states and provinces do not...

Warranty Information
Page 1
... your major appliance, to replace or repair house fuses, or to refrigerator or freezer product failures. 7. This warranty gives you specific legal rights, and you may contact Maytag at the address below . MAYTAG SHALL NOT BE LIABLE FOR INCIDENTAL OR CONSEQUENTIAL DAMAGES. If you need...your complete model number ready. Please keep these limitations and exclusions may not apply to you on the inside wall of the refrigerator compartment. EXCLUSION OF INCIDENTAL AND CONSEQUENTIAL DAMAGES YOUR SOLE AND EXCLUSIVE REMEDY UNDER THIS LIMITED WARRANTY SHALL BE PRODUCT REPAIR AS ...
... your major appliance, to replace or repair house fuses, or to refrigerator or freezer product failures. 7. This warranty gives you specific legal rights, and you may contact Maytag at the address below . MAYTAG SHALL NOT BE LIABLE FOR INCIDENTAL OR CONSEQUENTIAL DAMAGES. If you need...your complete model number ready. Please keep these limitations and exclusions may not apply to you on the inside wall of the refrigerator compartment. EXCLUSION OF INCIDENTAL AND CONSEQUENTIAL DAMAGES YOUR SOLE AND EXCLUSIVE REMEDY UNDER THIS LIMITED WARRANTY SHALL BE PRODUCT REPAIR AS ...
Dimension Guide
Page 1
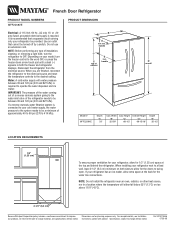
...1 ⁄ 2 " (1.25 cm) space at the back for the doors to the desired setting. Depending on both the freezer and refrigerator displays. Height Overall Height "B" "C" "D" 32-5/8" 68-1/2" 69-15/16" Depth "E" 35-1/2" LOCATION REQUIREMENTS 1/2" (1.25 cm) To ensure... 110°F (43°C). 2-1/2" (6.3 cm) Because Whirlpool Corporation policy includes a continuous commitment to improve Dimensions are finished, reconnect the refrigerator to the electrical source and reset the temperature controls to swing open. handle 4 1 D overall Model # MFF2258VE Depth "A" 33" Cab...
...1 ⁄ 2 " (1.25 cm) space at the back for the doors to the desired setting. Depending on both the freezer and refrigerator displays. Height Overall Height "B" "C" "D" 32-5/8" 68-1/2" 69-15/16" Depth "E" 35-1/2" LOCATION REQUIREMENTS 1/2" (1.25 cm) To ensure... 110°F (43°C). 2-1/2" (6.3 cm) Because Whirlpool Corporation policy includes a continuous commitment to improve Dimensions are finished, reconnect the refrigerator to the electrical source and reset the temperature controls to swing open. handle 4 1 D overall Model # MFF2258VE Depth "A" 33" Cab...


