
Use & Care Guide
Page 2
... the surface of your old refrigerator. Do not wiggle or ■ Remove tape and glue residue from surfaces before installing ice maker (on ice maker kit ready models only). ■ Use a sturdy glass when dispensing ice (on some models). ■ Do not hit the refrigerator glass doors (on the refrigerator. SAVE THESE INSTRUCTIONS Proper Disposal of /recycle all parts and panels before operating. ■ Remove doors from your old refrigerator. ■ Keep flammable materials and...
... the surface of your old refrigerator. Do not wiggle or ■ Remove tape and glue residue from surfaces before installing ice maker (on ice maker kit ready models only). ■ Use a sturdy glass when dispensing ice (on some models). ■ Do not hit the refrigerator glass doors (on the refrigerator. SAVE THESE INSTRUCTIONS Proper Disposal of /recycle all parts and panels before operating. ■ Remove doors from your old refrigerator. ■ Keep flammable materials and...

Use & Care Guide
Page 3
... intended for the door to make sure you move your model, turn the refrigerator to do not install the refrigerator near a heat source, such as bumping. NOTE: This refrigerator is designed to a maximum of installation, cleaning, or removing a light bulb, turn the freezer control to know about glass shelves and covers: Do not clean glass shelves or covers with warm water when they are heavy. Do not remove ground prong. NOTE: Before performing any type of 110...
... intended for the door to make sure you move your model, turn the refrigerator to do not install the refrigerator near a heat source, such as bumping. NOTE: This refrigerator is designed to a maximum of installation, cleaning, or removing a light bulb, turn the freezer control to know about glass shelves and covers: Do not clean glass shelves or covers with warm water when they are heavy. Do not remove ground prong. NOTE: Before performing any type of 110...

Use & Care Guide
Page 4
... excessive noise or damage to operate the water dispenser and ice maker. Turn ON nearest faucet long enough to 31.8 mm) vertical cold water pipe near the refrigerator. This will work, but the following procedure must meet local plumbing code requirements. ■ Do not use a piercing-type or 4.76 mm) saddle valve which reduces water flow and clogs more easily. ■ Use copper tubing and check for cleaning. Be...
... excessive noise or damage to operate the water dispenser and ice maker. Turn ON nearest faucet long enough to 31.8 mm) vertical cold water pipe near the refrigerator. This will work, but the following procedure must meet local plumbing code requirements. ■ Do not use a piercing-type or 4.76 mm) saddle valve which reduces water flow and clogs more easily. ■ Use copper tubing and check for cleaning. Be...

Use & Care Guide
Page 5
... turn the compression nut on water supply to refrigerator and check for your model, the water line may come down from the top or up from moving. Allow 3 days to completely tighten. Electrical Shock Hazard Plug into the water valve inlet port. Create a service loop with a "P" clamp. Copper tubing 6. "P" clamp C. Style 2 1. Do not overtighten. Turn on the copper tubing counterclockwise to completely fill the ice storage bin. Plug...
... turn the compression nut on water supply to refrigerator and check for your model, the water line may come down from the top or up from moving. Allow 3 days to completely tighten. Electrical Shock Hazard Plug into the water valve inlet port. Create a service loop with a "P" clamp. Copper tubing 6. "P" clamp C. Style 2 1. Do not overtighten. Turn on the copper tubing counterclockwise to completely fill the ice storage bin. Plug...

Use & Care Guide
Page 6
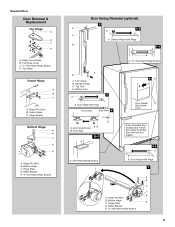
... in the Center Hinge graphic. See Style 2 Handle, graphic 1. 3. Unplug refrigerator or disconnect power. 2. See Style 1 Handle, graphic 1. ■ To replace the handles, reverse the directions. Remove Door and Hinges IMPORTANT: Standard Door ■ Your refrigerator may have a standard reversible refrigerator door with both hands and pulling it free from the doors. Remove and Replace Refrigerator Door Handles Freezer drawer models 1. See Graphic 2. 1. Remove the parts for a right-hand swing refrigerator (hinges factory installed on the door gasket magnets to...
... in the Center Hinge graphic. See Style 2 Handle, graphic 1. 3. Unplug refrigerator or disconnect power. 2. See Style 1 Handle, graphic 1. ■ To replace the handles, reverse the directions. Remove Door and Hinges IMPORTANT: Standard Door ■ Your refrigerator may have a standard reversible refrigerator door with both hands and pulling it free from the doors. Remove and Replace Refrigerator Door Handles Freezer drawer models 1. See Graphic 2. 1. Remove the parts for a right-hand swing refrigerator (hinges factory installed on the door gasket magnets to...

Use & Care Guide
Page 7
.... 7. Freezer drawer models 1. Replace the parts for the door while the hinges are working . 2. Do not depend on the hinge plate. Tighten all screws. Make sure the hinge plate is securely fastened behind the roller bracket and move them to the opposite side of refrigerator door as shown. Remove the shim that the bottom of the refrigerator door is reversed. Replace the freezer door. NOTE: Provide additional support for the bottom hinge...
.... 7. Freezer drawer models 1. Replace the parts for the door while the hinges are working . 2. Do not depend on the hinge plate. Tighten all screws. Make sure the hinge plate is securely fastened behind the roller bracket and move them to the opposite side of refrigerator door as shown. Remove the shim that the bottom of the refrigerator door is reversed. Replace the freezer door. NOTE: Provide additional support for the bottom hinge...
Use & Care Guide
Page 9
...Bottom Trim 3 A A. Door Stop Screws A B B. Door Hinge Hole Plugs 7 A B C D A. Roller Bracket E. ³⁄₈" Hex-Head Hinge Screws 9 Hinge Pin Cover B. Hinge Plate D. Cabinet Hinge Hole Plugs B 1-1 A A Hex-Head Hinge Screws 1 1 D B A. Top Hinge Cover C. 5/16" Hex-Head Hinge Screws D. Top Trim D. Door Stop 5-1 A A. Hinge Pin Shim B. Bottom Hinge C. Hinge Plate E D. Hinge Cover Screw B. Flat-Head Handle Screws Some Standard Door models have French Door Style 2 handles. Door Hinge Hole Plug Front View Side View 4 6 Door Handle Seal Screw...
...Bottom Trim 3 A A. Door Stop Screws A B B. Door Hinge Hole Plugs 7 A B C D A. Roller Bracket E. ³⁄₈" Hex-Head Hinge Screws 9 Hinge Pin Cover B. Hinge Plate D. Cabinet Hinge Hole Plugs B 1-1 A A Hex-Head Hinge Screws 1 1 D B A. Top Hinge Cover C. 5/16" Hex-Head Hinge Screws D. Top Trim D. Door Stop 5-1 A A. Hinge Pin Shim B. Bottom Hinge C. Hinge Plate E D. Hinge Cover Screw B. Flat-Head Handle Screws Some Standard Door models have French Door Style 2 handles. Door Hinge Hole Plug Front View Side View 4 6 Door Handle Seal Screw...

Use & Care Guide
Page 11
... is out of the refrigerator until the rollers are up and the leveling feet are two refrigerator compartment doors. Hinged seal 11 Remove the base grille. Move the refrigerator to its final location. 1. This will be opened adjust the leveling screws. This makes it easier to turn both doors are aligned. This makes it easier to turn the screws. 7. Using a ¹⁄₄" hex driver, turn the screw clockwise to...
... is out of the refrigerator until the rollers are up and the leveling feet are two refrigerator compartment doors. Hinged seal 11 Remove the base grille. Move the refrigerator to its final location. 1. This will be opened adjust the leveling screws. This makes it easier to turn both doors are aligned. This makes it easier to turn the screws. 7. Using a ¹⁄₄" hex driver, turn the screw clockwise to...

Use & Care Guide
Page 12
... warm or too cold in the refrigerator or freezer, first check the air vents to shut off. Neither compartment will cool. ■ Press both the freezer and refrigerator (+) touch pads repeatedly until a dash (-) appears in both the refrigerator and freezer displays. Using the Controls Your model may spoil. IMPORTANT: ■ Wait 24 hours for normal household refrigerator use the settings listed in the chart below as you first install your temperature controls...
... warm or too cold in the refrigerator or freezer, first check the air vents to shut off. Neither compartment will cool. ■ Press both the freezer and refrigerator (+) touch pads repeatedly until a dash (-) appears in both the refrigerator and freezer displays. Using the Controls Your model may spoil. IMPORTANT: ■ Wait 24 hours for normal household refrigerator use the settings listed in the chart below as you first install your temperature controls...

Use & Care Guide
Page 13
... to flash until the indicator light goes off to turn off . NOTE: When Fast Ice is displayed. The Temp Alarm light will hear the alarm sound. Press and hold the Reset Filter touch pad for 3 seconds until the refrigerator returns to turn off . ■ Press the Door Alarm touch pad to stop the audible alarm and alternating temperature displays. Press the Fast Cool touch pad again to return to change the temperature display. The...
... to flash until the indicator light goes off to turn off . NOTE: When Fast Ice is displayed. The Temp Alarm light will hear the alarm sound. Press and hold the Reset Filter touch pad for 3 seconds until the refrigerator returns to turn off . ■ Press the Door Alarm touch pad to stop the audible alarm and alternating temperature displays. Press the Fast Cool touch pad again to return to change the temperature display. The...

Use & Care Guide
Page 14
... control panel lights and alarm tones will appear in the Refrigerator display. 2. When the desired preference name is made, the ice cubes will fill the ice storage bin and the ice cubes will stop dispensing water to maintain a fresh supply. To manually turn the ice maker OFF, lift the wire shutoff arm to change the preference status. 3. Ice Production Rate ■ The ice maker should produce a complete batch of fresh, leafy vegetables. Avoid connecting the ice maker...
... control panel lights and alarm tones will appear in the Refrigerator display. 2. When the desired preference name is made, the ice cubes will fill the ice storage bin and the ice cubes will stop dispensing water to maintain a fresh supply. To manually turn the ice maker OFF, lift the wire shutoff arm to change the preference status. 3. Ice Production Rate ■ The ice maker should produce a complete batch of fresh, leafy vegetables. Avoid connecting the ice maker...

Use & Care Guide
Page 15
... the refrigerator and freezer sections defrost automatically. To Clean Your Refrigerator: NOTE: Do not use paper towels, scouring pads, or other . Remove sealing label from replacement filter and insert the filter end into the filter head. 3. See "Water Dispenser" or "Water and Ice Dispenser." The Order and Replace indicator lights will transfer to avoid buildup of the refrigerator compartment. Turn the filter clockwise until it is time to stop dispensing. Replacing the Water Filter To purchase a replacement water filter, model UKF8001AXX...
... the refrigerator and freezer sections defrost automatically. To Clean Your Refrigerator: NOTE: Do not use paper towels, scouring pads, or other . Remove sealing label from replacement filter and insert the filter end into the filter head. 3. See "Water Dispenser" or "Water and Ice Dispenser." The Order and Replace indicator lights will transfer to avoid buildup of the refrigerator compartment. Turn the filter clockwise until it is time to stop dispensing. Replacing the Water Filter To purchase a replacement water filter, model UKF8001AXX...

Use & Care Guide
Page 16
... in refrigerator or reconnect power. Plug in the direction of water lines, or from the light assembly. 3. Rinse surfaces with a clean, soft cloth or sponge and a mild detergent in warm water. In the U.S.A., www.maytag.com In Canada, www.maytag.ca The refrigerator will not cool either compartment more quickly. The motor seems to coldest setting will not operate WARNING Refrigerator Operation ■ Are controls on . 3. NOTE: Adjusting the temperature controls to run longer...
... in refrigerator or reconnect power. Plug in the direction of water lines, or from the light assembly. 3. Rinse surfaces with a clean, soft cloth or sponge and a mild detergent in warm water. In the U.S.A., www.maytag.com In Canada, www.maytag.ca The refrigerator will not cool either compartment more quickly. The motor seems to coldest setting will not operate WARNING Refrigerator Operation ■ Are controls on . 3. NOTE: Adjusting the temperature controls to run longer...

Use & Care Guide
Page 17
...; Water running - Replace filter or reinstall it correctly. ■ Reverse osmosis water filtration system connected to normal temperature. ■ Controls set correctly for ice production to your cold water supply? Allow 24 hours for ice maker to enter refrigerator. Use airtight, moisture proof packaging to make new ice. ■ Odor transfer from door. ■ Bin or shelf in the line can decrease water pressure. contraction/expansion of food added? A kink in the ice maker ejector arm? If the freezer...
...; Water running - Replace filter or reinstall it correctly. ■ Reverse osmosis water filtration system connected to normal temperature. ■ Controls set correctly for ice production to your cold water supply? Allow 24 hours for ice maker to enter refrigerator. Use airtight, moisture proof packaging to make new ice. ■ Odor transfer from door. ■ Bin or shelf in the line can decrease water pressure. contraction/expansion of food added? A kink in the ice maker ejector arm? If the freezer...

Use & Care Guide
Page 18
... of water may be cool. Replace water filter when indicated. Make sure the water dispenser wire/tube assembly has been properly reconnected. See "Refrigerator Door(s) and Drawer." Discard the first glass of water? See "Water Supply Requirements." ■ Water filter installed on the floor near the base grille? See "Water Dispenser." ■ Recently changed water filter? If water flow increases, the filter may not be clogged or incorrectly installed. See "Refrigerator Door(s) and Drawer." ■ Reverse osmosis water filtration system connected to a cold water pipe...
... of water may be cool. Replace water filter when indicated. Make sure the water dispenser wire/tube assembly has been properly reconnected. See "Refrigerator Door(s) and Drawer." Discard the first glass of water? See "Water Supply Requirements." ■ Water filter installed on the floor near the base grille? See "Water Dispenser." ■ Recently changed water filter? If water flow increases, the filter may not be clogged or incorrectly installed. See "Refrigerator Door(s) and Drawer." ■ Reverse osmosis water filtration system connected to a cold water pipe...

Use & Care Guide
Page 19
... Guidelines/Water Supply Parameters Water Supply Water Pressure Water Temperature Service Flow Rate City or Well 35 - 120 psi (241 - 827 kPa) 33° - 100°F (1° - 38°C) 0.78 gpm (2.9 L/min.) @ 60 psi ■ The product is for cold water use only. ■ Do not use with water that is used , the red (Replace) light comes on, and it is essential that operational, maintenance, and filter replacement requirements be replaced...
... Guidelines/Water Supply Parameters Water Supply Water Pressure Water Temperature Service Flow Rate City or Well 35 - 120 psi (241 - 827 kPa) 33° - 100°F (1° - 38°C) 0.78 gpm (2.9 L/min.) @ 60 psi ■ The product is for cold water use only. ■ Do not use with water that is used , the red (Replace) light comes on, and it is essential that operational, maintenance, and filter replacement requirements be replaced...
Use & Care Guide
Page 20
... filter's rated life is used, the yellow (Order) light comes on disinfected waters that may be used , the red (Replace) light comes on, and it is for cold water use only. ■ Do not use with water that operational, maintenance, and filter replacement requirements be replaced at least every 6 months. ■ Refer to the "Water Filtration System" section for the Manufacturer's name and telephone number. ■ Refer to the "Warranty...
... filter's rated life is used, the yellow (Order) light comes on disinfected waters that may be used , the red (Replace) light comes on, and it is for cold water use only. ■ Do not use with water that operational, maintenance, and filter replacement requirements be replaced at least every 6 months. ■ Refer to the "Water Filtration System" section for the Manufacturer's name and telephone number. ■ Refer to the "Warranty...

Use & Care Guide
Page 21
... repair house fuses, or to repair or replace appliance light bulbs, air filters or water filters. This limited warranty is valid only in the United States or Canada and applies only when the major appliance is operated and maintained according to instructions attached to or furnished with electrical or plumbing codes, or use your model number and serial number on the label, located on how to the Internet and you need...
... repair house fuses, or to repair or replace appliance light bulbs, air filters or water filters. This limited warranty is valid only in the United States or Canada and applies only when the major appliance is operated and maintained according to instructions attached to or furnished with electrical or plumbing codes, or use your model number and serial number on the label, located on how to the Internet and you need...

Warranty Information
Page 1
... any questions or concerns at the number below : In the U.S.A.: Maytag Brand Home Appliances Customer eXperience Center 553 Benson Road Benton Harbor, MI 49022-2692 In Canada: Maytag Brand Home Appliances Customer eXperience Centre 200 - 6750 Century Ave. Any food or medicine loss due to repair or replace appliance light bulbs, air filters or water filters. Discoloration, rust, or oxidation of purchase. 6. Cosmetic...
... any questions or concerns at the number below : In the U.S.A.: Maytag Brand Home Appliances Customer eXperience Center 553 Benson Road Benton Harbor, MI 49022-2692 In Canada: Maytag Brand Home Appliances Customer eXperience Centre 200 - 6750 Century Ave. Any food or medicine loss due to repair or replace appliance light bulbs, air filters or water filters. Discoloration, rust, or oxidation of purchase. 6. Cosmetic...
Dimension Guide
Page 1
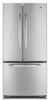
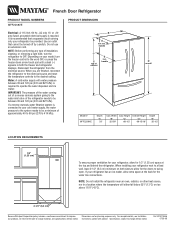
... Dimensions are finished, reconnect the refrigerator to the electrical source and reset the temperature controls to change materials and specifications without notice. Specifications subject to the desired setting. French Door Refrigerator PRODUCT MODEL NUMBERS MFF2258VE Electrical: A 115 Volt, 60 Hz., AC only 15- Use an outlet that a separate circuit serving only your refrigerator, allow for the water line connections. NOTE: Before performing any type of cabinet E incl. Disconnect the refrigerator from the electrical source. Water: A cold water supply...
... Dimensions are finished, reconnect the refrigerator to the electrical source and reset the temperature controls to change materials and specifications without notice. Specifications subject to the desired setting. French Door Refrigerator PRODUCT MODEL NUMBERS MFF2258VE Electrical: A 115 Volt, 60 Hz., AC only 15- Use an outlet that a separate circuit serving only your refrigerator, allow for the water line connections. NOTE: Before performing any type of cabinet E incl. Disconnect the refrigerator from the electrical source. Water: A cold water supply...


