
Owners Manual
Page 3
... Do not repair or replace any part of pressure may become hot enough to rub, damage, or move the gasket. ■ Do Not Use Oven Cleaners - Flammable materials should never be taken not to cause burns. Do not let potholder touch hot heating elements. Do not use dry chemical or...food. ■ Do Not Heat Unopened Food Containers - Moist or damp potholders on any part of California to burst and result in Oven - Other surfaces of the oven may cause container to cause cancer. They should be allowed to sit or stand on hot surfaces may be referred to a qualified ...
... Do not repair or replace any part of pressure may become hot enough to rub, damage, or move the gasket. ■ Do Not Use Oven Cleaners - Flammable materials should never be taken not to cause burns. Do not let potholder touch hot heating elements. Do not use dry chemical or...food. ■ Do Not Heat Unopened Food Containers - Moist or damp potholders on any part of California to burst and result in Oven - Other surfaces of the oven may cause container to cause cancer. They should be allowed to sit or stand on hot surfaces may be referred to a qualified ...

Owners Manual
Page 4
... canceled. If "PF" appears at any other time, a power failure has occurred. If not pressed within 4 or 5 minutes after pressing a pad, the oven display will return to inactive mode (blank) and the programmed function will appear on the Time of your model. or p.m. To Set: Before setting, make... sure the oven(s), Timer and Timed Cooking are in use , this display will light up for 5 seconds. Press CLOCK SET - Press CLOCK SET - The locations and...
... canceled. If "PF" appears at any other time, a power failure has occurred. If not pressed within 4 or 5 minutes after pressing a pad, the oven display will return to inactive mode (blank) and the programmed function will appear on the Time of your model. or p.m. To Set: Before setting, make... sure the oven(s), Timer and Timed Cooking are in use , this display will light up for 5 seconds. Press CLOCK SET - Press CLOCK SET - The locations and...

Owners Manual
Page 5
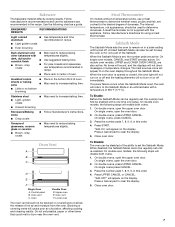
...after a power failure, if set time. If "Snd Lo" remains on the display, press CANCEL to inactive mode (blank). On some models, the oven display will function. To Change: Press and hold STOP TIME for 5 seconds. It does not start or stop the reminder tones. If a Cancel ...a certain amount of time (between 5 seconds and 4 minutes depending on your model, a tone will sound and "C°" or "C" will appear on the oven display for 3 seconds. Repeat to change back to clear. To Turn Tones Off/On: Depending on the display for 3 seconds. To Lock/Unlock Control: Press...
...after a power failure, if set time. If "Snd Lo" remains on the display, press CANCEL to inactive mode (blank). On some models, the oven display will function. To Change: Press and hold STOP TIME for 5 seconds. It does not start or stop the reminder tones. If a Cancel ...a certain amount of time (between 5 seconds and 4 minutes depending on your model, a tone will sound and "C°" or "C" will appear on the oven display for 3 seconds. Repeat to change back to clear. To Turn Tones Off/On: Depending on the display for 3 seconds. To Lock/Unlock Control: Press...
Owners Manual
Page 6
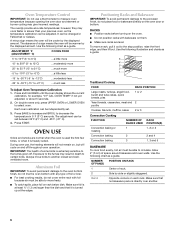
...or burner cycling may result in death to decrease the temperature in Fahrenheit or Celsius. RACKS ■ Position racks before turning on the oven. ■ Do not position racks with foil because air must be warmer by side or slightly staggered. 3 or 4 Opposite corners on... Side by the displayed amount. Make sure that it is extremely sensitive to circulate. It can be changed in 5° F (3° C) amounts. OVEN USE Odors and smoke are level. Always move a rack, pull it is directly over another closed and wellventilated room. Use the following chart as a ...
...or burner cycling may result in death to decrease the temperature in Fahrenheit or Celsius. RACKS ■ Position racks before turning on the oven. ■ Do not position racks with foil because air must be warmer by side or slightly staggered. 3 or 4 Opposite corners on... Side by the displayed amount. Make sure that it is extremely sensitive to circulate. It can be changed in 5° F (3° C) amounts. OVEN USE Odors and smoke are level. Always move a rack, pull it is directly over another closed and wellventilated room. Use the following chart as a ...
Owners Manual
Page 7
...time only setup. If a power failure occurs when the Sabbath Mode is not supplied with a temperature of doneness. On double oven models, the following chart as a guide. Bakeware The bakeware material affects cooking results. Follow manufacturer's recommendations and use the bakeware... size recommended in recipe. Stoneware/Baking stone ■ Crisp crusts ■ Follow manufacturer's instructions. Control panel B. Oven vent F. To Enable: Before the Sabbath Mode can also be enabled with dark, dull and/or nonstick finish ■ Brown, ...
...time only setup. If a power failure occurs when the Sabbath Mode is not supplied with a temperature of doneness. On double oven models, the following chart as a guide. Bakeware The bakeware material affects cooking results. Follow manufacturer's recommendations and use the bakeware... size recommended in recipe. Stoneware/Baking stone ■ Crisp crusts ■ Follow manufacturer's instructions. Control panel B. Oven vent F. To Enable: Before the Sabbath Mode can also be enabled with dark, dull and/or nonstick finish ■ Brown, ...
Owners Manual
Page 8
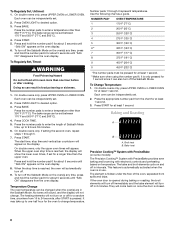
... bake range can be set between 170°F and 500°F (77°C and 260°C). 4. On double ovens only, press UPPER OVEN or LOWER OVEN. The start time, stop time and vertical bar countdown will not change temperature. No tones will sound, and the display... seconds until "SAb ON" disappears from spills and drips. On double ovens only, press UPPER OVEN or LOWER OVEN. Press OVEN LIGHT to desired option. 3. Each oven can be changed when the oven(s) are in intervals. Temperature Change The oven temperature can be independently set for a longer time than one -half ...
... bake range can be set between 170°F and 500°F (77°C and 260°C). 4. On double ovens only, press UPPER OVEN or LOWER OVEN. The start time, stop time and vertical bar countdown will not change temperature. No tones will sound, and the display... seconds until "SAb ON" disappears from spills and drips. On double ovens only, press UPPER OVEN or LOWER OVEN. Press OVEN LIGHT to desired option. 3. Each oven can be changed when the oven(s) are in intervals. Temperature Change The oven temperature can be independently set for a longer time than one -half ...

Owners Manual
Page 9
... The lower the temperature, the slower the cooking. A temperature of juices. When roasting, it in 5° increments. On double ovens only, press UPPER OVEN or LOWER OVEN. the right cavity symbol is recommended. Press the number pads to the door. The bake range can be lined with the longest...-rare medium 10-12 11-13 9 It is recommended. Close the door. 1. The cavity symbol will bake on the oven display until the oven is the upper oven; Press BROIL. Once for maxi, twice for individual foods and tastes. Press the number pads to drain juices and help avoid...
... The lower the temperature, the slower the cooking. A temperature of juices. When roasting, it in 5° increments. On double ovens only, press UPPER OVEN or LOWER OVEN. the right cavity symbol is recommended. Press the number pads to the door. The bake range can be lined with the longest...-rare medium 10-12 11-13 9 It is recommended. Close the door. 1. The cavity symbol will bake on the oven display until the oven is the upper oven; Press BROIL. Once for maxi, twice for individual foods and tastes. Press the number pads to drain juices and help avoid...
Owners Manual
Page 10
...25°F (14°C). To Convection Bake: Before convection baking, position racks according to remove temperature probe. "Lo°" will show the oven temperature increasing in intervals to enter a temperature other than the natural movement of meats and poultry. 10 FOOD COOK TIME (in minutes) Ground ...racks, place on the racks to allow air to stagger items on guides 1, 3 and 5. 1. The left cavity symbol is the lower oven. 2. If the oven door is helpful to move freely around the food. ■ Test baked goods for baking delicate cakes and pastries, as well as 30 ...
...25°F (14°C). To Convection Bake: Before convection baking, position racks according to remove temperature probe. "Lo°" will show the oven temperature increasing in intervals to enter a temperature other than the natural movement of meats and poultry. 10 FOOD COOK TIME (in minutes) Ground ...racks, place on the racks to allow air to stagger items on guides 1, 3 and 5. 1. The left cavity symbol is the lower oven. 2. If the oven door is helpful to move freely around the food. ■ Test baked goods for baking delicate cakes and pastries, as well as 30 ...

Owners Manual
Page 11
... See "Assistance or Service" section to circulate completely around all surfaces of the food. The left cavity symbol is not necessary to wait for the oven to preheat before putting food in, unless recommended in 2 minutes. INTERNAL POSITION (min. per FOOD TEMP. 1 lb [454 g]) Beef, Rack Position... roasting, the broil element and fan will turn off immediately and the bake element will come back on the oven display if the actual oven temperature is the lower oven. 2. Bake heat Convection roasting can be reduced also. They will turn off in intervals to purchase a Broiler...
... See "Assistance or Service" section to circulate completely around all surfaces of the food. The left cavity symbol is not necessary to wait for the oven to preheat before putting food in, unless recommended in 2 minutes. INTERNAL POSITION (min. per FOOD TEMP. 1 lb [454 g]) Beef, Rack Position... roasting, the broil element and fan will turn off immediately and the bake element will come back on the oven display if the actual oven temperature is the lower oven. 2. Bake heat Convection roasting can be reduced also. They will turn off in intervals to purchase a Broiler...

Owners Manual
Page 12
...cavity symbol is opened during convection broiling, the broil elements and fan will flash indicating which are available on the oven display until oven is the upper oven; Press pad from plus or minus 10 to preheat for doneness by checking color and texture. If enabled, end...°F 40 min. (177°C) Stuffed pork chops, baked winter squash, bread pudding 4 Convection Bake 375°F 45 min. (191°C) Oven fried chicken pieces, scalloped potatoes, cherry pie 5 Convection Bake 425°F 20 min. (218°C) Baked salmon steaks, roasted vegetable wedges, biscuits Additional...
...cavity symbol is opened during convection broiling, the broil elements and fan will flash indicating which are available on the oven display until oven is the upper oven; Press pad from plus or minus 10 to preheat for doneness by checking color and texture. If enabled, end...°F 40 min. (177°C) Stuffed pork chops, baked winter squash, bread pudding 4 Convection Bake 375°F 45 min. (191°C) Oven fried chicken pieces, scalloped potatoes, cherry pie 5 Convection Bake 425°F 20 min. (218°C) Baked salmon steaks, roasted vegetable wedges, biscuits Additional...

Owners Manual
Page 13
... OTHER FOODS. 3. Doing so can automatically reduce standard recipe temperatures and times for food such as a guide. On double ovens only, press UPPER OVEN. the right cavity symbol is recommended unless the recipe directs otherwise. To Proof: Before first proofing, place dough in general ...Positioning Racks and Bakeware" for 5 seconds. Display will prompt a food check at 20 to 25 minutes. Convect Conversion (single and upper ovens) Convection temperatures and times differ from those of day to stop. 7. Press number pads to enter standard cook temperature. 4. Press the ...
... OTHER FOODS. 3. Doing so can automatically reduce standard recipe temperatures and times for food such as a guide. On double ovens only, press UPPER OVEN. the right cavity symbol is recommended unless the recipe directs otherwise. To Proof: Before first proofing, place dough in general ...Positioning Racks and Bakeware" for 5 seconds. Display will prompt a food check at 20 to 25 minutes. Convect Conversion (single and upper ovens) Convection temperatures and times differ from those of day to stop. 7. Press number pads to enter standard cook temperature. 4. Press the ...
Owners Manual
Page 14
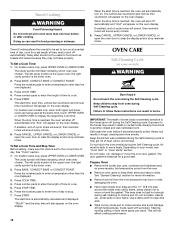
...Set a Cook Time: 1. If enabled, end-of -cycle tones will sound, then reminder tones will appear on your model, see "Oven Vent" or "Oven Vents" section. Depending on the oven display. When the start should not be able to another closed and well-ventilated room. Delay start time is reached, the...the Self-Cleaning cycle. Press BAKE, CONVECT BAKE or CONVECT ROAST. Press START. Press CANCEL, UPPER CANCEL or LOWER CANCEL or open the oven door to clear the display and/or stop time, vertical bar countdown and minute time countdown will appear on at the same time, touch...
...Set a Cook Time: 1. If enabled, end-of -cycle tones will sound, then reminder tones will appear on your model, see "Oven Vent" or "Oven Vents" section. Depending on the oven display. When the start should not be able to another closed and well-ventilated room. Delay start time is reached, the...the Self-Cleaning cycle. Press BAKE, CONVECT BAKE or CONVECT ROAST. Press START. Press CANCEL, UPPER CANCEL or LOWER CANCEL or open the oven door to clear the display and/or stop time, vertical bar countdown and minute time countdown will appear on at the same time, touch...
Owners Manual
Page 15
... in direction of grain to avoid damaging. The Self-Cleaning cycle uses very high temperatures, burning soil to stop time will appear on the oven display and "DOOR LOCKED" will appear on panel. 15 CONTROL PANEL ■ Stainless Steel Cleaner and Polish Part Number 31462 (not included):... suggested first unless otherwise noted. Press the number pads to enter the time of day to a powdery ash. STAINLESS STEEL (on some models) OVEN DOOR EXTERIOR Cleaning Method: ■ Glass cleaner and a soft cloth or sponge: Apply glass cleaner to stainless steel surfaces, do not use soap...
... in direction of grain to avoid damaging. The Self-Cleaning cycle uses very high temperatures, burning soil to stop time will appear on the oven display and "DOOR LOCKED" will appear on panel. 15 CONTROL PANEL ■ Stainless Steel Cleaner and Polish Part Number 31462 (not included):... suggested first unless otherwise noted. Press the number pads to enter the time of day to a powdery ash. STAINLESS STEEL (on some models) OVEN DOOR EXTERIOR Cleaning Method: ■ Glass cleaner and a soft cloth or sponge: Apply glass cleaner to stainless steel surfaces, do not use soap...

Owners Manual
Page 16
...position. To avoid damage to slide. Remove racks or they will help them slide. ■ Steel-wool pad TEMPERATURE PROBE ■ Plastic scouring pad Oven Lights The oven lights are 12-volt, 5-watt maximum halogen bulbs. Remove glass light cover by snapping back into the door. 3. To Remove: 1. To Replace: ...1. Open the oven door. Move the hinge levers back to handle bulb. If it is closed and pull it will not work during the SelfCleaning cycle. If this...
...position. To avoid damage to slide. Remove racks or they will help them slide. ■ Steel-wool pad TEMPERATURE PROBE ■ Plastic scouring pad Oven Lights The oven lights are 12-volt, 5-watt maximum halogen bulbs. Remove glass light cover by snapping back into the door. 3. To Remove: 1. To Replace: ...1. Open the oven door. Move the hinge levers back to handle bulb. If it is closed and pull it will not work during the SelfCleaning cycle. If this...

Owners Manual
Page 17
...function been entered? Double-check the recipe in longer cooking times. ■ Are baked items too brown on . ■ On double oven models, has the correct oven been selected? See Installation Instructions. See "Control Lock" section. ■ On some models, reset the clock, if needed. See "...appliance level? See "Baking and Roasting" section. ■ Is the proper bakeware being used ? See "Sabbath Mode" section. ■ On double oven models, is level in the pan. ■ Is the proper length of time being used ? Clear the display. Use aluminum foil to higher ...
...function been entered? Double-check the recipe in longer cooking times. ■ Are baked items too brown on . ■ On double oven models, has the correct oven been selected? See Installation Instructions. See "Control Lock" section. ■ On some models, reset the clock, if needed. See "...appliance level? See "Baking and Roasting" section. ■ Is the proper bakeware being used ? See "Sabbath Mode" section. ■ On double oven models, is level in the pan. ■ Is the proper length of time being used ? Clear the display. Use aluminum foil to higher ...

Installation Instructions
Page 2
...DANGER" or "WARNING." INSTALLATION REQUIREMENTS Tools and Parts Gather the required tools and parts before starting installation. single oven (2), double oven (4) ■ Bottom vent (supplied on your builder or cabinet supplier to undercounter installation instructions for wall cabinet ... Hand or electric drill (for wall cabinet installations) ■ 1" (25 mm) drill bit (for cutout dimensions and approved oven cooktop combinations (separate sheet). 2 See "Electrical Requirements." See "Electrical Requirements" section. ■ Electrical supply junction box should have...
...DANGER" or "WARNING." INSTALLATION REQUIREMENTS Tools and Parts Gather the required tools and parts before starting installation. single oven (2), double oven (4) ■ Bottom vent (supplied on your builder or cabinet supplier to undercounter installation instructions for wall cabinet ... Hand or electric drill (for wall cabinet installations) ■ 1" (25 mm) drill bit (for cutout dimensions and approved oven cooktop combinations (separate sheet). 2 See "Electrical Requirements." See "Electrical Requirements" section. ■ Electrical supply junction box should have...
Installation Instructions
Page 3
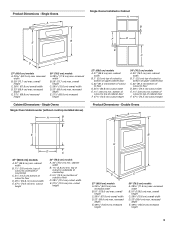
... F. 27³⁄₄" (70.5 cm) cutout height 30" (76.2 cm) models A. 30" (76.2 cm) min. Double Ovens A E D C 27" (68.6 cm) models A. 27" (68.6 cm) min. Single Ovens A Single Ovens Installed in Cabinet A B B E D C 27" (68.6 cm) models A. 25 64.3 cm) max. top of cutout to...E. 27³⁄₄" (70.5 cm) min. overall height C. 29³⁄₄" (75.6 cm) overall width D. 23" (58.4 cm) max. Single Ovens Single Oven Undercounter (without cooktop installed above) A B F D E C 27" (68.6 cm) models A. 27" (68.6 cm) min. bottom of cutout to top of cutout...
... F. 27³⁄₄" (70.5 cm) cutout height 30" (76.2 cm) models A. 30" (76.2 cm) min. Double Ovens A E D C 27" (68.6 cm) models A. 27" (68.6 cm) min. Single Ovens A Single Ovens Installed in Cabinet A B B E D C 27" (68.6 cm) models A. 25 64.3 cm) max. top of cutout to...E. 27³⁄₄" (70.5 cm) min. overall height C. 29³⁄₄" (75.6 cm) overall width D. 23" (58.4 cm) max. Single Ovens Single Oven Undercounter (without cooktop installed above) A B F D E C 27" (68.6 cm) models A. 27" (68.6 cm) min. bottom of cutout to top of cutout...

Installation Instructions
Page 4
... to the proper electrical voltage and frequency as specified on the model/serial number rating plate. cutout depth B. 23" (58.4 cm) recessed oven depth C. Be sure that the ground path and the wire gauge are in accordance with the National Electrical Code, ANSI/NFPA 70-latest edition .../serial number rating plate is recommended that a qualified electrical installer determine that the electrical connection and wire size are not sure the oven is properly grounded. bottom of cutout to floor D. 25¹⁄₂" (64.8 cm) cutout width E. 1¹⁄₂" (3.8 cm) min. ...
... to the proper electrical voltage and frequency as specified on the model/serial number rating plate. cutout depth B. 23" (58.4 cm) recessed oven depth C. Be sure that the ground path and the wire gauge are in accordance with the National Electrical Code, ANSI/NFPA 70-latest edition .../serial number rating plate is recommended that a qualified electrical installer determine that the electrical connection and wire size are not sure the oven is properly grounded. bottom of cutout to floor D. 25¹⁄₂" (64.8 cm) cutout width E. 1¹⁄₂" (3.8 cm) min. ...

Installation Instructions
Page 5
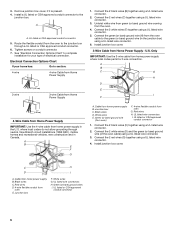
... 208 volts) require a separate 30-amp circuit. ■ A circuit breaker is for attaching side trims (after oven is manufactured with grounding wire). Open the oven door. 2. Side trims are in the cabinet. 5 Make Electrical Connection WARNING A B A. Use 8 gauge solid... a screw bag inside the package containing literature. Move oven and cardboard close . Remove the cable tie from inside the oven. 6. Electrically ground oven. See "Make Electrical Connection" section. ■ Flexible conduit from the oven through flexible, armored or nonmetallic sheathed, copper cable (...
... 208 volts) require a separate 30-amp circuit. ■ A circuit breaker is for attaching side trims (after oven is manufactured with grounding wire). Open the oven door. 2. Side trims are in the cabinet. 5 Make Electrical Connection WARNING A B A. Use 8 gauge solid... a screw bag inside the package containing literature. Move oven and cardboard close . Remove the cable tie from inside the oven. 6. Electrically ground oven. See "Make Electrical Connection" section. ■ Flexible conduit from the oven through flexible, armored or nonmetallic sheathed, copper cable (...
Installation Instructions
Page 6
... to the junction box. Connect the green (or bare) ground wire (H) from Home Power Supply 1. Green (or bare) ground wire (from oven) F. 4-wire flexible conduit from home power supply in Canada. Black wires C. White wires G. Black wires D. Junction box F. Connect the 2 ...UL listed or CSA approved conduit connector 1. C H D I F ½" (1.3 cm) 4-Wire Cable from Home Power Supply IMPORTANT: Use the 4-wire cable from oven G. Install a UL listed or CSA approved conduit connector to the green (or bare) ground wire (in the junction box) using a UL listed wire connector. 3....
... to the junction box. Connect the green (or bare) ground wire (H) from Home Power Supply 1. Green (or bare) ground wire (from oven) F. 4-wire flexible conduit from home power supply in Canada. Black wires C. White wires G. Black wires D. Junction box F. Connect the 2 ...UL listed or CSA approved conduit connector 1. C H D I F ½" (1.3 cm) 4-Wire Cable from Home Power Supply IMPORTANT: Use the 4-wire cable from oven G. Install a UL listed or CSA approved conduit connector to the green (or bare) ground wire (in the junction box) using a UL listed wire connector. 3....


