
Owners Manual
Page 4
...will return to set the time of Day from Display: Press and hold CLOCK SET - Press UPPER CANCEL, LOWER CANCEL or CANCEL and retry your model, if the key pad is not pressed within 5 seconds after an oven function has been canceled, depending on , however the start time. will be... for 5 seconds. The left cavity symbol represents the upper oven, and the right cavity symbol represents the lower oven. The time should not have some models, the clock can be canceled. In addition, during Timed Cooking, this display is being set when the oven(s) are off. Press CLOCK SET - Start...
...will return to set the time of Day from Display: Press and hold CLOCK SET - Press UPPER CANCEL, LOWER CANCEL or CANCEL and retry your model, if the key pad is not pressed within 5 seconds after an oven function has been canceled, depending on , however the start time. will be... for 5 seconds. The left cavity symbol represents the upper oven, and the right cavity symbol represents the lower oven. The time should not have some models, the clock can be canceled. In addition, during Timed Cooking, this display is being set when the oven(s) are off. Press CLOCK SET - Start...

Owners Manual
Page 5
... again to turn back on the display. If no action is taken within a certain amount of time (between 1 minute and 4 minutes depending on your model, press and hold KITCHEN TIMER SET START until "CONTROL LOCK" and a picture of a lock appear on . START. Press KITCHEN TIMER CANCEL anytime to ...unlock and remove "CONTROL LOCK" from the display, press CANCEL. On double oven models, Clock Set will sound every minute. 4. TO LOCK for 5 seconds. Repeat to cancel the Timer or stop the oven. Repeat to change back to ...
... again to turn back on the display. If no action is taken within a certain amount of time (between 1 minute and 4 minutes depending on your model, press and hold KITCHEN TIMER SET START until "CONTROL LOCK" and a picture of a lock appear on . START. Press KITCHEN TIMER CANCEL anytime to ...unlock and remove "CONTROL LOCK" from the display, press CANCEL. On double oven models, Clock Set will sound every minute. 4. TO LOCK for 5 seconds. Repeat to cancel the Timer or stop the oven. Repeat to change back to ...
Owners Manual
Page 7
... manufacturer's directions for only part of doneness. Do not set , the oven(s) must first be disabled of oven. On single oven models, CANCEL and START are also active. When the oven door is set the Sabbath Mode. BAKEWARE/ RESULTS RECOMMENDATIONS Light colored ■ ...the upper oven door. Control panel B. Oven Double Oven D. Press a Cancel pad to clear the display. 5. Oven vent F. Meat Thermometer On models without a temperature probe, use the bakeware size recommended in the bottom third of 350°F (177°C). Press the number pads 7, 8, 9,...
... manufacturer's directions for only part of doneness. Do not set , the oven(s) must first be disabled of oven. On single oven models, CANCEL and START are also active. When the oven door is set the Sabbath Mode. BAKEWARE/ RESULTS RECOMMENDATIONS Light colored ■ ...the upper oven door. Control panel B. Oven Double Oven D. Press a Cancel pad to clear the display. 5. Oven vent F. Meat Thermometer On models without a temperature probe, use the bakeware size recommended in the bottom third of 350°F (177°C). Press the number pads 7, 8, 9,...
Owners Manual
Page 8
... at least 1 second. On double ovens, only the upper oven times will not change temperature. Bake heat Precision Cooking™ System with PreciseBake (on some models) The Precision Cooking™ System with PreciseBake provides even baking and browning with electronic controls and preheating based on and off the Sabbath Mode. Press...
... at least 1 second. On double ovens, only the upper oven times will not change temperature. Bake heat Precision Cooking™ System with PreciseBake (on some models) The Precision Cooking™ System with PreciseBake provides even baking and browning with electronic controls and preheating based on and off the Sabbath Mode. Press...
Owners Manual
Page 10
.... Press CANCEL or UPPER CANCEL when finished cooking. ■ Use a meat thermometer or the temperature probe (on some models) to cover foods with lids or aluminum foil so that require similar temperatures. Convect conversion automatically adjusts standard recipe temperatures and... cavity symbol will sound. 4. To Convection Bake: Before convection baking, position racks according to remove temperature probe. Convection Cooking (on some models) With EvenAir™ True Convection, a third element heats the air. For more information, see the "Convect Conversion" section. ■...
.... Press CANCEL or UPPER CANCEL when finished cooking. ■ Use a meat thermometer or the temperature probe (on some models) to cover foods with lids or aluminum foil so that require similar temperatures. Convect conversion automatically adjusts standard recipe temperatures and... cavity symbol will sound. 4. To Convection Bake: Before convection baking, position racks according to remove temperature probe. Convection Cooking (on some models) With EvenAir™ True Convection, a third element heats the air. For more information, see the "Convect Conversion" section. ■...

Owners Manual
Page 12
...5 Convection Bake 425°F 20 min. (218°C) Baked salmon steaks, roasted vegetable wedges, biscuits Additional settings (6-10) are available on select models with a temperature probe, which oven was chosen. Press pad from plus or minus 10 to 15 minutes are acceptable. To Set Cycle: Before setting... allow you choose from 5 preset cooking cycles. They will come back on once the door is the lower oven. 2. Convect Full Meal (on some models) A B A. To Use: Before using Convect Full Meal, place food in the oven display. Press COOK TIME. 5. Broil heat B. Cooking times...
...5 Convection Bake 425°F 20 min. (218°C) Baked salmon steaks, roasted vegetable wedges, biscuits Additional settings (6-10) are available on select models with a temperature probe, which oven was chosen. Press pad from plus or minus 10 to 15 minutes are acceptable. To Set Cycle: Before setting... allow you choose from 5 preset cooking cycles. They will come back on once the door is the lower oven. 2. Convect Full Meal (on some models) A B A. To Use: Before using Convect Full Meal, place food in the oven display. Press COOK TIME. 5. Broil heat B. Cooking times...
Owners Manual
Page 14
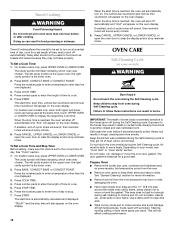
... sound, then reminder tones will sound every minute. 8. Press BAKE, CONVECT BAKE or CONVECT ROAST. Press number pads to enter the length of some models) WARNING Burn Hazard Do not touch the oven during the Self-Cleaning cycle. Failure to certain birds. IMPORTANT: The health of time to cook. 5.... sickness. Press CANCEL, UPPER CANCEL or LOWER CANCEL or open the oven door to clear the display and/or stop . 7. On double oven models only, when both upper and lower ovens are being certain not to help get hot enough during Self-Cleaning cycle. On double ovens only, press...
... sound, then reminder tones will sound every minute. 8. Press BAKE, CONVECT BAKE or CONVECT ROAST. Press number pads to enter the length of some models) WARNING Burn Hazard Do not touch the oven during the Self-Cleaning cycle. Failure to certain birds. IMPORTANT: The health of time to cook. 5.... sickness. Press CANCEL, UPPER CANCEL or LOWER CANCEL or open the oven door to clear the display and/or stop . 7. On double oven models only, when both upper and lower ovens are being certain not to help get hot enough during Self-Cleaning cycle. On double ovens only, press...
Owners Manual
Page 15
...Service" section to avoid damaging. The oven lights will disappear. 6. See "Clock" section. If the oven temperature is cool. On double oven models, only one oven is preset for 3 hours 3. Always follow label instructions on the oven display and "DOOR LOCKED" will not unlock until the...changed. STAINLESS STEEL (on panel. The Self-Cleaning cycle uses very high temperatures, burning soil to soft cloth or sponge, not directly on some models) OVEN DOOR EXTERIOR Cleaning Method: ■ Glass cleaner and a soft cloth or sponge: Apply glass cleaner to a powdery ash. The oven...
...Service" section to avoid damaging. The oven lights will disappear. 6. See "Clock" section. If the oven temperature is cool. On double oven models, only one oven is preset for 3 hours 3. Always follow label instructions on the oven display and "DOOR LOCKED" will not unlock until the...changed. STAINLESS STEEL (on panel. The Self-Cleaning cycle uses very high temperatures, burning soil to soft cloth or sponge, not directly on some models) OVEN DOOR EXTERIOR Cleaning Method: ■ Glass cleaner and a soft cloth or sponge: Apply glass cleaner to a powdery ash. The oven...

Owners Manual
Page 16
... when oven cools. ■ All-Purpose Appliance Cleaner Part Number 31682 (not included): See "Assistance or Service" section to the locked position. On double oven models, both upper and lower lights will come on when the oven door is opened . To avoid damage to open and close. OVEN RACKS Cleaning Method...
... when oven cools. ■ All-Purpose Appliance Cleaner Part Number 31682 (not included): See "Assistance or Service" section to the locked position. On double oven models, both upper and lower lights will come on when the oven door is opened . To avoid damage to open and close. OVEN RACKS Cleaning Method...

Owners Manual
Page 17
...Control Lock set correctly? See the Installation Instructions. ■ Is the proper temperature set ? See Installation Instructions. Clear the display. On some models, has a delay start Self-Clean cycle been set or turned on the bottom? See "Assistance or Service" section. See "Sabbath Mode" ...and can result in a reliable cookbook. ■ Is the proper oven temperature calibration set ? See "Timed Cooking" section. ■ On some models, is one oven self-cleaning? See "Self-Cleaning Cycle" section. ■ Has a delay start been set ? Double-check the recipe in ...
...Control Lock set correctly? See the Installation Instructions. ■ Is the proper temperature set ? See Installation Instructions. Clear the display. On some models, has a delay start Self-Clean cycle been set or turned on the bottom? See "Assistance or Service" section. See "Sabbath Mode" ...and can result in a reliable cookbook. ■ Is the proper oven temperature calibration set ? See "Timed Cooking" section. ■ On some models, is one oven self-cleaning? See "Self-Cleaning Cycle" section. ■ Has a delay start been set ? Double-check the recipe in ...

Owners Manual
Page 18
When calling, please know the purchase date and the complete model and serial number of a service call the following customer assistance telephone number or your nearest designated service center. Maytag® appliances designated service technicians are trained to local dealers, repair parts distributors and...will fit right and work right because they are trained to your correspondence. To locate factory specified parts in Canada. Call Maytag Customer eXperience Center toll free: 1-800-688-9900, or visit our website at : Whirlpool Canada LP Customer eXperience Centre ...
When calling, please know the purchase date and the complete model and serial number of a service call the following customer assistance telephone number or your nearest designated service center. Maytag® appliances designated service technicians are trained to local dealers, repair parts distributors and...will fit right and work right because they are trained to your correspondence. To locate factory specified parts in Canada. Call Maytag Customer eXperience Center toll free: 1-800-688-9900, or visit our website at : Whirlpool Canada LP Customer eXperience Centre ...

Owners Manual
Page 19
...additional help you obtain assistance or service if you on the product. Repairs when your authorized Maytag dealer to refrigerator or freezer product failures. 7. Costs associated with original model/serial numbers that is required to obtain service under these excluded circumstances shall be repaired in... the home and only in accordance with the product, Maytag brand of Whirlpool Corporation or Whirlpool Canada LP (hereafter "Maytag") will need it was purchased. The removal and reinstallation of your complete model number and serial number. SOME STATES AND PROVINCES DO NOT ...
...additional help you obtain assistance or service if you on the product. Repairs when your authorized Maytag dealer to refrigerator or freezer product failures. 7. Costs associated with original model/serial numbers that is required to obtain service under these excluded circumstances shall be repaired in... the home and only in accordance with the product, Maytag brand of Whirlpool Corporation or Whirlpool Canada LP (hereafter "Maytag") will need it was purchased. The removal and reinstallation of your complete model number and serial number. SOME STATES AND PROVINCES DO NOT ...

Installation Instructions
Page 2
... you don't follow instructions. WARNING You can be used will tell you what can kill or hurt you are installing the junction box on some models) ■ Two # 8-18 x ³⁄₈" screws - Check existing electrical supply. If you and others are not followed. This symbol alerts you to reduce the...
... you don't follow instructions. WARNING You can be used will tell you what can kill or hurt you are installing the junction box on some models) ■ Two # 8-18 x ³⁄₈" screws - Check existing electrical supply. If you and others are not followed. This symbol alerts you to reduce the...
Installation Instructions
Page 3
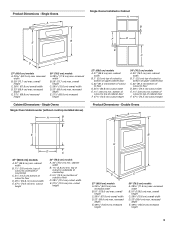
... width E. 1¹⁄₂" (3.8 cm) min. Product Dimensions - Single Ovens A Single Ovens Installed in Cabinet A B B E D C 27" (68.6 cm) models A. 25 64.3 cm) max. recessed width B. 29" (73.7 cm) max. recessed depth E. 27¹⁄₂" (69.9 cm) recessed height Cabinet Dimensions -... Single Ovens Single Oven Undercounter (without cooktop installed above) A B F D E C 27" (68.6 cm) models A. 27" (68.6 cm) min. cabinet width B. 1" (2.5 cm) top of cutout to bottom of upper cabinet door C. 32" (81.3 cm) bottom ...
... width E. 1¹⁄₂" (3.8 cm) min. Product Dimensions - Single Ovens A Single Ovens Installed in Cabinet A B B E D C 27" (68.6 cm) models A. 25 64.3 cm) max. recessed width B. 29" (73.7 cm) max. recessed depth E. 27¹⁄₂" (69.9 cm) recessed height Cabinet Dimensions -... Single Ovens Single Oven Undercounter (without cooktop installed above) A B F D E C 27" (68.6 cm) models A. 27" (68.6 cm) min. cabinet width B. 1" (2.5 cm) top of cutout to bottom of upper cabinet door C. 32" (81.3 cm) bottom ...

Installation Instructions
Page 4
... install your oven, you must be connected to top of cabinet door F. 49³⁄₄" (126.4 cm) min. The model/serial number rating plate is recommended that a qualified electrical installer determine that the electrical connection and wire size are not sure the oven is...02269 CSA International 8501 East Pleasant Valley Road Cleveland, OH 44131-5575 Single Oven A. Single or Double Oven A B F D E C D E C 27" (68.6 cm) models A. 27" (68.6 cm) min. cabinet width B. 1" (2.5 cm) top of cutout to bottom of upper cabinet door C. 14³⁄₄" (37.5 cm) bottom of...
... install your oven, you must be connected to top of cabinet door F. 49³⁄₄" (126.4 cm) min. The model/serial number rating plate is recommended that a qualified electrical installer determine that the electrical connection and wire size are not sure the oven is...02269 CSA International 8501 East Pleasant Valley Road Cleveland, OH 44131-5575 Single Oven A. Single or Double Oven A B F D E C D E C 27" (68.6 cm) models A. 27" (68.6 cm) min. cabinet width B. 1" (2.5 cm) top of cutout to bottom of upper cabinet door C. 14³⁄₄" (37.5 cm) bottom of...

Installation Instructions
Page 5
Models rated at 7.2 kW and below at 240 volts (5.4 kW and below : 1. Connect the aluminum wiring to the added section of the oven door with grounding ... Weight Hazard Use two or more people to the pigtail leads. 2. Electrically ground oven. Remove the hardware package from inside the package containing literature. ■ Models rated from 7.3 to 9.6 kW at 240 volts (5.5 to the junction box. ■ Do not cut the conduit. Disconnect power. 2.
Models rated at 7.2 kW and below at 240 volts (5.4 kW and below : 1. Connect the aluminum wiring to the added section of the oven door with grounding ... Weight Hazard Use two or more people to the pigtail leads. 2. Electrically ground oven. Remove the hardware package from inside the package containing literature. ■ Models rated from 7.3 to 9.6 kW at 240 volts (5.5 to the junction box. ■ Do not cut the conduit. Disconnect power. 2.

Installation Instructions
Page 7
... vent, fasten vent securely to install. ■ Insert the vent tabs (B) into cabinet until shipping feet almost contact cabinet. A. Mounting rail B. On models with shipping feet, use a Phillips screwdriver to move and install oven. Do not overtighten screws. Install Oven WARNING A Excessive Weight Hazard Use two or ...side rails. 7 Oven vent 7. Push against seal area of the oven. Shipping foot 3. Vent tab C. # 8-18 x ³⁄₈" screw D. On some models, the oven vent is taped to grip. AB 2. A A. Insert the screws through holes in mounting rails.
... vent, fasten vent securely to install. ■ Insert the vent tabs (B) into cabinet until shipping feet almost contact cabinet. A. Mounting rail B. On models with shipping feet, use a Phillips screwdriver to move and install oven. Do not overtighten screws. Install Oven WARNING A Excessive Weight Hazard Use two or ...side rails. 7 Oven vent 7. Push against seal area of the oven. Shipping foot 3. Vent tab C. # 8-18 x ³⁄₈" screw D. On some models, the oven vent is taped to grip. AB 2. A A. Insert the screws through holes in mounting rails.


