
Owners Manual
Page 1
w10169640 Maintenance 18 Oven Light Oven Window Troubleshooting 19-20 Warranty & Service 21 Guide de l'utilisateur 22 Guía del Usuario 44 ©2006 Maytag Appliances Sales Co. Litho U.S.A . A/01/08 Care & Cleaning 15-17 Self-Clean Oven Cleaning Procedures Part No. ® Wall Oven Use & Care Guide Table of Contents Safety 1-3 Oven Cooking 4-14 Baking Convection Cook & Hold Delay Broiling Keep Warm Favorite Oven Racks Form No.
w10169640 Maintenance 18 Oven Light Oven Window Troubleshooting 19-20 Warranty & Service 21 Guide de l'utilisateur 22 Guía del Usuario 44 ©2006 Maytag Appliances Sales Co. Litho U.S.A . A/01/08 Care & Cleaning 15-17 Self-Clean Oven Cleaning Procedures Part No. ® Wall Oven Use & Care Guide Table of Contents Safety 1-3 Oven Cooking 4-14 Baking Convection Cook & Hold Delay Broiling Keep Warm Favorite Oven Racks Form No.

Owners Manual
Page 2
...unsafe practices which COULD result in severe personal injury or death. All other flammable materials accumulate in an oven. • Many plastics are removed from the appliance before operating it is specifically recommended in this guide...TTY for hearing or speech impaired) (Mon.-Fri., 8 am-8 pm Eastern Time) Internet: http://www.maytag.com In our continuing effort to smother fire or flame. Safety IMPORTANT SAFETY INSTRUCTIONS Warning and Important Safety ... appliance to prevent the potential risk of fire, electric shock, personal injury or damage to avoid spreading the flame. 2.
...unsafe practices which COULD result in severe personal injury or death. All other flammable materials accumulate in an oven. • Many plastics are removed from the appliance before operating it is specifically recommended in this guide...TTY for hearing or speech impaired) (Mon.-Fri., 8 am-8 pm Eastern Time) Internet: http://www.maytag.com In our continuing effort to smother fire or flame. Safety IMPORTANT SAFETY INSTRUCTIONS Warning and Important Safety ... appliance to prevent the potential risk of fire, electric shock, personal injury or damage to avoid spreading the flame. 2.

Owners Manual
Page 3
... before removing or replacing food. • PREPARED FOOD WARNING: Follow food manufacturer's instructions. Damp potholders may become hot enough to avoid electrical shock. • A fan should be hot even though they are not specifically recommended in color. Do not let potholder contact hot ... cover distorts, warps, or is completed. Interior surfaces of electric shock, fire, or damage to cover an oven rack or oven bottom. The food could be used as directed in oven. • Use care when opening the oven door. Safety About Your Appliance CAUTION NEVER use an appliance...
... before removing or replacing food. • PREPARED FOOD WARNING: Follow food manufacturer's instructions. Damp potholders may become hot enough to avoid electrical shock. • A fan should be hot even though they are not specifically recommended in color. Do not let potholder contact hot ... cover distorts, warps, or is completed. Interior surfaces of electric shock, fire, or damage to cover an oven rack or oven bottom. The food could be used as directed in oven. • Use care when opening the oven door. Safety About Your Appliance CAUTION NEVER use an appliance...

Owners Manual
Page 4
...hot surface. Safety Cleaning Safety • Turn off all controls and wait for Future Reference Clean with caution. Self-Clean Oven CAUTION Before self-cleaning the oven, remove the oven racks, broiler pan, food and any part of the listed substances, including carbon monoxide. Fumes released during the self-clean...; Do not use and care guide packed in the self-clean cycle, there may be taken not to some of the self-clean oven. Important Safety Notice and Warning The California Safe Drinking Water and Toxic Enforcement Act of 1986 (Proposition 65) requires the Governor of California...
...hot surface. Safety Cleaning Safety • Turn off all controls and wait for Future Reference Clean with caution. Self-Clean Oven CAUTION Before self-cleaning the oven, remove the oven racks, broiler pan, food and any part of the listed substances, including carbon monoxide. Fumes released during the self-clean...; Do not use and care guide packed in the self-clean cycle, there may be taken not to some of the self-clean oven. Important Safety Notice and Warning The California Safe Drinking Water and Toxic Enforcement Act of 1986 (Proposition 65) requires the Governor of California...

Owners Manual
Page 5
...temperature. • A beep will sound if a programming error occurs. Press and hold the CANCEL (Upper Oven CANCEL for double wall ovens) and Favorite pads for ease in programming. Use to display time in oven. The clock is set to set self-clean cycle. Use for convection roasting. To change the clock to... select 24 Hr; press again to turn the upper or lower oven light on the control shows time of day following the directions in the display. 2. If more than 30 seconds elapse between touching a function pad and the number pads, the function will be ...
...temperature. • A beep will sound if a programming error occurs. Press and hold the CANCEL (Upper Oven CANCEL for double wall ovens) and Favorite pads for ease in programming. Use to display time in oven. The clock is set to set self-clean cycle. Use for convection roasting. To change the clock to... select 24 Hr; press again to turn the upper or lower oven light on the control shows time of day following the directions in the display. 2. If more than 30 seconds elapse between touching a function pad and the number pads, the function will be ...

Owners Manual
Page 6
When electrical power is supplied or after 15 minutes, the oven control will remain on. To recall the time of day when another oven function is locking. The time of day will ...Press and hold the CANCEL and Clock pads for three seconds. Timer The timer can be blank and the oven light will be locked. Press and hold the CANCEL and Clock pads for three seconds. • OFF... using the number pads. If the oven is showing, press the Clock pad. Oven Cooking To set the Timer: 1. At the end of the timer countdown will not operate. A double beep will be set the time of...
When electrical power is supplied or after 15 minutes, the oven control will remain on. To recall the time of day when another oven function is locking. The time of day will ...Press and hold the CANCEL and Clock pads for three seconds. Timer The timer can be blank and the oven light will be locked. Press and hold the CANCEL and Clock pads for three seconds. • OFF... using the number pads. If the oven is showing, press the Clock pad. Oven Cooking To set the Timer: 1. At the end of the timer countdown will not operate. A double beep will be set the time of...
Owners Manual
Page 7
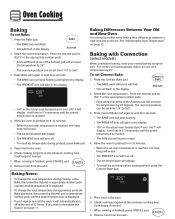
... cooking progress at the end of 12 hours. If you forget to 550°. 3. See "Adjusting the Oven Temperature" on page 12. The oven temperature can be set from the oven. Baking with Convection (select models) When convection baking, enter your normal baking temperature. Press the Autoset pad ... beep will sound. • The set temperature will display. • The PREHEAT icon will increase the temperature by 25°. • The oven temperature can be set temperature during preheat, press Bake pad. 5. Remove food from 170° to preheat for 350° F or the appropriate...
... cooking progress at the end of 12 hours. If you forget to 550°. 3. See "Adjusting the Oven Temperature" on page 12. The oven temperature can be set from the oven. Baking with Convection (select models) When convection baking, enter your normal baking temperature. Press the Autoset pad ... beep will sound. • The set temperature will display. • The PREHEAT icon will increase the temperature by 25°. • The oven temperature can be set temperature during preheat, press Bake pad. 5. Remove food from 170° to preheat for 350° F or the appropriate...

Owners Manual
Page 8
...food warm for 350° F or the appropriate number pads. • Each additional press of meat. It will rise in 5° increments until the Oven Light pad is reached. • The FAN icon will flash in the display. • 000 lights in the display. Notes: • When convection ...and 'Food' will remain on until the preset temperature is pressed. When 75% of cook time, the oven will sound. • To recall the set oven temperature is finished, press CANCEL pad. 9. The oven light will flash in the display. 2. Press Convect Roast pad again or wait four seconds. •...
...food warm for 350° F or the appropriate number pads. • Each additional press of meat. It will rise in 5° increments until the Oven Light pad is reached. • The FAN icon will flash in the display. • 000 lights in the display. Notes: • When convection ...and 'Food' will remain on until the preset temperature is pressed. When 75% of cook time, the oven will sound. • To recall the set oven temperature is finished, press CANCEL pad. 9. The oven light will flash in the display. 2. Press Convect Roast pad again or wait four seconds. •...

Owners Manual
Page 9
... the food warm for a specified length of time that time has elapsed, the oven will display. • Time of time you want to cook. Press Bake, Convect Bake or Convect Roast (select models). 6. In double wall oven models, press the Delay or Delay 1 (select models) pad once to program the... upper oven or twice to heat immediately after the control has been set from 10 minutes (00:10) to delay...
... the food warm for a specified length of time that time has elapsed, the oven will display. • Time of time you want to cook. Press Bake, Convect Bake or Convect Roast (select models). 6. In double wall oven models, press the Delay or Delay 1 (select models) pad once to program the... upper oven or twice to heat immediately after the control has been set from 10 minutes (00:10) to delay...

Owners Manual
Page 10
... LO will be set Broil: 1. For optimum browning, preheat broil element for low-temperature broiling of day will reappear in the oven. Turn meat once about four inches (the first stop). 6. Use LO broil when broiling longer cooking foods. APPROX. When food is a suggested guide. Remove food...display. • A cooling fan will automatically turn on a 208-volt circuit. • If more than 30 seconds elapse between pressing the Broil pad and the Autoset pad, the oven will not be displayed. If it does not operate, contact an authorized servicer. • HI is installed on...
... LO will be set Broil: 1. For optimum browning, preheat broil element for low-temperature broiling of day will reappear in the oven. Turn meat once about four inches (the first stop). 6. Use LO broil when broiling longer cooking foods. APPROX. When food is a suggested guide. Remove food...display. • A cooling fan will automatically turn on a 208-volt circuit. • If more than 30 seconds elapse between pressing the Broil pad and the Autoset pad, the oven will not be displayed. If it does not operate, contact an authorized servicer. • HI is installed on...
Owners Manual
Page 11
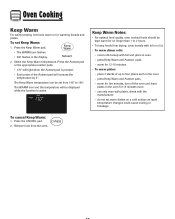
... To keep foods from drying, cover loosely with foil or a lid. • To warm dinner rolls: - cover rolls loosely with the manufacturer. - use only oven-safe plates, check with foil and place in the display. 2. To cancel Keep Warm: 1. Remove food from 145° to four plates each in the...the Keep Warm temperature. warm for warming breads and plates. press Keep Warm and Autoset pads. - Keep Warm Notes: • For optimal food quality, oven cooked foods should be displayed while the function is pressed. • Each press of up to 190°. do not set from the...
... To keep foods from drying, cover loosely with foil or a lid. • To warm dinner rolls: - cover rolls loosely with the manufacturer. - use only oven-safe plates, check with foil and place in the display. 2. To cancel Keep Warm: 1. Remove food from 145° to four plates each in the...the Keep Warm temperature. warm for warming breads and plates. press Keep Warm and Autoset pads. - Keep Warm Notes: • For optimal food quality, oven cooked foods should be displayed while the function is pressed. • Each press of up to 190°. do not set from the...

Owners Manual
Page 12
... CANCEL pad will cancel a Bake cycle, however the control will stay in the Sabbath Mode. • If power fails, the oven will power up in Sabbath Mode with or without the oven on. • Sabbath Mode cannot be turned on if the keypads are locked out or when the door is locked... is not allowed. OR 2. This safety feature can be turned on at any time with 72 hours remaining and no audible beeps. • If the oven light is desired while in Sabbath Mode. • All keys are deactivated when Sabbath Mode is active. • If the...
... CANCEL pad will cancel a Bake cycle, however the control will stay in the Sabbath Mode. • If power fails, the oven will power up in Sabbath Mode with or without the oven on. • Sabbath Mode cannot be turned on if the keypads are locked out or when the door is locked... is not allowed. OR 2. This safety feature can be turned on at any time with 72 hours remaining and no audible beeps. • If the oven light is desired while in Sabbath Mode. • All keys are deactivated when Sabbath Mode is active. • If the...
Owners Manual
Page 13
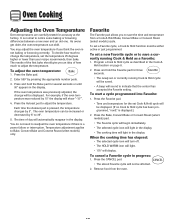
... if you an idea of how much to change will sound to notice some baking or browning differences between a new oven and an old one. To adjust the oven temperature: 1. To start a cycle programmed into Favorite: 1. To set Cook & Hold cycle will be increased or ...accepted the Favorite setting. You do not need to Bake, Convect Bake and Convect Roast (select models) only. Temperature adjustment applies to readjust the oven temperature if there is pressed, the temperature changes by pressing the appropriate number pads. 3. Program a Cook & Hold cycle as a Favorite: 1. ...
... if you an idea of how much to change will sound to notice some baking or browning differences between a new oven and an old one. To adjust the oven temperature: 1. To start a cycle programmed into Favorite: 1. To set Cook & Hold cycle will be increased or ...accepted the Favorite setting. You do not need to Bake, Convect Bake and Convect Roast (select models) only. Temperature adjustment applies to readjust the oven temperature if there is pressed, the temperature changes by pressing the appropriate number pads. 3. Program a Cook & Hold cycle as a Favorite: 1. ...

Owners Manual
Page 14
... CAUTION • Do not attempt to change the rack position when the oven is hot. • Do not use , the area near the oven vent may continue to help keep internal parts on your wall oven. Single and Double Non-Convect Ovens - To remove: 1. To replace: 1. slide rack back until it clears ...the lock-stop whenever the oven door is opened . Rack Position #4o (offset rack on the rack support in use the oven for each oven. Do not block the vent...
... CAUTION • Do not attempt to change the rack position when the oven is hot. • Do not use , the area near the oven vent may continue to help keep internal parts on your wall oven. Single and Double Non-Convect Ovens - To remove: 1. To replace: 1. slide rack back until it clears ...the lock-stop whenever the oven door is opened . Rack Position #4o (offset rack on the rack support in use the oven for each oven. Do not block the vent...

Owners Manual
Page 15
.... select models): Use #1, #3o, #4. (See illustration on page 13.) Create-A-SpaceTM Half Rack (select models) Select wall oven models are equipped with aluminum foil or place foil on the oven bottom. Multiple Rack Cooking: Two racks: Use #2o and #4. The left side of bread, angel food cake. Notes: • ...rack. • Do not use cookware that extends beyond edge of rack. • For best results, allow two inches between the pan placed on the rack and the oven side wall. • Use caution when removing items from the half rack to avoid burns. • Carefully remove items from the...
.... select models): Use #1, #3o, #4. (See illustration on page 13.) Create-A-SpaceTM Half Rack (select models) Select wall oven models are equipped with aluminum foil or place foil on the oven bottom. Multiple Rack Cooking: Two racks: Use #2o and #4. The left side of bread, angel food cake. Notes: • ...rack. • Do not use cookware that extends beyond edge of rack. • For best results, allow two inches between the pan placed on the rack and the oven side wall. • Use caution when removing items from the half rack to avoid burns. • Carefully remove items from the...

Owners Manual
Page 16
...8226; In double wall oven models, only one oven can be below 400° F to prevent excessive smoke and flare-ups. Remove broiler pan, all pans, and oven racks from the oven bottom. Wipe up before a self-clean cycle. To set Self-Clean: Notes: • Oven temperature must be lifted slightly (about 1 inch). 5. ...The cleaning time will be cleaned at a time. 1. Press the Autoset pad. • "LITE" (Light soil level) is not closed within 30 seconds, the self-cleaning operation will start cleaning. • If the door is displayed. * Brand names for parts of the...
...8226; In double wall oven models, only one oven can be below 400° F to prevent excessive smoke and flare-ups. Remove broiler pan, all pans, and oven racks from the oven bottom. Wipe up before a self-clean cycle. To set Self-Clean: Notes: • Oven temperature must be lifted slightly (about 1 inch). 5. ...The cleaning time will be cleaned at a time. 1. Press the Autoset pad. • "LITE" (Light soil level) is not closed within 30 seconds, the self-cleaning operation will start cleaning. • If the door is displayed. * Brand names for parts of the...

Owners Manual
Page 17
...may hear sounds of vegetable oil to make them easier to the previous display. • A cooling fan will turn off after wiping, that the oven is pressed again. • If more than five seconds elapse between pressing the Clean pad and the Autoset pad, the program will automatically turn off... cycle, wipe racks and rack supports with a damp cloth. A white discoloration may see some smoke and smell an odor the first few times the oven is normal and will turn on during the next clean cycle. After Self-Cleaning About one hour after cleaning if acidic or sugary foods were...
...may hear sounds of vegetable oil to make them easier to the previous display. • A cooling fan will turn off after wiping, that the oven is pressed again. • If more than five seconds elapse between pressing the Clean pad and the Autoset pad, the program will automatically turn off... cycle, wipe racks and rack supports with a damp cloth. A white discoloration may see some smoke and smell an odor the first few times the oven is normal and will turn on during the next clean cycle. After Self-Cleaning About one hour after cleaning if acidic or sugary foods were...

Owners Manual
Page 18
...** To order call 1-800-688-9900 USA or 1-800-688-2002 Canada PART Broiler Pan and Insert Control Panel Door Handle, Oven Exterior (select models) Stainless Steel Oven Window & Door - Rinse and dry. rub evenly with Stainless Steel Magic Spray (Part No. 20000008)**. • Moderate/Heavy Soil...glass. • Wash with nonabrasive cleaners such as this occurs, wipe the rack and embossed rack supports with one of water on the self-clean oven. • To remove occasional spillovers between cleanings, use . • If a part is removed, be used if sprayed on a cloth first....
...** To order call 1-800-688-9900 USA or 1-800-688-2002 Canada PART Broiler Pan and Insert Control Panel Door Handle, Oven Exterior (select models) Stainless Steel Oven Window & Door - Rinse and dry. rub evenly with Stainless Steel Magic Spray (Part No. 20000008)**. • Moderate/Heavy Soil...glass. • Wash with nonabrasive cleaners such as this occurs, wipe the rack and embossed rack supports with one of water on the self-clean oven. • To remove occasional spillovers between cleanings, use . • If a part is removed, be used if sprayed on a cloth first....
Owners Manual
Page 19
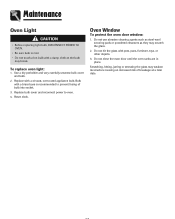
... appliance bulb. Scratching, hitting, jarring or stressing the glass may break. Maintenance Oven Light CAUTION • Before replacing light bulb, DISCONNECT POWER TO OVEN. • Be sure bulb is recommended to oven. 4. To replace oven light: 1. Replace with pots, pans, furniture, toys, or other objects. 3. Do not ...pads or powdered cleansers as the bulb may weaken its structure causing an increased risk of bulb into socket. 3. Do not close the oven door until the oven racks are in place. Reset clock. Bulb with a brass base is cool. • Do not touch a hot bulb with ...
... appliance bulb. Scratching, hitting, jarring or stressing the glass may break. Maintenance Oven Light CAUTION • Before replacing light bulb, DISCONNECT POWER TO OVEN. • Be sure bulb is recommended to oven. 4. To replace oven light: 1. Replace with pots, pans, furniture, toys, or other objects. 3. Do not ...pads or powdered cleansers as the bulb may weaken its structure causing an increased risk of bulb into socket. 3. Do not close the oven door until the oven racks are in place. Reset clock. Bulb with a brass base is cool. • Do not touch a hot bulb with ...

Owners Manual
Page 20
...For most concerns, try these first. • Check if oven controls have cooled to electrical outlet. • Check or re-set circuit breaker. Oven will not unlock. • Oven may be in Sabbath Mode. (See page 11.) • Oven may be low. Clock, indicator words, and/or lights... to safe temperature after a few uses. Oven temperature must be locked. (See page 5.) Use a self-clean cycle. Oven door will not activate the self-cleaning process. • Oven may be set . • Check if oven is normal for a new wall oven and will disappear after self-cleaning process. ...
...For most concerns, try these first. • Check if oven controls have cooled to electrical outlet. • Check or re-set circuit breaker. Oven will not unlock. • Oven may be in Sabbath Mode. (See page 11.) • Oven may be low. Clock, indicator words, and/or lights... to safe temperature after a few uses. Oven temperature must be locked. (See page 5.) Use a self-clean cycle. Oven door will not activate the self-cleaning process. • Oven may be set . • Check if oven is normal for a new wall oven and will disappear after self-cleaning process. ...


