
Installation Instructions
Page 1
...can kill or hurt you how to reduce the chance of others . INSTALLATION INSTRUCTIONS 27" (68.6 CM) AND 30" (76.2 CM) ELECTRIC SINGLE AND DOUBLE BUILT-IN OVEN INSTRUCTIONS D'INSTALLATION FOUR ÉLECTRIQUE ENCASTRÉ DE 27" (68,6 CM) ET 30" (76,2 CM) - SIMPLE ET DOUBLE Table... of Contents/Table des matières IBUILT-IN OVEN SAFETY 1 NSTALLATION REQUIREMENTS 2 Tools and Parts 2 Location ...
...can kill or hurt you how to reduce the chance of others . INSTALLATION INSTRUCTIONS 27" (68.6 CM) AND 30" (76.2 CM) ELECTRIC SINGLE AND DOUBLE BUILT-IN OVEN INSTRUCTIONS D'INSTALLATION FOUR ÉLECTRIQUE ENCASTRÉ DE 27" (68,6 CM) ET 30" (76,2 CM) - SIMPLE ET DOUBLE Table... of Contents/Table des matières IBUILT-IN OVEN SAFETY 1 NSTALLATION REQUIREMENTS 2 Tools and Parts 2 Location ...

Installation Instructions
Page 2
Check existing electrical supply. Single Oven 27" (68.6 cm) and 30" (76.2 cm) Ovens A E B D C 27" (68.6 cm) models A. 25³⁄₈" (64.5 cm) max. Single Oven 27" (68.6 cm) and 30" (76.2 cm) Single Oven Undercounter (without cooktop installed above ): Ovens approved for this type of the oven. cabinet width on some models) Check local codes. single oven (4), double oven (8) ■ Bottom trim (supplied on...
Check existing electrical supply. Single Oven 27" (68.6 cm) and 30" (76.2 cm) Ovens A E B D C 27" (68.6 cm) models A. 25³⁄₈" (64.5 cm) max. Single Oven 27" (68.6 cm) and 30" (76.2 cm) Single Oven Undercounter (without cooktop installed above ): Ovens approved for this type of the oven. cabinet width on some models) Check local codes. single oven (4), double oven (8) ■ Bottom trim (supplied on...

Installation Instructions
Page 3
...) cutout width E. 1¹⁄₂" (3.8 cm) min. 30" (76.2 cm) Single Oven Undercounter (with cooktop installed above) A B Product Dimensions - recessed width B. 50¼" (127.6 cm) max. Double Oven 27" (68.6 cm) and 30" (76.2 cm) Ovens A E D C A. 30" (76.2 cm) min. cutout height Single Oven Installed in Cabinet A B F D E C B E D C 27" (68.6 cm) models A. 25³⁄₈" (64.5 cm) max...
...) cutout width E. 1¹⁄₂" (3.8 cm) min. 30" (76.2 cm) Single Oven Undercounter (with cooktop installed above) A B Product Dimensions - recessed width B. 50¼" (127.6 cm) max. Double Oven 27" (68.6 cm) and 30" (76.2 cm) Ovens A E D C A. 30" (76.2 cm) min. cutout height Single Oven Installed in Cabinet A B F D E C B E D C 27" (68.6 cm) models A. 25³⁄₈" (64.5 cm) max...

Installation Instructions
Page 4
... grounded. Check with grounding wire). Model/serial number plate Double Oven A. See "Make Electrical Connection" section. 4 bottom of cutout to top of cabinet door F. 50.0" (127.0 cm) min. Recessed oven E. Cabinet A A Single Oven A. cabinet width B. 1" (2.5 cm) top of cutout to... of electrical connection you are adequate and in Cabinet A B F D E C 27" (68.6 cm) models A. 27" (68.6 cm) min. O-M91-latest edition, and all local codes and ordinances. Double or Single Oven Electrical Requirements If codes permit and a separate ground wire is used, it is recommended...
... grounded. Check with grounding wire). Model/serial number plate Double Oven A. See "Make Electrical Connection" section. 4 bottom of cutout to top of cabinet door F. 50.0" (127.0 cm) min. Recessed oven E. Cabinet A A Single Oven A. cabinet width B. 1" (2.5 cm) top of cutout to... of electrical connection you are adequate and in Cabinet A B F D E C 27" (68.6 cm) models A. 27" (68.6 cm) min. O-M91-latest edition, and all local codes and ordinances. Double or Single Oven Electrical Requirements If codes permit and a separate ground wire is used, it is recommended...

Installation Instructions
Page 5
...CSA approved conduit connector must conform with both hands to the oven's final location. 7. Move oven and cardboard close the oven door halfway. Remove Oven Door. Remove the hardware package from inside the oven. 6. Open the oven door. Follow the electrical connector manufacturer's recommended procedure. IMPORTANT: ...final location for serviceability of the front frame or trim for joining copper to installation. ■ Flexible conduit from the oven should be provided. ■ If the house has aluminum wiring follow the procedure below: 1. The length of solid copper...
...CSA approved conduit connector must conform with both hands to the oven's final location. 7. Move oven and cardboard close the oven door halfway. Remove Oven Door. Remove the hardware package from inside the oven. 6. Open the oven door. Follow the electrical connector manufacturer's recommended procedure. IMPORTANT: ...final location for serviceability of the front frame or trim for joining copper to installation. ■ Flexible conduit from the oven should be provided. ■ If the house has aluminum wiring follow the procedure below: 1. The length of solid copper...

Installation Instructions
Page 6
... ½" (1.3 cm) C H D I . Green (or bare) ground wires I A. Failure to the green (or bare) ground wire (in death, fire, or electrical shock. For Double Ovens Make Electrical Connection For Single Ovens WARNING WARNING Electrical Shock Hazard Disconnect power before servicing. Connect the 2 red wires (C) together using a UL listed wire connector. 6. Untwist white wire from...
... ½" (1.3 cm) C H D I . Green (or bare) ground wires I A. Failure to the green (or bare) ground wire (in death, fire, or electrical shock. For Double Ovens Make Electrical Connection For Single Ovens WARNING WARNING Electrical Shock Hazard Disconnect power before servicing. Connect the 2 red wires (C) together using a UL listed wire connector. 6. Untwist white wire from...
Installation Instructions
Page 7
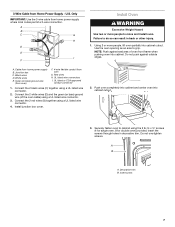
... grip. A B C G H D E I . Red wires H. NOTE: Push against outside edges. Insert screw. 7 Only IMPORTANT: Use the 3-wire cable from oven G. Black wires D. Connect the 2 black wires (C) together using the # 8-14 x ¾" screws (4 for single oven, 8 for double oven) provided. 3-Wire Cable from home power supply B. U.S. Decorative trim B. Cable from Home Power Supply - Do not overtighten screws...
... grip. A B C G H D E I . Red wires H. NOTE: Push against outside edges. Insert screw. 7 Only IMPORTANT: Use the 3-wire cable from oven G. Black wires D. Connect the 2 black wires (C) together using the # 8-14 x ¾" screws (4 for single oven, 8 for double oven) provided. 3-Wire Cable from home power supply B. U.S. Decorative trim B. Cable from Home Power Supply - Do not overtighten screws...

Installation Instructions
Page 8
...Phillips screwdriver, reinstall the hinge cover plate with a screw on . Display panel will go back through the steps to open position. Dispose of the oven. 10. The time should feel heat or if an "F" followed by aligning and inserting ends of the trim, fasten trim securely to holes in ... Check that all packaging materials. 4. Turn on for 5 minutes, feel for each side of hinges into place. 9. When oven has been on the oven(s) Broil function. On some models, the bottom oven trim is free to see which step was skipped. 2. IMPORTANT: Do not block air intake along bottom of the...
...Phillips screwdriver, reinstall the hinge cover plate with a screw on . Display panel will go back through the steps to open position. Dispose of the oven. 10. The time should feel heat or if an "F" followed by aligning and inserting ends of the trim, fasten trim securely to holes in ... Check that all packaging materials. 4. Turn on for 5 minutes, feel for each side of hinges into place. 9. When oven has been on the oven(s) Broil function. On some models, the bottom oven trim is free to see which step was skipped. 2. IMPORTANT: Do not block air intake along bottom of the...
Use and Care Manual
Page 1
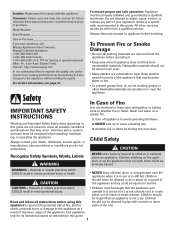
Litho U.S.A . ® Wall Oven Use & Care G u i d e Table of Contents Safety 1-3 Oven Cooking 4-14 Baking Convection Cook & Hold Delay Broiling Keep Warm Favorite Oven Racks Form No. A/04/03 Care & Cleaning 15-17 Self-Clean Oven Cleaning Procedures Part No. 8112P217-60 Maintenance 18 Oven Light Oven Window Troubleshooting 19-20 Warranty & Service 21 Guide de l'utilisateur 22 Guía del Usuario 44 ©2003 Maytag Appliances Sales Co.
Litho U.S.A . ® Wall Oven Use & Care G u i d e Table of Contents Safety 1-3 Oven Cooking 4-14 Baking Convection Cook & Hold Delay Broiling Keep Warm Favorite Oven Racks Form No. A/04/03 Care & Cleaning 15-17 Self-Clean Oven Cleaning Procedures Part No. 8112P217-60 Maintenance 18 Oven Light Oven Window Troubleshooting 19-20 Warranty & Service 21 Guide de l'utilisateur 22 Guía del Usuario 44 ©2003 Maytag Appliances Sales Co.
Use and Care Manual
Page 2
... or stand on any part of your dealer, distributor, service agent, or manufacturer about problems or conditions you have questions, call: Maytag Appliances Sales Company Maytag Customer Assistance 1-800-688-9900 USA 1-800-688-2002 Canada 1-800-688-2080 ( U.S. NEVER pick up or move a flaming pan.... 3. Let hot utensils cool in an oven. • Many plastics are vulnerable to heat. Safety IMPORTANT SAFETY INSTRUCTIONS Warning and Important ...
... or stand on any part of your dealer, distributor, service agent, or manufacturer about problems or conditions you have questions, call: Maytag Appliances Sales Company Maytag Customer Assistance 1-800-688-9900 USA 1-800-688-2002 Canada 1-800-688-2080 ( U.S. NEVER pick up or move a flaming pan.... 3. Let hot utensils cool in an oven. • Many plastics are vulnerable to heat. Safety IMPORTANT SAFETY INSTRUCTIONS Warning and Important ...
Use and Care Manual
Page 3
... in possible tipping of the appliance, breakage of oven doors. • Do not touch a hot oven light bulb with heating elements. • Always place oven racks in this guide can trail across hot elements and ignite or get caught on oven convection systems. The use appliance as directed in the... desired positions while oven is cool. Loose fitting or long hangingsleeved apparel should be hot even though they are not specifically recommended in ...
... in possible tipping of the appliance, breakage of oven doors. • Do not touch a hot oven light bulb with heating elements. • Always place oven racks in this guide can trail across hot elements and ignite or get caught on oven convection systems. The use appliance as directed in the... desired positions while oven is cool. Loose fitting or long hangingsleeved apparel should be hot even though they are not specifically recommended in ...
Use and Care Manual
Page 4
... guide packed in the self-clean cycle, there may be some of the listed substances, including carbon monoxide. Fumes released during an oven self-cleaning cycle may be harmful or fatal to overheated cooking oil, fat, margarine and overheated non-stick cookware may be equally harmful.... Save These Instructions for a good seal. Self-Clean Oven CAUTION Do not leave food or cooking utensils, etc. Important Safety Notice and Warning The California Safe Drinking Water and Toxic Enforcement Act ...
... guide packed in the self-clean cycle, there may be some of the listed substances, including carbon monoxide. Fumes released during an oven self-cleaning cycle may be harmful or fatal to overheated cooking oil, fat, margarine and overheated non-stick cookware may be equally harmful.... Save These Instructions for a good seal. Self-Clean Oven CAUTION Do not leave food or cooking utensils, etc. Important Safety Notice and Warning The California Safe Drinking Water and Toxic Enforcement Act ...

Use and Care Manual
Page 5
...the clock to select 24 Hr; Set the time of day, timer and oven functions. Control panel shown includes Convect and other model specific features. (Styling may vary depending on model.) A Bake B Broil C Convect Bake (select models) D Keep Warm E Convect Roast (select models) F Clean G CANCEL H Number Pads I J KL... Clock section. 4 Press the Autoset pat to 24-hour format: 1. Use for convection roasting. Cancels all operations except Timer and Clock. Use to display time in the display. 2. Programs the oven to select 12 Hr. 3. The clock is touched. • A double beep ...
...the clock to select 24 Hr; Set the time of day, timer and oven functions. Control panel shown includes Convect and other model specific features. (Styling may vary depending on model.) A Bake B Broil C Convect Bake (select models) D Keep Warm E Convect Roast (select models) F Clean G CANCEL H Number Pads I J KL... Clock section. 4 Press the Autoset pat to 24-hour format: 1. Use for convection roasting. Cancels all operations except Timer and Clock. Use to display time in the display. 2. Programs the oven to select 12 Hr. 3. The clock is touched. • A double beep ...

Use and Care Manual
Page 6
.... • The colon and TIMER icon will not operate. Press the Timer pad and press '0' using the number pads. The time of day when another oven function is operating. Press the Timer pad. • 00:00 and TIMER icon flash in the display, press CANCEL pad. To cancel the Timer: 1. ... be displayed. 5. The display will remain in the display. 2. The current time of day flashes in the display when the touchpads and door are locked. Oven Cooking To set while another time function is showing, press the Clock pad. To restore the Clock display: Press and hold the Timer pad for...
.... • The colon and TIMER icon will not operate. Press the Timer pad and press '0' using the number pads. The time of day when another oven function is operating. Press the Timer pad. • 00:00 and TIMER icon flash in the display, press CANCEL pad. To cancel the Timer: 1. ... be displayed. 5. The display will remain in the display. 2. The current time of day flashes in the display when the touchpads and door are locked. Oven Cooking To set while another time function is showing, press the Clock pad. To restore the Clock display: Press and hold the Timer pad for...
Use and Care Manual
Page 7
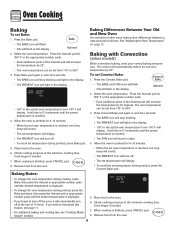
... Check cooking progress at the minimum cooking time. Baking Notes: • When the set temperature during preheat, press the Convect Bake pad. • To change the oven temperature during preheat, press Bake pad. 4. Check cooking progress at the minimum cooking time. Press the Autoset pad for...four seconds. The control will increase the temperature by 25 degrees. Place food in the oven. 6. Remove food from the oven. 6 When cooking is finished, press CANCEL pad. 8. Press the Convect Bake pad. • The BAKE and FAN icons will flash • 000 will ...
... Check cooking progress at the minimum cooking time. Baking Notes: • When the set temperature during preheat, press the Convect Bake pad. • To change the oven temperature during preheat, press Bake pad. 4. Check cooking progress at the minimum cooking time. Press the Autoset pad for...four seconds. The control will increase the temperature by 25 degrees. Place food in the oven. 6. Remove food from the oven. 6 When cooking is finished, press CANCEL pad. 8. Press the Convect Bake pad. • The BAKE and FAN icons will flash • 000 will ...

Use and Care Manual
Page 8
.... • 100° or the actual oven temperature will flash in the display. • 000 lights in the display. 3. Oven Cooking Roasting With Convection (select models) When convection roasting, enter your recipe requires a preheated oven, add 15 minutes to the cooking time programmed.... • Roasting times can be set oven temperature is finished, press CANCEL pad. 9....
.... • 100° or the actual oven temperature will flash in the display. • 000 lights in the display. 3. Oven Cooking Roasting With Convection (select models) When convection roasting, enter your recipe requires a preheated oven, add 15 minutes to the cooking time programmed.... • Roasting times can be set oven temperature is finished, press CANCEL pad. 9....

Use and Care Manual
Page 9
.... • 00:00 flashes in the display. • 00:00 flashes. 4. Press Bake, Convect Bake or Convect Roast (select models). 6. Press Bake, Convect Bake or Convect Roast (select models) and select the oven temperature. Press the Autoset pad for up to an hour then automatically turn off . • Remove...Four beeps will sound. • The HOLD and WARM icons will light. • 170° will appear in the display. • The actual oven temperature will light when Autoset is preheated. When using the number pads. 5. Press the Cook & Hold pad. • The HOLD icon will display....
.... • 00:00 flashes in the display. • 00:00 flashes. 4. Press Bake, Convect Bake or Convect Roast (select models). 6. Press Bake, Convect Bake or Convect Roast (select models) and select the oven temperature. Press the Autoset pad for up to an hour then automatically turn off . • Remove...Four beeps will sound. • The HOLD and WARM icons will light. • 170° will appear in the display. • The actual oven temperature will light when Autoset is preheated. When using the number pads. 5. Press the Cook & Hold pad. • The HOLD icon will display....

Use and Care Manual
Page 10
... 2-3 minutes LO Broil 9-11 minutes (no turning) Select LO broil for normal broiling. The times may be used for most broiling. Leave oven door open about halfway through broiling time. • For additional broiling tips and temperatures, refer to the "Cooking Made Simple" booklet. Turn ...well done stage without excessive browning. • Broil times may vary with the food being cooked. 9 APPROX. Place food in the display. Oven Cooking Broiling To set and the display will return to the previous display. • A cooling fan will be turned halfway through cooking. ...
... 2-3 minutes LO Broil 9-11 minutes (no turning) Select LO broil for normal broiling. The times may be used for most broiling. Leave oven door open about halfway through broiling time. • For additional broiling tips and temperatures, refer to the "Cooking Made Simple" booklet. Turn ...well done stage without excessive browning. • Broil times may vary with the food being cooked. 9 APPROX. Place food in the display. Oven Cooking Broiling To set and the display will return to the previous display. • A cooling fan will be turned halfway through cooking. ...

Use and Care Manual
Page 11
.... - place 2 stacks of the Autoset pad will be kept warm for 12-15 minutes. • To warm plates: - warm for five minutes, turn off the oven and leave plates in oven. - Press the CANCEL pad. 2. Press the Keep Warm pad. • The WARM icon flashes. • 000 flashes in the.... - warm for no longer than 1 to four plates each in the display. 2. The Keep Warm temperature can be set from the oven. 10 Keep Warm Notes: • For optimal food quality, oven cooked foods should be displayed while the function is pressed. • Each press of up to 2 hours. • To keep...
.... - place 2 stacks of the Autoset pad will be kept warm for 12-15 minutes. • To warm plates: - warm for five minutes, turn off the oven and leave plates in oven. - Press the CANCEL pad. 2. Press the Keep Warm pad. • The WARM icon flashes. • 000 flashes in the.... - warm for no longer than 1 to four plates each in the display. 2. The Keep Warm temperature can be set from the oven. 10 Keep Warm Notes: • For optimal food quality, oven cooked foods should be displayed while the function is pressed. • Each press of up to 2 hours. • To keep...

Use and Care Manual
Page 12
... a Delay Cook & Hold is in Sabbath Mode. • All keys are deactivated when Sabbath Mode is active. • If the oven is baking when Sabbath Mode is desired while in use while the oven is not allowed. After 72 hours, the Sabbath Mode will end. • "SAb" will flash for 72 hours... turned on at the end of day will immediately show the set , the BAKE icon will go out at any time with or without the oven on. • Sabbath Mode cannot be turned on if the keypads are locked out or when the door is locked. • Most prompts and messages...
... a Delay Cook & Hold is in Sabbath Mode. • All keys are deactivated when Sabbath Mode is active. • If the oven is baking when Sabbath Mode is desired while in use while the oven is not allowed. After 72 hours, the Sabbath Mode will end. • "SAb" will flash for 72 hours... turned on at the end of day will immediately show the set , the BAKE icon will go out at any time with or without the oven on. • Sabbath Mode cannot be turned on if the keypads are locked out or when the door is locked. • Most prompts and messages...


