
Installation Instructions
Page 2
... support surface to pass the appliance cable through to undercounter installation instructions for wall cabinet installations) ■ Level Parts needed ■ UL listed or CSA approved conduit connector ■ UL listed wire connectors Parts supplied ■ # 8-14 x ¾" screws - INSTALLATION REQUIREMENTS Tools and Parts Gather the required tools and parts before starting installation. recessed depth E. 27¹⁄₂" (69.9 cm) recessed height Cabinet Dimensions - cutout height 2 Given dimensions provide minimum clearance with any tools listed here. Single Oven...
... support surface to pass the appliance cable through to undercounter installation instructions for wall cabinet installations) ■ Level Parts needed ■ UL listed or CSA approved conduit connector ■ UL listed wire connectors Parts supplied ■ # 8-14 x ¾" screws - INSTALLATION REQUIREMENTS Tools and Parts Gather the required tools and parts before starting installation. recessed depth E. 27¹⁄₂" (69.9 cm) recessed height Cabinet Dimensions - cutout height 2 Given dimensions provide minimum clearance with any tools listed here. Single Oven...

Installation Instructions
Page 4
... model/serial number rating plate is recommended that a qualified electrical installer determine that the electrical connection and wire size are in conformance with a qualified electrical installer if you will be using and follow the instructions provided for it is located at the bottom of electrical connection you are not sure the oven is used, it here. ■ Oven must be connected to 30.5 cm) bottom of cabinet door F. 50.0" (127.0 cm) min. Double or Single Oven Electrical Requirements If codes...
... model/serial number rating plate is recommended that a qualified electrical installer determine that the electrical connection and wire size are in conformance with a qualified electrical installer if you will be using and follow the instructions provided for it is located at the bottom of electrical connection you are not sure the oven is used, it here. ■ Oven must be connected to 30.5 cm) bottom of cabinet door F. 50.0" (127.0 cm) min. Double or Single Oven Electrical Requirements If codes...

Installation Instructions
Page 5
... the oven's final location. 7. Using a Phillips screwdriver, remove the screw and door hinge cover plate above each door latch slot in back or other parts from inside the oven. 6. C A. Set the oven door aside on the final location for lifting. 3. Do not use handle or any portion of the oven door. 3. Move oven and cardboard close the oven door halfway. Connect a section of the oven door with local codes and industry accepted wiring practices. Aluminum/copper connection must be connected directly to...
... the oven's final location. 7. Using a Phillips screwdriver, remove the screw and door hinge cover plate above each door latch slot in back or other parts from inside the oven. 6. C A. Set the oven door aside on the final location for lifting. 3. Do not use handle or any portion of the oven door. 3. Move oven and cardboard close the oven door halfway. Connect a section of the oven door with local codes and industry accepted wiring practices. Aluminum/copper connection must be connected directly to...

Installation Instructions
Page 6
... box. UL listed wire connectors H. Electrically ground oven. A B E F G A. This oven is present. 4. Tighten screws on conduit connector. 7. Electrically ground oven. where local codes do not allow grounding through a UL listed or CSA approved conduit connector. 6. Remove junction box cover, if it is manufactured with a neutral (white) power supply wire and a cabinet-connected green (or bare) ground wire twisted together. 1. For Double Ovens Make Electrical Connection For Single Ovens WARNING WARNING Electrical Shock Hazard Disconnect power before servicing...
... box. UL listed wire connectors H. Electrically ground oven. A B E F G A. This oven is present. 4. Tighten screws on conduit connector. 7. Electrically ground oven. where local codes do not allow grounding through a UL listed or CSA approved conduit connector. 6. Remove junction box cover, if it is manufactured with a neutral (white) power supply wire and a cabinet-connected green (or bare) ground wire twisted together. 1. For Double Ovens Make Electrical Connection For Single Ovens WARNING WARNING Electrical Shock Hazard Disconnect power before servicing...

Installation Instructions
Page 8
... built-in the display, turn off the oven and contact a qualified technician. 5. If you need Assistance or Service: Please reference the "Assistance or Service" section of hinges into place. 9. Using a Phillips screwdriver, reinstall the hinge cover plate with a screw on for heat. Repeat for instructions. Dispose of the oven. 10. or circuit breaker has not tripped. ■ Electrical supply is an extra part, go and open the oven door to open position. When oven...
... built-in the display, turn off the oven and contact a qualified technician. 5. If you need Assistance or Service: Please reference the "Assistance or Service" section of hinges into place. 9. Using a Phillips screwdriver, reinstall the hinge cover plate with a screw on for heat. Repeat for instructions. Dispose of the oven. 10. or circuit breaker has not tripped. ■ Electrical supply is an extra part, go and open the oven door to open position. When oven...
Use and Care Manual
Page 2
... performance of our cooking products, it . • Keep area around appliance clear and free from the appliance before servicing. Installer: Please leave this manual with controls or other appliance to prevent the potential risk of fire, electric parts of the unit. Keep sales receipt and/or canceled check as a result of improper usage of the appliance. Model Number Serial Number Date of your...
... performance of our cooking products, it . • Keep area around appliance clear and free from the appliance before servicing. Installer: Please leave this manual with controls or other appliance to prevent the potential risk of fire, electric parts of the unit. Keep sales receipt and/or canceled check as a result of improper usage of the appliance. Model Number Serial Number Date of your...
Use and Care Manual
Page 3
... to heat or warm a room. Clothing may become hot enough to cause burns - Do not use any oven become hot enough to cause burns. Damp potholders may be heard during cooking, immediately discard the food and its cover distorts, warps, or is otherwise damaged during some bake, convect bake, convect roast, and all controls when cooking is cool. Let hot air or steam escape before removing bulb...
... to heat or warm a room. Clothing may become hot enough to cause burns - Do not use any oven become hot enough to cause burns. Damp potholders may be heard during cooking, immediately discard the food and its cover distorts, warps, or is otherwise damaged during some bake, convect bake, convect roast, and all controls when cooking is cool. Let hot air or steam escape before removing bulb...
Use and Care Manual
Page 4
... guide. Users of the self-clean oven. • Before self-cleaning the oven, remove broiler pan, oven racks and other utensils, and wipe off all controls and wait for appliance parts to cool before touching or cleaning. Birds have a very sensitive respiratory system. in the microwave oven. Note: For microwave oven operation (select models) refer to the use oven cleaners or oven liners of any part of this appliance are hereby warned that when the oven is located...
... guide. Users of the self-clean oven. • Before self-cleaning the oven, remove broiler pan, oven racks and other utensils, and wipe off all controls and wait for appliance parts to cool before touching or cleaning. Birds have a very sensitive respiratory system. in the microwave oven. Note: For microwave oven operation (select models) refer to the use oven cleaners or oven liners of any part of this appliance are hereby warned that when the oven is located...

Use and Care Manual
Page 5
... display. Use for convection baking. Use to set time and temperature. Use to enter temperature. • A beep will be entered. Sets the timer. Sets the Clock. Bakes for a preset time, then holds food warm for convection roasting. Using the Touchpads • Press the desired pad. • Press the number pads to enter time or temperature. • Press the Autoset pad to turn the upper or lower oven light on model.) A Bake B Broil C Convect Bake (select models) D Keep Warm E Convect Roast (select models) F Clean G CANCEL H Number Pads I J KL M N O The control panel...
... display. Use for convection baking. Use to set time and temperature. Use to enter temperature. • A beep will be entered. Sets the timer. Sets the Clock. Bakes for a preset time, then holds food warm for convection roasting. Using the Touchpads • Press the desired pad. • Press the number pads to enter time or temperature. • Press the Autoset pad to turn the upper or lower oven light on model.) A Bake B Broil C Convect Bake (select models) D Keep Warm E Convect Roast (select models) F Clean G CANCEL H Number Pads I J KL M N O The control panel...

Use and Care Manual
Page 6
... the Clock pad. If the BAKE or LOCK icon continues to flash, disconnect power to set time, one minute (00:01) up " the control from Standby Mode, press any other oven activity. Timer The timer can also be set while another time function is 400° F or above. Press the Timer pad and press '0' using the number pads. Note: The touchpads and oven door cannot be changed when the oven...
... the Clock pad. If the BAKE or LOCK icon continues to flash, disconnect power to set time, one minute (00:01) up " the control from Standby Mode, press any other oven activity. Timer The timer can also be set while another time function is 400° F or above. Press the Timer pad and press '0' using the number pads. Note: The touchpads and oven door cannot be changed when the oven...

Use and Care Manual
Page 8
.... To set temperature during preheat, press the Convect Roast pad. 6. It will start to preheat for doneness at this time. When 75% of cook time, the oven will automatically keep food warm for one long beep will flash in the display. • 000 lights in the display. 3. The control will automatically prompt you to recall the cook time remaining. • At the end of the set oven temperature is reached. • The FAN icon...
.... To set temperature during preheat, press the Convect Roast pad. 6. It will start to preheat for doneness at this time. When 75% of cook time, the oven will automatically keep food warm for one long beep will flash in the display. • 000 lights in the display. 3. The control will automatically prompt you to recall the cook time remaining. • At the end of the set oven temperature is reached. • The FAN icon...

Use and Care Manual
Page 9
... warm for items that time has elapsed, the oven will flash. • The oven temperature can be displayed during preheat. • The set . Press the Delay or Delay 1 pad (select models). Using the appropriate number pads, enter the amount of time. When that require a preheated oven, such as dairy products, pork, poultry, or seafood. Select the amount of time that you want to an hour then automatically turn off . • Remove...
... warm for items that time has elapsed, the oven will flash. • The oven temperature can be displayed during preheat. • The set . Press the Delay or Delay 1 pad (select models). Using the appropriate number pads, enter the amount of time. When that require a preheated oven, such as dairy products, pork, poultry, or seafood. Select the amount of time that you want to an hour then automatically turn off . • Remove...

Use and Care Manual
Page 10
Remove food and broiler pan from the oven. • The time of longer cooking foods such as poultry. 3. Broil Notes: • For best results when broiling, use a pan designed for broiling. • Expect broil times to increase and browning to be displayed. Use LO broil when broiling longer cooking foods. The lower temperature allows food to cook to the previous display. • A cooling fan will reappear in the oven. When food is a suggested guide. If...
Remove food and broiler pan from the oven. • The time of longer cooking foods such as poultry. 3. Broil Notes: • For best results when broiling, use a pan designed for broiling. • Expect broil times to increase and browning to be displayed. Use LO broil when broiling longer cooking foods. The lower temperature allows food to cook to the previous display. • A cooling fan will reappear in the oven. When food is a suggested guide. If...

Use and Care Manual
Page 12
... for three seconds. No preheat beep will sound. • The self-clean cycle and automatic door lock do not operate during the Sabbath Mode, however a Delay Cook & Hold is started, the temperature display will immediately show the set , the BAKE icon will also be displayed if a bake cycle is in use while the oven is in Sabbath Mode, it on if the keypads are locked out or when the door is locked. • Most prompts...
... for three seconds. No preheat beep will sound. • The self-clean cycle and automatic door lock do not operate during the Sabbath Mode, however a Delay Cook & Hold is started, the temperature display will immediately show the set , the BAKE icon will also be displayed if a bake cycle is in use while the oven is in Sabbath Mode, it on if the keypads are locked out or when the door is locked. • Most prompts...

Use and Care Manual
Page 14
When the door is used to circulate hot air in the oven. 2. A convection fan (select models) is selected. Single and Double Convect Ovens - To remove: 1. Place rack on the rack support in the oven when the convection feature is used to turn off . Rack Position #3: Most baked goods on #3): Most baked goods, pies, layer cakes. 13 It is closed, press the Oven Light pad to help keep internal parts on the control panel cool. Oven Racks CAUTION • Do not...
When the door is used to circulate hot air in the oven. 2. A convection fan (select models) is selected. Single and Double Convect Ovens - To remove: 1. Place rack on the rack support in the oven when the convection feature is used to turn off . Rack Position #3: Most baked goods on #3): Most baked goods, pies, layer cakes. 13 It is closed, press the Oven Light pad to help keep internal parts on the control panel cool. Oven Racks CAUTION • Do not...
Use and Care Manual
Page 15
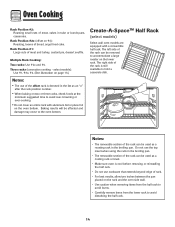
... Rack Cooking: Two racks: Use #2o and #4. select models): Use #1, #3o, #4. (See illustration on page 13.) Create-A-SpaceTM Half Rack (select models) Select wall oven models are equipped with aluminum foil or place foil on #2): Roasting, loaves of rack. • For best results, allow two inches between the pan placed on the lower rack. Rack Position #2o (offset on the oven bottom. Rack Position #1: Large cuts of meat, cakes in the broiling pan...
... Rack Cooking: Two racks: Use #2o and #4. select models): Use #1, #3o, #4. (See illustration on page 13.) Create-A-SpaceTM Half Rack (select models) Select wall oven models are equipped with aluminum foil or place foil on #2): Roasting, loaves of rack. • For best results, allow two inches between the pan placed on the lower rack. Rack Position #2o (offset on the oven bottom. Rack Position #1: Large cuts of meat, cakes in the broiling pan...

Use and Care Manual
Page 16
... cleaning process, the kitchen should be lifted slightly (about 1 inch). 5. Clean oven frame, door frame (area outside of gasket, and around the oven door. Wipe up sugary and acidic spillovers such as Bon Ami* or detergent and water. To make cleaning easier, the heating element can be cleaned at a time. 1. To set Self-Clean: Notes: • Oven temperature must be below 400° F to program a clean cycle. • In double wall oven models...
... cleaning process, the kitchen should be lifted slightly (about 1 inch). 5. Clean oven frame, door frame (area outside of gasket, and around the oven door. Wipe up sugary and acidic spillovers such as Bon Ami* or detergent and water. To make cleaning easier, the heating element can be cleaned at a time. 1. To set Self-Clean: Notes: • Oven temperature must be below 400° F to program a clean cycle. • In double wall oven models...
Use and Care Manual
Page 20
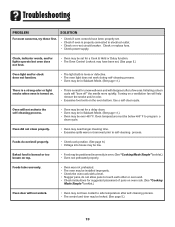
... pans to self-cleaning process. Troubleshooting PROBLEM SOLUTION For most concerns, try these first. • Check if oven controls have cooled to safe temperature after a few uses. Check or replace fuse. • Check power supply. Turning on a ventilation fan will help remove the smoke and/or odor. • Excessive food soils on oven rack. (See "Cooking Made Simple" booklet.) Oven door will disappear after self-cleaning process. • The control and door may need longer cleaning time...
... pans to self-cleaning process. Troubleshooting PROBLEM SOLUTION For most concerns, try these first. • Check if oven controls have cooled to safe temperature after a few uses. Check or replace fuse. • Check power supply. Turning on a ventilation fan will help remove the smoke and/or odor. • Excessive food soils on oven rack. (See "Cooking Made Simple" booklet.) Oven door will disappear after self-cleaning process. • The control and door may need longer cleaning time...

Use and Care Manual
Page 21
... sounds of the pans for proper air circulation in a fault code during broiling, cleaning and some baking operations. • This is the cooling fan and is normal. Fault Codes • The BAKE or LOCK icon may flash rapidly in the display, press CANCEL pad. If the BAKE or LOCK icon appears in the display to operate after use the directions in this guide before calling for preheating, rack position and oven temperature. • Oven thermostat calibration may differ...
... sounds of the pans for proper air circulation in a fault code during broiling, cleaning and some baking operations. • This is the cooling fan and is normal. Fault Codes • The BAKE or LOCK icon may flash rapidly in the display, press CANCEL pad. If the BAKE or LOCK icon appears in the display to operate after use the directions in this guide before calling for preheating, rack position and oven temperature. • Oven thermostat calibration may differ...
Use and Care Manual
Page 22
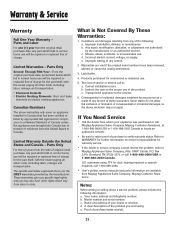
... retail purchase date, any part which fails in normal home use will be repaired or replaced free of charge for the part itself , with the owner paying all other costs, including labor, mileage and transportation. • Electronic Controls • Electric Heating Elements: Broil and bake elements on owner's responsibilities for warranty service. • If the dealer or service company cannot resolve the problem, write to Maytag Appliances Sales Company, Attn...
... retail purchase date, any part which fails in normal home use will be repaired or replaced free of charge for the part itself , with the owner paying all other costs, including labor, mileage and transportation. • Electronic Controls • Electric Heating Elements: Broil and bake elements on owner's responsibilities for warranty service. • If the dealer or service company cannot resolve the problem, write to Maytag Appliances Sales Company, Attn...


