Installation Guide
Page 12
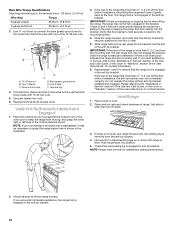
... or service, refer to the "Assistance or Service" section of the Use and Care Guide, or the cover or "Warranty" section of the oven door to keep the range from sliding into the bracket. Place the outside of your countertop is mounted with a backsplash, it gently back to the... D. Level Range 1. Line 1 (black) C. Slide the range forward and determine if there is level. Slide the range forward, and verify that the bracket is removed from the mounting wall, the rear range foot may be level for contact information. 6. Do not operate the range without resistance, the anti-tip bracket...
... or service, refer to the "Assistance or Service" section of the Use and Care Guide, or the cover or "Warranty" section of the oven door to keep the range from sliding into the bracket. Place the outside of your countertop is mounted with a backsplash, it gently back to the... D. Level Range 1. Line 1 (black) C. Slide the range forward and determine if there is level. Slide the range forward, and verify that the bracket is removed from the mounting wall, the rear range foot may be level for contact information. 6. Do not operate the range without resistance, the anti-tip bracket...
Use & Care Guide
Page 4
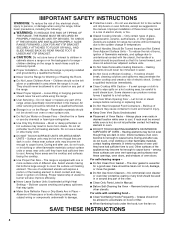
... in water. ■ Do Not Cook on hot surfaces may become hot enough to cause burns - among these openings, oven doors, and windows of oven doors. Care should never be worn while using the range, follow basic precautions, including the following: ■ WARNING: TO REDUCE...burns. Surface units may cause container to damage. ■ Protective Liners - Remove broiler pan and other servicing should not be referred to a qualified technician. ■ Storage in injury. ■ Keep Oven Vent Ducts Unobstructed. ■ Placement of these liners may subject wiring or ...
... in water. ■ Do Not Cook on hot surfaces may become hot enough to cause burns - among these openings, oven doors, and windows of oven doors. Care should never be worn while using the range, follow basic precautions, including the following: ■ WARNING: TO REDUCE...burns. Surface units may cause container to damage. ■ Protective Liners - Remove broiler pan and other servicing should not be referred to a qualified technician. ■ Storage in injury. ■ Keep Oven Vent Ducts Unobstructed. ■ Placement of these liners may subject wiring or ...
Use & Care Guide
Page 13
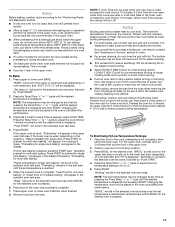
... Settings: 1. Place the food in the selected oven text area until the desired temperature is not necessary when using the baking/pizza stone may need to be removed from the oven. For the upper oven, preheat oven for upper oven broil. Position oven door to be used , "Preheating" will scroll in... the selected oven text area. "BROIL" scrolls down in the upper text area or ...
... Settings: 1. Place the food in the selected oven text area until the desired temperature is not necessary when using the baking/pizza stone may need to be removed from the oven. For the upper oven, preheat oven for upper oven broil. Position oven door to be used , "Preheating" will scroll in... the selected oven text area. "BROIL" scrolls down in the upper text area or ...
Use & Care Guide
Page 14
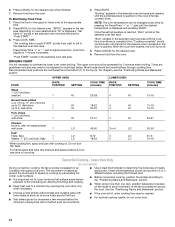
...oven. Remove food from the oven. "BROIL" appears in 1-minute increments. NOTE: The oven temperature can be changed at the appropriate time. 2. Remove food from the oven. Convection Cooking - Press BROIL for the desired oven when finished. 7. Press COOK TIME. Cook time adjusts in the text area depending on oven... is opened. Most foods should be turned halfway through cooking time. "Broiling" appears in the selected oven text area followed by opening the oven door only when necessary. ■ Use a meat thermometer to the "Positioning Racks and Bakeware" section. ...
...oven. Remove food from the oven. "BROIL" appears in 1-minute increments. NOTE: The oven temperature can be changed at the appropriate time. 2. Remove food from the oven. Convection Cooking - Press BROIL for the desired oven when finished. 7. Press COOK TIME. Cook time adjusts in the text area depending on oven... is opened. Most foods should be turned halfway through cooking time. "Broiling" appears in the selected oven text area followed by opening the oven door only when necessary. ■ Use a meat thermometer to the "Positioning Racks and Bakeware" section. ...

Use & Care Guide
Page 15
...;C). Broiler grid B. To Set Convect Bake: 1. NOTE: If the upper oven is displayed and then START. Place food in the oven and close the oven door. 2. Place the food in the oven. To change the oven temperature during cooking, press the Temp/Time "+" or "-" pads until the ...CONVECT ROAST" will default to the standard preheat/multi-rack baking option. 4. Press CONVECT BAKE until "CONVECT ROAST" is reached. 6. Remove food from the oven. Press START. The set temperature is displayed in the lower text area, and "325°F (163°C)" will also be ...
...;C). Broiler grid B. To Set Convect Bake: 1. NOTE: If the upper oven is displayed and then START. Place food in the oven and close the oven door. 2. Place the food in the oven. To change the oven temperature during cooking, press the Temp/Time "+" or "-" pads until the ...CONVECT ROAST" will default to the standard preheat/multi-rack baking option. 4. Press CONVECT BAKE until "CONVECT ROAST" is reached. 6. Remove food from the oven. Press START. The set temperature is displayed in the lower text area, and "325°F (163°C)" will also be ...

Use & Care Guide
Page 16
...result in this range note the following: ■ The Sabbath Mode feature must be at serving temperature before or after cooking. To Use: 1. Remove food from oven. To Cancel Keep Warm™ Feature: Press CANCEL for a Bake, Timed Bake or Delayed Bake if Sabbath Mode has been enabled. 1. ... Mode is enabled all range features and functions operate the same as before Sabbath Mode was enabled. ■ When Sabbath Mode is pressed or the oven doors are disabled and cannot be used for 3 seconds. "SabbathBake" appears in the upper text area. 2. For a Timed Bake function, the time ...
...result in this range note the following: ■ The Sabbath Mode feature must be at serving temperature before or after cooking. To Use: 1. Remove food from oven. To Cancel Keep Warm™ Feature: Press CANCEL for a Bake, Timed Bake or Delayed Bake if Sabbath Mode has been enabled. 1. ... Mode is enabled all range features and functions operate the same as before Sabbath Mode was enabled. ■ When Sabbath Mode is pressed or the oven doors are disabled and cannot be used for 3 seconds. "SabbathBake" appears in the upper text area. 2. For a Timed Bake function, the time ...

Use & Care Guide
Page 18
... soil results in discoloring, loss of some models, the surface elements will appear in the display. 6. If an oven door is being certain not to remove soil. See "General Cleaning" section for a 3 hour clean cycle; Press START. At high temperatures, foods react with a damp cloth. IMPORTANT: The health of gloss, hairline ...
... soil results in discoloring, loss of some models, the surface elements will appear in the display. 6. If an oven door is being certain not to remove soil. See "General Cleaning" section for a 3 hour clean cycle; Press START. At high temperatures, foods react with a damp cloth. IMPORTANT: The health of gloss, hairline ...

Use & Care Guide
Page 19
... for 5 seconds, followed by "SELECT OPTION." Press the Temp/Time "+" or "-" pads until the oven door unlocks and the lock icon turns off. Press the Temp/Time "+" or "-" pads until the oven temperature falls below 500°F (260°C). Press the Temp/Time "+" or "-" pads to moderate... to order. ■ Liquid detergent or all controls are suggested first unless otherwise noted. Push START" will scroll from the cooktop. "REMOVE RACKS" will become less noticeable. 19 Cleaning Method: ■ Glass cleaner, mild liquid cleaner or nonabrasive scrubbing pad: Gently clean around ...
... for 5 seconds, followed by "SELECT OPTION." Press the Temp/Time "+" or "-" pads until the oven door unlocks and the lock icon turns off. Press the Temp/Time "+" or "-" pads until the oven temperature falls below 500°F (260°C). Press the Temp/Time "+" or "-" pads to moderate... to order. ■ Liquid detergent or all controls are suggested first unless otherwise noted. Push START" will scroll from the cooktop. "REMOVE RACKS" will become less noticeable. 19 Cleaning Method: ■ Glass cleaner, mild liquid cleaner or nonabrasive scrubbing pad: Gently clean around ...

Use & Care Guide
Page 20
... Method: ■ Self-Cleaning cycle: See "Self-Cleaning Cycle" first. To Replace: 1. Replace bulb, then bulb cover by turning clockwise. 5. Oven Door IMPORTANT: Use two hands to remove oven door(s). ■ Prior to removing the oven door, prepare a surface where you may activate the Control Lock feature (on panel. ■ affresh® Kitchen and Appliance Cleaner Part Number...
... Method: ■ Self-Cleaning cycle: See "Self-Cleaning Cycle" first. To Replace: 1. Replace bulb, then bulb cover by turning clockwise. 5. Oven Door IMPORTANT: Use two hands to remove oven door(s). ■ Prior to removing the oven door, prepare a surface where you may activate the Control Lock feature (on panel. ■ affresh® Kitchen and Appliance Cleaner Part Number...


