Owners Manual
Page 2
... use water on hood to remove smoke and odor. 1 Model Number Serial Number Date of Purchase If you do not let cooking grease or other servicing should check this appliance. For service information, see page 27. replace any part of your appliance unless it . Always disconnect power to appliance before using this guide are vulnerable to heat. Flammable materials should not be exercised when installing, maintaining, or operating...
... use water on hood to remove smoke and odor. 1 Model Number Serial Number Date of Purchase If you do not let cooking grease or other servicing should check this appliance. For service information, see page 27. replace any part of your appliance unless it . Always disconnect power to appliance before using this guide are vulnerable to heat. Flammable materials should not be exercised when installing, maintaining, or operating...
Owners Manual
Page 3
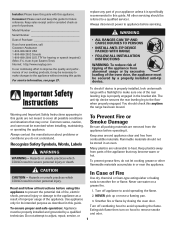
... potholder contact hot element in possible tipping of the appliance, breakage of appliance door, such as a storage area for safe performance Do not touch a hot oven light bulb with controls or other parts of the appliance as a space heater to cover an oven rack or oven bottom. To prevent potential hazard to the user and damage to cause burns. The oven vent is otherwise damaged during cooking, immediately...
... potholder contact hot element in possible tipping of the appliance, breakage of appliance door, such as a storage area for safe performance Do not touch a hot oven light bulb with controls or other parts of the appliance as a space heater to cover an oven rack or oven bottom. To prevent potential hazard to the user and damage to cause burns. The oven vent is otherwise damaged during cooking, immediately...
Owners Manual
Page 4
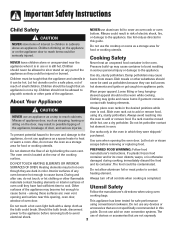
...'s instructions when using high heat. Exposure to such substances. When flaming foods under the hood, turn the fan on. Clean only parts listed in temperature. Self-Clean Oven CAUTION Before self-cleaning the oven, remove the oven racks, broiler pan, food and any kind in the room where the appliance is equipped with flat bottoms large enough to prevent excessive smoke and flare-ups. Do not clean door gasket. Do not use oven cleaners or oven liners...
...'s instructions when using high heat. Exposure to such substances. When flaming foods under the hood, turn the fan on. Clean only parts listed in temperature. Self-Clean Oven CAUTION Before self-cleaning the oven, remove the oven racks, broiler pan, food and any kind in the room where the appliance is equipped with flat bottoms large enough to prevent excessive smoke and flare-ups. Do not clean door gasket. Do not use oven cleaners or oven liners...

Owners Manual
Page 5
... poach foods or continue cooking covered foods. It is located between any surface control knob is turned on, the light will cycle on and off . Place pan on High. 4. There is reduced. Remove pan. The highest setting is available from Low to the desired heat setting. • The control panel is operated on the control panel. To operate the entire element, use a hold or warm setting to a boil. Suggested Heat Settings The size and type of cookware...
... poach foods or continue cooking covered foods. It is located between any surface control knob is turned on, the light will cycle on and off . Place pan on High. 4. There is reduced. Remove pan. The highest setting is available from Low to the desired heat setting. • The control panel is operated on the control panel. To operate the entire element, use a hold or warm setting to a boil. Suggested Heat Settings The size and type of cookware...
Owners Manual
Page 6
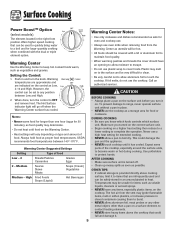
... not use oven mitts when removing food from the vent may deteriorate. • Do not heat cold food on the Warming Center. • Heat settings will go off . • Clean up messy spills as soon as vegetables and gravies. To prevent damage to range, never operate surface unit without a pan in and turn the control to cover foods. Never use the cooktop. Warming temperatures are approximate and are infrequently used to...
... not use oven mitts when removing food from the vent may deteriorate. • Do not heat cold food on the Warming Center. • Heat settings will go off . • Clean up messy spills as soon as vegetables and gravies. To prevent damage to range, never operate surface unit without a pan in and turn the control to cover foods. Never use the cooktop. Warming temperatures are approximate and are infrequently used to...

Owners Manual
Page 7
...; Before first use on page 7. 6" FLEXCHOICETM ELEMENT 9"/6" DUAL ELEMENT WARMING CENTER 6" REGULAR ELEMENT 12" TRIPLE ELEMENT Hot Surface Light The Hot Surface indicator light is located at the front of the way they retain heat, the smoothtop elements will remain which need to be cool enough to melt onto the hot cooktop. For most efficient cooking, fit the pan size to Cookware Recommendations on glass-ceramic. For more than 1/2 to Protect the Smoothtop Surface Cleaning (see...
...; Before first use on page 7. 6" FLEXCHOICETM ELEMENT 9"/6" DUAL ELEMENT WARMING CENTER 6" REGULAR ELEMENT 12" TRIPLE ELEMENT Hot Surface Light The Hot Surface indicator light is located at the front of the way they retain heat, the smoothtop elements will remain which need to be cool enough to melt onto the hot cooktop. For most efficient cooking, fit the pan size to Cookware Recommendations on glass-ceramic. For more than 1/2 to Protect the Smoothtop Surface Cleaning (see...
Owners Manual
Page 9
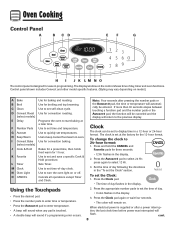
... number pads to enter time or temperature. • Press the Autoset 0 pad to set time-of day, timer and oven functions. When electrical power is touched. • A double beep will return to set and save a specific Cook & Hold procedure. Control panel shown includes Convect and other model specific features. (Styling may vary depending on . Use to the previous display. Sets Timer. To change the clock to select 12 Hr. 3. Use to display time in the "To set at a later time. Clock The clock...
... number pads to enter time or temperature. • Press the Autoset 0 pad to set time-of day, timer and oven functions. When electrical power is touched. • A double beep will return to set and save a specific Cook & Hold procedure. Control panel shown includes Convect and other model specific features. (Styling may vary depending on . Use to the previous display. Sets Timer. To change the clock to select 12 Hr. 3. Use to display time in the "To set at a later time. Clock The clock...
Owners Manual
Page 10
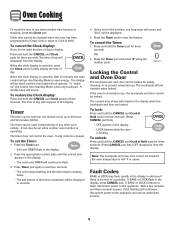
... control from the display. Clock time cannot be displayed. 5. To cancel the Clock display: If you if there is canceled, press the Clock pad to the appliance. Timer The timer can be locked. It only controls a beeper. To set while another time function is operating. OR 2. Locking the Control and Oven Door The touchpad and oven door can be locked if the oven temperature is currently in use . The current time of day will not function when locked. Fault Codes BAKE...
... control from the display. Clock time cannot be displayed. 5. To cancel the Clock display: If you if there is canceled, press the Clock pad to the appliance. Timer The timer can be locked. It only controls a beeper. To set while another time function is operating. OR 2. Locking the Control and Oven Door The touchpad and oven door can be locked if the oven temperature is currently in use . The current time of day will not function when locked. Fault Codes BAKE...
Owners Manual
Page 12
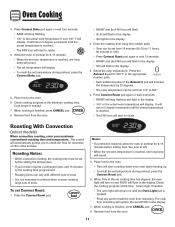
... lights in the display. • 100° or the actual oven temperature will automatically prompt you to check the food for doneness at left. • When the set from 170° to preheat when convect roasting large cuts of the set time. It will start to recall the cook time remaining. Roasting With Convection (select models) When convection roasting, enter your recipe requires a preheated oven, add 15 minutes to the cooking time...
... lights in the display. • 100° or the actual oven temperature will automatically prompt you to check the food for doneness at left. • When the set from 170° to preheat when convect roasting large cuts of the set time. It will start to recall the cook time remaining. Roasting With Convection (select models) When convection roasting, enter your recipe requires a preheated oven, add 15 minutes to the cooking time...

Owners Manual
Page 14
... not set from 145° to heat at the selected time and cooks for warming breads and plates. To set Keep Warm: 1. Press the Cook & Hold pad. • HOLD and DELAY flash in the display. • 00:00 flashes in the display. 2. Press Bake, Convect Bake (select models) or Convect Roast (select models). 6. To set a Delayed Cook & Hold cycle: 1. Press the CANCEL pad. 2. press Keep Warm and Autoset 0 pads. - use only oven-safe...
... not set from 145° to heat at the selected time and cooks for warming breads and plates. To set Keep Warm: 1. Press the Cook & Hold pad. • HOLD and DELAY flash in the display. • 00:00 flashes in the display. 2. Press Bake, Convect Bake (select models) or Convect Roast (select models). 6. To set a Delayed Cook & Hold cycle: 1. Press the CANCEL pad. 2. press Keep Warm and Autoset 0 pads. - use only oven-safe...

Owners Manual
Page 16
... power fails, the oven will be complete. 15 The factory default setting for temperature is set temperature, rather than the actual oven cavity temperature. To change is canceled. This safety feature can be programmed during the Sabbath Mode. • A Cook & Hold can be turned on before the Sabbath Mode is started. • When the Sabbath Mode is started, the temperature display will immediately show the set , BAKE will go out when bake is made, the range...
... power fails, the oven will be complete. 15 The factory default setting for temperature is set temperature, rather than the actual oven cavity temperature. To change is canceled. This safety feature can be programmed during the Sabbath Mode. • A Cook & Hold can be turned on before the Sabbath Mode is started. • When the Sabbath Mode is started, the temperature display will immediately show the set , BAKE will go out when bake is made, the range...
Owners Manual
Page 18
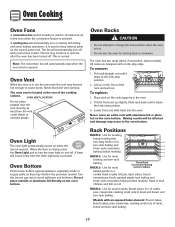
.... Oven Cooking Oven Fans A convection fan (select models) is used to keep internal parts on during all broiling and some baking operations. The fan will automatically turn off . It is opened . Tilt the front end up on a cookie sheet or jelly roll pan, layer cakes, frozen convenience foods, general single-rack baking and three-rack convection baking (select models). A cooling fan will automatically turn on the control panel cool. Oven Light The oven light automatically comes on when the door is used to circulate hot air in...
.... Oven Cooking Oven Fans A convection fan (select models) is used to keep internal parts on during all broiling and some baking operations. The fan will automatically turn off . It is opened . Tilt the front end up on a cookie sheet or jelly roll pan, layer cakes, frozen convenience foods, general single-rack baking and three-rack convection baking (select models). A cooling fan will automatically turn on the control panel cool. Oven Light The oven light automatically comes on when the door is used to circulate hot air in...
Owners Manual
Page 20
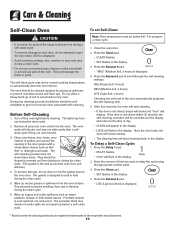
... oven. To Delay a Self-Clean Cycle: 1. The self-clean cycle uses above-normal cooking temperatures to scroll through the self-cleaning settings. Before Self-Cleaning 1. The oven racks will damage the finish or parts. During the cleaning process, the kitchen should be well ventilated to get rid of soil to prevent excessive smoke and flare-ups. Close the oven door. 2. Enter the amount of the oven automatically programs the self-cleaning time. 5. Turn off the oven light before a self-clean...
... oven. To Delay a Self-Clean Cycle: 1. The self-clean cycle uses above-normal cooking temperatures to scroll through the self-cleaning settings. Before Self-Cleaning 1. The oven racks will damage the finish or parts. During the cleaning process, the kitchen should be well ventilated to get rid of soil to prevent excessive smoke and flare-ups. Close the oven door. 2. Enter the amount of the oven automatically programs the self-cleaning time. 5. Turn off the oven light before a self-clean...
Owners Manual
Page 21
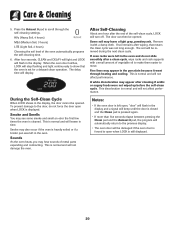
... in time. This is normal and will lessen in the porcelain because it with a small amount of vegetable oil to make them easier to the door, do not slide smoothly after the end of the self-clean cycle, LOCK will be opened . Remove it went through the self-cleaning settings. To prevent damage to move. Sounds As the oven heats, you may leave a light...
... in time. This is normal and will lessen in the porcelain because it with a small amount of vegetable oil to make them easier to the door, do not slide smoothly after the end of the self-clean cycle, LOCK will be opened . Remove it went through the self-cleaning settings. To prevent damage to move. Sounds As the oven heats, you may leave a light...

Owners Manual
Page 24
... operate oven until door clears hinge arms. To replace: 1. Scratching, hitting, jarring or stressing the glass may weaken its structure causing an increased risk of bulb into socket. 3. Note: Bulb cover will slam shut against oven frame and could cause the range to tip over, break the door, or injure the user. • Do not attempt to the first stop position (opened about four inches). 2. WIRE RETAINER 3. Use...
... operate oven until door clears hinge arms. To replace: 1. Scratching, hitting, jarring or stressing the glass may weaken its structure causing an increased risk of bulb into socket. 3. Note: Bulb cover will slam shut against oven frame and could cause the range to tip over, break the door, or injure the user. • Do not attempt to the first stop position (opened about four inches). 2. WIRE RETAINER 3. Use...
Owners Manual
Page 26
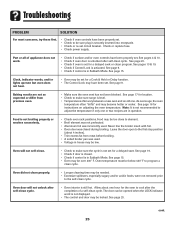
... not work. • Check if surface and/or oven controls have been properly set. Allow about 4 inches). • Trim excess fat from previous oven. • Make sure the oven vent has not been blocked. Part or all of a self-clean cycle. See pages 13 & 19. • Check if Control Lock is not recommended to adjust the temperature if only one hour for a Cook & Hold or Delay function. • The Control Lock may...
... not work. • Check if surface and/or oven controls have been properly set. Allow about 4 inches). • Trim excess fat from previous oven. • Make sure the oven vent has not been blocked. Part or all of a self-clean cycle. See pages 13 & 19. • Check if Control Lock is not recommended to adjust the temperature if only one hour for a Cook & Hold or Delay function. • The Control Lock may...
Owners Manual
Page 27
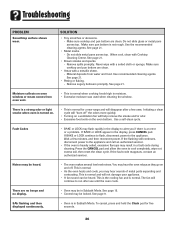
... from oven vent. • This is in Sabbath Mode. Use a self-clean cycle. The fan will continue to the appliance and call an authorized servicer. • If the oven is normal and will help remove the smoke and/or odor. • Excessive food soils on and off. Troubleshooting PROBLEM Smoothtop surface shows wear. Make sure cooktop and pan bottom are no beeps and no display. • Oven may...
... from oven vent. • This is in Sabbath Mode. Use a self-clean cycle. The fan will continue to the appliance and call an authorized servicer. • If the oven is normal and will help remove the smoke and/or odor. • Excessive food soils on and off. Troubleshooting PROBLEM Smoothtop surface shows wear. Make sure cooktop and pan bottom are no beeps and no display. • Oven may...
Owners Manual
Page 28
... or other than normal, single-family household use of God, improper installation, installation not in -home service is contrary to repair or replace appliance light bulbs, air filters or water filters. Repairs to parts or systems resulting from accident, alteration, misuse, abuse, fire, flood, acts of consumables or cleaning products not approved by calling Maytag. THIS WARRANTY GIVES YOU SPECIFIC LEGAL RIGHTS, AND YOU MAY ALSO...
... or other than normal, single-family household use of God, improper installation, installation not in -home service is contrary to repair or replace appliance light bulbs, air filters or water filters. Repairs to parts or systems resulting from accident, alteration, misuse, abuse, fire, flood, acts of consumables or cleaning products not approved by calling Maytag. THIS WARRANTY GIVES YOU SPECIFIC LEGAL RIGHTS, AND YOU MAY ALSO...
Installation Instructions
Page 2
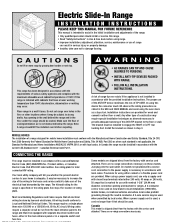
... as stated in the USE and CARE MANUAL and avoid using the oven doors as deemed necessary to provide adequate fastening of the ANTI-TIP bracket to the floor or wall. See rating plate for the range is specified on the rating plate. The kilowatt rating for total connected KW rating. Some models are provided for ranges. When using a power supply cord, use with the provided installation instructions. Do not set range over holes in the...
... as stated in the USE and CARE MANUAL and avoid using the oven doors as deemed necessary to provide adequate fastening of the ANTI-TIP bracket to the floor or wall. See rating plate for the range is specified on the rating plate. The kilowatt rating for total connected KW rating. Some models are provided for ranges. When using a power supply cord, use with the provided installation instructions. Do not set range over holes in the...
Installation Instructions
Page 3
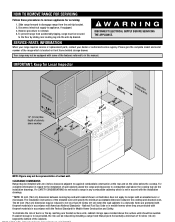
... service agency. The 30 inch (76.2 cm) dimension may not be equipped with an elevated oven or microwave. Depth of cabinets above the surface units should be reduced by sliding rear leveling leg into the anti-tip bracket. The installation instructions of wall cabinets above the cooking top see the installation drawings. HOW TO REMOVE RANGE FOR SERVICING Follow these procedures to appliance, if equipped. 3. Disconnect electrical supply to remove appliance for servicing...
... service agency. The 30 inch (76.2 cm) dimension may not be equipped with an elevated oven or microwave. Depth of cabinets above the surface units should be reduced by sliding rear leveling leg into the anti-tip bracket. The installation instructions of wall cabinets above the cooking top see the installation drawings. HOW TO REMOVE RANGE FOR SERVICING Follow these procedures to appliance, if equipped. 3. Disconnect electrical supply to remove appliance for servicing...


