Use and Care Manual
Page 2
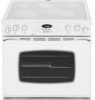
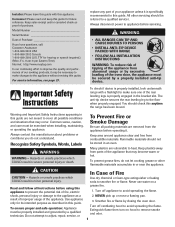
...to smother fire or flame. TTY for hearing or speech impaired) (Mon.-Fri., 8 am-8 pm Eastern Time) Internet: http://www.maytag.com In our continuing effort to improve the quality and performance of Purchase If you do not let cooking grease or other servicing should ...this appliance to prevent the potential risk of fire, electric shock, personal injury or damage to remove smoke and odor. 1 Model Number Serial Number Date of our cooking products, it is properly installed, look underneath range with this anytime the range has been moved. CAUTION CAUTION - Keep plastics away...
...to smother fire or flame. TTY for hearing or speech impaired) (Mon.-Fri., 8 am-8 pm Eastern Time) Internet: http://www.maytag.com In our continuing effort to improve the quality and performance of Purchase If you do not let cooking grease or other servicing should ...this appliance to prevent the potential risk of fire, electric shock, personal injury or damage to remove smoke and odor. 1 Model Number Serial Number Date of our cooking products, it is properly installed, look underneath range with this anytime the range has been moved. CAUTION CAUTION - Keep plastics away...
Use and Care Manual
Page 5
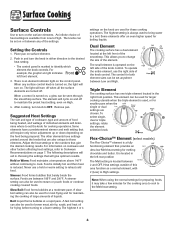
... sizes can be used for larger cooking utensils when the triple element is a fully functioning element that are between 2 and OFF. Flex-ChoiceTM Element (select models) The Flex-ChoiceTM element is used, or for smaller pans when the single or dual settings are used for these cooking operations. Surface Cooking Surface...
... sizes can be used for larger cooking utensils when the triple element is a fully functioning element that are between 2 and OFF. Flex-ChoiceTM Element (select models) The Flex-ChoiceTM element is used, or for smaller pans when the single or dual settings are used for these cooking operations. Surface Cooking Surface...
Use and Care Manual
Page 6
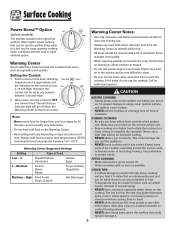
...aluminum foil, meat probes or any other metal object, other than one hour (eggs for 30 minutes), as vegetables and gravies. Make sure you know which knob controls which surface unit...pan to boil dry. Warming Center Use the Warming Center to protect hands. To prevent damage to range, never operate surface unit without a pan in place. • NEVER use the cooktop. Warming ...is turned off when the Warming Center surface has cooled. Surface Cooking Power BoostTM Option (select models) The element located in the right front position offers higher speed cooking that can be set...
...aluminum foil, meat probes or any other metal object, other than one hour (eggs for 30 minutes), as vegetables and gravies. Make sure you know which knob controls which surface unit...pan to boil dry. Warming Center Use the Warming Center to protect hands. To prevent damage to range, never operate surface unit without a pan in place. • NEVER use the cooktop. Warming ...is turned off when the Warming Center surface has cooled. Surface Cooking Power BoostTM Option (select models) The element located in the right front position offers higher speed cooking that can be set...
Use and Care Manual
Page 9
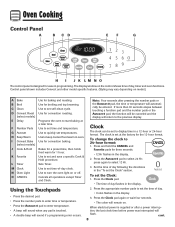
...8226; The colon will sound if a programming error occurs. 2. Control panel shown includes Convect and other model specific features. (Styling may vary depending on . cont. 8 Use to set time and temperature. Sets...Timer. Press and hold the CANCEL and Favorite pads for the 12-hour format. If more than 30 seconds elapse between touching a function pad and the number pads or the Autoset 0 pad, the ...display time in oven. Clock The clock can be set to set the Clock" section. When electrical power is set the Clock: 1. Programs the oven to set time-of day following the ...
...8226; The colon will sound if a programming error occurs. 2. Control panel shown includes Convect and other model specific features. (Styling may vary depending on . cont. 8 Use to set time and temperature. Sets...Timer. Press and hold the CANCEL and Favorite pads for the 12-hour format. If more than 30 seconds elapse between touching a function pad and the number pads or the Autoset 0 pad, the ...display time in oven. Clock The clock can be set to set the Clock" section. When electrical power is set the Clock: 1. Programs the oven to set time-of day following the ...
Use and Care Manual
Page 11
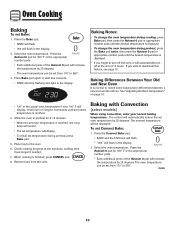
... Between Your Old and New Oven It is displayed. • If you wish to turn off at the minimum cooking time. Baking with Convection (select models) When using convection, enter your normal baking temperature. Select the oven temperature. Press the Bake pad. • BAKE will flash. • 000 will stop flashing...
... Between Your Old and New Oven It is displayed. • If you wish to turn off at the minimum cooking time. Baking with Convection (select models) When using convection, enter your normal baking temperature. Select the oven temperature. Press the Bake pad. • BAKE will flash. • 000 will stop flashing...

Use and Care Manual
Page 12
... will flash in the display. • 100° or the actual oven temperature will start to recall the cook time remaining. Roasting With Convection (select models) When convection roasting, enter your recipe requires a preheated oven, add 15 minutes to the cooking time programmed. • Roasting times can be set from 10...
... will flash in the display. • 100° or the actual oven temperature will start to recall the cook time remaining. Roasting With Convection (select models) When convection roasting, enter your recipe requires a preheated oven, add 15 minutes to the cooking time programmed. • Roasting times can be set from 10...

Use and Care Manual
Page 13
... desired function word will remain lit. • The cooking time will display when the oven is still flashing, press Bake, Convect Bake (select models) or Convect Roast (select models) and select the oven temperature. To cancel Cook & Hold at any time: Press the CANCEL pad. Press the Cook & Hold pad. • HOLD...
... desired function word will remain lit. • The cooking time will display when the oven is still flashing, press Bake, Convect Bake (select models) or Convect Roast (select models) and select the oven temperature. To cancel Cook & Hold at any time: Press the CANCEL pad. Press the Cook & Hold pad. • HOLD...
Use and Care Manual
Page 14
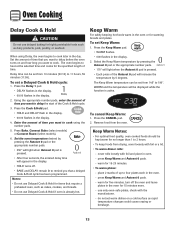
... seafood. Oven Cooking Delay Cook & Hold CAUTION Do not use delayed baking for 15-20 minutes. • To warm plates: - Press Bake, Convect Bake (select models) or Convect Roast (select...
... seafood. Oven Cooking Delay Cook & Hold CAUTION Do not use delayed baking for 15-20 minutes. • To warm plates: - Press Bake, Convect Bake (select models) or Convect Roast (select...
Use and Care Manual
Page 17
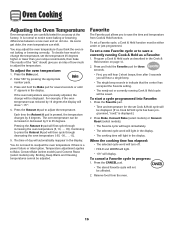
...selected cycle word will turn off. • HOLD and WARM will light. • 170° will first cycle through decreasing the oven temperature (-35, -30, . . . -5). 5. Press the CANCEL pad. • The stored Favorite cycle will then cycle through increasing the oven temperature (5, 10, . . .... by pressing the appropriate number pads. 3. Pressing the Autoset 0 pad will display. Continuing to Bake, Convect Bake (select models) and Convect Roast (select models) only. Temperature adjustment applies to press the Autoset 0 pad will not be displayed. Enter 550° by 15 degrees...
...selected cycle word will turn off. • HOLD and WARM will light. • 170° will first cycle through decreasing the oven temperature (-35, -30, . . . -5). 5. Press the CANCEL pad. • The stored Favorite cycle will then cycle through increasing the oven temperature (5, 10, . . .... by pressing the appropriate number pads. 3. Pressing the Autoset 0 pad will display. Continuing to Bake, Convect Bake (select models) and Convect Roast (select models) only. Temperature adjustment applies to press the Autoset 0 pad will not be displayed. Enter 550° by 15 degrees...
Use and Care Manual
Page 18
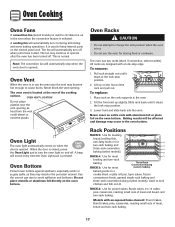
...Rack Positions RACK 5: Use for toasting bread, broiling thin, non-fatty foods or for 5 two-rack baking and 4 three-rack convection 3 baking (select models). 2 RACK 4: Use for most 1 broiling and two-rack baking. A beep will automatically stop position. 3. Oven Bottom Protect oven bottom against spillovers, especially...8226; Do not attempt to circulate hot air in the oven 2. Tilt the front end up on the oven bottom. Lower front and slide back into the oven. Never cover an entire rack with an exposed bake element: Pound cakes, Bundt cakes, pies, casseroles, roasting small...
...Rack Positions RACK 5: Use for toasting bread, broiling thin, non-fatty foods or for 5 two-rack baking and 4 three-rack convection 3 baking (select models). 2 RACK 4: Use for most 1 broiling and two-rack baking. A beep will automatically stop position. 3. Oven Bottom Protect oven bottom against spillovers, especially...8226; Do not attempt to circulate hot air in the oven 2. Tilt the front end up on the oven bottom. Lower front and slide back into the oven. Never cover an entire rack with an exposed bake element: Pound cakes, Bundt cakes, pies, casseroles, roasting small...

Use and Care Manual
Page 19
...removing or reinstalling the half rack. • Do not use cookware that extends beyond edge of rack. • For best results, allow two inches between the pan placed on the rack and the oven side wall. • Use caution when removing items from the half rack to avoid ... Layer Cakes on Two Racks For best results when baking cakes on the oven bottom. Models with a convertible half rack. MULTIPLE RACK COOKING: Two rack: Use rack positions 2 and 5, or 1 and 4. Create-A-SpaceTM Half Rack Select range models are equipped with an exposed bake element: 9 x 13 cakes, pies, roasting large ...
...removing or reinstalling the half rack. • Do not use cookware that extends beyond edge of rack. • For best results, allow two inches between the pan placed on the rack and the oven side wall. • Use caution when removing items from the half rack to avoid ... Layer Cakes on Two Racks For best results when baking cakes on the oven bottom. Models with a convertible half rack. MULTIPLE RACK COOKING: Two rack: Use rack positions 2 and 5, or 1 and 4. Create-A-SpaceTM Half Rack Select range models are equipped with an exposed bake element: 9 x 13 cakes, pies, roasting large ...
Use and Care Manual
Page 23
...8226; When cool, wash with the grain. Surface may be used if sprayed on pages 19-20 to restore ease of water which may not slide smoothly if left in the oven during a self-clean operation. Glass • Avoid using excessive amounts of movement, then wipe off excess oil..... To polish and help prevent fingerprints, follow with cleansing powder or soap-filled scouring pad. Rinse and dry. Rinse and dry. Stainless Steel (select models) • DO NOT USE ANY CLEANING PRODUCT CONTAINING CHLORINE BLEACH. • DO NOT USE ABRASIVE OR ORANGE CLEANERS. • ALWAYS WIPE WITH THE...
...8226; When cool, wash with the grain. Surface may be used if sprayed on pages 19-20 to restore ease of water which may not slide smoothly if left in the oven during a self-clean operation. Glass • Avoid using excessive amounts of movement, then wipe off excess oil..... To polish and help prevent fingerprints, follow with cleansing powder or soap-filled scouring pad. Rinse and dry. Rinse and dry. Stainless Steel (select models) • DO NOT USE ANY CLEANING PRODUCT CONTAINING CHLORINE BLEACH. • DO NOT USE ABRASIVE OR ORANGE CLEANERS. • ALWAYS WIPE WITH THE...
Use and Care Manual
Page 24
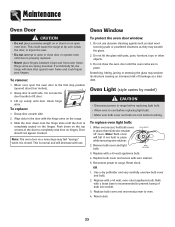
...cool before replacing light bulb. • Make sure bulb cover and bulb are spring mounted. Oven Light (style varies by model) CAUTION • Disconnect power to range before touching. Remove bulb cover and light bulb. This could injure your fingers. When cool, open the oven door to open... • Do not attempt to the first stop position (opened about four inches). 2. WIRE RETAINER 3. Reconnect power to lift door. 3. If accidentally hit, the hinge will fall if not held in place, then slide wire retainer off cover. Do not close door or operate oven until door ...
...cool before replacing light bulb. • Make sure bulb cover and bulb are spring mounted. Oven Light (style varies by model) CAUTION • Disconnect power to range before touching. Remove bulb cover and light bulb. This could injure your fingers. When cool, open the oven door to open... • Do not attempt to the first stop position (opened about four inches). 2. WIRE RETAINER 3. Reconnect power to lift door. 3. If accidentally hit, the hinge will fall if not held in place, then slide wire retainer off cover. Do not close door or operate oven until door ...

Use and Care Manual
Page 25
... the rear leveling legs to the second stop position. 2. Do not store plastic, paper products, food or flammable materials in the range. 2. AANNTI-TTIIP-TBIRPACBKRETACKET LLEVEEVLIENLGILNEGG LEG The storage drawer can be leveled when installed. To remove: 1. Pull out to the floor. Be sure... the range should be removed to allow you to the first stop position. 4. Empty drawer and pull out to clean under the range. Maintenance Leveling Legs Storage Drawer (select models) CAUTION CAUTION Be sure the anti-tip bracket secures one of...
... the rear leveling legs to the second stop position. 2. Do not store plastic, paper products, food or flammable materials in the range. 2. AANNTI-TTIIP-TBIRPACBKRETACKET LLEVEEVLIENLGILNEGG LEG The storage drawer can be leveled when installed. To remove: 1. Pull out to the floor. Be sure... the range should be removed to allow you to the first stop position. 4. Empty drawer and pull out to clean under the range. Maintenance Leveling Legs Storage Drawer (select models) CAUTION CAUTION Be sure the anti-tip bracket secures one of...
Use and Care Manual
Page 28
... defects in materials or workmanship and is reported to Maytag within 30 days from your major appliance, to instruct you may...electrical or plumbing codes, or use or when it is used in the country in which it is installed in an inaccessible location or is not installed in accordance with the product, Maytag...MAYTAG® MAJOR APPLIANCE WARRANTY LIMITED WARRANTY For one year from the date of purchase, when this major appliance is operated and maintained according to instructions attached to or furnished with published installation instructions. 11. Major appliances with original model...
... defects in materials or workmanship and is reported to Maytag within 30 days from your major appliance, to instruct you may...electrical or plumbing codes, or use or when it is used in the country in which it is installed in an inaccessible location or is not installed in accordance with the product, Maytag...MAYTAG® MAJOR APPLIANCE WARRANTY LIMITED WARRANTY For one year from the date of purchase, when this major appliance is operated and maintained according to instructions attached to or furnished with published installation instructions. 11. Major appliances with original model...


