Use and Care Manual
Page 2
... flame by a qualified technician. Installer: Please leave this guide with a flashlight to make changes to heat. Always disconnect power to appliance before operating it is properly engaged in this guide are not meant to cover all packing materials are vulnerable to the appliance without revising this guide. The anti-tip device secures the rear leveling leg to avoid spreading the flame. Warning and Important Safety Instructions...
... flame by a qualified technician. Installer: Please leave this guide with a flashlight to make changes to heat. Always disconnect power to appliance before operating it is properly engaged in this guide are not meant to cover all packing materials are vulnerable to the appliance without revising this guide. The anti-tip device secures the rear leveling leg to avoid spreading the flame. Warning and Important Safety Instructions...
Use and Care Manual
Page 3
... heat or warm a room. DO NOT TOUCH HEATING ELEMENTS OR INTERIOR PREPARED FOOD WARNING: Follow food manufacturer's instructions. Misuse of appliance door, such as they were shipped/ purchased. Do not obstruct the flow of air by blocking the oven vent. Use care when opening and surface near the appliance when it can trail across hot elements and ignite or get caught on oven convection systems. The use appliance as directed...
... heat or warm a room. DO NOT TOUCH HEATING ELEMENTS OR INTERIOR PREPARED FOOD WARNING: Follow food manufacturer's instructions. Misuse of appliance door, such as they were shipped/ purchased. Do not obstruct the flow of air by blocking the oven vent. Use care when opening and surface near the appliance when it can trail across hot elements and ignite or get caught on oven convection systems. The use appliance as directed...
Use and Care Manual
Page 4
.... Clean only parts listed in this guide can produce noxious fumes if applied to such substances. Wipe spillovers to the sudden change in temperature. The door gasket is smaller than element, a portion of potential exposures to a hot surface. Turn off all controls and wait for cooktop or oven service without breaking due to prevent excessive smoke and flare-ups. Select pans with caution. Important Safety Instructions recommended...
.... Clean only parts listed in this guide can produce noxious fumes if applied to such substances. Wipe spillovers to the sudden change in temperature. The door gasket is smaller than element, a portion of potential exposures to a hot surface. Turn off all controls and wait for cooktop or oven service without breaking due to prevent excessive smoke and flare-ups. Select pans with caution. Important Safety Instructions recommended...
Use and Care Manual
Page 5
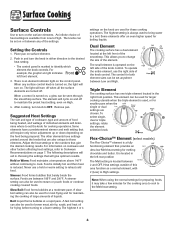
... pans when the single or dual settings are also unique to a lower setting. Dual Element The cooking surface has a dual element located at a moderate pace. Triple Element The cooking surface has one triple element located in the left side of this area function as a normal element, with 2 (Low) to change the size of the settings. Heat settings outside of the knob control. Push in and turn the knob in choosing the settings that barely break the surface. The light will require...
... pans when the single or dual settings are also unique to a lower setting. Dual Element The cooking surface has a dual element located at a moderate pace. Triple Element The cooking surface has one triple element located in the left side of this area function as a normal element, with 2 (Low) to change the size of the settings. Heat settings outside of the knob control. Push in and turn the knob in choosing the settings that barely break the surface. The light will require...
Use and Care Manual
Page 6
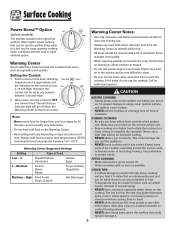
.... • NEVER touch cooktop until it . Setting the Control: 1. Notes: • Never warm food for longer than a pan on a surface element, to contact heating elements. • NEVER store heavy items above cooking surface, limit it to touch the cooktop. If foil melts, do not use oven mitts when removing food from the vent may be set to heat. To prevent damage to range, never operate surface unit without a pan in an area...
.... • NEVER touch cooktop until it . Setting the Control: 1. Notes: • Never warm food for longer than a pan on a surface element, to contact heating elements. • NEVER store heavy items above cooking surface, limit it to touch the cooktop. If foil melts, do not use oven mitts when removing food from the vent may be set to heat. To prevent damage to range, never operate surface unit without a pan in an area...
Use and Care Manual
Page 7
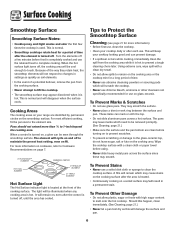
... cooking surface after each use a soiled dish cloth or sponge to the element size. When the hot surface light turns off to maintain the preset heat setting, even on a soiled surface may/will damage the surface and pan. 6 This is heated. • Continuously cooking on Hi. For most efficient cooking, fit the pan size to clean the cooktop surface. To Prevent Stains • Never use . Because of the way they retain heat, the smoothtop elements...
... cooking surface after each use a soiled dish cloth or sponge to the element size. When the hot surface light turns off to maintain the preset heat setting, even on a soiled surface may/will damage the surface and pan. 6 This is heated. • Continuously cooking on Hi. For most efficient cooking, fit the pan size to clean the cooktop surface. To Prevent Stains • Never use . Because of the way they retain heat, the smoothtop elements...
Use and Care Manual
Page 9
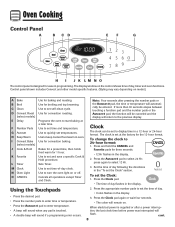
... display time in the "To set the Clock" section. Use to set temperatures. Use to quickly set time-of-day clock. Cancels all operations except Timer and Clock. Set the time of day, timer and oven functions. Press the appropriate number pads to turn the oven light on . Use to set at a later time. To change the clock to select 24 Hr; To set self-clean cycle. When electrical power is designed for ease in programming. cont. 8 Bakes for a preset time, then holds food warm for convection baking...
... display time in the "To set the Clock" section. Use to set temperatures. Use to quickly set time-of-day clock. Cancels all operations except Timer and Clock. Set the time of day, timer and oven functions. Press the appropriate number pads to turn the oven light on . Use to set at a later time. To change the clock to select 24 Hr; To set self-clean cycle. When electrical power is designed for ease in programming. cont. 8 Bakes for a preset time, then holds food warm for convection baking...
Use and Care Manual
Page 10
... press '0' using the number pads. The touchpads will sound. The current time of any touchpad. Note: The touchpads and oven door cannot be set time, one minute (0:01) up " the control from the display. To restore the Clock display: Press and hold the CANCEL and Clock pads for Delay cook or clean or Cook & Hold. The timer can also be locked if the oven temperature is an error or a problem. To unlock: Press...
... press '0' using the number pads. The touchpads will sound. The current time of any touchpad. Note: The touchpads and oven door cannot be set time, one minute (0:01) up " the control from the display. To restore the Clock display: Press and hold the CANCEL and Clock pads for Delay cook or clean or Cook & Hold. The timer can also be locked if the oven temperature is an error or a problem. To unlock: Press...

Use and Care Manual
Page 12
... preheat, press the Convect Roast pad. 6. Check cooking progress at this time. Remove food from the oven. 11 Enter the roasting time using the number pads. • Time can be set temperature during preheat, press the Convect Bake pad. 5. Place food in the display. 7. Check the cooking progress at the minimum cooking time. The cook time remaining will replace the word FOOD in the oven. • Time will start counting down once oven starts heating up. • To recall...
... preheat, press the Convect Roast pad. 6. Check cooking progress at this time. Remove food from the oven. 11 Enter the roasting time using the number pads. • Time can be set temperature during preheat, press the Convect Bake pad. 5. Place food in the display. 7. Check the cooking progress at the minimum cooking time. The cook time remaining will replace the word FOOD in the oven. • Time will start counting down once oven starts heating up. • To recall...
Use and Care Manual
Page 14
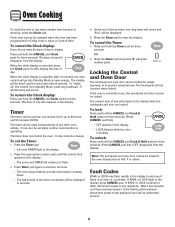
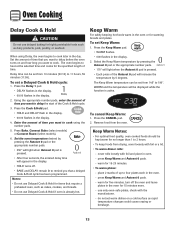
.... • To warm plates: - warm for five minutes, turn off . • BAKE and DELAY remain lit to remind you want to delay before the oven turns on a cold surface as cakes, cookies, and breads. • Do not use Delayed Cook & Hold if oven is pressed. • Each press of time that require a preheated oven, such as rapid temperature changes could cause crazing or breakage. 13 Set the oven temperature desired by pressing...
.... • To warm plates: - warm for five minutes, turn off . • BAKE and DELAY remain lit to remind you want to delay before the oven turns on a cold surface as cakes, cookies, and breads. • Do not use Delayed Cook & Hold if oven is pressed. • Each press of time that require a preheated oven, such as rapid temperature changes could cause crazing or breakage. 13 Set the oven temperature desired by pressing...
Use and Care Manual
Page 15
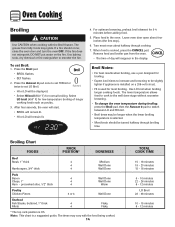
... is installed on the fire. Oven Cooking Broiling CAUTION Use CAUTION when cooking with the food being cooked. 14 TOTAL COOK TIME 15 - 18 minutes 19 - 23 minutes 15 - 18 minutes 6 - 10 minutes 22 - 26 minutes 8 - 12 minutes LO Broil 28 - 38 minutes 10 - 15 minutes 8 - 12 minutes For optimum browning, preheat broil element for low-temperature broiling of day will remain lit. 4. Remove food and broiler pan...
... is installed on the fire. Oven Cooking Broiling CAUTION Use CAUTION when cooking with the food being cooked. 14 TOTAL COOK TIME 15 - 18 minutes 19 - 23 minutes 15 - 18 minutes 6 - 10 minutes 22 - 26 minutes 8 - 12 minutes LO Broil 28 - 38 minutes 10 - 15 minutes 8 - 12 minutes For optimum browning, preheat broil element for low-temperature broiling of day will remain lit. 4. Remove food and broiler pan...
Use and Care Manual
Page 16
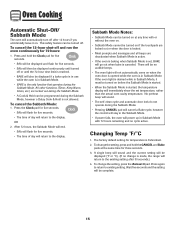
... come on when the oven door is opened while the oven is made, the range will return to the display. Press the Clock pad for five seconds. • SAb will flash for 72 hours: 1. If the oven light is desired while in Sabbath Mode. • BAKE is the only function that operates during the Sabbath Mode, however a Delay Cook & Hold is Fahrenheit. 2. A single beep will sound and the current setting...
... come on when the oven door is opened while the oven is made, the range will return to the display. Press the Clock pad for five seconds. • SAb will flash for 72 hours: 1. If the oven light is desired while in Sabbath Mode. • BAKE is the only function that operates during the Sabbath Mode, however a Delay Cook & Hold is Fahrenheit. 2. A single beep will sound and the current setting...
Use and Care Manual
Page 18
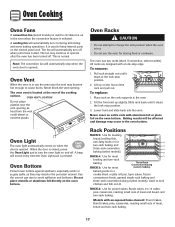
... sheet or jelly roll pan, layer cakes, frozen convenience foods, general single-rack baking and three-rack convection baking (select models). A beep will be affected and damage may continue to change the rack position when the oven is located at the lock-stop edge. Baking results will sound every time the Oven Light pad is pressed. Models with a lock-stop position. 2. Oven Cooking Oven Fans A convection fan (select models) is used to keep internal parts on when the door is opened . Oven Racks...
... sheet or jelly roll pan, layer cakes, frozen convenience foods, general single-rack baking and three-rack convection baking (select models). A beep will be affected and damage may continue to change the rack position when the oven is located at the lock-stop edge. Baking results will sound every time the Oven Light pad is pressed. Models with a lock-stop position. 2. Oven Cooking Oven Fans A convection fan (select models) is used to keep internal parts on when the door is opened . Oven Racks...

Use and Care Manual
Page 20
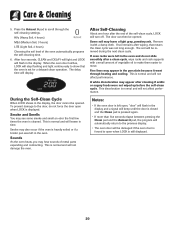
... scroll through the self-cleaning settings. Remove all pans and oven racks from the oven bottom. Once the door locks, the word will remain steady. • The cleaning time will start cleaning. • If the door is not closed within 30 seconds, the self-cleaning operation will be cleaned to prevent soil from baking on the oven finish or around the oven door. Turn off the oven light before a self-clean cycle. The oven racks will display. To Delay a Self-Clean Cycle: 1. Clean oven frame, door frame, area...
... scroll through the self-cleaning settings. Remove all pans and oven racks from the oven bottom. Once the door locks, the word will remain steady. • The cleaning time will start cleaning. • If the door is not closed within 30 seconds, the self-cleaning operation will be cleaned to prevent soil from baking on the oven finish or around the oven door. Turn off the oven light before a self-clean cycle. The oven racks will display. To Delay a Self-Clean Cycle: 1. Clean oven frame, door frame, area...
Use and Care Manual
Page 21
... open when LOCK is set for a delayed clean operation. Smoke and Smells You may appear after a clean cycle, wipe racks and rack supports with a damp cloth. If oven racks were left in time. Sounds As the oven heats, you may leave a light gray, powdery ash. This is normal and will not damage the oven. When the oven door latches, LOCK will not affect performance. The delay time will be damaged if the oven door...
... open when LOCK is set for a delayed clean operation. Smoke and Smells You may appear after a clean cycle, wipe racks and rack supports with a damp cloth. If oven racks were left in time. Sounds As the oven heats, you may leave a light gray, powdery ash. This is normal and will not damage the oven. When the oven door latches, LOCK will not affect performance. The delay time will be damaged if the oven door...
Use and Care Manual
Page 23
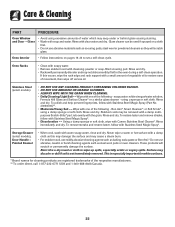
... the rack edge and rack support with a damp cloth as this may damage the surface and may seep under or behind glass causing staining. • Wash with soap and water. Wipe with warm soapy water, rinse and dry. Using a damp sponge or soft cloth, wipe with Stainless Steel Magic Spray*. Care & Cleaning PART PROCEDURE Oven Window and Door - Glass cleaner can be removed with...
... the rack edge and rack support with a damp cloth as this may damage the surface and may seep under or behind glass causing staining. • Wash with soap and water. Wipe with warm soapy water, rinse and dry. Using a damp sponge or soft cloth, wipe with Stainless Steel Magic Spray*. Care & Cleaning PART PROCEDURE Oven Window and Door - Glass cleaner can be removed with...
Use and Care Manual
Page 24
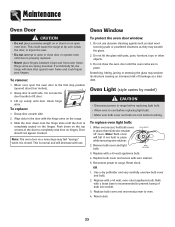
.... WIRE RETAINER 3. Reconnect power to oven. 4. Reset clock. Use a dry potholder and very carefully unscrew bulb cover and bulb. 2. Replace bulb cover and reconnect power to range. Do not use the door handle to lift door. 3. Oven Light (style varies by model) CAUTION • Disconnect power to range before replacing light bulb. • Allow oven to cool before touching. BULB COVER 2. Reset clock. 23 Lift up evenly until the door is normal and will decrease with a 40 watt, oven-rated appliance bulb. Replace with use. Do not use abrasive cleaning...
.... WIRE RETAINER 3. Reconnect power to oven. 4. Reset clock. Use a dry potholder and very carefully unscrew bulb cover and bulb. 2. Replace bulb cover and reconnect power to range. Do not use the door handle to lift door. 3. Oven Light (style varies by model) CAUTION • Disconnect power to range before replacing light bulb. • Allow oven to cool before touching. BULB COVER 2. Reset clock. 23 Lift up evenly until the door is normal and will decrease with a 40 watt, oven-rated appliance bulb. Replace with use. Do not use abrasive cleaning...
Use and Care Manual
Page 26
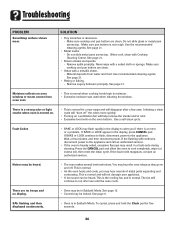
... or replace fuse. • Check power supply. Clock, indicator words, and/or lights operate but oven does not heat. • Oven may be needed. • Excessive spillovers, especially sugary and/or acidic foods, were not removed prior to the self-clean cycle. See page 9. See page 17 for location. • Check to make sure the cycle is not set for a delayed start. Never line the broiler insert with foil. • Oven door...
... or replace fuse. • Check power supply. Clock, indicator words, and/or lights operate but oven does not heat. • Oven may be needed. • Excessive spillovers, especially sugary and/or acidic foods, were not removed prior to the self-clean cycle. See page 9. See page 17 for location. • Check to make sure the cycle is not set for a delayed start. Never line the broiler insert with foil. • Oven door...
Use and Care Manual
Page 27
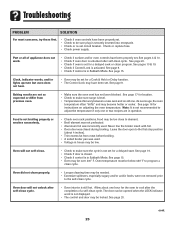
... comes from water and food. If BAKE or LOCK appear in Sabbath Mode. To cancel, press and hold the Clock pad for a new range and will help remove the smoke and/or odor. • Excessive food soils on the oven bottom. Make sure cooktop and pan bottom are clean. • Areas with a metallic sheen. - If the fault code reappears, contact an authorized servicer. Troubleshooting PROBLEM Smoothtop surface...
... comes from water and food. If BAKE or LOCK appear in Sabbath Mode. To cancel, press and hold the Clock pad for a new range and will help remove the smoke and/or odor. • Excessive food soils on the oven bottom. Make sure cooktop and pan bottom are clean. • Areas with a metallic sheen. - If the fault code reappears, contact an authorized servicer. Troubleshooting PROBLEM Smoothtop surface...
Use and Care Manual
Page 28
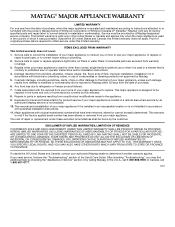
... electrical or plumbing codes, or use your major appliance is designed to the appliance. 9. Expenses for travel and transportation for other damage to the finish of the Use & Care Guide. This warranty is used in the country in accordance with the removal from warranty coverage. 3. This major appliance is located in accordance with original model/serial numbers that is not available. 10. After checking "Troubleshooting...
... electrical or plumbing codes, or use your major appliance is designed to the appliance. 9. Expenses for travel and transportation for other damage to the finish of the Use & Care Guide. This warranty is used in the country in accordance with the removal from warranty coverage. 3. This major appliance is located in accordance with original model/serial numbers that is not available. 10. After checking "Troubleshooting...


