
Installation Instructions
Page 1
... Save for local electrical inspector's use. These words mean: DANGER You can tip the range and be killed or seriously injured if you and others are not followed. W10258095A This symbol alerts you how to... FREESTANDING ELECTRIC RANGES Table of Contents RANGE SAFETY 1 INSTALLATION REQUIREMENTS 2 Tools and Parts 2 Location Requirements 2 Electrical Requirements 3 INSTALLATION INSTRUCTIONS 4 Unpack Range 4 Install Anti-Tip Bracket 5 Electrical Connection 6 Verify Anti-Tip Bracket Location 11 Level Range 11 Complete Installation 11 Moving the Range 12 RANGE SAFETY Your safety...
... Save for local electrical inspector's use. These words mean: DANGER You can tip the range and be killed or seriously injured if you and others are not followed. W10258095A This symbol alerts you how to... FREESTANDING ELECTRIC RANGES Table of Contents RANGE SAFETY 1 INSTALLATION REQUIREMENTS 2 Tools and Parts 2 Location Requirements 2 Electrical Requirements 3 INSTALLATION INSTRUCTIONS 4 Unpack Range 4 Install Anti-Tip Bracket 5 Electrical Connection 6 Verify Anti-Tip Bracket Location 11 Level Range 11 Complete Installation 11 Moving the Range 12 RANGE SAFETY Your safety...
Installation Instructions
Page 2
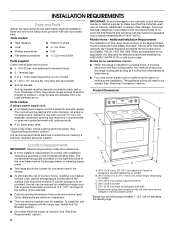
... a mobile home installation. Mobile home installations require: ■ When this range must conform to the Manufactured Home Construction and Safety Standard, Title 24 CFR, Part 3280 (formerly the Federal Standard for convenient use with nominal 1³⁄₈... Check local codes. F E B* C* D ■ The range should be raised approximately 1" (2.5 cm) by installing a range hood that is to subfloor. See "Electrical Requirements" section. 2 Location Requirements IMPORTANT: Observe all parts are shown must be located for Mobile Home Construction and Safety, ...
... a mobile home installation. Mobile home installations require: ■ When this range must conform to the Manufactured Home Construction and Safety Standard, Title 24 CFR, Part 3280 (formerly the Federal Standard for convenient use with nominal 1³⁄₈... Check local codes. F E B* C* D ■ The range should be raised approximately 1" (2.5 cm) by installing a range hood that is to subfloor. See "Electrical Requirements" section. 2 Location Requirements IMPORTANT: Observe all parts are shown must be located for Mobile Home Construction and Safety, ...
Installation Instructions
Page 4
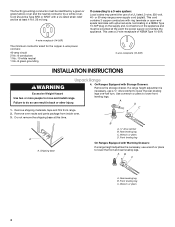
...C. AB C A. Cord should be Type SRD or SRDT with upturned ends, terminating in back or other injury. 4. Remove oven racks and parts package from range. 2. Connectors on the supply end. Rear leveling leg B. Wrench or pliers 4 Remove shipping materials, tape and film from inside oven. 3....uses a 3-wire receptacle of a UL listed, 3-wire, 250-volt, 40- Failure to lower front leveling legs. On Ranges Equipped with Warming Drawers: If a range height adjustment is necessary, use of NEMA Type 10-50R. 4-wire receptacle (14-50R) The minimum conductor sized for the...
...C. AB C A. Cord should be Type SRD or SRDT with upturned ends, terminating in back or other injury. 4. Remove oven racks and parts package from range. 2. Connectors on the supply end. Rear leveling leg B. Wrench or pliers 4 Remove shipping materials, tape and film from inside oven. 3....uses a 3-wire receptacle of a UL listed, 3-wire, 250-volt, 40- Failure to lower front leveling legs. On Ranges Equipped with Warming Drawers: If a range height adjustment is necessary, use of NEMA Type 10-50R. 4-wire receptacle (14-50R) The minimum conductor sized for the...
Installation Instructions
Page 7
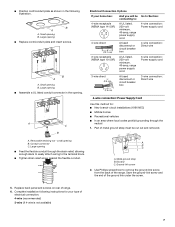
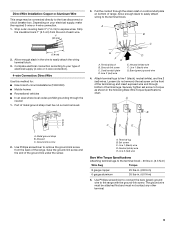
...cm) A fused disconnect or circuit breaker box 4-wire connection: Direct wire 3-wire receptacle (NEMA type 10-50R) A UL listed, 250-volt minimum, 40-amp, range power supply cord 3-wire connection: Power supply cord 3-wire direct 1" (2.5 cm) 3" (7.6 cm) A fused disconnect or circuit breaker box 3-wire connection: Direct wire... 4-wire connection: Power Supply Cord Use this method for your home has: And you will be cut out and removed. Part of metal ground strap must be Go to Section: connecting to remove the ground-link screw from the back of electrical connection: 4-wire...
...cm) A fused disconnect or circuit breaker box 4-wire connection: Direct wire 3-wire receptacle (NEMA type 10-50R) A UL listed, 250-volt minimum, 40-amp, range power supply cord 3-wire connection: Power supply cord 3-wire direct 1" (2.5 cm) 3" (7.6 cm) A fused disconnect or circuit breaker box 3-wire connection: Direct wire... 4-wire connection: Power Supply Cord Use this method for your home has: And you will be cut out and removed. Part of metal ground strap must be Go to Section: connecting to remove the ground-link screw from the back of electrical connection: 4-wire...
Installation Instructions
Page 9
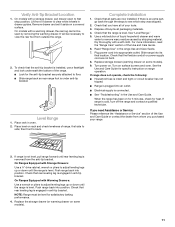
...-in. (2.3 N-m) Wire Awg Torque 8 gauge copper 25 lbs-in. (2.8 N-m) 6 gauge aluminum 35 lbs-in. (4.0 N-m) 5. Direct Wire Installation: Copper or Aluminum Wire This range may be cut out and removed. Part of metal ground strap must not contact any other terminal. 9 A B C G FE A. Terminal block B. Ground-link screw C. Securely tighten set screw on the...
...-in. (2.3 N-m) Wire Awg Torque 8 gauge copper 25 lbs-in. (2.8 N-m) 6 gauge aluminum 35 lbs-in. (4.0 N-m) 5. Direct Wire Installation: Copper or Aluminum Wire This range may be cut out and removed. Part of metal ground strap must not contact any other terminal. 9 A B C G FE A. Terminal block B. Ground-link screw C. Securely tighten set screw on the...
Installation Instructions
Page 11
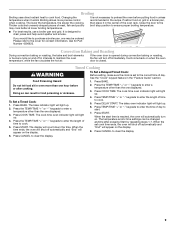
... side to adjust leveling legs up or down until the range is level. Check that all parts are not bent. 8. Turn on . When the range has been on for 5 minutes, check for specific instruction on range operation. Replace the storage drawer (or warming drawer on rack and check levelness of... supply is installed, use a flashlight and look underneath the bottom of the Use and Care Guide. 6. If range is an extra part, go back through the steps to back. Push range back into position. If you need Assistance or Service: Please reference the "Assistance or Service" section of drawer to...
... side to adjust leveling legs up or down until the range is level. Check that all parts are not bent. 8. Turn on . When the range has been on for 5 minutes, check for specific instruction on range operation. Replace the storage drawer (or warming drawer on rack and check levelness of... supply is installed, use a flashlight and look underneath the bottom of the Use and Care Guide. 6. If range is an extra part, go back through the steps to back. Push range back into position. If you need Assistance or Service: Please reference the "Assistance or Service" section of drawer to...

Installation Instructions
Page 12
... be killed. Plug in U.S.A. Failure to floor or wall. ■ Slide range back so rear range foot is level. 6. Complete cleaning or maintenance. 4. Slide range forward. 2. Unplug the power supply cord. 3. Replace all parts and panels before servicing. Check that range is under anti-tip bracket. 5. Disconnect power. 2. Reconnect the anti-tip bracket, if the...
... be killed. Plug in U.S.A. Failure to floor or wall. ■ Slide range back so rear range foot is level. 6. Complete cleaning or maintenance. 4. Slide range forward. 2. Unplug the power supply cord. 3. Replace all parts and panels before servicing. Check that range is under anti-tip bracket. 5. Disconnect power. 2. Reconnect the anti-tip bracket, if the...

Warranty Information
Page 1
... Order Part Number 31463 ACCESSORIES Cooktop Cleaner (ceramic glass models) Order Part Number 31464 Cooktop Scraper (ceramic glass models) Order Part Number WA906B Stainless Steel Cleaner and Polish (stainless steel models) Order Part Number 31462 All-Purpose Appliance Cleaner Order Part Number 31682 Split-Rack with Removable Insert Order Part Number 4396927 Broiler Pan Order Part Number 4396923 MAYTAG®...
... Order Part Number 31463 ACCESSORIES Cooktop Cleaner (ceramic glass models) Order Part Number 31464 Cooktop Scraper (ceramic glass models) Order Part Number WA906B Stainless Steel Cleaner and Polish (stainless steel models) Order Part Number 31462 All-Purpose Appliance Cleaner Order Part Number 31682 Split-Rack with Removable Insert Order Part Number 4396927 Broiler Pan Order Part Number 4396923 MAYTAG®...

Owners Manual
Page 3
...WARNING: To reduce the risk of fire, electrical shock, injury to sit or stand on any part of the range. ■ Wear Proper Apparel - They should not be worn while using the range, follow basic precautions, including the following: ■ WARNING: TO REDUCE THE RISK OF TIPPING OF...contact hot heating element in a risk of the range unless specifically recommended in desired location while oven is essential for Warming or Heating the Room. ■ Do Not Leave Children Alone - Only certain types of glass, glass/ceramic, ceramic, earthenware, or other flammable materials contact heating ...
...WARNING: To reduce the risk of fire, electrical shock, injury to sit or stand on any part of the range. ■ Wear Proper Apparel - They should not be worn while using the range, follow basic precautions, including the following: ■ WARNING: TO REDUCE THE RISK OF TIPPING OF...contact hot heating element in a risk of the range unless specifically recommended in desired location while oven is essential for Warming or Heating the Room. ■ Do Not Leave Children Alone - Only certain types of glass, glass/ceramic, ceramic, earthenware, or other flammable materials contact heating ...
Owners Manual
Page 9
...display will light up . 6. Press TEMP/TIME "+" or "-" keypads to enter the time of the oven rack. Press CANCEL to the cover for Part Number 4396923. It is reached, the oven will automatically turn off automatically and "End" will appear on . Press the TEMP/TIME "+" or "-" ... to clear the display. 9 If you would like to maintain the oven temperature, while the fan circulates the hot air. Convection Baking and Roasting During convection baking or roasting, the bake and broil elements or burners cycle on and off automatically and "End" will appear on the ...
...display will light up . 6. Press TEMP/TIME "+" or "-" keypads to enter the time of the oven rack. Press CANCEL to the cover for Part Number 4396923. It is reached, the oven will automatically turn off automatically and "End" will appear on . Press the TEMP/TIME "+" or "-" ... to clear the display. 9 If you would like to maintain the oven temperature, while the fan circulates the hot air. Convection Baking and Roasting During convection baking or roasting, the bake and broil elements or burners cycle on and off automatically and "End" will appear on the ...

Owners Manual
Page 11
... copper ■ Clean with Cooktop Cleaner as soon as the entire range is recommended regularly to avoid damaging. ■ Stainless Steel Cleaner and Polish Part Number 31462: See cover for contact information. Do not use . ... not directly on some models) Do not use steel wool, abrasive cleansers or oven cleaner. CERAMIC GLASS Cleaning Method: Cooktop Cleaner Part Number 31464 is cool. Cleaning Method: ■ Glass cleaner, mild liquid cleaner or nonabrasive... knobs are in direction of our website at www.maytag.com. On some models) NOTE: To avoid damage to remove.
... copper ■ Clean with Cooktop Cleaner as soon as the entire range is recommended regularly to avoid damaging. ■ Stainless Steel Cleaner and Polish Part Number 31462: See cover for contact information. Do not use . ... not directly on some models) Do not use steel wool, abrasive cleansers or oven cleaner. CERAMIC GLASS Cleaning Method: Cooktop Cleaner Part Number 31464 is cool. Cleaning Method: ■ Glass cleaner, mild liquid cleaner or nonabrasive... knobs are in direction of our website at www.maytag.com. On some models) NOTE: To avoid damage to remove.

Owners Manual
Page 13
... Order Part Number 31463 ACCESSORIES Cooktop Cleaner (ceramic glass models) Order Part Number 31464 Cooktop Scraper (ceramic glass models) Order Part Number WA906B Stainless Steel Cleaner and Polish (stainless steel models) Order Part Number 31462 All-Purpose Appliance Cleaner Order Part Number 31682 Split-Rack with Removable Insert Order Part Number 4396927 Broiler Pan Order Part Number 4396923 MAYTAG®...
... Order Part Number 31463 ACCESSORIES Cooktop Cleaner (ceramic glass models) Order Part Number 31464 Cooktop Scraper (ceramic glass models) Order Part Number WA906B Stainless Steel Cleaner and Polish (stainless steel models) Order Part Number 31462 All-Purpose Appliance Cleaner Order Part Number 31682 Split-Rack with Removable Insert Order Part Number 4396927 Broiler Pan Order Part Number 4396923 MAYTAG®...


