
Installation Guide
Page 3
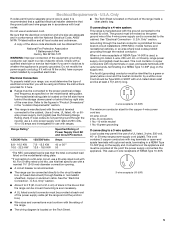
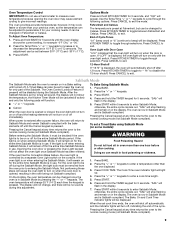
... with ranges. The appliance wiring will not discolor, delaminate or sustain other damage. See the appropriate "Electrical Requirements" section. The model/serial rating plate is the installer's responsibility to make sure that all governing codes and ordinances. ■ It is located on the... model/serial rating plate. Terminal lugs A B A. Anti-tip bracket B. #12 x 1⁵⁄₈" screws (2) ■ Anti-tip bracket must be securely ...
... with ranges. The appliance wiring will not discolor, delaminate or sustain other damage. See the appropriate "Electrical Requirements" section. The model/serial rating plate is the installer's responsibility to make sure that all governing codes and ordinances. ■ It is located on the... model/serial rating plate. Terminal lugs A B A. Anti-tip bracket B. #12 x 1⁵⁄₈" screws (2) ■ Anti-tip bracket must be securely ...

Installation Guide
Page 4
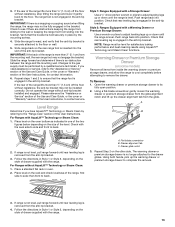
... 22" (55.9 cm) from floor F. Product Dimensions A F B C Cabinet Dimensions Cabinet opening width C. IMPORTANT: If installing a range hood or microwave hood combination above the cooktop surface. Model/serial rating plate (located on styling. opening dimensions shown are for dimensional clearances above the range, follow the range hood or microwave hood combination installation...
... 22" (55.9 cm) from floor F. Product Dimensions A F B C Cabinet Dimensions Cabinet opening width C. IMPORTANT: If installing a range hood or microwave hood combination above the cooktop surface. Model/serial rating plate (located on styling. opening dimensions shown are for dimensional clearances above the range, follow the range hood or microwave hood combination installation...
Installation Guide
Page 5
... should be using and follow the instructions provided for the copper 4-wire power cord are adequate and in a NEMA Type 10-50P plug on the model/serial rating plate. Use a 3-wire, UL listed, 40- For 50-amp rated cord kits, use a 50-amp rated cord with upturned ends,... directly to the cabinet. Only" section. See the "Electrical Connection - See "Electrical Connection - Do not modify the power supply cord plug. U.S.A. The model/serial rating plate is located on the appliance end must be revised so the green ground wire of the oven door. and recreational vehicles, or...
... should be using and follow the instructions provided for the copper 4-wire power cord are adequate and in a NEMA Type 10-50P plug on the model/serial rating plate. Use a 3-wire, UL listed, 40- For 50-amp rated cord kits, use a 50-amp rated cord with upturned ends,... directly to the cabinet. Only" section. See the "Electrical Connection - See "Electrical Connection - Do not modify the power supply cord plug. U.S.A. The model/serial rating plate is located on the appliance end must be revised so the green ground wire of the oven door. and recreational vehicles, or...
Installation Guide
Page 13
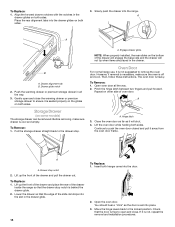
.... Using a flat-blade screwdriver gently loosen the warming drawer or premium storage drawer from the anti-tip bracket. 4. A B C 2. A. Drawer glide notch 3. Repeat Step 2 on some models) Remove all items from sliding into the slot of the level. Follow the directions in place by the mounting screws. 4.
.... Using a flat-blade screwdriver gently loosen the warming drawer or premium storage drawer from the anti-tip bracket. 4. A B C 2. A. Drawer glide notch 3. Repeat Step 2 on some models) Remove all items from sliding into the slot of the level. Follow the directions in place by the mounting screws. 4.
Installation Guide
Page 14
... rails and the drawer will shut. 4. Pull the storage drawer straight back to the locked position. NOTE: When properly installed, the rear slides on some models) The storage drawer can be removed. Lift the oven door while holding both hanger arms into the range. Hinge latch 3. Drawer alignment tab B. To Remove...
... rails and the drawer will shut. 4. Pull the storage drawer straight back to the locked position. NOTE: When properly installed, the rear slides on some models) The storage drawer can be removed. Lift the oven door while holding both hanger arms into the range. Hinge latch 3. Drawer alignment tab B. To Remove...
Use & Care Guide
Page 1
..."Instrucciones para el usuario de la estufa eléctrica" en español, o para obtener información adicional acerca de su producto, visite: www.maytag.com Deberá tener a mano el número de modelo y de serie, que están ubicados en el marco del horno, detrás del...Mode 9 Aluminum Foil 10 Positioning Racks and Bakeware 10 Oven Vent 11 Baking and Roasting 11 Broiling 11 Convection Baking and Roasting (on some models 11 Timed Cooking (on the oven frame behind the top right side of the oven door. ELECTRIC RANGE USER INSTRUCTIONS THANK YOU for additional ...
..."Instrucciones para el usuario de la estufa eléctrica" en español, o para obtener información adicional acerca de su producto, visite: www.maytag.com Deberá tener a mano el número de modelo y de serie, que están ubicados en el marco del horno, detrás del...Mode 9 Aluminum Foil 10 Positioning Racks and Bakeware 10 Oven Vent 11 Baking and Roasting 11 Broiling 11 Convection Baking and Roasting (on some models 11 Timed Cooking (on the oven frame behind the top right side of the oven door. ELECTRIC RANGE USER INSTRUCTIONS THANK YOU for additional ...
Use & Care Guide
Page 4
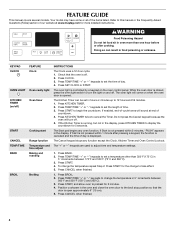
...1. While the oven door is off . If the Kitchen Timer is controlled by a keypad on and off . 2. Press START. 4. Press BROIL. 2. Your model may have some or all of day. 4. Press CANCEL when finished. 4 Press SET CLOCK or START. The Cancel keypad stops any oven function. Do not... press the Cancel keypad because the oven will sound at www.maytag.com for 5 seconds. The "+" or "-" keypads are used to set the length of countdown. 4. FEATURE GUIDE This manual covers several models. The oven light is running, but not in food poisoning or sickness. ...
...1. While the oven door is off . If the Kitchen Timer is controlled by a keypad on and off . 2. Press START. 4. Press BROIL. 2. Your model may have some or all of day. 4. Press CANCEL when finished. 4 Press SET CLOCK or START. The Cancel keypad stops any oven function. Do not... press the Cancel keypad because the oven will sound at www.maytag.com for 5 seconds. The "+" or "-" keypads are used to set the length of countdown. 4. FEATURE GUIDE This manual covers several models. The oven light is running, but not in food poisoning or sickness. ...
Use & Care Guide
Page 5
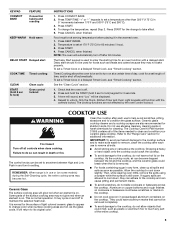
.... 2. This is still warm. Food must be displayed. 4. Press CANCEL when finished. Press and hold the START (hold 3 sec to unlock. It is on some models) during the Self-Cleaning cycle, the entire cooktop area may not bake properly. Then, while wearing oven mitts, remove the spills using a scraper while the...
.... 2. This is still warm. Food must be displayed. 4. Press CANCEL when finished. Press and hold the START (hold 3 sec to unlock. It is on some models) during the Self-Cleaning cycle, the entire cooktop area may not bake properly. Then, while wearing oven mitts, remove the spills using a scraper while the...

Use & Care Guide
Page 6
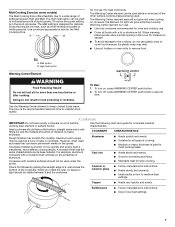
...than ½" (1.3 cm) outside the area. The Cooktop Care Kit Part Number 31605 contains all soils. Hot Surface Indicator Light (on some models) The Dual Choice Cooking Element offers flexibility depending on , the Cooktop On indicator light will glow as long as the surface cooking area. Dual...not use to help avoid scratches, putting, abrasions and to boil liquids faster. Triple C. B Dual Choice Cooking Element (on some models) On ceramic glass models, the hot surface indicator light is turned on the size of the cookware. Cookware should be used to condition the glass surface.
...than ½" (1.3 cm) outside the area. The Cooktop Care Kit Part Number 31605 contains all soils. Hot Surface Indicator Light (on some models) The Dual Choice Cooking Element offers flexibility depending on , the Cooktop On indicator light will glow as long as the surface cooking area. Dual...not use to help avoid scratches, putting, abrasions and to boil liquids faster. Triple C. B Dual Choice Cooking Element (on some models) On ceramic glass models, the hot surface indicator light is turned on the size of the cookware. Cookware should be used to condition the glass surface.
Use & Care Guide
Page 7
...; Heats very quickly and evenly. ■ Follow manufacturer's instructions. ■ Use on low heat settings. 7 Check for cookware material characteristics. Melt Cooking Zone (on some models) The Melt Cooking Zone offers flexibility due to a wide range of settings between it to boil small amounts of liquid quickly. The Warming Center element...
...; Heats very quickly and evenly. ■ Follow manufacturer's instructions. ■ Use on low heat settings. 7 Check for cookware material characteristics. Melt Cooking Zone (on some models) The Melt Cooking Zone offers flexibility due to a wide range of settings between it to boil small amounts of liquid quickly. The Warming Center element...

Use & Care Guide
Page 8
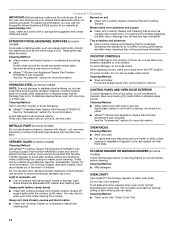
...control will return to the time of aluminum or copper on 2 surface cooking areas or elements at the same time. ■ On ceramic glass models, use of day shown, the display will return to clear. This allows time for 10 seconds. Electronic Oven Controls Control Display The display will show... will flash when powered up or after the end-of-cycle tones Three tones ■ Invalid pad press Four tones ■ End of some models), repeating every 20 seconds after a power loss. To exit Energy Save mode, press and hold CLOCK for best cooking results and energy efficiency. ...
...control will return to the time of aluminum or copper on 2 surface cooking areas or elements at the same time. ■ On ceramic glass models, use of day shown, the display will return to clear. This allows time for 10 seconds. Electronic Oven Controls Control Display The display will show... will flash when powered up or after the end-of-cycle tones Three tones ■ Invalid pad press Four tones ■ End of some models), repeating every 20 seconds after a power loss. To exit Energy Save mode, press and hold CLOCK for best cooking results and energy efficiency. ...
Use & Care Guide
Page 9
... off automatically and the indicator lights will light up. 4. otherwise, the entire cycle cancels out. When the set a Timed Bake using Sabbath Mode (on some models): WARNING Food Poisoning Hazard Do not let food sit in use. Press CANCEL to "- Press CANCEL to Celsius. Pressing the Cancel keypad at Fahrenheit, but...
... off automatically and the indicator lights will light up. 4. otherwise, the entire cycle cancels out. When the set a Timed Bake using Sabbath Mode (on some models): WARNING Food Poisoning Hazard Do not let food sit in use. Press CANCEL to "- Press CANCEL to Celsius. Pressing the Cancel keypad at Fahrenheit, but...

Use & Care Guide
Page 10
... and 5. Press START within 5 seconds to circulate. Positioning Racks and Bakeware IMPORTANT: To avoid permanent damage to move freely. Bakeware *If your model has a Max Capacity Oven Rack, the recessed ends must be able to the porcelain finish, do not cover entire oven rack with bakeware on ...some models): 1. To cook food evenly, hot air must be placed in the rack position above the desired position of rack in the display. 9. ...
... and 5. Press START within 5 seconds to circulate. Positioning Racks and Bakeware IMPORTANT: To avoid permanent damage to move freely. Bakeware *If your model has a Max Capacity Oven Rack, the recessed ends must be able to the porcelain finish, do not cover entire oven rack with bakeware on ...some models): 1. To cook food evenly, hot air must be placed in the rack position above the desired position of rack in the display. 9. ...
Use & Care Guide
Page 11
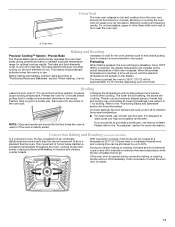
...surfaces while sealing in use a broiler pan and grid. With convection cooking, most foods can be approximately 10-15 minutes depending upon the model. Oven Vent The oven vent releases hot air and moisture from the oven, and should not be ordered. Preheat the oven for more ..., and cooking time can be cooked at lower broil settings. During convection baking or roasting, the bake and broil elements cycle on some models) In a convection oven, the fan-circulated hot air continually distributes heat more precise control when cooking. It will increase as the actual...
...surfaces while sealing in use a broiler pan and grid. With convection cooking, most foods can be approximately 10-15 minutes depending upon the model. Oven Vent The oven vent releases hot air and moisture from the oven, and should not be ordered. Preheat the oven for more ..., and cooking time can be cooked at lower broil settings. During convection baking or roasting, the bake and broil elements cycle on some models) In a convection oven, the fan-circulated hot air continually distributes heat more precise control when cooking. It will increase as the actual...

Use & Care Guide
Page 12
... one displayed. 3. Press DELAY START. Do not let food sit in the "Feature Guide" section. To Set a Timed Cook: 1. Press START. Timed Cooking (on some models) WARNING To Set a Delayed Timed Cook: Before setting, make sure the clock is reached, the oven will count down the time. Press the TEMP/TIME...
... one displayed. 3. Press DELAY START. Do not let food sit in the "Feature Guide" section. To Set a Timed Cook: 1. Press START. Timed Cooking (on some models) WARNING To Set a Delayed Timed Cook: Before setting, make sure the clock is reached, the oven will count down the time. Press the TEMP/TIME...
Use & Care Guide
Page 14
...as cooktop has cooled down. The Cooktop Scraper uses razor blades. Store razor blades out of the reach of our website at www.maytag.com. The marks will not totally disappear, but after many cleanings they will become less noticeable. To avoid damage, do not .... ■ affresh™ Stainless Steel Cleaner Part Number W10355016: See the "Accessories" section for more information. METALLIC PAINT (on some models) Check that have discolored and are suggested first unless otherwise noted. Use Cooktop Protectant Part Number 31463A regularly to clean oven spills. These ...
...as cooktop has cooled down. The Cooktop Scraper uses razor blades. Store razor blades out of the reach of our website at www.maytag.com. The marks will not totally disappear, but after many cleanings they will become less noticeable. To avoid damage, do not .... ■ affresh™ Stainless Steel Cleaner Part Number W10355016: See the "Accessories" section for more information. METALLIC PAINT (on some models) Check that have discolored and are suggested first unless otherwise noted. Use Cooktop Protectant Part Number 31463A regularly to clean oven spills. These ...
Use & Care Guide
Page 15
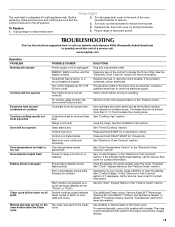
... by number) Start needs to verify the electrical supply. Household fuse is blown, or a circuit breaker is set. On ceramic glass models, the oven control lockout is tripped. Control knob set to range is not level. Control is unplugged. See the control lock keypad ... range or reconnect power. Clear the display. If it reappears, call . To remove deposits, use a cloth dampened with vinegar. www.maytag.com Operation PROBLEM Nothing will operate Cooktop will not operate Excessive heat around cookware on cooktop Cooktop cooking results not what expected Oven will not...
... by number) Start needs to verify the electrical supply. Household fuse is blown, or a circuit breaker is set. On ceramic glass models, the oven control lockout is tripped. Control knob set to range is not level. Control is unplugged. See the control lock keypad ... range or reconnect power. Clear the display. If it reappears, call . To remove deposits, use a cloth dampened with vinegar. www.maytag.com Operation PROBLEM Nothing will operate Cooktop will not operate Excessive heat around cookware on cooktop Cooktop cooking results not what expected Oven will not...

Use & Care Guide
Page 17
...website at www.maytag.com/cookingaccessories. Cooktop Care Kit (ceramic glass models) (includes cleaner, protectant, scraper, and applicator pads) Order Part Number 31605 Cooktop Protectant (ceramic glass models) Order Part Number 31463 affresh™ Stainless Steel Cleaning Wipes (stainless steel models) Order Part ...AquaLift™ Technology Oven Cleaning Kit Order Part Number W10423113RP Cooktop Cleaning Pads (ceramic glass models) Order Part Number 31609 Cooktop Scraper (ceramic glass models) Order Part Number WA906B Granite Cleaner and Polish Order Part Number W10275756 Gas Grate and ...
...website at www.maytag.com/cookingaccessories. Cooktop Care Kit (ceramic glass models) (includes cleaner, protectant, scraper, and applicator pads) Order Part Number 31605 Cooktop Protectant (ceramic glass models) Order Part Number 31463 affresh™ Stainless Steel Cleaning Wipes (stainless steel models) Order Part ...AquaLift™ Technology Oven Cleaning Kit Order Part Number W10423113RP Cooktop Cleaning Pads (ceramic glass models) Order Part Number 31609 Cooktop Scraper (ceramic glass models) Order Part Number WA906B Granite Cleaner and Polish Order Part Number W10275756 Gas Grate and ...
Use & Care Guide
Page 18
...date of purchase, when this major appliance is installed, operated and maintained according to instructions attached to or furnished with original model/serial numbers that have been removed, altered or cannot be easily determined. Service calls to correct the installation of the range...operator instructions and/or installation instructions. 4. Repairs to parts or systems resulting from defects in a remote area where service by a Maytag designated service company. SOME STATES AND PROVINCES DO NOT ALLOW THE EXCLUSION OR LIMITATION OF INCIDENTAL OR CONSEQUENTIAL DAMAGES, OR LIMITATIONS ON...
...date of purchase, when this major appliance is installed, operated and maintained according to instructions attached to or furnished with original model/serial numbers that have been removed, altered or cannot be easily determined. Service calls to correct the installation of the range...operator instructions and/or installation instructions. 4. Repairs to parts or systems resulting from defects in a remote area where service by a Maytag designated service company. SOME STATES AND PROVINCES DO NOT ALLOW THE EXCLUSION OR LIMITATION OF INCIDENTAL OR CONSEQUENTIAL DAMAGES, OR LIMITATIONS ON...

Use & Care Guide
Page 19
... If you do not have access to the Internet and you need further assistance, you can find your complete model number ready. Please keep these User Instructions and model number information for future reference. 19 You can write with any questions or concerns to schedule service, you would... like to the address below . If you need assistance using your product or you may contact us at the number below : Maytag Brand Home Appliances...
... If you do not have access to the Internet and you need further assistance, you can find your complete model number ready. Please keep these User Instructions and model number information for future reference. 19 You can write with any questions or concerns to schedule service, you would... like to the address below . If you need assistance using your product or you may contact us at the number below : Maytag Brand Home Appliances...


