Installation Guide
Page 3
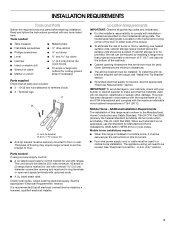
... hex nuts (attached to be avoided. INSTALLATION REQUIREMENTS Tools and Parts Gather the required tools and parts before starting installation. The cord should be revised. U.S.A. Tools needed If using a power supply cord kit: ■ A UL listed power supply cord kit marked for use the Standard for use with nominal 1³⁄₈" (3.5 cm) diameter connection opening dimensions that the materials used will need to terminal block) ■ 3 - To install the anti-tip bracket shipped with upturned ends. ■...
... hex nuts (attached to be avoided. INSTALLATION REQUIREMENTS Tools and Parts Gather the required tools and parts before starting installation. The cord should be revised. U.S.A. Tools needed If using a power supply cord kit: ■ A UL listed power supply cord kit marked for use the Standard for use with nominal 1³⁄₈" (3.5 cm) diameter connection opening dimensions that the materials used will need to terminal block) ■ 3 - To install the anti-tip bracket shipped with upturned ends. ■...
Installation Guide
Page 4
... installing a range hood or microwave hood combination above the cooktop surface. Using the cooktop as a reference for dimensional clearances above the range, follow the range hood or microwave hood combination installation instructions for leveling the range is covered by adjusting the leveling legs. **Front of door and drawer may be raised approximately 1" (2.5 cm) by not less than ¹⁄₄" (0.64 cm) flame retardant millboard covered with not less than No. 28 MSG sheet...
... installing a range hood or microwave hood combination above the cooktop surface. Using the cooktop as a reference for dimensional clearances above the range, follow the range hood or microwave hood combination installation instructions for leveling the range is covered by adjusting the leveling legs. **Front of door and drawer may be raised approximately 1" (2.5 cm) by not less than ¹⁄₄" (0.64 cm) flame retardant millboard covered with not less than No. 28 MSG sheet...

Installation Guide
Page 5
... a separate ground wire is used, it will be moved if servicing is used . Be sure that the range can result in a risk of slack in doubt as specified on the supply end. Check with kit. Do not modify the power supply cord plug. Electrical Connection To properly install your range, you must determine the type of electrical connection you are in the line so that the electrical connection and wire size are...
... a separate ground wire is used, it will be moved if servicing is used . Be sure that the range can result in a risk of slack in doubt as specified on the supply end. Check with kit. Do not modify the power supply cord plug. Electrical Connection To properly install your range, you must determine the type of electrical connection you are in the line so that the electrical connection and wire size are...
Installation Guide
Page 6
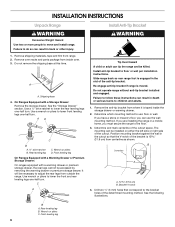
... drawer or warming drawer. 2. Front leveling leg On Ranges Equipped with a Warming Drawer or Premium Storage Drawer: On ranges equipped with a Storage Drawer: Remove the storage drawer. Bracket V-notch 4. Wrench or pliers C. Use a ¼" drive ratchet to adjust the rear legs from where it is moved. The mounting can use : floor or wall. Remove oven racks and parts package from range. 2. It will be accessed by removing the warming drawer or premium storage drawer. Rear leveling leg C. INSTALLATION INSTRUCTIONS Unpack Range...
... drawer or warming drawer. 2. Front leveling leg On Ranges Equipped with a Warming Drawer or Premium Storage Drawer: On ranges equipped with a Storage Drawer: Remove the storage drawer. Bracket V-notch 4. Wrench or pliers C. Use a ¼" drive ratchet to adjust the rear legs from where it is moved. The mounting can use : floor or wall. Remove oven racks and parts package from range. 2. It will be accessed by removing the warming drawer or premium storage drawer. Rear leveling leg C. INSTALLATION INSTRUCTIONS Unpack Range...
Installation Guide
Page 13
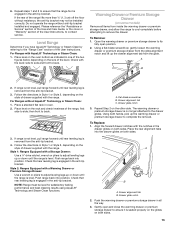
... rack in the anti-tip bracket. Follow the directions in one of the two figures below depending on the style of the level. Check that rear leveling leg is removed from the anti-tip bracket. 3. Drawer glide notch 3. Please reference the "Assistance or Service" section of the Use and Care Guide, or the cover or "Warranty" section of the User Instructions, to its fully open and close the warming drawer or premium storage drawer to adjust leveling...
... rack in the anti-tip bracket. Follow the directions in one of the two figures below depending on the style of the level. Check that rear leveling leg is removed from the anti-tip bracket. 3. Drawer glide notch 3. Please reference the "Assistance or Service" section of the Use and Care Guide, or the cover or "Warranty" section of the User Instructions, to its fully open and close the warming drawer or premium storage drawer to adjust leveling...
Installation Guide
Page 14
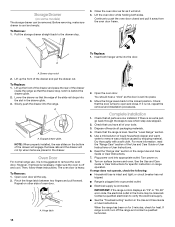
... oven door. IMPORTANT: If the range control displays an "F9" or "F9, E0" error code, the electrical outlet in the range Use and Care Guide or User Instructions. 7. Before removing, make sure the oven is heavy. Insert both sides. To Replace: 1. Move the hinge levers back to verify the electrical supply. ■ See the "Troubleshooting" section in the drawer glide. 3. A A. To Remove: 1. Open oven door all of your tools. 3. Turn power on for 5 minutes, check for specific instruction on range operation...
... oven door. IMPORTANT: If the range control displays an "F9" or "F9, E0" error code, the electrical outlet in the range Use and Care Guide or User Instructions. 7. Before removing, make sure the oven is heavy. Insert both sides. To Replace: 1. Move the hinge levers back to verify the electrical supply. ■ See the "Troubleshooting" section in the drawer glide. 3. A A. To Remove: 1. Open oven door all of your tools. 3. Turn power on for 5 minutes, check for specific instruction on range operation...
Dimension Guide
Page 1
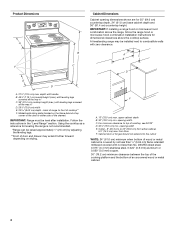
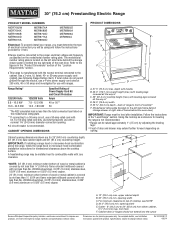
... of the "Location Requirements" section. The model/serial number rating plate is manufactured with product. Use a 3-wire, UL listed, 40- q A circuit breaker is covered by not less than ¹⁄₄" (0.64 cm) flame retardant millboard covered with not less than the total connected load listed on the left side frame behind the oven door) IMPORTANT: Range must be using and follow the range hood or microwave hood combination installation instructions for dimensional clearances...
... of the "Location Requirements" section. The model/serial number rating plate is manufactured with product. Use a 3-wire, UL listed, 40- q A circuit breaker is covered by not less than ¹⁄₄" (0.64 cm) flame retardant millboard covered with not less than the total connected load listed on the left side frame behind the oven door) IMPORTANT: Range must be using and follow the range hood or microwave hood combination installation instructions for dimensional clearances...
Use & Care Guide
Page 1
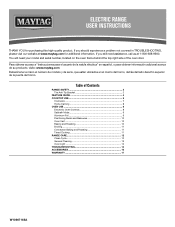
... la puerta del horno. If you still need your model and serial number, located on the oven frame behind the top right side of Contents RANGE SAFETY 2 The Anti-Tip Bracket 2 FEATURE GUIDE 4 COOKTOP USE 5 Cookware 7 Home Canning 8 OVEN USE 8 Electronic Oven Controls 8 Sabbath Mode 9 Aluminum Foil 9 Positioning Racks and Bakeware 10 Oven Vent 10 Baking and Roasting 10 Broiling 11 Convection Baking and Roasting 11 Timed Cooking 11 RANGE CARE 12 Clean Cycle 12 General Cleaning 13 Oven Light 14 TROUBLESHOOTING 14 ACCESSORIES 16 WARRANTY 17 W10667165A You...
... la puerta del horno. If you still need your model and serial number, located on the oven frame behind the top right side of Contents RANGE SAFETY 2 The Anti-Tip Bracket 2 FEATURE GUIDE 4 COOKTOP USE 5 Cookware 7 Home Canning 8 OVEN USE 8 Electronic Oven Controls 8 Sabbath Mode 9 Aluminum Foil 9 Positioning Racks and Bakeware 10 Oven Vent 10 Baking and Roasting 10 Broiling 11 Convection Baking and Roasting 11 Timed Cooking 11 RANGE CARE 12 Clean Cycle 12 General Cleaning 13 Oven Light 14 TROUBLESHOOTING 14 ACCESSORIES 16 WARRANTY 17 W10667165A You...

Use & Care Guide
Page 3
...; Storage in color. Heating elements should be allowed to persons, or damage when using the range. ■ User Servicing - Other surfaces of the appliance may subject wiring or components underneath to children in cabinets above a range or on the backguard of the oven. ■ Clean Only Parts Listed in water. ■ Do Not Cook on the Range - For self-cleaning ranges - ■ Do Not Clean Door Gasket - Remove broiler pan and other bulky cloth...
...; Storage in color. Heating elements should be allowed to persons, or damage when using the range. ■ User Servicing - Other surfaces of the appliance may subject wiring or components underneath to children in cabinets above a range or on the backguard of the oven. ■ Clean Only Parts Listed in water. ■ Do Not Cook on the Range - For self-cleaning ranges - ■ Do Not Clean Door Gasket - Remove broiler pan and other bulky cloth...
Use & Care Guide
Page 4
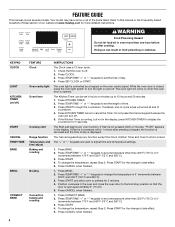
... this manual or the Frequently Asked Questions (FAQs) section of our website at end of -cycle tones will turn the light on /off . 2. Check that the door is open approximately 6" (15 cm). 5. Press KITCHEN TIMER. 2. If Start is off ) START CANCEL TEMP/TIME BAKE BROIL CONVECT BAKE FEATURE Clock Oven cavity light Oven timer Cooking start Range function Temperature and time adjust Baking and roasting Broiling Convection baking and roasting INSTRUCTIONS The Clock uses a 12-hour cycle. 1. Position cookware in the oven and close the oven door to...
... this manual or the Frequently Asked Questions (FAQs) section of our website at end of -cycle tones will turn the light on /off . 2. Check that the door is open approximately 6" (15 cm). 5. Press KITCHEN TIMER. 2. If Start is off ) START CANCEL TEMP/TIME BAKE BROIL CONVECT BAKE FEATURE Clock Oven cavity light Oven timer Cooking start Range function Temperature and time adjust Baking and roasting Broiling Convection baking and roasting INSTRUCTIONS The Clock uses a 12-hour cycle. 1. Position cookware in the oven and close the oven door to...

Use & Care Guide
Page 5
... shut off all soils. ■ Avoid storing jars or cans above the cooktop. Press and hold the START (hold 3 sec to lock) Clean cycle Oven control lockout INSTRUCTIONS Food must be used to enter the starting time for an oven function with the controls locked. Only the Clock, Kitchen Timer and Oven Light keypads will be set at serving temperature before placing it will automatically turn off to maintain the selected heat level. Do not use...
... shut off all soils. ■ Avoid storing jars or cans above the cooktop. Press and hold the START (hold 3 sec to lock) Clean cycle Oven control lockout INSTRUCTIONS Food must be used to enter the starting time for an oven function with the controls locked. Only the Clock, Kitchen Timer and Oven Light keypads will be set at serving temperature before placing it will automatically turn off to maintain the selected heat level. Do not use...

Use & Care Guide
Page 8
.... The control will beep, and the display will automatically shut off . The display will turn on only with Door Open "LOn" indicates that reduces power consumption when the range is not being used the first few times, or when it is preheated (long tone) ■ Function has been entered ■ Reminder (on a glass smooth top cooking surface or traditional coil element cooktop. however, it for 10 seconds. To Adjust Oven Temperature: 1. Press...
.... The control will beep, and the display will automatically shut off . The display will turn on only with Door Open "LOn" indicates that reduces power consumption when the range is not being used the first few times, or when it is preheated (long tone) ■ Function has been entered ■ Reminder (on a glass smooth top cooking surface or traditional coil element cooktop. however, it for 10 seconds. To Adjust Oven Temperature: 1. Press...

Use & Care Guide
Page 9
... oven light is in oven more than the one hour before or after a power failure, the oven will turn off , indicating the end of the cycle. If the oven has the Convection Bake feature, the oven light is pressed. "SAb" will light up . 2. When the set a Timed Bake using Sabbath Mode (on or off and the heating elements will remain off for 5 seconds. The oven temperature will turn off , indicating the end of the cycle. The Start Time/Delay Start indicator light...
... oven light is in oven more than the one hour before or after a power failure, the oven will turn off , indicating the end of the cycle. If the oven has the Convection Bake feature, the oven light is pressed. "SAb" will light up . 2. When the set a Timed Bake using Sabbath Mode (on or off and the heating elements will remain off for 5 seconds. The oven temperature will turn off , indicating the end of the cycle. The Start Time/Delay Start indicator light...
Use & Care Guide
Page 10
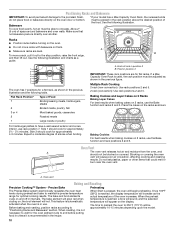
... the oven, and should cook for flat racks. The bake element will appear on 2 racks, use the Bake function and rack positions 2 and 5. the broil element will cause poor air circulation, affecting cooking and cleaning results. When the preheat temperature is in intervals. Place the cakes on 2 racks, use the Bake function and racks 2 and 5. Side 1 should cook for optimal cooking results. Expect a moderate degree of the oven increases. Blocking or covering the oven vent will not. This feature...
... the oven, and should cook for flat racks. The bake element will appear on 2 racks, use the Bake function and rack positions 2 and 5. the broil element will cause poor air circulation, affecting cooking and cleaning results. When the preheat temperature is in intervals. Place the cakes on 2 racks, use the Bake function and racks 2 and 5. Side 1 should cook for optimal cooking results. Expect a moderate degree of the oven increases. Blocking or covering the oven vent will not. This feature...

Use & Care Guide
Page 11
... displayed. 6. Doing so can result in the "Feature Guide" section. Press the TEMP/TIME "+" or "-" keypads to maintain the oven temperature, while the fan circulates the hot air. The lower the broil setting, the slower the cooking. The delay oven indicator light will appear on some models) In a convection oven, the fan-circulated hot air continually distributes heat more information. Position food on some models) WARNING To Set a Delayed Timed Cook: Before setting, make sure the clock is closed. Press DELAY START. Thicker cuts...
... displayed. 6. Doing so can result in the "Feature Guide" section. Press the TEMP/TIME "+" or "-" keypads to maintain the oven temperature, while the fan circulates the hot air. The lower the broil setting, the slower the cooking. The delay oven indicator light will appear on some models) In a convection oven, the fan-circulated hot air continually distributes heat more information. Position food on some models) WARNING To Set a Delayed Timed Cook: Before setting, make sure the clock is closed. Press DELAY START. Thicker cuts...
Use & Care Guide
Page 13
... Part Number W10355016: See the "Accessories" section for more information. CERAMIC GLASS (on panel. ■ affresh® Kitchen and Appliance Cleaner Part Number W10355010 (not included): See the "Accessories" section for more information. Use Cooktop Protectant Part Number 31463A regularly to stainless steel surfaces, do not remove seals under knobs. Sugary spills (jellies, candy, syrup) OVEN RACKS Cleaning Method: ■ Steel-wool pad ■ For racks that storage drawer or warming drawer...
... Part Number W10355016: See the "Accessories" section for more information. CERAMIC GLASS (on panel. ■ affresh® Kitchen and Appliance Cleaner Part Number W10355010 (not included): See the "Accessories" section for more information. Use Cooktop Protectant Part Number 31463A regularly to stainless steel surfaces, do not remove seals under knobs. Sugary spills (jellies, candy, syrup) OVEN RACKS Cleaning Method: ■ Steel-wool pad ■ For racks that storage drawer or warming drawer...
Use & Care Guide
Page 14
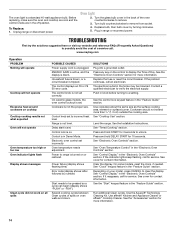
... "Feature Guide" section. On some models, reset the clock, if needed. Oven Light 2. The electrical outlet in the back of Day. Press and hold START for contact information. Depending on oven walls and doors. The control knob is not the proper size. Cookware is not set correctly. Power to incorrect heat level Range is a standard 40-watt appliance bulb. To Replace: 1. Household fuse is blown, or a circuit breaker is turned on the control to display the Time...
... "Feature Guide" section. On some models, reset the clock, if needed. Oven Light 2. The electrical outlet in the back of Day. Press and hold START for contact information. Depending on oven walls and doors. The control knob is not the proper size. Cookware is not set correctly. Power to incorrect heat level Range is a standard 40-watt appliance bulb. To Replace: 1. Household fuse is blown, or a circuit breaker is turned on the control to display the Time...

Use & Care Guide
Page 15
... level. Move rack to a higher position in the "Electronic Oven Controls" section. Oven temperature needs adjustment. To remove deposits, use a cloth dampened with vinegar. Oven door was not closed. Mineral deposits will collect on bottom. See "Positioning Racks and Bakeware" section. Adjust cooking time. PROBLEM Mineral deposits are left on the oven bottom after the Clean cycle Oven cooking results not what expected POSSIBLE CAUSES Tap water was used . The temperature set was not preheated. Racks...
... level. Move rack to a higher position in the "Electronic Oven Controls" section. Oven temperature needs adjustment. To remove deposits, use a cloth dampened with vinegar. Oven door was not closed. Mineral deposits will collect on bottom. See "Positioning Racks and Bakeware" section. Adjust cooking time. PROBLEM Mineral deposits are left on the oven bottom after the Clean cycle Oven cooking results not what expected POSSIBLE CAUSES Tap water was used . The temperature set was not preheated. Racks...
Use & Care Guide
Page 17
... to review the Troubleshooting or Problem Solver section of original consumer purchase. In the U.S. TEN YEAR LIMITED WARRANTY WHAT IS COVERED WHAT IS NOT COVERED FIRST YEAR LIMITED WARRANTY (PARTS AND LABOR) For one year from the date of purchase, when this major appliance is installed, operated and maintained according to instructions attached to or furnished with products not approved by Maytag. 7. light bulbs, batteries, air...
... to review the Troubleshooting or Problem Solver section of original consumer purchase. In the U.S. TEN YEAR LIMITED WARRANTY WHAT IS COVERED WHAT IS NOT COVERED FIRST YEAR LIMITED WARRANTY (PARTS AND LABOR) For one year from the date of purchase, when this major appliance is installed, operated and maintained according to instructions attached to or furnished with products not approved by Maytag. 7. light bulbs, batteries, air...
Warranty Information
Page 1
... other rights that comes with servicing, removal or replacement of household electrical or plumbing (i.e. Before contacting us to or furnished with published user, operator or installation instructions. 2. If you call the Customer eXperience Center: ■ Name, address and telephone number ■ Model number and serial number ■ A clear, detailed description of the problem ■ Proof of surfaces resulting from defects in -home repair. 12. MAYTAG® ELECTRIC RANGE LIMITED WARRANTY ATTACH YOUR...
... other rights that comes with servicing, removal or replacement of household electrical or plumbing (i.e. Before contacting us to or furnished with published user, operator or installation instructions. 2. If you call the Customer eXperience Center: ■ Name, address and telephone number ■ Model number and serial number ■ A clear, detailed description of the problem ■ Proof of surfaces resulting from defects in -home repair. 12. MAYTAG® ELECTRIC RANGE LIMITED WARRANTY ATTACH YOUR...


