
Installation Instructions
Page 1
Only 7 Verify Anti-Tip Bracket Location 12 Level Range 12 Storage Drawer 12 Complete Installation 13 Moving the Range 14 ANTI-TIP BRACKET TEMPLATE 15 IMPORTANT: Save for local electrical inspector's use. U.S.A. W10252706B U.S.A. Only 4 INSTALLATION INSTRUCTIONS 6 Unpack Range 6 Install Anti-Tip Bracket 6 Electrical Connection - INSTALLATION INSTRUCTIONS 30" (76 CM) FREESTANDING ELECTRIC RANGES Table of Contents RANGE SAFETY 2 INSTALLATION REQUIREMENTS 3 Tools and Parts 3 Location Requirements 3 Electrical Requirements -
Only 7 Verify Anti-Tip Bracket Location 12 Level Range 12 Storage Drawer 12 Complete Installation 13 Moving the Range 14 ANTI-TIP BRACKET TEMPLATE 15 IMPORTANT: Save for local electrical inspector's use. U.S.A. W10252706B U.S.A. Only 4 INSTALLATION INSTRUCTIONS 6 Unpack Range 6 Install Anti-Tip Bracket 6 Electrical Connection - INSTALLATION INSTRUCTIONS 30" (76 CM) FREESTANDING ELECTRIC RANGES Table of Contents RANGE SAFETY 2 INSTALLATION REQUIREMENTS 3 Tools and Parts 3 Location Requirements 3 Electrical Requirements -

Installation Instructions
Page 3
...as it must be located for Manufactured Home Installations, ANSI A225.1/NFPA 501A or local codes. Any method of this range is recommended that all parts are available from your local hardware store. Terminal lugs A B C A. Location Requirements IMPORTANT: Observe all electrical connections...) drill bit (for wood floors) 4.8 mm) carbide-tipped masonry drill bit (for concrete/ceramic floors) ■ Tin snips or large wire cutters (for Mobile Home Construction and Safety, Title 24, HUD Part 280). Check existing electrical supply. Read and follow the instructions provided with...
...as it must be located for Manufactured Home Installations, ANSI A225.1/NFPA 501A or local codes. Any method of this range is recommended that all parts are available from your local hardware store. Terminal lugs A B C A. Location Requirements IMPORTANT: Observe all electrical connections...) drill bit (for wood floors) 4.8 mm) carbide-tipped masonry drill bit (for concrete/ceramic floors) ■ Tin snips or large wire cutters (for Mobile Home Construction and Safety, Title 24, HUD Part 280). Check existing electrical supply. Read and follow the instructions provided with...

Installation Instructions
Page 6
... result in back or other injury. 1. It will be necessary to children and adults. Rear leveling leg B. Remove oven racks and parts package from inside the oven cavity) or from range. 2. Wrench or pliers 6 If countertop is moved. Failure to do so can result in cabinet opening edge, align template with Storage...
... result in back or other injury. 1. It will be necessary to children and adults. Rear leveling leg B. Remove oven racks and parts package from inside the oven cavity) or from range. 2. Wrench or pliers 6 If countertop is moved. Failure to do so can result in cabinet opening edge, align template with Storage...

Installation Instructions
Page 8
Part of metal ground strap must be Go to Section: connecting to remove the ground-link screw from the back of the range. Ground-link screw 2. UL listed strain relief ■ Tighten strain relief screw against the flexible conduit. 3-wire direct ³⁄₈" (1.0 cm)... connection: box or fused Direct wire disconnect 5" (12.7 cm) 3-wire receptacle (NEMA type 10-50R) A UL listed, 250-volt minimum, 40-amp, range power supply cord 3-wire connection: Power supply cord Style 2: Direct wire strain relief ■ Remove the knockout as needed for : ■ New branch-circuit ...
Part of metal ground strap must be Go to Section: connecting to remove the ground-link screw from the back of the range. Ground-link screw 2. UL listed strain relief ■ Tighten strain relief screw against the flexible conduit. 3-wire direct ³⁄₈" (1.0 cm)... connection: box or fused Direct wire disconnect 5" (12.7 cm) 3-wire receptacle (NEMA type 10-50R) A UL listed, 250-volt minimum, 40-amp, range power supply cord 3-wire connection: Power supply cord Style 2: Direct wire strain relief ■ Remove the knockout as needed for : ■ New branch-circuit ...

Installation Instructions
Page 10
...on the front of the terminal lug and insert exposed wire end through the strain relief on your type of the range. A A B B C A. Save the ground-link screw and the end of range. Terminal lug B. Line 1 (black) wire Bare Wire Torque Specifications Attaching terminal lugs to line 1 (black), neutral... through bottom of each wire. ³⁄₈" (1.0 cm) 3. Allow enough slack in the wire to the range with the ground-link screw and ground-link section. Part of metal ground strap must be connected directly to remove the ground-link screw from the end of terminal lugs. C...
...on the front of the terminal lug and insert exposed wire end through the strain relief on your type of the range. A A B B C A. Save the ground-link screw and the end of range. Terminal lug B. Line 1 (black) wire Bare Wire Torque Specifications Attaching terminal lugs to line 1 (black), neutral... through bottom of each wire. ³⁄₈" (1.0 cm) 3. Allow enough slack in the wire to the range with the ground-link screw and ground-link section. Part of metal ground strap must be connected directly to remove the ground-link screw from the end of terminal lugs. C...

Installation Instructions
Page 13
...into an outlet. ■ Electrical supply is an extra part, go back through the steps to move the drawer stop notch past the drawer glides. Check that all packaging materials. 4. For more information, read the "Range Care" section of liquid household cleaner and warm water to...fuse is cold, turn off the range and contact a qualified technician. 13 Read "Range Use" in the drawer glides. If range is intact and tight; Check that the range is fully engaged on surface burners and oven. Lift up the back of /recycle all parts are removing and replacing the storage...
...into an outlet. ■ Electrical supply is an extra part, go back through the steps to move the drawer stop notch past the drawer glides. Check that all packaging materials. 4. For more information, read the "Range Care" section of liquid household cleaner and warm water to...fuse is cold, turn off the range and contact a qualified technician. 13 Read "Range Use" in the drawer glides. If range is intact and tight; Check that the range is fully engaged on surface burners and oven. Lift up the back of /recycle all parts are removing and replacing the storage...

Installation Instructions
Page 14
... result in power supply cord. 5. Reconnect power. 6. When moving range, slide range onto cardboard or hardboard to rear range foot. Electrical Shock Hazard Disconnect power before operating. Replace all parts and panels before servicing. Slide range forward. 3. Failure to floor. ■ Slide range back so rear range foot is moved. Unplug the power supply cord. 3. Check that...
... result in power supply cord. 5. Reconnect power. 6. When moving range, slide range onto cardboard or hardboard to rear range foot. Electrical Shock Hazard Disconnect power before operating. Replace all parts and panels before servicing. Slide range forward. 3. Failure to floor. ■ Slide range back so rear range foot is moved. Unplug the power supply cord. 3. Check that...

Owners Manual
Page 3
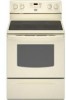
... or more surface units of different size. Loose-fitting or hanging garments should be moved while oven is used in or around any part of the range. ■ Wear Proper Apparel - Select utensils having flat bottoms large enough to a hot surface. ■ Use Care When Opening... Oven Cleaners - Only certain types of glass, glass/ceramic, ceramic, earthenware, or other flammable materials contact surface units or areas near surface units. ■ Do Not Use Water on any part of the oven. ■ Clean Only Parts Listed in ignition of clothing. Surface units may become hot...
... or more surface units of different size. Loose-fitting or hanging garments should be moved while oven is used in or around any part of the range. ■ Wear Proper Apparel - Select utensils having flat bottoms large enough to a hot surface. ■ Use Care When Opening... Oven Cleaners - Only certain types of glass, glass/ceramic, ceramic, earthenware, or other flammable materials contact surface units or areas near surface units. ■ Do Not Use Water on any part of the oven. ■ Clean Only Parts Listed in ignition of clothing. Surface units may become hot...

Owners Manual
Page 7
.... The lower the temperature, the slower the cooking. Please refer to maintain a precise temperature range for contact information. Rack Positions Rack 5: Toasting bread or broiling thin, non-fatty foods. ... items that no bakeware piece is reached, the display temperature will not. Oven vent (ceramic glass model) Baking and Roasting PRECISE BAKE Temperature Management System The PRECISE BAKE system electronically...or burn near the oven vent. When roasting, it is not necessary to wait for Part Number 4396923. 7 Ask for the oven preheat cycle to purchase a broiler pan, one...
.... The lower the temperature, the slower the cooking. Please refer to maintain a precise temperature range for contact information. Rack Positions Rack 5: Toasting bread or broiling thin, non-fatty foods. ... items that no bakeware piece is reached, the display temperature will not. Oven vent (ceramic glass model) Baking and Roasting PRECISE BAKE Temperature Management System The PRECISE BAKE system electronically...or burn near the oven vent. When roasting, it is not necessary to wait for Part Number 4396923. 7 Ask for the oven preheat cycle to purchase a broiler pan, one...

Owners Manual
Page 9
...wool, abrasive powder cleansers, chlorine bleach, rust remover or ammonia because damage may stain. CERAMIC GLASS Cleaning Method: Cleaning Method: ■ Glass cleaner and soft cloth or sponge: ... not use abrasive cleaners, steel-wool pads, gritty washcloths or abrasive paper towels. Unplug range or disconnect power. 4. Cleaning Method: ■ Glass cleaner, mild liquid cleaner or ... of our website at www.maytag.com. Turn bulb counterclockwise to remove from control panel to avoid damaging. ■ Stainless Steel Cleaner and Polish Part Number 31462 (not included): See...
...wool, abrasive powder cleansers, chlorine bleach, rust remover or ammonia because damage may stain. CERAMIC GLASS Cleaning Method: Cleaning Method: ■ Glass cleaner and soft cloth or sponge: ... not use abrasive cleaners, steel-wool pads, gritty washcloths or abrasive paper towels. Unplug range or disconnect power. 4. Cleaning Method: ■ Glass cleaner, mild liquid cleaner or ... of our website at www.maytag.com. Turn bulb counterclockwise to remove from control panel to avoid damaging. ■ Stainless Steel Cleaner and Polish Part Number 31462 (not included): See...

Owners Manual
Page 11
Canning Unit Kit (coil element models) Order Part Number 242905 Cooktop Care Kit (includes cleaner, protectant, and applicator pads) Order Part Number 31605 Cooktop Protectant Order Part Number 31463 ACCESSORIES Cooktop Cleaner (ceramic glass models) Order Part Number 31464 Cooktop Scraper (ceramic glass models) Order Part Number WA906B Stainless Steel Cleaner and Polish (stainless steel models) Order Part Number 31462 All-Purpose Appliance Cleaner Order Part Number 31682 Split-Rack with Removable Insert Order Part Number 4396927 Broiler Pan Order Part Number 4396923 11
Canning Unit Kit (coil element models) Order Part Number 242905 Cooktop Care Kit (includes cleaner, protectant, and applicator pads) Order Part Number 31605 Cooktop Protectant Order Part Number 31463 ACCESSORIES Cooktop Cleaner (ceramic glass models) Order Part Number 31464 Cooktop Scraper (ceramic glass models) Order Part Number WA906B Stainless Steel Cleaner and Polish (stainless steel models) Order Part Number 31462 All-Purpose Appliance Cleaner Order Part Number 31682 Split-Rack with Removable Insert Order Part Number 4396927 Broiler Pan Order Part Number 4396923 11
Owners Manual
Page 12
...is located in accordance with the removal from your home of your major appliance for factory specified parts and repair labor to correct defects in -home service is covered by a Maytag designated service company. DISCLAIMER OF IMPLIED WARRANTIES; If outside the 50 United States and Canada, ... does not cover: 1. Service calls to be provided by this limited warranty does not apply. Consumable parts are excluded from unauthorized modifications made to the finish of Maytag Corporation or its related companies. 12/08 Printed in materials or workmanship and is designed to repair or...
...is located in accordance with the removal from your home of your major appliance for factory specified parts and repair labor to correct defects in -home service is covered by a Maytag designated service company. DISCLAIMER OF IMPLIED WARRANTIES; If outside the 50 United States and Canada, ... does not cover: 1. Service calls to be provided by this limited warranty does not apply. Consumable parts are excluded from unauthorized modifications made to the finish of Maytag Corporation or its related companies. 12/08 Printed in materials or workmanship and is designed to repair or...

Warranty Information
Page 1
...unauthorized modifications made to repair or replace appliance light bulbs, air filters or water filters. Repairs to parts or systems resulting from your authorized Maytag dealer to refrigerator or freezer product failures. 7. IMPLIED WARRANTIES, INCLUDING WARRANTIES OF MERCHANTABILITY OR FITNESS FOR ... limited warranty. Have your correspondence. Service calls to correct defects in materials or workmanship. Consumable parts are excluded from your major appliance is reported to Maytag within 30 days from accident, alteration, misuse, abuse, fire, flood, acts of God, ...
...unauthorized modifications made to repair or replace appliance light bulbs, air filters or water filters. Repairs to parts or systems resulting from your authorized Maytag dealer to refrigerator or freezer product failures. 7. IMPLIED WARRANTIES, INCLUDING WARRANTIES OF MERCHANTABILITY OR FITNESS FOR ... limited warranty. Have your correspondence. Service calls to correct defects in materials or workmanship. Consumable parts are excluded from your major appliance is reported to Maytag within 30 days from accident, alteration, misuse, abuse, fire, flood, acts of God, ...


