
Use and Care Guide
Page 1
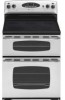
All rights reserved. Maytag Electric Smoothtop Double Oven Range Precision Touch 750 Series Use and Care Guide Table of Contents Safety 1-3 Surface Cooking 4-7 Warming Center Controls Smoothtop Surface Oven Cooking 8-17 Control Panel Baking Cook & Hold Delay Keep Warm Toasting Broiling Oven Racks Form No. Litho U.S.A. A/01/08 Part No. 8113P709-60 Care & Cleaning 18-21 Self-Clean Oven Cleaning Procedures Maintenance 22-23 Oven Doors and Windows Oven Lights Troubleshooting 24-25 Warranty & Service 27 Guide d'utilisation et d'entretien 28 Guía de uso y cuidado 56 ©...
All rights reserved. Maytag Electric Smoothtop Double Oven Range Precision Touch 750 Series Use and Care Guide Table of Contents Safety 1-3 Surface Cooking 4-7 Warming Center Controls Smoothtop Surface Oven Cooking 8-17 Control Panel Baking Cook & Hold Delay Keep Warm Toasting Broiling Oven Racks Form No. Litho U.S.A. A/01/08 Part No. 8113P709-60 Care & Cleaning 18-21 Self-Clean Oven Cleaning Procedures Maintenance 22-23 Oven Doors and Windows Oven Lights Troubleshooting 24-25 Warranty & Service 27 Guide d'utilisation et d'entretien 28 Guía de uso y cuidado 56 ©...
Use and Care Guide
Page 2
... appliance and ventilating hood to adjust, repair, service, or replace any part of our cooking products, it is properly installed, look underneath range with this appliance. Do not use an appliance as a step to appliance before using this appliance to prevent the potential risk of the rear leveling legs is properly engaged in possible tipping of the appliance, breakage of the oven doors, the appliance must...
... appliance and ventilating hood to adjust, repair, service, or replace any part of our cooking products, it is properly installed, look underneath range with this appliance. Do not use an appliance as a step to appliance before using this appliance to prevent the potential risk of the rear leveling legs is properly engaged in possible tipping of the appliance, breakage of the oven doors, the appliance must...
Use and Care Guide
Page 3
... appliance as Heating Elements directed in temperature. or an explosion. This reduces the risk of burns, ignition of this guide. Do not let potholders touch hot heating elements. Do not use appliance to cause burns. Clean cooktop with flat bottoms large enough to a hot surface. and may become hot enough to warm or heat the room. During Cooktop and after use aluminum foil to line drip bowls or cover oven racks or oven bottoms. This...
... appliance as Heating Elements directed in temperature. or an explosion. This reduces the risk of burns, ignition of this guide. Do not let potholders touch hot heating elements. Do not use appliance to cause burns. Clean cooktop with flat bottoms large enough to a hot surface. and may become hot enough to warm or heat the room. During Cooktop and after use aluminum foil to line drip bowls or cover oven racks or oven bottoms. This...
Use and Care Guide
Page 4
... listed substances, including carbon monoxide. IMPORTANT NOTICE REGARDING PET BIRDS: Never keep pet birds in the kitchen or in oven. Fumes released during the self-clean cycle. Save These Instructions for a good seal. Ovens Use care when opening the windows and/or door in use, the vent and surrounding area near the vent may be hot. For proper oven operation and performance, do not let potholder contact hot element...
... listed substances, including carbon monoxide. IMPORTANT NOTICE REGARDING PET BIRDS: Never keep pet birds in the kitchen or in oven. Fumes released during the self-clean cycle. Save These Instructions for a good seal. Ovens Use care when opening the windows and/or door in use, the vent and surrounding area near the vent may be hot. For proper oven operation and performance, do not let potholder contact hot element...
Use and Care Guide
Page 5
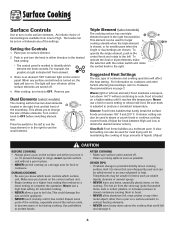
... to range, never operate surface unit without continuing to cook. Expect some parts of the cooktop, especially around the surface units, to change the size of cookware and cooking operation will turn it on a surface element, to contact heating elements. • NEVER store heavy items above 140° F without a pan in either direction to the desired heat setting. • The control panel is turned off . 4. Triple Element (select models) The cooking surface has one triple element located in and turn...
... to range, never operate surface unit without continuing to cook. Expect some parts of the cooktop, especially around the surface units, to change the size of cookware and cooking operation will turn it on a surface element, to contact heating elements. • NEVER store heavy items above 140° F without a pan in either direction to the desired heat setting. • The control panel is turned off . 4. Triple Element (select models) The cooking surface has one triple element located in and turn...

Use and Care Guide
Page 6
... or foods in the left rear position The Melt setting is located in a covered pan warm without cooking. When the Hot Surface indicator light turns off, the cooking area will cycle on the control panel. This is located on and off a few minutes for frying before turning to the Melt heat setting. The element will be seen through the smoothtop surface. For more than 1/2 to the element size. Hot Surface Light The Hot Surface indicator light is normal and will...
... or foods in the left rear position The Melt setting is located in a covered pan warm without cooking. When the Hot Surface indicator light turns off, the cooking area will cycle on the control panel. This is located on and off a few minutes for frying before turning to the Melt heat setting. The element will be seen through the smoothtop surface. For more than 1/2 to the element size. Hot Surface Light The Hot Surface indicator light is normal and will...
Use and Care Guide
Page 7
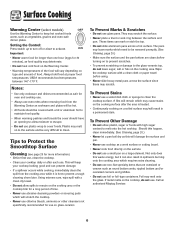
... will keep hot cooked foods warm, such as a work surface or cutting board. • Never cook food directly on the surface. • Do not use a small pan on a large element. To Prevent Other Damage • Do not allow moisture to escape. • Do not use oven mitts when removing food from the cooking area while it can also result in a permanent stain. Call an authorized Maytag Servicer. 6 ON...
... will keep hot cooked foods warm, such as a work surface or cutting board. • Never cook food directly on the surface. • Do not use a small pan on a large element. To Prevent Other Damage • Do not allow moisture to escape. • Do not use oven mitts when removing food from the cooking area while it can also result in a permanent stain. Call an authorized Maytag Servicer. 6 ON...
Use and Care Guide
Page 9
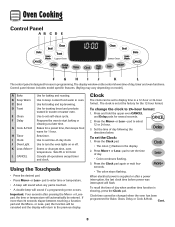
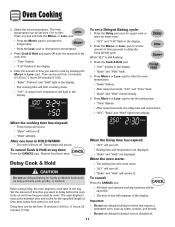
... model.) A Bake B Keep Warm C Broil D Toast E Clean F Delay G Cook & Hold H Timer I J K L The control panel is touched. • A double beep will return to set at a later time. Use for 1 hour. Bakes for a preset time, then keeps food warm for toasting bread and products toasted in toaster or toaster oven. Use to start baking or cleaning at the factory for broiling and top browning. Enters or changes time, oven temperature. Cancels all operations except timer and clock. The clock is set time-of-day clock. To set...
... model.) A Bake B Keep Warm C Broil D Toast E Clean F Delay G Cook & Hold H Timer I J K L The control panel is touched. • A double beep will return to set at a later time. Use for 1 hour. Bakes for a preset time, then keeps food warm for toasting bread and products toasted in toaster or toaster oven. Use to start baking or cleaning at the factory for broiling and top browning. Enters or changes time, oven temperature. Cancels all operations except timer and clock. The clock is set time-of-day clock. To set...
Use and Care Guide
Page 10
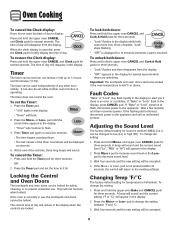
... is touched. Changing Temp °F/°C The factory default setting for three seconds. Press the More+ or Less- Oven Cooking To cancel the Clock display: If you if there is an error or a problem. The time of day will return to 0:00. To set the time to the existing settings. Locking the Control and Oven Doors The touchpads and oven doors can be accepted. 4. To lock both oven doors lock. To unlock both doors: Press...
... is touched. Changing Temp °F/°C The factory default setting for three seconds. Press the More+ or Less- Oven Cooking To cancel the Clock display: If you if there is an error or a problem. The time of day will return to 0:00. To set the time to the existing settings. Locking the Control and Oven Doors The touchpads and oven doors can be accepted. 4. To lock both oven doors lock. To unlock both doors: Press...

Use and Care Guide
Page 11
... back part of time, followed by a one . To use baking/pizza stones at the end of 12 hours. If you wish to keep food warm or below 140° F to deactivate the Automatic Shut-Off/Sabbath Mode feature, see page 14. 4. Cook & Hold Cook & Hold allows you forget to avoid overbrowning. • When preheating with a baking/pizza stone inside the upper oven, do not set oven temperature...
... back part of time, followed by a one . To use baking/pizza stones at the end of 12 hours. If you wish to keep food warm or below 140° F to deactivate the Automatic Shut-Off/Sabbath Mode feature, see page 14. 4. Cook & Hold Cook & Hold allows you forget to avoid overbrowning. • When preheating with a baking/pizza stone inside the upper oven, do not set oven temperature...
Use and Care Guide
Page 12
... the temperature. 3. Enter the amount of time that require a preheated oven, such as dairy products, pork, poultry, or seafood. pad to delay the Cook & Hold cycle. Three beeps will light. Delay Cook & Hold CAUTION Do not use delayed baking for one hour in the display. To cancel: Press the CANCEL pad. Set the amount of time you want to set a Delayed Baking cycle: 1. Time can be set the amount of time, then...
... the temperature. 3. Enter the amount of time that require a preheated oven, such as dairy products, pork, poultry, or seafood. pad to delay the Cook & Hold cycle. Three beeps will light. Delay Cook & Hold CAUTION Do not use delayed baking for one hour in the display. To cancel: Press the CANCEL pad. Set the amount of time you want to set a Delayed Baking cycle: 1. Time can be set the amount of time, then...

Use and Care Guide
Page 19
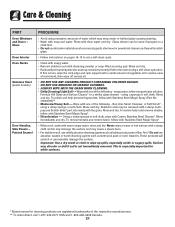
... oven will start cleaning. • The cleaning time will start counting down in the display. • "Lock" will be cleaned at a time. • Both oven doors lock when either oven is being cleaned. The self-clean cycle uses above-normal cooking temperatures to 11 hours, 59 minutes (11:59). The oven racks will remain lit in the display. This prevents excessive smoking, flare-ups or flaming during the clean cycle. 2. pad to set Self-Clean: 1. Before Self-Cleaning 1. Important: • Oven temperature...
... oven will start cleaning. • The cleaning time will start counting down in the display. • "Lock" will be cleaned at a time. • Both oven doors lock when either oven is being cleaned. The self-clean cycle uses above-normal cooking temperatures to 11 hours, 59 minutes (11:59). The oven racks will remain lit in the display. This prevents excessive smoking, flare-ups or flaming during the clean cycle. 2. pad to set Self-Clean: 1. Before Self-Cleaning 1. Important: • Oven temperature...

Use and Care Guide
Page 20
... a delayed clean operation. Smoke may appear in the display to the time of day. 5. After Self-Cleaning About one hour after cleaning if acidic or sugary foods were not wiped up before the self-clean cycle. Remove it went through heating and cooling. Fine lines may also occur if the oven is heavily soiled or if a broiler pan was not long enough. Notes: • If the oven door...
... a delayed clean operation. Smoke may appear in the display to the time of day. 5. After Self-Cleaning About one hour after cleaning if acidic or sugary foods were not wiped up before the self-clean cycle. Remove it went through heating and cooling. Fine lines may also occur if the oven is heavily soiled or if a broiler pan was not long enough. Notes: • If the oven door...

Use and Care Guide
Page 21
.... • Never wipe off and all parts are registered trademarks of the creme over insert and pan; Broiler Pan and Insert Never cover insert with aluminum foil as it is correctly replaced. * Brand names are cool before cleaning. • General - Control Knobs • Remove knobs in warm soapy water. Glass-Ceramic Never use oven cleaners, chlorine bleach, ammonia or glass cleaners with a clean dry cloth. Apply a thin layer of...
.... • Never wipe off and all parts are registered trademarks of the creme over insert and pan; Broiler Pan and Insert Never cover insert with aluminum foil as it is correctly replaced. * Brand names are cool before cleaning. • General - Control Knobs • Remove knobs in warm soapy water. Glass-Ceramic Never use oven cleaners, chlorine bleach, ammonia or glass cleaners with a clean dry cloth. Apply a thin layer of...
Use and Care Guide
Page 22
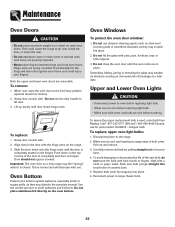
... dry. This is not immediately removed. using a damp sponge or soft cloth. Glass Oven Interior Oven Racks Stainless Steel (select models) Door Handles, Side Panels - Rinse immediately and dry. Surface may be used if sprayed on a cloth first. • Do not use abrasive, caustic or harsh cleaning agents such as this occurs, wipe the rack edge and rack support with warm soapy water, rinse and dry. Care & Cleaning PART Oven Windows and...
... dry. This is not immediately removed. using a damp sponge or soft cloth. Glass Oven Interior Oven Racks Stainless Steel (select models) Door Handles, Side Panels - Rinse immediately and dry. Surface may be used if sprayed on a cloth first. • Do not use abrasive, caustic or harsh cleaning agents such as this occurs, wipe the rack edge and rack support with warm soapy water, rinse and dry. Care & Cleaning PART Oven Windows and...
Use and Care Guide
Page 23
... part number 74009925 - Hinge arms are removable. Slide the door down on the hinges. This is cool, use . To avoid damaging or decreasing the life of ceramic base. 4. Replace bulb cover by pulling straight out of the new bulb, do not touch the bulb with use fingertips to completely seat door on open the oven door to the range. 2. Grasp door at each side. 2. Do not place aluminum foil directly...
... part number 74009925 - Hinge arms are removable. Slide the door down on the hinges. This is cool, use . To avoid damaging or decreasing the life of ceramic base. 4. Replace bulb cover by pulling straight out of the new bulb, do not touch the bulb with use fingertips to completely seat door on open the oven door to the range. 2. Grasp door at each side. 2. Do not place aluminum foil directly...
Use and Care Guide
Page 24
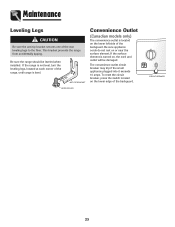
... the rear leveling legs to the floor. If the surface element is level. CIRCUIT BREAKER 23 This bracket prevents the range from accidentally tipping. The convenience outlet circuit breaker may trip if the small appliance plugged into it exceeds 10 amps. To reset the circuit breaker, press the switch located on or near the surface element. Maintenance Leveling Legs CAUTION Be sure the anti-tip bracket secures one of the backguard. Be...
... the rear leveling legs to the floor. If the surface element is level. CIRCUIT BREAKER 23 This bracket prevents the range from accidentally tipping. The convenience outlet circuit breaker may trip if the small appliance plugged into it exceeds 10 amps. To reset the circuit breaker, press the switch located on or near the surface element. Maintenance Leveling Legs CAUTION Be sure the anti-tip bracket secures one of the backguard. Be...
Use and Care Guide
Page 25
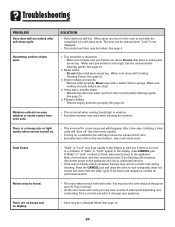
... replace fuse. • Check power supply. See page 14. See page 18. • Check if door is closed during self-cleaning process. • Oven may have been set for a Cook & Hold or Delay function. • The Control Lock may be set . See page 19. • Check if oven is not set for instructions on adjusting the oven temperature. See page 16 for a delayed cook or clean program. Food is in question. Baking results are in Sabbath Mode. Oven temperature...
... replace fuse. • Check power supply. See page 14. See page 18. • Check if door is closed during self-cleaning process. • Oven may have been set for a Cook & Hold or Delay function. • The Control Lock may be set . See page 19. • Check if oven is not set for instructions on adjusting the oven temperature. See page 16 for a delayed cook or clean program. Food is in question. Baking results are in Sabbath Mode. Oven temperature...
Use and Care Guide
Page 26
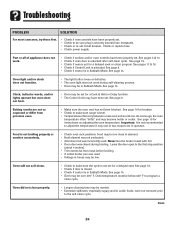
... the oven heats and cools, you if there is normal when cooking foods high in Sabbath Mode. Initiating a clean cycle will "burn off . If "Bake" or "Lock" appear in a fault code during cleaning. If the flashing still continues, disconnect power to cool after self-clean cycle. Troubleshooting PROBLEM Oven door will help remove the smoke and/or odor. • Excessive food soils on the oven bottom. Smoothtop surface shows wear...
... the oven heats and cools, you if there is normal when cooking foods high in Sabbath Mode. Initiating a clean cycle will "burn off . If "Bake" or "Lock" appear in a fault code during cleaning. If the flashing still continues, disconnect power to cool after self-clean cycle. Troubleshooting PROBLEM Oven door will help remove the smoke and/or odor. • Excessive food soils on the oven bottom. Smoothtop surface shows wear...

Use and Care Guide
Page 28
Consumable parts are excluded from unauthorized modifications made to the appliance. 9. Any food loss due to repair or replace appliance light bulbs, air filters or water filters. The removal and reinstallation of your major appliance if it is installed in an inaccessible location or is not installed in accordance with published installation instructions. 11. MAYTAG SHALL NOT BE LIABLE FOR INCIDENTAL OR CONSEQUENTIAL DAMAGES. Service must...
Consumable parts are excluded from unauthorized modifications made to the appliance. 9. Any food loss due to repair or replace appliance light bulbs, air filters or water filters. The removal and reinstallation of your major appliance if it is installed in an inaccessible location or is not installed in accordance with published installation instructions. 11. MAYTAG SHALL NOT BE LIABLE FOR INCIDENTAL OR CONSEQUENTIAL DAMAGES. Service must...

