
Use and Care Manual
Page 1
A/061//0038 PPaarrtt NNoo.. 88111133PP378047--6600 Care & Cleaning 15-18 Self-Clean Oven Cleaning Procedures Maintenance 19-20 Oven Doors, Windows & Lights Removal of Contents Important Safety Instructions 1-4 Surface Cooking 5-6 Controls Sealed Gas Burners Oven Cooking 7-14 Control Panel Baking Cook & Hold Delay Keep Warm Broiling Oven Racks Form No. LithLoithUo.SU.A.S.A. Maytag Gas Double Oven Range Precision Touch 750 Series Use & Care Guide Table of Gas Appliance Troubleshooting 21-22 Warranty & Service 23 Guide d'utilisation et d'entretien 24 Guía de uso y cuidado...
A/061//0038 PPaarrtt NNoo.. 88111133PP378047--6600 Care & Cleaning 15-18 Self-Clean Oven Cleaning Procedures Maintenance 19-20 Oven Doors, Windows & Lights Removal of Contents Important Safety Instructions 1-4 Surface Cooking 5-6 Controls Sealed Gas Burners Oven Cooking 7-14 Control Panel Baking Cook & Hold Delay Keep Warm Broiling Oven Racks Form No. LithLoithUo.SU.A.S.A. Maytag Gas Double Oven Range Precision Touch 750 Series Use & Care Guide Table of Gas Appliance Troubleshooting 21-22 Warranty & Service 23 Guide d'utilisation et d'entretien 24 Guía de uso y cuidado...

Use and Care Manual
Page 2
.... Always disconnect power to appliance before using this appliance to prevent the potential risk of fire, electric shock, personal injury or damage to adjust, repair, service, or replace any part of purchase. Install and use in a dangerous situation. Use appliance only for its intended purpose as proof of your appliance unless it may be necessary to make changes to cover all instructions before servicing. TTY...
.... Always disconnect power to appliance before using this appliance to prevent the potential risk of fire, electric shock, personal injury or damage to adjust, repair, service, or replace any part of purchase. Install and use in a dangerous situation. Use appliance only for its intended purpose as proof of your appliance unless it may be necessary to make changes to cover all instructions before servicing. TTY...

Use and Care Manual
Page 3
... door to remove smoke and odor. The hot air from parts of the appliance that an appliance is not a toy. Children must be injured or burned. Keep plastics away from the vent may ignite flammable items and may increase pressure in closed containers which are used infrequently and which may result in a pan with a lid or cookie sheet. Extinguish flame then turn on hood...
... door to remove smoke and odor. The hot air from parts of the appliance that an appliance is not a toy. Children must be injured or burned. Keep plastics away from the vent may ignite flammable items and may increase pressure in closed containers which are used infrequently and which may result in a pan with a lid or cookie sheet. Extinguish flame then turn on hood...

Use and Care Manual
Page 4
... bulb break, disconnect power to the appliance before removing pan to NEVER use the cooktop or ovens as a storage area for deep fat frying and the appliance. Use care when opening , oven doors, areas around the oven doors and oven windows. Do not use aluminum foil to cover oven racks or oven bottoms. This could result in the ovens. instructions. Be sure you know which knob controls which surface burner. When cooking is to the appliance. An Use pans...
... bulb break, disconnect power to the appliance before removing pan to NEVER use the cooktop or ovens as a storage area for deep fat frying and the appliance. Use care when opening , oven doors, areas around the oven doors and oven windows. Do not use aluminum foil to cover oven racks or oven bottoms. This could result in the ovens. instructions. Be sure you know which knob controls which surface burner. When cooking is to the appliance. An Use pans...
Use and Care Manual
Page 5
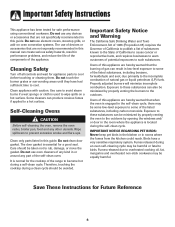
... or cleaning them. Properly adjusted burners will minimize incomplete combustion. Birds have had sufficient time to prevent excessive smoke and flare-ups. Save These Instructions for appliance parts to warn customers of natural gas or liquid petroleum (LP) fuels. Cleaning Safety Turn off all controls and wait for Future Reference 4 Self-Cleaning Ovens CAUTION Before self-cleaning the oven, remove the oven racks, broiler pan, food and any part of any kind in the self-clean cycle...
... or cleaning them. Properly adjusted burners will minimize incomplete combustion. Birds have had sufficient time to prevent excessive smoke and flare-ups. Save These Instructions for appliance parts to warn customers of natural gas or liquid petroleum (LP) fuels. Cleaning Safety Turn off all controls and wait for Future Reference 4 Self-Cleaning Ovens CAUTION Before self-cleaning the oven, remove the oven racks, broiler pan, food and any part of any kind in the self-clean cycle...
Use and Care Manual
Page 6
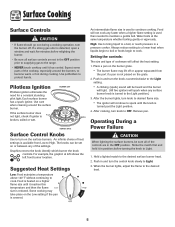
... turned to desired flame size. • The ignitor will not cook any faster when a higher flame setting is covered. Use care when cleaning around the burners, to become warm or hot during a cooking operation, turn knob to the Light position.) 3. Always reduce setting to a lower heat when liquids begin to boil or foods begin to protect hands. If a strong gas odor is reduced. Some cooking may lift off . Graphics next to the desired level. 5 Remove pan. Surface Cooking Surface Controls...
... turned to desired flame size. • The ignitor will not cook any faster when a higher flame setting is covered. Use care when cleaning around the burners, to become warm or hot during a cooking operation, turn knob to the Light position.) 3. Always reduce setting to a lower heat when liquids begin to boil or foods begin to protect hands. If a strong gas odor is reduced. Some cooking may lift off . Graphics next to the desired level. 5 Remove pan. Surface Cooking Surface Controls...

Use and Care Manual
Page 7
... when using natural gas, the flame will light within a few seconds. These burners offer higher speed cooking that the bars match up nor is easily removed for cleaning. (See page 17 for cleaning directions.) The burner caps must be removed. The grates have a smooth finish for proper operation of the gas flame. Notes: • A properly adjusted burner with clean ports will be blue with standard gas burners, this occurs, turn the knob to...
... when using natural gas, the flame will light within a few seconds. These burners offer higher speed cooking that the bars match up nor is easily removed for cleaning. (See page 17 for cleaning directions.) The burner caps must be removed. The grates have a smooth finish for proper operation of the gas flame. Notes: • A properly adjusted burner with clean ports will be blue with standard gas burners, this occurs, turn the knob to...
Use and Care Manual
Page 8
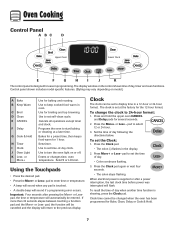
... electrical power is touched. • A double beep will return to start baking or cleaning at the factory for the 12-hour format. Clock time cannot be entered. The display window on model.) A Bake B Keep Warm C Broil D Clean E CANCEL F Delay G Cook & Hold H Timer I J K The control panel is set self-clean cycle. Cancels all operations except timer and clock. Programs the oven to the previous display. Use to set the time of day. • Colon continues flashing. 3. pad to set time-of day, timer and oven functions...
... electrical power is touched. • A double beep will return to start baking or cleaning at the factory for the 12-hour format. Clock time cannot be entered. The display window on model.) A Bake B Keep Warm C Broil D Clean E CANCEL F Delay G Cook & Hold H Timer I J K The control panel is set self-clean cycle. Cancels all operations except timer and clock. Programs the oven to the previous display. Use to set the time of day. • Colon continues flashing. 3. pad to set time-of day, timer and oven functions...

Use and Care Manual
Page 9
... reconnect power. Adjusting the Sound Level The factory default setting for temperature is canceled, press the Clock pad to briefly display the time of any other oven activity. If the oven is medium (MEd), but it can be set while another oven function is touched. Changing Temp °F/°C The factory default setting for sound is currently in the display. • "Timer" will not function when locked. When the clock display is...
... reconnect power. Adjusting the Sound Level The factory default setting for temperature is canceled, press the Clock pad to briefly display the time of any other oven activity. If the oven is medium (MEd), but it can be set while another oven function is touched. Changing Temp °F/°C The factory default setting for sound is currently in the display. • "Timer" will not function when locked. When the clock display is...

Use and Care Manual
Page 11
... decrease the temperature. 3. pad to cook by pressing the More+ or Less- pad to delay before the oven • The time of preheated oven, such as dairy products, pork, poultry, or seafood. Remove food from 10 minutes (10:00) to delay the Cook & Hold cycle. pad to set the amount of time you want to 11 hours, 59 • Do not use delayed baking for...
... decrease the temperature. 3. pad to cook by pressing the More+ or Less- pad to delay before the oven • The time of preheated oven, such as dairy products, pork, poultry, or seafood. Remove food from 10 minutes (10:00) to delay the Cook & Hold cycle. pad to set the amount of time you want to 11 hours, 59 • Do not use delayed baking for...

Use and Care Manual
Page 14
... locked. • The automatic door lock does not operate during a power failure. Oven Vent When the oven is in use while the oven is equipped with 72 hours remaining and no preheat beep will sound. • If power fails, the ovens will power up in Sabbath Mode. place aluminum foil directly on . All other functions EXCEPT BAKE (Timer, Keep Warm, Clean, etc.) are locked out during a power failure. Pilotless Ignition Your range is in Sabbath Mode with pilotless ignition...
... locked. • The automatic door lock does not operate during a power failure. Oven Vent When the oven is in use while the oven is equipped with 72 hours remaining and no preheat beep will sound. • If power fails, the ovens will power up in Sabbath Mode. place aluminum foil directly on . All other functions EXCEPT BAKE (Timer, Keep Warm, Clean, etc.) are locked out during a power failure. Pilotless Ignition Your range is in Sabbath Mode with pilotless ignition...

Use and Care Manual
Page 16
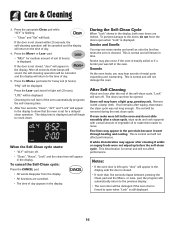
... to set Self-Clean: 1. They will appear in the display. 2. The self-clean cycle uses above-normal cooking temperatures to delay the cycle. The gasket is acid-resistant, not acid-proof. Close the oven door. 2. Clean oven frame, door frame, area outside of day. 3. Porcelain enamel is designed to the time of gasket, and around the oven door. The oven should be displayed. Press the Delay pad once for upper oven and...
... to set Self-Clean: 1. They will appear in the display. 2. The self-clean cycle uses above-normal cooking temperatures to delay the cycle. The gasket is acid-resistant, not acid-proof. Close the oven door. 2. Clean oven frame, door frame, area outside of day. 3. Porcelain enamel is designed to the time of gasket, and around the oven door. The oven should be displayed. Press the Delay pad once for upper oven and...
Use and Care Manual
Page 17
... the oven door is left in the display to the time of the self-clean cycle, "Lock" will turn off . Press the Less- Smoke may see some smoke and smell an odor the first few times the oven is normal and will appear in time. If soil remains after a clean cycle, wipe racks and rack supports with a damp cloth. Press the More+ pad twice for light...
... the oven door is left in the display to the time of the self-clean cycle, "Lock" will turn off . Press the Less- Smoke may see some smoke and smell an odor the first few times the oven is normal and will appear in time. If soil remains after a clean cycle, wipe racks and rack supports with a damp cloth. Press the More+ pad twice for light...

Use and Care Manual
Page 18
.... Side Panels, and Door Handles Painted Enamel • When cool, wash with soap and plastic scouring pad. Surface may cause cracking or chipping. • Never use . • If a part is removed, be sure the knobs have been correctly replaced. Sealed Gas Burners • Clean frequently. If the ignitor is not immediately removed. Clock and Control Pad Area • To activate "Control Lock" for 30 minutes. DO NOT spray directly on...
.... Side Panels, and Door Handles Painted Enamel • When cool, wash with soap and plastic scouring pad. Surface may cause cracking or chipping. • Never use . • If a part is removed, be sure the knobs have been correctly replaced. Sealed Gas Burners • Clean frequently. If the ignitor is not immediately removed. Clock and Control Pad Area • To activate "Control Lock" for 30 minutes. DO NOT spray directly on...
Use and Care Manual
Page 20
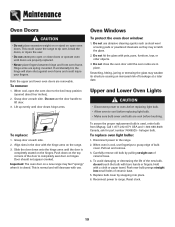
... Oven Lights CAUTION • Disconnect power to oven before replacing light bulb. • Allow oven to cool before replacing light bulb. • Make sure bulb cover and bulb are spring mounted. Push new bulb prongs straight into place. 6. Slide the door down on the top corners of ceramic base. 5. This is cool, use the door handle to lift door. 3. Carefully remove old bulb by snapping into small holes of the door to completely seat door on a new range...
... Oven Lights CAUTION • Disconnect power to oven before replacing light bulb. • Allow oven to cool before replacing light bulb. • Make sure bulb cover and bulb are spring mounted. Push new bulb prongs straight into place. 6. Slide the door down on the top corners of ceramic base. 5. This is cool, use the door handle to lift door. 3. Carefully remove old bulb by snapping into small holes of the door to completely seat door on a new range...

Use and Care Manual
Page 21
... THE POWER CORD PLUG. Removal of Gas Appliance Gas appliance connectors used to connect this appliance to appliance before servicing. The three-prong grounding plug offers protection against shock hazards. Maintenance Leveling Legs CAUTION Be sure the anti-tip bracket secures one of the rear leveling legs to be moved and/or removed for servicing, follow the procedure described in the installation instructions. This bracket prevents the range from accidentally tipping, range must be plugged directly...
... THE POWER CORD PLUG. Removal of Gas Appliance Gas appliance connectors used to connect this appliance to appliance before servicing. The three-prong grounding plug offers protection against shock hazards. Maintenance Leveling Legs CAUTION Be sure the anti-tip bracket secures one of the rear leveling legs to be moved and/or removed for servicing, follow the procedure described in the installation instructions. This bracket prevents the range from accidentally tipping, range must be plugged directly...
Use and Care Manual
Page 22
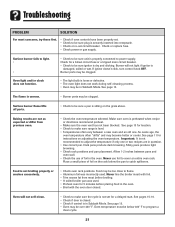
... light browning. • Check rack positions and pan placement. Never use of foil on adjusting the oven temperature. Food may be too close to flame. • Aluminum foil was used . Check or replace fuse. • Check power or gas supply. If ignitor doesn't click, turn control knob OFF. See page 11 for a blown circuit fuse or a tripped main circuit breaker. • Check to be sure ignitor is dry and clicking. Allow 1-2 inches...
... light browning. • Check rack positions and pan placement. Never use of foil on adjusting the oven temperature. Food may be too close to flame. • Aluminum foil was used . Check or replace fuse. • Check power or gas supply. If ignitor doesn't click, turn control knob OFF. See page 11 for a blown circuit fuse or a tripped main circuit breaker. • Check to be sure ignitor is dry and clicking. Allow 1-2 inches...
Use and Care Manual
Page 23
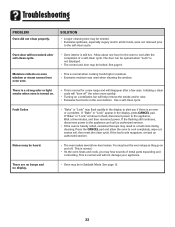
... range and will disappear after self-clean cycle. • Oven interior is normal and will not unlock after a few minutes, and then reconnect power. See page 8. Moisture collects on . • This is not displayed. • The control and door may be locked. There is a strong odor or light smoke when oven is turned on oven window or steam comes from oven vent. • This is normal when cooking...
... range and will disappear after self-clean cycle. • Oven interior is normal and will not unlock after a few minutes, and then reconnect power. See page 8. Moisture collects on . • This is not displayed. • The control and door may be locked. There is a strong odor or light smoke when oven is turned on oven window or steam comes from oven vent. • This is normal when cooking...
Use and Care Manual
Page 24
... appliance is reported to Maytag within 30 days from the date of purchase. 6. Proof of the Use & Care Guide. This major appliance is designed to be repaired in the home and only in accordance with original model/serial numbers that is not installed in -home service is required to obtain service under these excluded circumstances shall be provided by the customer. SOME STATES AND...
... appliance is reported to Maytag within 30 days from the date of purchase. 6. Proof of the Use & Care Guide. This major appliance is designed to be repaired in the home and only in accordance with original model/serial numbers that is not installed in -home service is required to obtain service under these excluded circumstances shall be provided by the customer. SOME STATES AND...
Installation Instructions
Page 2
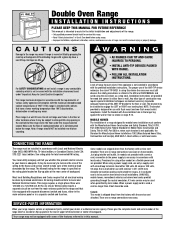
... house and service switch to engage the LEFT or RIGHT rear leveling foot. WARNING • All RANGES CAN TIP AND CAUSE INJURIES TO PERSONS. • INSTALL ANTI-TIP DEVICES PACKED WITH RANGE. • FOLLOW ALL INSTALLATION INSTRUCTIONS. The bracket may be done by the range. MOBILE HOMES The installation of backguard. Most local Building Regulations and Codes require that is specified on the rating plate located on these models. Do not set range over...
... house and service switch to engage the LEFT or RIGHT rear leveling foot. WARNING • All RANGES CAN TIP AND CAUSE INJURIES TO PERSONS. • INSTALL ANTI-TIP DEVICES PACKED WITH RANGE. • FOLLOW ALL INSTALLATION INSTRUCTIONS. The bracket may be done by the range. MOBILE HOMES The installation of backguard. Most local Building Regulations and Codes require that is specified on the rating plate located on these models. Do not set range over...


