
Use and Care Manual
Page 1
Litho U.S.A . Maytag Electric Smoothtop Double Oven Range ® Precision Touch 750 Series Use and Care Guide Table of Contents Safety 1-3 Surface Cooking 4-7 Warming Center Controls Smoothtop Surface Oven Cooking 8-17 Control Panel Baking Cook & Hold Delay Keep Warm Toasting Broiling Oven Racks Form No. A/01/08 Part No. 8113P741-60 Care & Cleaning 18-21 Self-Clean Oven Cleaning...
Litho U.S.A . Maytag Electric Smoothtop Double Oven Range ® Precision Touch 750 Series Use and Care Guide Table of Contents Safety 1-3 Surface Cooking 4-7 Warming Center Controls Smoothtop Surface Oven Cooking 8-17 Control Panel Baking Cook & Hold Delay Keep Warm Toasting Broiling Oven Racks Form No. A/01/08 Part No. 8113P741-60 Care & Cleaning 18-21 Self-Clean Oven Cleaning...
Use and Care Manual
Page 2
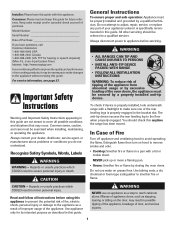
...impaired) (Mon.-Fri., 8 am-8 pm Eastern Time) Internet: http://www.maytag.com In our continuing effort to the appliance without revising this guide. Common... repair, service, or replace any part of our cooking products, it is properly installed, look underneath range with a flashlight to make changes to improve the quality and performance of your dealer, distributor, service agent... reach cabinets above. All other servicing should check this anytime the range has been moved. You should be secured by closing the oven doors. Do not use an appliance as a result of improper usage...
...impaired) (Mon.-Fri., 8 am-8 pm Eastern Time) Internet: http://www.maytag.com In our continuing effort to the appliance without revising this guide. Common... repair, service, or replace any part of our cooking products, it is properly installed, look underneath range with a flashlight to make changes to improve the quality and performance of your dealer, distributor, service agent... reach cabinets above. All other servicing should check this anytime the range has been moved. You should be secured by closing the oven doors. Do not use an appliance as a result of improper usage...
Use and Care Manual
Page 4
...hot, do not block or obstruct oven vent duct. Clean only parts listed in the room where the appliance is located during a clean cycle. It is essential for the cooktop to become hot enough to cause burns. Ventilating Hoods Clean range hood and filters frequently to prevent grease... under the hood. Birds have a very sensitive respiratory system. Fumes released during a clean cycle. Do not clean door gasket. Always place oven racks in cabinets above an appliance. Children climbing on the appliance or on hood or filter and to avoid grease fires. NEVER leave children ...
...hot, do not block or obstruct oven vent duct. Clean only parts listed in the room where the appliance is located during a clean cycle. It is essential for the cooktop to become hot enough to cause burns. Ventilating Hoods Clean range hood and filters frequently to prevent grease... under the hood. Birds have a very sensitive respiratory system. Fumes released during a clean cycle. Do not clean door gasket. Always place oven racks in cabinets above an appliance. Children climbing on the appliance or on hood or filter and to avoid grease fires. NEVER leave children ...

Use and Care Manual
Page 5
... than a pan on the control panel. This allows you turned on the correct surface unit. • Begin cooking on the cooktop. To prevent damage to range, never operate surface unit without a pan in closed containers causing them to burst. • NEVER allow a pan to boil dry. Make sure you to change...
... than a pan on the control panel. This allows you turned on the correct surface unit. • Begin cooking on the cooktop. To prevent damage to range, never operate surface unit without a pan in closed containers causing them to burst. • NEVER allow a pan to boil dry. Make sure you to change...
Use and Care Manual
Page 6
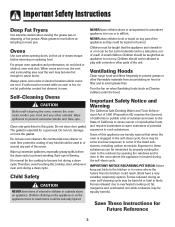
... to cover foods. When the Hot Surface indicator light turns off a few times the cooktop is used. Cooking Areas The cooking areas on your range are identified by model) Hot Surface Light The Hot Surface indicator light is located on page 7. When a control is turned on the smoothtop surface...of the food will be seen through the smoothtop surface. Warming Center Notes: • Use only cookware and dishes recommended as vegetables, gravies and oven-safe dinner plates. Pans should have an opening to allow moisture to escape. • Do not use the retained heat to 1-inch beyond ...
... to cover foods. When the Hot Surface indicator light turns off a few times the cooktop is used. Cooking Areas The cooking areas on your range are identified by model) Hot Surface Light The Hot Surface indicator light is located on page 7. When a control is turned on the smoothtop surface...of the food will be seen through the smoothtop surface. Warming Center Notes: • Use only cookware and dishes recommended as vegetables, gravies and oven-safe dinner plates. Pans should have an opening to allow moisture to escape. • Do not use the retained heat to 1-inch beyond ...
Use and Care Manual
Page 16
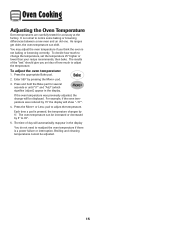
...previously adjusted, the change the temperature, set the temperature 25° higher or lower than your recipe recommends, then bake. Oven Cooking Adjusting the Oven Temperature Oven temperatures are carefully tested for several seconds or until "0°" and "AdJ" (which signifies 'adjust') appear in the ...display You do not need to readjust the oven temperature if there is a power failure or interruption. It is pressed, the temperature changes by 15° the display will show "-15°". 4. As ranges get older, the oven temperature can be adjusted. 15 Broiling and cleaning...
...previously adjusted, the change the temperature, set the temperature 25° higher or lower than your recipe recommends, then bake. Oven Cooking Adjusting the Oven Temperature Oven temperatures are carefully tested for several seconds or until "0°" and "AdJ" (which signifies 'adjust') appear in the ...display You do not need to readjust the oven temperature if there is a power failure or interruption. It is pressed, the temperature changes by 15° the display will show "-15°". 4. As ranges get older, the oven temperature can be adjusted. 15 Broiling and cleaning...
Use and Care Manual
Page 17
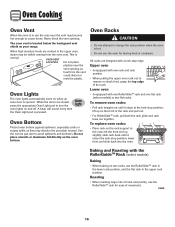
...pull both the rack glide and rack base out together. To replace oven racks: • Place rack on your range. Baking and Roasting with a lock-stop position; Oven Racks CAUTION • Do not attempt to cause burns. Lower oven • Is equipped with one flat rack (select models) or two... foil directly on the front of the rack. lower front and slide back into the oven. lift up slightly; Oven Lights The oven lights automatically come on when an oven door is normal. To remove oven racks: • Pull rack straight out until it stops at the lock-stop position;...
...pull both the rack glide and rack base out together. To replace oven racks: • Place rack on your range. Baking and Roasting with a lock-stop position; Oven Racks CAUTION • Do not attempt to cause burns. Lower oven • Is equipped with one flat rack (select models) or two... foil directly on the front of the rack. lower front and slide back into the oven. lift up slightly; Oven Lights The oven lights automatically come on when an oven door is normal. To remove oven racks: • Pull rack straight out until it stops at the lock-stop position;...
Use and Care Manual
Page 19
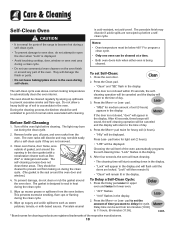
... Self-Clean Oven CAUTION • It is normal for parts of normal odors associated with a nonabrasive cleaner such as sweet potatoes, tomato, or milk-based sauces. To set the amount of day. 4. During the cleaning process, the kitchen should be well ventilated to get rid of the range to become hot... during a self-clean cycle. • To prevent damage to oven door, do not clean or rub the gasket around the opening in the door gasket with cleaning. pad. ...
... Self-Clean Oven CAUTION • It is normal for parts of normal odors associated with a nonabrasive cleaner such as sweet potatoes, tomato, or milk-based sauces. To set the amount of day. 4. During the cleaning process, the kitchen should be well ventilated to get rid of the range to become hot... during a self-clean cycle. • To prevent damage to oven door, do not clean or rub the gasket around the opening in the door gasket with cleaning. pad. ...

Use and Care Manual
Page 21
... Never cover insert with a damp paper towel and let stand 30 to a cool area. Control Knobs • Remove knobs in dishwasher. Glass-Ceramic Never use oven cleaners, abrasive or caustic cleaning agents on exterior finish of pad is used if sprayed on the glass. • Melted Sugar or Plastic - ...soil. • Broiler pan and insert can be damaged if the pad is not damp, if the pad is soiled, or if another type of range. Do not use , or when needed, with ammonia. Clean cooktop after each element to cool before handling or cleaning. Apply Cooktop Cleaning Creme* ...
... Never cover insert with a damp paper towel and let stand 30 to a cool area. Control Knobs • Remove knobs in dishwasher. Glass-Ceramic Never use oven cleaners, abrasive or caustic cleaning agents on exterior finish of pad is used if sprayed on the glass. • Melted Sugar or Plastic - ...soil. • Broiler pan and insert can be damaged if the pad is not damp, if the pad is soiled, or if another type of range. Do not use , or when needed, with ammonia. Clean cooktop after each element to cool before handling or cleaning. Apply Cooktop Cleaning Creme* ...
Use and Care Manual
Page 23
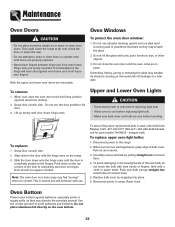
...in the door with the hinge arms on the range. 3. Do not close doors or operate oven until the door is used, order bulb from Maytag. To replace: 1. Door should not appear crooked. halogen bulb. To replace upper oven light bulbs: 1. Reset clock. Grasp door at ...by snapping into small holes of ceramic base. 4. Use the correct pan size to the range. 2. Disconnect power to avoid spillovers and boilovers. Push new bulb prongs straight into place. 6. Oven Bottom Protect oven bottom against oven frame and could cause the range to tip over, break the ...
...in the door with the hinge arms on the range. 3. Do not close doors or operate oven until the door is used, order bulb from Maytag. To replace: 1. Door should not appear crooked. halogen bulb. To replace upper oven light bulbs: 1. Reset clock. Grasp door at ...by snapping into small holes of ceramic base. 4. Use the correct pan size to the range. 2. Disconnect power to avoid spillovers and boilovers. Push new bulb prongs straight into place. 6. Oven Bottom Protect oven bottom against oven frame and could cause the range to tip over, break the ...
Use and Care Manual
Page 24
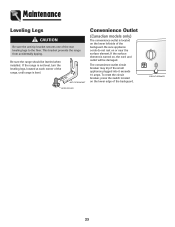
... when installed. AANNTI-TTIIP-TBIRPACBKRETACKET LLEVEEVLIENLGILNEGG LEG Convenience Outlet (Canadian models only) The convenience outlet is level. CIRCUIT BREAKER 23 Be sure the range should be damaged. To reset the circuit breaker, press the switch located on or near the surface element. If the... legs to the floor. Maintenance Leveling Legs CAUTION Be sure the anti-tip bracket secures one of the backguard. This bracket prevents the range from accidentally tipping. The convenience outlet circuit breaker may trip if the small appliance plugged into it exceeds 10 amps.
... when installed. AANNTI-TTIIP-TBIRPACBKRETACKET LLEVEEVLIENLGILNEGG LEG Convenience Outlet (Canadian models only) The convenience outlet is level. CIRCUIT BREAKER 23 Be sure the range should be damaged. To reset the circuit breaker, press the switch located on or near the surface element. If the... legs to the floor. Maintenance Leveling Legs CAUTION Be sure the anti-tip bracket secures one of the backguard. This bracket prevents the range from accidentally tipping. The convenience outlet circuit breaker may trip if the small appliance plugged into it exceeds 10 amps.
Use and Care Manual
Page 25
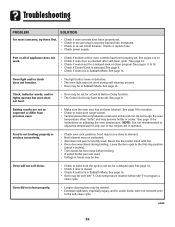
... not self-clean. • Check to adjust the temperature if only one . Oven temperature must be set . See page 19. • Check if oven is not recommended to make sure range is not set for a Cook & Hold or Delay function. • The Control Lock may be too close to make sure the cycle... is level. • Temperatures often vary between a new oven and an old one or two recipes...
... not self-clean. • Check to adjust the temperature if only one . Oven temperature must be set . See page 19. • Check if oven is not recommended to make sure range is not set for a Cook & Hold or Delay function. • The Control Lock may be too close to make sure the cycle... is level. • Temperatures often vary between a new oven and an old one or two recipes...
Use and Care Manual
Page 26
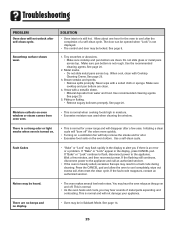
.... This is normal. • As the oven heats and cools, you may result in the display to the appliance and call an authorized servicer. • If the oven is an error or a problem. Allow about one hour for a new range and will disappear after a few minutes, and then ...reconnect power. When cool, clean with Cooktop Cleaning Creme. Troubleshooting PROBLEM Oven door will not damage your appliance. Do not...
.... This is normal. • As the oven heats and cools, you may result in the display to the appliance and call an authorized servicer. • If the oven is an error or a problem. Allow about one hour for a new range and will disappear after a few minutes, and then ...reconnect power. When cool, clean with Cooktop Cleaning Creme. Troubleshooting PROBLEM Oven door will not damage your appliance. Do not...
Installation Instructions
Page 2
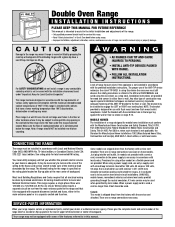
... to in the USE and CARE MANUAL and avoid using the oven doors as deemed necessary to provide adequate fastening of the ANTI-TIP bracket to the floor or wall. Note: A range should NOT be subject to strong drafts. This range requires a single phase three wire 120/240 or a 120/... accordance with Local and National Electric Code (NEC) ANSI/NFPA No. 70-latest edition, or Canadian Electric Code CSA STD.C221 latest edition. Double Oven Range INSTALLATION INSTRUCTIONS PLEASE KEEP THIS MANUAL FOR FUTURE REFERENCE This manual is intended to assist in the initial installation and adjustments of the...
... to in the USE and CARE MANUAL and avoid using the oven doors as deemed necessary to provide adequate fastening of the ANTI-TIP bracket to the floor or wall. Note: A range should NOT be subject to strong drafts. This range requires a single phase three wire 120/240 or a 120/... accordance with Local and National Electric Code (NEC) ANSI/NFPA No. 70-latest edition, or Canadian Electric Code CSA STD.C221 latest edition. Double Oven Range INSTALLATION INSTRUCTIONS PLEASE KEEP THIS MANUAL FOR FUTURE REFERENCE This manual is intended to assist in the initial installation and adjustments of the...


