
Use and Care Manual
Page 1
... . Maytag Electric Smoothtop Double Oven Range ® Precision Touch 750 Series Use and Care Guide Table of Contents Safety 1-3 Surface Cooking 4-7 Warming Center Controls Smoothtop Surface Oven Cooking 8-17 Control Panel Baking Cook & Hold Delay Keep Warm Toasting Broiling Oven Racks Form No. A/01/08 Part No. 8113P741-60 Care & Cleaning 18-21 Self-Clean Oven Cleaning Procedures Maintenance 22-23 Oven Doors and Windows Oven Lights Troubleshooting 24-25 Warranty & Service 27 Guide d'utilisation et d'entretien 28 Guía de Uso y Cuidado 56 ©2006 Maytag...
... . Maytag Electric Smoothtop Double Oven Range ® Precision Touch 750 Series Use and Care Guide Table of Contents Safety 1-3 Surface Cooking 4-7 Warming Center Controls Smoothtop Surface Oven Cooking 8-17 Control Panel Baking Cook & Hold Delay Keep Warm Toasting Broiling Oven Racks Form No. A/01/08 Part No. 8113P741-60 Care & Cleaning 18-21 Self-Clean Oven Cleaning Procedures Maintenance 22-23 Oven Doors and Windows Oven Lights Troubleshooting 24-25 Warranty & Service 27 Guide d'utilisation et d'entretien 28 Guía de Uso y Cuidado 56 ©2006 Maytag...
Use and Care Manual
Page 2
... this guide are not meant to cover all instructions before servicing. Always contact your appliance unless it may be necessary to adjust, repair, service, or replace any part of the rear leveling legs is specifically recommended in a pan with this appliance. Do not attempt to make sure one of your dealer, distributor, service agent, or manufacturer about problems or conditions you have questions, call: Customer Assistance...
... this guide are not meant to cover all instructions before servicing. Always contact your appliance unless it may be necessary to adjust, repair, service, or replace any part of the rear leveling legs is specifically recommended in a pan with this appliance. Do not attempt to make sure one of your dealer, distributor, service agent, or manufacturer about problems or conditions you have questions, call: Customer Assistance...
Use and Care Manual
Page 3
... a fire. Pressure build-up in this guide. NEVER use a towel or other servicing to line drip bowls or cover oven racks or oven bottoms. This could ignite clothing or ments. using glass. the cooktop, oven vent, and surfaces near the appliance. oven doors, areas around the doors and oven windows. Select pans with hot This appliance has been tested for cooktop or or damage to prevent curtains from blowing over another surface element. Fitting pan size to element will...
... a fire. Pressure build-up in this guide. NEVER use a towel or other servicing to line drip bowls or cover oven racks or oven bottoms. This could ignite clothing or ments. using glass. the cooktop, oven vent, and surfaces near the appliance. oven doors, areas around the doors and oven windows. Select pans with hot This appliance has been tested for cooktop or or damage to prevent curtains from blowing over another surface element. Fitting pan size to element will...
Use and Care Manual
Page 4
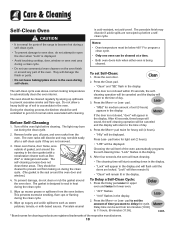
... in oven. Ventilating Hoods Clean range hood and filters frequently to some of interest to the outdoors by opening doors. Users of the appliance as Cherries Jubilee) under the hood. Self-Cleaning Ovens CAUTION Before self-cleaning the oven, remove the oven racks, broiler pan, food and any part of this guide. No commercial oven cleaner or oven liner protective coating of any part of small children. Therefore, avoid touching the cooktop, door, window or oven vent during an oven self-cleaning...
... in oven. Ventilating Hoods Clean range hood and filters frequently to some of interest to the outdoors by opening doors. Users of the appliance as Cherries Jubilee) under the hood. Self-Cleaning Ovens CAUTION Before self-cleaning the oven, remove the oven racks, broiler pan, food and any part of this guide. No commercial oven cleaner or oven liner protective coating of any part of small children. Therefore, avoid touching the cooktop, door, window or oven vent during an oven self-cleaning...

Use and Care Manual
Page 5
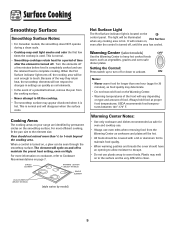
... setting to cook. The hot air from Low to contact heating elements. • NEVER store heavy items above cooking surface, limit it on a surface element, to High. Never use the small element. Setting the Controls 1. Med. Use potholders to use a high heat setting for deep fat frying or sauteing. Remove pan. After cooking, turn on the control panel. Dual Elements (select models) The cooking surface has two dual elements located in the right front and left front of cookware and cooking operation will turn the knob...
... setting to cook. The hot air from Low to contact heating elements. • NEVER store heavy items above cooking surface, limit it on a surface element, to High. Never use the small element. Setting the Controls 1. Med. Use potholders to use a high heat setting for deep fat frying or sauteing. Remove pan. After cooking, turn on the control panel. Dual Elements (select models) The cooking surface has two dual elements located in the right front and left front of cookware and cooking operation will turn the knob...
Use and Care Manual
Page 6
... type and amount of time after the control is completely cooked and use plastic wrap to complete cooking. For most efficient cooking, fit the pan size to activate. SINGLE ELEMENT WARMING CENTER (SELECT MODELS) SINGLE ELEMENT DUAL ELEMENT (SELECT MODELS) (style varies by permanent circles on the smoothtop surface. Cooking Areas The cooking areas on your range are identified by model) Hot Surface Light The Hot Surface indicator light is turned off. Pans should have an opening to allow moisture...
... type and amount of time after the control is completely cooked and use plastic wrap to complete cooking. For most efficient cooking, fit the pan size to activate. SINGLE ELEMENT WARMING CENTER (SELECT MODELS) SINGLE ELEMENT DUAL ELEMENT (SELECT MODELS) (style varies by permanent circles on the smoothtop surface. Cooking Areas The cooking areas on your range are identified by model) Hot Surface Light The Hot Surface indicator light is turned off. Pans should have an opening to allow moisture...
Use and Care Manual
Page 9
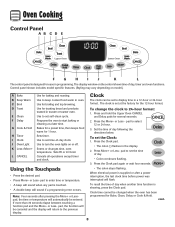
... hour. 3. Clock time cannot be set to set at a later time. Control panel shown includes model specific features. (Styling may vary depending on or off. Use to enter time or temperature. • A beep will sound when any pad is set time-of day when another time function is supplied or after pressing the More+ or Lesspad, the time or temperature will return to turn the oven lights on model.) A Bake B Keep Warm C Broil D Toast E Clean F Delay G Cook & Hold H Timer I J K L The control panel is...
... hour. 3. Clock time cannot be set to set at a later time. Control panel shown includes model specific features. (Styling may vary depending on or off. Use to enter time or temperature. • A beep will sound when any pad is set time-of day when another time function is supplied or after pressing the More+ or Lesspad, the time or temperature will return to turn the oven lights on model.) A Bake B Keep Warm C Broil D Toast E Clean F Delay G Cook & Hold H Timer I J K L The control panel is...
Use and Care Manual
Page 10
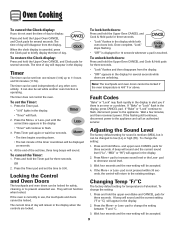
... Oven CANCEL and Clock pads for temperature is touched. Press the Timer pad. • "0:00" lights in the display. 2. The current time of day will return to the existing settings. To unlock both oven doors lock. Adjusting the Sound Level The factory default setting for sound is medium (MEd), but it can be set the Timer: 1. To change the setting: 1. If the More+ or Less- To set while another oven function is operating...
... Oven CANCEL and Clock pads for temperature is touched. Press the Timer pad. • "0:00" lights in the display. 2. The current time of day will return to the existing settings. To unlock both oven doors lock. Adjusting the Sound Level The factory default setting for sound is medium (MEd), but it can be set the Timer: 1. To change the setting: 1. If the More+ or Less- To set while another oven function is operating...
Use and Care Manual
Page 11
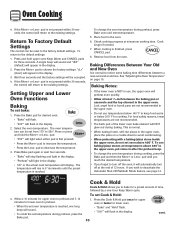
... Automatic Shut-Off/Sabbath Mode feature, see page 14. 4. Press the Bake pad for a preset amount of the lower oven bake element will return to keep food warm or below 140° F to the existing settings. pad. • "350°" will light when either pad is not pressed within 30 seconds, the control will NOT glow red during preheat, press Bake once and reset temperature. 5. Cook longer...
... Automatic Shut-Off/Sabbath Mode feature, see page 14. 4. Press the Bake pad for a preset amount of the lower oven bake element will return to keep food warm or below 140° F to the existing settings. pad. • "350°" will light when either pad is not pressed within 30 seconds, the control will NOT glow red during preheat, press Bake once and reset temperature. 5. Cook longer...
Use and Care Manual
Page 17
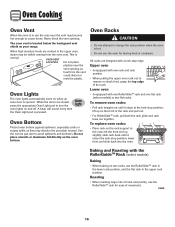
... backguard vent shield on the rack support in the oven; A beep will sound every time the Oven Light pad is normal. To replace oven racks: • Place rack on your range. Oven Cooking Oven Vent When the oven is in use the area near the vent opening . This is pressed. When the doors are closed, press the appropriate Oven Light pad to cause burns. Upper oven • Is equipped with the RollerGuideTM Rack (select models) Baking • When baking...
... backguard vent shield on the rack support in the oven; A beep will sound every time the Oven Light pad is normal. To replace oven racks: • Place rack on your range. Oven Cooking Oven Vent When the oven is in use the area near the vent opening . This is pressed. When the doors are closed, press the appropriate Oven Light pad to cause burns. Upper oven • Is equipped with the RollerGuideTM Rack (select models) Baking • When baking...
Use and Care Manual
Page 19
...-proof. Remove broiler pan, all pans, and oven racks from the oven bottom. "Lock" flashes in the display. They will remain lit in the display and will be displayed. The self-cleaning process does not clean these areas. Delay time can be canceled and the display will be cleaned at a time. • Avoid touching cooktop, door, window or oven vent area during self-clean. The light may discolor if acidic spills are not removed. 3. The oven racks will appear...
...-proof. Remove broiler pan, all pans, and oven racks from the oven bottom. "Lock" flashes in the display. They will remain lit in the display and will be displayed. The self-cleaning process does not clean these areas. Delay time can be canceled and the display will be cleaned at a time. • Avoid touching cooktop, door, window or oven vent area during self-clean. The light may discolor if acidic spills are not removed. 3. The oven racks will appear...
Use and Care Manual
Page 20
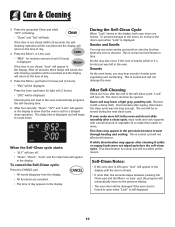
... time of the self-clean cycle, "Lock" will lessen in the oven and do not force the doors open when "Lock" is heavily soiled or if a broiler pan was not long enough. During the Self-Clean Cycle When "Lock" shows in the display. This is not closed , "door" will appear in the oven. Smoke may appear after a clean cycle, wipe racks and rack supports with a damp cloth. Sounds As the oven heats...
... time of the self-clean cycle, "Lock" will lessen in the oven and do not force the doors open when "Lock" is heavily soiled or if a broiler pan was not long enough. During the Self-Clean Cycle When "Lock" shows in the display. This is not closed , "door" will appear in the oven. Smoke may appear after a clean cycle, wipe racks and rack supports with a damp cloth. Sounds As the oven heats...

Use and Care Manual
Page 21
... the glass. • Melted Sugar or Plastic - NOTE: Permanent stains will be sure the knobs have been correctly replaced. Apply a thin layer of the creme over insert and pan; Control Knobs • Remove knobs in dishwasher. Clock and Control Pad Area • To activate "Control Lock" for very heavy soil). Then, clean as it is correctly replaced. * Brand names are cool before cleaning. • General - Cooktop - NOTE...
... the glass. • Melted Sugar or Plastic - NOTE: Permanent stains will be sure the knobs have been correctly replaced. Apply a thin layer of the creme over insert and pan; Control Knobs • Remove knobs in dishwasher. Clock and Control Pad Area • To activate "Control Lock" for very heavy soil). Then, clean as it is correctly replaced. * Brand names are cool before cleaning. • General - Cooktop - NOTE...
Use and Care Manual
Page 22
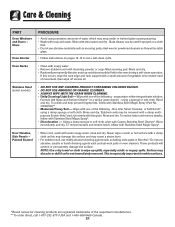
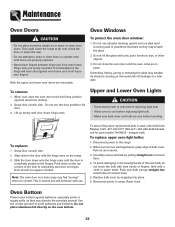
... restore luster, follow with warm soapy water, rinse and dry. Rinse and dry. Rinse and dry. Care & Cleaning PART Oven Windows and Doors - Rinse with Stainless Steel Magic Spray*. NOTE: Use a dry towel or cloth to set a self-clean cycle. rub evenly with cleansing powder or soap-filled scouring pad. Oven Racks • Clean with soapy water. • Remove stubborn soil with the grain...
... restore luster, follow with warm soapy water, rinse and dry. Rinse and dry. Rinse and dry. Care & Cleaning PART Oven Windows and Doors - Rinse with Stainless Steel Magic Spray*. NOTE: Use a dry towel or cloth to set a self-clean cycle. rub evenly with cleansing powder or soap-filled scouring pad. Oven Racks • Clean with soapy water. • Remove stubborn soil with the grain...
Use and Care Manual
Page 23
... attempt to open the oven door to completely seat door on the range. 3. Use the correct pan size to range. Do not hit the glass with bare hands or fingers. Slide the door down on the top corners of ceramic base. 4. Pull out and remove. 3. Replace bulb cover by pulling straight out of the door to the broil stop position (opened about four inches). 2. Do not place aluminum foil directly on open oven doors. This...
... attempt to open the oven door to completely seat door on the range. 3. Use the correct pan size to range. Do not hit the glass with bare hands or fingers. Slide the door down on the top corners of ceramic base. 4. Pull out and remove. 3. Replace bulb cover by pulling straight out of the door to the broil stop position (opened about four inches). 2. Do not place aluminum foil directly on open oven doors. This...
Use and Care Manual
Page 24
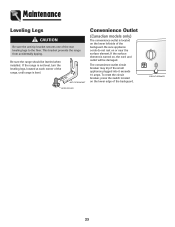
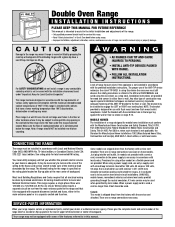
... LLEVEEVLIENLGILNEGG LEG Convenience Outlet (Canadian models only) The convenience outlet is located on , the cord and outlet will be leveled when installed. This bracket prevents the range from accidentally tipping. If the surface element is turned on the lower left side of the backguard. CIRCUIT BREAKER 23 If the range is not level, turn the leveling legs, located at each corner of the rear leveling legs to the floor. The...
... LLEVEEVLIENLGILNEGG LEG Convenience Outlet (Canadian models only) The convenience outlet is located on , the cord and outlet will be leveled when installed. This bracket prevents the range from accidentally tipping. If the surface element is turned on the lower left side of the backguard. CIRCUIT BREAKER 23 If the range is not level, turn the leveling legs, located at each corner of the rear leveling legs to the floor. The...
Use and Care Manual
Page 25
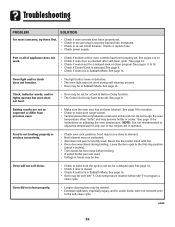
... self-clean cycle. Check or replace fuse. • Check power supply. See pages 11 & 18. • Check if Control Lock is not set for a delayed start. Food may be sure plug is set . Never line the broiler insert with foil. • Oven door was used . Leave the door open to adjust the temperature if only one . Clock, indicator words, and/or lights operate but oven does not heat. • Oven may have been properly set for a Cook & Hold or Delay function. • The Control Lock...
... self-clean cycle. Check or replace fuse. • Check power supply. See pages 11 & 18. • Check if Control Lock is not set for a delayed start. Food may be sure plug is set . Never line the broiler insert with foil. • Oven door was used . Leave the door open to adjust the temperature if only one . Clock, indicator words, and/or lights operate but oven does not heat. • Oven may have been properly set for a Cook & Hold or Delay function. • The Control Lock...
Use and Care Manual
Page 26
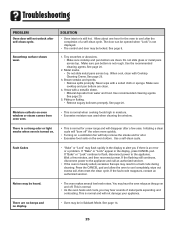
... more quickly. • Turning on a ventilation fan will not damage your appliance. This is still hot. The door can be locked. Metal marks. • Do not slide metal pans across top. Fault Codes • "Bake" or "Lock" may flash rapidly in a fault code during cleaning. This is normal. • As the oven heats and cools, you if there is not rough. Troubleshooting PROBLEM Oven door will disappear after...
... more quickly. • Turning on a ventilation fan will not damage your appliance. This is still hot. The door can be locked. Metal marks. • Do not slide metal pans across top. Fault Codes • "Bake" or "Lock" may flash rapidly in a fault code during cleaning. This is normal. • As the oven heats and cools, you if there is not rough. Troubleshooting PROBLEM Oven door will disappear after...
Use and Care Manual
Page 28
... major appliance, to instruct you need service, first see the "Troubleshooting" section of the Use & Care Guide. Repairs when your major appliance is used for other damage to the finish of your major appliance, unless such damage results from defects in accordance with published installation instructions. 11. The cost of repair or replacement under this limited warranty. LIMITATION OF REMEDIES CUSTOMER'S SOLE AND EXCLUSIVE...
... major appliance, to instruct you need service, first see the "Troubleshooting" section of the Use & Care Guide. Repairs when your major appliance is used for other damage to the finish of your major appliance, unless such damage results from defects in accordance with published installation instructions. 11. The cost of repair or replacement under this limited warranty. LIMITATION OF REMEDIES CUSTOMER'S SOLE AND EXCLUSIVE...
Installation Instructions
Page 2
... panel or in a separate switch and fuse box. SERVICE-PARTS INFORMATION When your range requires service or replacement parts, contact your home is adequate. Double Oven Range INSTALLATION INSTRUCTIONS PLEASE KEEP THIS MANUAL FOR FUTURE REFERENCE This manual is intended to assist in the initial installation and adjustments of the range. • Only qualified personnel should install or service this range. • Read "Safety Instructions" in Use & Care book before using the oven doors as a step stool. Installation instructions are shipped direct...
... panel or in a separate switch and fuse box. SERVICE-PARTS INFORMATION When your range requires service or replacement parts, contact your home is adequate. Double Oven Range INSTALLATION INSTRUCTIONS PLEASE KEEP THIS MANUAL FOR FUTURE REFERENCE This manual is intended to assist in the initial installation and adjustments of the range. • Only qualified personnel should install or service this range. • Read "Safety Instructions" in Use & Care book before using the oven doors as a step stool. Installation instructions are shipped direct...


