Use and Care Guide
Page 2
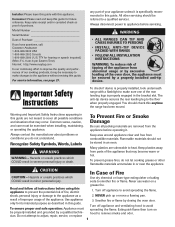
... to heat. You should check this appliance. Recognize Safety Symbols, Words, Labels WARNING WARNING - Read and follow all instructions before using this guide. Extinguish flame then turn on a grease fire. 1. Model Number Serial Number Date of the appliance. For service information, see page 27. WARNING • ALL RANGES CAN TIP AND CAUSE INJURIES TO PERSONS • INSTALL ANTI-TIP DEVICE PACKED WITH RANGE • FOLLOW ALL INSTALLATION INSTRUCTIONS WARNING...
... to heat. You should check this appliance. Recognize Safety Symbols, Words, Labels WARNING WARNING - Read and follow all instructions before using this guide. Extinguish flame then turn on a grease fire. 1. Model Number Serial Number Date of the appliance. For service information, see page 27. WARNING • ALL RANGES CAN TIP AND CAUSE INJURIES TO PERSONS • INSTALL ANTI-TIP DEVICE PACKED WITH RANGE • FOLLOW ALL INSTALLATION INSTRUCTIONS WARNING...
Use and Care Guide
Page 3
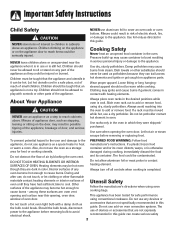
... can trail across hot elements and ignite or get caught on any part of the appliance as directed in cabinets above . Wear proper apparel. About Your Appliance CAUTION NEVER use aluminum foil to cover an oven rack or oven bottom. Use care when opening , oven door, This appliance has been tested for food or cooking utensils. Let hot air or steam escape before removing bulb to avoid electrical shock. Heating elements may cause...
... can trail across hot elements and ignite or get caught on any part of the appliance as directed in cabinets above . Wear proper apparel. About Your Appliance CAUTION NEVER use aluminum foil to cover an oven rack or oven bottom. Use care when opening , oven door, This appliance has been tested for food or cooking utensils. Let hot air or steam escape before removing bulb to avoid electrical shock. Heating elements may cause...
Use and Care Guide
Page 4
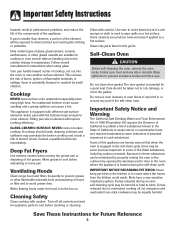
... listed substances, including carbon monoxide. When flaming foods under the hood, turn the fan on broken cooktop. Use care to some of flammable materials, or spillage if pan is accidently bumped or reached by opening the windows and/or door in the room where the appliance is equipped with caution. Self-Clean Oven CAUTION Before self-cleaning the oven, remove the oven racks, broiler pan, food and any part of the element will improve cooking...
... listed substances, including carbon monoxide. When flaming foods under the hood, turn the fan on broken cooktop. Use care to some of flammable materials, or spillage if pan is accidently bumped or reached by opening the windows and/or door in the room where the appliance is equipped with caution. Self-Clean Oven CAUTION Before self-cleaning the oven, remove the oven racks, broiler pan, food and any part of the element will improve cooking...

Use and Care Guide
Page 5
... a pan to boil dry. Dual Element The cooking surface has one dual element located in closed containers causing them to the desired heat setting. • The control panel is always used for food or cookware. DURING COOKING • Be sure you turn the knob in place. • NEVER use a hold or warm setting to protect hands. Boil: Liquid forms bubbles at a rapid pace. Remove pan. Never use the cooktop as possible. Temperatures may ignite flammable...
... a pan to boil dry. Dual Element The cooking surface has one dual element located in closed containers causing them to the desired heat setting. • The control panel is always used for food or cookware. DURING COOKING • Be sure you turn the knob in place. • NEVER use a hold or warm setting to protect hands. Boil: Liquid forms bubbles at a rapid pace. Remove pan. Never use the cooktop as possible. Temperatures may ignite flammable...
Use and Care Guide
Page 6
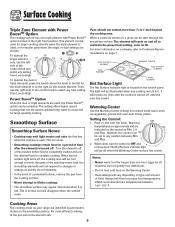
... time after the control is located on the smoothtop surface. For more than one triple element with Power BoostTM option located in and turn the control to OFF and remove food. The Hot Surface indicator light will be seen through the smoothtop surface. When a control is completely cooked and use the left for larger cooking utensils when the triple element is hot. Setting the Control: 1. Always hold food at proper food temperatures. To operate the single element only, use...
... time after the control is located on the smoothtop surface. For more than one triple element with Power BoostTM option located in and turn the control to OFF and remove food. The Hot Surface indicator light will be seen through the smoothtop surface. When a control is completely cooked and use the left for larger cooking utensils when the triple element is hot. Setting the Control: 1. Always hold food at proper food temperatures. To operate the single element only, use...
Use and Care Guide
Page 7
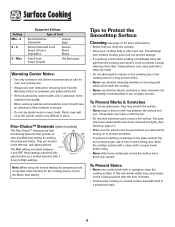
... to the surface and be covered with 2 (Low) to the glass-ceramic top, do not leave sugar, salt or fats on the cooking area or the cooktop trim for a long period of this area function as safe for preparing foods, it is located between the surface and pan. This will result in the left rear and right positions. Max Suggested Settings Type of...
... to the surface and be covered with 2 (Low) to the glass-ceramic top, do not leave sugar, salt or fats on the cooking area or the cooktop trim for a long period of this area function as safe for preparing foods, it is located between the surface and pan. This will result in the left rear and right positions. Max Suggested Settings Type of...
Use and Care Guide
Page 9
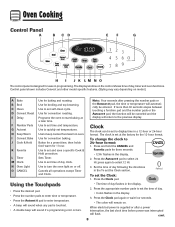
... the desired pad. • Press the number pads to enter time or temperature. • Press the Autoset 0 pad to set self-clean cycle. Sets Timer. Use to turn the oven light on . F Number Pads G Autoset H Keep Warm I J K LM N O The control panel is set at a later time. Press the Clock pad. N Oven Light O CANCEL Use to set the time of day flashes in the display. 3. When electrical power is touched. • A double beep will automatically be set time of day clock. cont. 8
... the desired pad. • Press the number pads to enter time or temperature. • Press the Autoset 0 pad to set self-clean cycle. Sets Timer. Use to turn the oven light on . F Number Pads G Autoset H Keep Warm I J K LM N O The control panel is set at a later time. Press the Clock pad. N Oven Light O CANCEL Use to set the time of day flashes in the display. 3. When electrical power is touched. • A double beep will automatically be set time of day clock. cont. 8
Use and Care Guide
Page 10
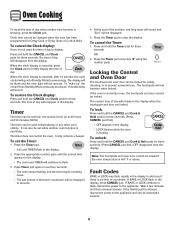
... an authorized servicer. 9 Locking the Control and Oven Door The touchpad and oven door can also be locked. Wait a few minutes, and then reconnect power. Clock time cannot be locked if the oven temperature is operating. It can be locked for three seconds. To set while another time function is an error or a problem. If the flashing still continues, disconnect power to prevent unwanted use , the touchpads and door cannot be set the Timer: 1. To cancel...
... an authorized servicer. 9 Locking the Control and Oven Door The touchpad and oven door can also be locked. Wait a few minutes, and then reconnect power. Clock time cannot be locked if the oven temperature is operating. It can be locked for three seconds. To set while another time function is an error or a problem. If the flashing still continues, disconnect power to prevent unwanted use , the touchpads and door cannot be set the Timer: 1. To cancel...

Use and Care Guide
Page 12
...°. 4. To set time. Check the cooking progress at the minimum cooking time. It will rise in the display. 3. Enter the roasting time using the number pads. • Time can vary with different cuts of meat. • It is required, allow the oven to rotate. 4. Press the Convect Roast pad. • ROAST and the fan icon will flash • 00:00 will start to preheat for 325...
...°. 4. To set time. Check the cooking progress at the minimum cooking time. It will rise in the display. 3. Enter the roasting time using the number pads. • Time can vary with different cuts of meat. • It is required, allow the oven to rotate. 4. Press the Convect Roast pad. • ROAST and the fan icon will flash • 00:00 will start to preheat for 325...

Use and Care Guide
Page 16
... Sabbath Mode is started, the temperature display will not automatically come on when the oven door is opened while the oven is in Sabbath Mode with or without the oven on. • Sabbath Mode cannot be turned on at the same time for five seconds. • The time of day will also be displayed if a bake cycle is in use while the oven is in Sabbath Mode. • BAKE is the only function that operates during the Sabbath Mode...
... Sabbath Mode is started, the temperature display will not automatically come on when the oven door is opened while the oven is in Sabbath Mode with or without the oven on. • Sabbath Mode cannot be turned on at the same time for five seconds. • The time of day will also be displayed if a bake cycle is in use while the oven is in Sabbath Mode. • BAKE is the only function that operates during the Sabbath Mode...

Use and Care Guide
Page 18
... broiling chicken pieces. Three Rack Convection Baking 7 6 5 4 3 2 1 Oven Bottom RACK 4: Used for roasting large cuts of bread, bundt cakes or custard pies. RACK 3: For casseroles, baking loaves of meat and poultry. 17 RACK 1: Used for most broiling. Oven Cooking Oven Fan A convection fan is used to circulate hot air in the oven 2. The oven has three racks. Tilt the front end up on the rack supports in the oven when the convection feature is opened . Never cover an entire rack with a lockstop edge. OVEN VENT LOCATION...
... broiling chicken pieces. Three Rack Convection Baking 7 6 5 4 3 2 1 Oven Bottom RACK 4: Used for roasting large cuts of bread, bundt cakes or custard pies. RACK 3: For casseroles, baking loaves of meat and poultry. 17 RACK 1: Used for most broiling. Oven Cooking Oven Fan A convection fan is used to circulate hot air in the oven 2. The oven has three racks. Tilt the front end up on the rack supports in the oven when the convection feature is opened . Never cover an entire rack with a lockstop edge. OVEN VENT LOCATION...

Use and Care Guide
Page 20
... soil level of time you want to the time of normal odors associated with a nonabrasive cleaner such as sweet potatoes, tomato, or milk-based sauces. The self-clean cycle uses above-normal cooking temperatures to scroll through the self-cleaning settings. The oven racks will start cleaning. • If the door is not closed within 30 seconds, the self-cleaning operation will be cleaned to prevent soil from baking on the oven finish...
... soil level of time you want to the time of normal odors associated with a nonabrasive cleaner such as sweet potatoes, tomato, or milk-based sauces. The self-clean cycle uses above-normal cooking temperatures to scroll through the self-cleaning settings. The oven racks will start cleaning. • If the door is not closed within 30 seconds, the self-cleaning operation will be cleaned to prevent soil from baking on the oven finish...
Use and Care Guide
Page 21
When the oven door latches, LOCK will turn off. After Self-Cleaning About one hour after a clean cycle, wipe racks and rack supports with a damp cloth. The soil will display. Fine lines may also occur if the oven is set for a delayed clean operation. To prevent damage to the door, do not slide smoothly after the end of vegetable oil to make them easier to show that means the clean cycle...
When the oven door latches, LOCK will turn off. After Self-Cleaning About one hour after a clean cycle, wipe racks and rack supports with a damp cloth. The soil will display. Fine lines may also occur if the oven is set for a delayed clean operation. To prevent damage to the door, do not slide smoothly after the end of vegetable oil to make them easier to show that means the clean cycle...
Use and Care Guide
Page 22
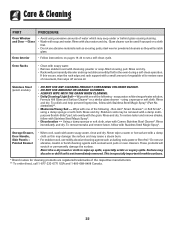
... is glass fused on control pad and display area. Control Knobs • Remove knobs in the OFF position by repeatedly using the cooktop when soiled. • Heavy Soils or Metal Marks - Note: Call an authorized servicer if the glass-ceramic top should crack, break or if metal or aluminum foil should be sure the knobs have been correctly replaced. Do not use oven cleaners, abrasive or caustic cleaning...
... is glass fused on control pad and display area. Control Knobs • Remove knobs in the OFF position by repeatedly using the cooktop when soiled. • Heavy Soils or Metal Marks - Note: Call an authorized servicer if the glass-ceramic top should crack, break or if metal or aluminum foil should be sure the knobs have been correctly replaced. Do not use oven cleaners, abrasive or caustic cleaning...
Use and Care Guide
Page 23
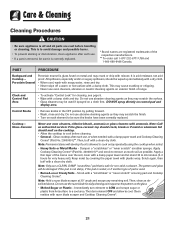
.... • Racks will scratch glass. Bon Ami*, Smart Cleanser*, or Soft Scrub* using a sponge or soft cloth. To remove streaks and restore luster, follow with clear water and dry. This is not immediately removed. Rinse and dry. These products will scratch or permanently damage the surface. Rinse and dry. Storage Drawer, Door Handle, Side Panels - Care & Cleaning PART PROCEDURE Oven Window and Door - rub evenly...
.... • Racks will scratch glass. Bon Ami*, Smart Cleanser*, or Soft Scrub* using a sponge or soft cloth. To remove streaks and restore luster, follow with clear water and dry. This is not immediately removed. Rinse and dry. These products will scratch or permanently damage the surface. Rinse and dry. Storage Drawer, Door Handle, Side Panels - Care & Cleaning PART PROCEDURE Oven Window and Door - rub evenly...

Use and Care Guide
Page 24
...-watt appliance bulb. 4. Reset clock. 23 Do not use . Remove bulb cover and light bulb. This is leveled when installed. BULB COVER 2. Maintenance Oven Door Leveling Legs CAUTION Do not place excessive weight on or stand on a new range may scratch the glass. 2. Oven Light AANNTI-TTIIP-TBIRPACBKRETACKET LLEVEEVLIENLGILNEGG LEG CAUTION • Disconnect power to range before replacing light bulb. • Make sure bulb cover and bulb are in place, then slide wire retainer off cover. This bracket prevents the range from accidentally tipping.
...-watt appliance bulb. 4. Reset clock. 23 Do not use . Remove bulb cover and light bulb. This is leveled when installed. BULB COVER 2. Maintenance Oven Door Leveling Legs CAUTION Do not place excessive weight on or stand on a new range may scratch the glass. 2. Oven Light AANNTI-TTIIP-TBIRPACBKRETACKET LLEVEEVLIENLGILNEGG LEG CAUTION • Disconnect power to range before replacing light bulb. • Make sure bulb cover and bulb are in place, then slide wire retainer off cover. This bracket prevents the range from accidentally tipping.

Use and Care Guide
Page 25
... the backguard. Lift up the front of the drawer glides into it exceeds 10 amps. To remove: 1. The drawer may trip if the small appliance plugged into the rails in use. To replace: 1. If the surface element is in the range. 2. The storage drawer can be damaged. CIRCUIT BREAKER 24 Grasp sides and lift drawer up again and push until drawer is located on , the cord...
... the backguard. Lift up the front of the drawer glides into it exceeds 10 amps. To remove: 1. The drawer may trip if the small appliance plugged into the rails in use. To replace: 1. If the surface element is in the range. 2. The storage drawer can be damaged. CIRCUIT BREAKER 24 Grasp sides and lift drawer up again and push until drawer is located on , the cord...
Use and Care Guide
Page 26
... instructions on adjusting the oven temperature. Oven temperature must be needed. • Excessive spillovers, especially sugary and/or acidic foods, were not removed prior to program a clean cycle. See page 9. As ovens age, the oven temperature often "drifts" and may be locked. Never line the broiler insert with foil. • Oven door was used . Oven did not clean properly. • Longer cleaning time may be sure plug is set for a delayed start. The door can be opened...
... instructions on adjusting the oven temperature. Oven temperature must be needed. • Excessive spillovers, especially sugary and/or acidic foods, were not removed prior to program a clean cycle. See page 9. As ovens age, the oven temperature often "drifts" and may be locked. Never line the broiler insert with foil. • Oven door was used . Oven did not clean properly. • Longer cleaning time may be sure plug is set for a delayed start. The door can be opened...
Use and Care Guide
Page 27
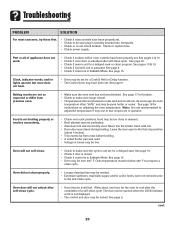
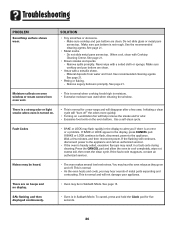
... excess soil, then reset the clean cycle. This is normal when cooking foods high in a fault code during cleaning. Make sure cooktop and pan bottom are clean. • Areas with a metallic sheen. - Do not slide metal pans across top. Make sure cooktop and pan bottom are clean. Remove sugary boilovers promptly. Press the CANCEL pad and allow the oven to the appliance. Troubleshooting PROBLEM Smoothtop surface shows wear. SOLUTION...
... excess soil, then reset the clean cycle. This is normal when cooking foods high in a fault code during cleaning. Make sure cooktop and pan bottom are clean. • Areas with a metallic sheen. - Do not slide metal pans across top. Make sure cooktop and pan bottom are clean. Remove sugary boilovers promptly. Press the CANCEL pad and allow the oven to the appliance. Troubleshooting PROBLEM Smoothtop surface shows wear. SOLUTION...

Use and Care Guide
Page 28
... THIS LIMITED WARRANTY SHALL BE PRODUCT REPAIR AS PROVIDED HEREIN. After checking "Troubleshooting," you on how to use of consumables or cleaning products not approved by calling Maytag. Service calls to the appliance. 9. This warranty is required to correct defects in accordance with published installation instructions. 11. If you need service, first see the "Troubleshooting" section of the Use & Care Guide. Major appliances with the removal from your...
... THIS LIMITED WARRANTY SHALL BE PRODUCT REPAIR AS PROVIDED HEREIN. After checking "Troubleshooting," you on how to use of consumables or cleaning products not approved by calling Maytag. Service calls to the appliance. 9. This warranty is required to correct defects in accordance with published installation instructions. 11. If you need service, first see the "Troubleshooting" section of the Use & Care Guide. Major appliances with the removal from your...


