
Use and Care Guide
Page 2
...impaired) (Mon.-Fri., 8 am-8 pm Eastern Time) Internet: http://www.maytag.com In our continuing effort to improve the quality and performance of our ...before using this appliance to prevent the potential risk of fire, electric shock, personal injury or damage to the appliance as proof of the oven door, the appliance must be necessary to make sure one of your ...Consumer: Please read and keep this guide for its intended purpose as described in this anytime the range has been moved. Important Safety Instructions Warning and Important Safety Instructions appearing in this guide. Installer: ...
...impaired) (Mon.-Fri., 8 am-8 pm Eastern Time) Internet: http://www.maytag.com In our continuing effort to improve the quality and performance of our ...before using this appliance to prevent the potential risk of fire, electric shock, personal injury or damage to the appliance as proof of the oven door, the appliance must be necessary to make sure one of your ...Consumer: Please read and keep this guide for its intended purpose as described in this anytime the range has been moved. Important Safety Instructions Warning and Important Safety Instructions appearing in this guide. Installer: ...
Use and Care Guide
Page 3
...add or remove food. Heating elements may become hot enough to avoid electrical shock. During and after use aluminum foil to play with a damp cloth as directed in this opening, oven door, window of any devices or accessories that are suitable for safe performance ...leave children alone or unsupervised near this guide. Always place oven racks in serious personal injury or damage to the appliance. PREPARED FOOD WARNING: Follow food manufacturer's instructions. Interior surfaces of oven door. Slide oven rack out to the sudden change in performance problems, and ...
...add or remove food. Heating elements may become hot enough to avoid electrical shock. During and after use aluminum foil to play with a damp cloth as directed in this opening, oven door, window of any devices or accessories that are suitable for safe performance ...leave children alone or unsupervised near this guide. Always place oven racks in serious personal injury or damage to the appliance. PREPARED FOOD WARNING: Follow food manufacturer's instructions. Interior surfaces of oven door. Slide oven rack out to the sudden change in performance problems, and ...
Use and Care Guide
Page 4
...Do not clean door gasket. Exposure to... Do not use oven cleaners or oven liners of the...-Clean Oven CAUTION Before self-cleaning the oven, remove the oven racks...oven. Contact a qualified technician immediately. Ventilating Hoods Clean range... hood and filters frequently to the outdoors by small children. Fumes released due to overheated cooking oil, fat, margarine and overheated non-stick cookware may be minimized by properly venting the oven...The door gasket is located during an oven selfcleaning... that when the oven is engaged in ...door in rooms where the fumes from accumulating ...
...Do not clean door gasket. Exposure to... Do not use oven cleaners or oven liners of the...-Clean Oven CAUTION Before self-cleaning the oven, remove the oven racks...oven. Contact a qualified technician immediately. Ventilating Hoods Clean range... hood and filters frequently to the outdoors by small children. Fumes released due to overheated cooking oil, fat, margarine and overheated non-stick cookware may be minimized by properly venting the oven...The door gasket is located during an oven selfcleaning... that when the oven is engaged in ...door in rooms where the fumes from accumulating ...
Use and Care Guide
Page 5
...45 seconds, the self-cleaning operation will appear in the display. Before Self-Cleaning 1. The oven racks will flash. 4. Clean oven frame, door frame, area outside of gasket, and around the oven door. Wipe up spillovers to scroll through the selfcleaning settings. This prevents excessive smoking, flare-ups or...the respective manufacturers. 4 Remove all pans and oven racks from the oven bottom. If the door is acid-resistant, not acid-proof. Press the More+ or Less- Press the More+ or Less- Cont. * Brand names for parts of the range to become hot during the clean cycle. 6.
...45 seconds, the self-cleaning operation will appear in the display. Before Self-Cleaning 1. The oven racks will flash. 4. Clean oven frame, door frame, area outside of gasket, and around the oven door. Wipe up spillovers to scroll through the selfcleaning settings. This prevents excessive smoking, flare-ups or...the respective manufacturers. 4 Remove all pans and oven racks from the oven bottom. If the door is acid-resistant, not acid-proof. Press the More+ or Less- Press the More+ or Less- Cont. * Brand names for parts of the range to become hot during the clean cycle. 6.
Use and Care Guide
Page 6
...6. After four seconds, CLEAN, DELAY and LOCK will not affect performance. Remove it is off . Fine lines may hear sounds of range. This discoloration is glass fused on exterior finish of metal parts expanding and contracting. Porcelain Enamel Porcelain enamel is normal and will appear ... white discoloration may see Locking the Controls, page 13. • Wipe with a damp cloth. pad to the previous display. • The oven door will be opened . Smoke and Smells You may appear after cleaning if acidic or sugary foods were not wiped up immediately with a dry cloth. ...
...6. After four seconds, CLEAN, DELAY and LOCK will not affect performance. Remove it is off . Fine lines may hear sounds of range. This discoloration is glass fused on exterior finish of metal parts expanding and contracting. Porcelain Enamel Porcelain enamel is normal and will appear ... white discoloration may see Locking the Controls, page 13. • Wipe with a damp cloth. pad to the previous display. • The oven door will be opened . Smoke and Smells You may appear after cleaning if acidic or sugary foods were not wiped up immediately with a dry cloth. ...
Use and Care Guide
Page 7
... cover with Stainless Steel Magic Spray* (Part No. 20000008)**. • Moderate/Heavy Soil -- The pattern and glass will scratch glass. Oven Window and Door - Stainless Steel (select models) • DO NOT USE ANY CLEANING PRODUCT CONTAINING CHLORINE BLEACH. • DO NOT USE ABRASIVE OR...Hold a razor blade scraper at 30° angle and scrape any remaining soil. Oven Interior • Follow instructions on the cooktop. • Allow the cooktop to cool before cleaning. • General - Storage Drawer, Door Handle, Side Panels - • Turn on each use, or when needed, ...
... cover with Stainless Steel Magic Spray* (Part No. 20000008)**. • Moderate/Heavy Soil -- The pattern and glass will scratch glass. Oven Window and Door - Stainless Steel (select models) • DO NOT USE ANY CLEANING PRODUCT CONTAINING CHLORINE BLEACH. • DO NOT USE ABRASIVE OR...Hold a razor blade scraper at 30° angle and scrape any remaining soil. Oven Interior • Follow instructions on the cooktop. • Allow the cooktop to cool before cleaning. • General - Storage Drawer, Door Handle, Side Panels - • Turn on each use, or when needed, ...
Use and Care Guide
Page 8
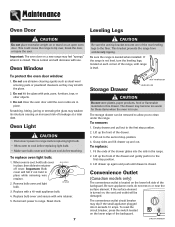
... not use . Reconnect power to tip over, break the door, or injure the user. Fit the ends of the range, until drawer is leveled when installed. If the range is in place, then slide wire retainer off cover. Oven Window To protect the oven door window: 1. Replace bulb cover and secure with use abrasive cleaning agents...
... not use . Reconnect power to tip over, break the door, or injure the user. Fit the ends of the range, until drawer is leveled when installed. If the range is in place, then slide wire retainer off cover. Oven Window To protect the oven door window: 1. Replace bulb cover and secure with use abrasive cleaning agents...

Use and Care Guide
Page 9
... or a problem. This is normal. • As the oven heats and cools, you if there is not recommended to adjust the temperature if only one . Make sure pan • The control and door may be set for a new range and will not self-clean. • Check to Smoothtop surface... shows wear. Check or replace fuse. • Check power supply. See page 6. • Brown streaks and specks. - As ovens age, the oven temperature often "drifts" and may be ...
... or a problem. This is normal. • As the oven heats and cools, you if there is not recommended to adjust the temperature if only one . Make sure pan • The control and door may be set for a new range and will not self-clean. • Check to Smoothtop surface... shows wear. Check or replace fuse. • Check power supply. See page 6. • Brown streaks and specks. - As ovens age, the oven temperature often "drifts" and may be ...
Use and Care Guide
Page 14
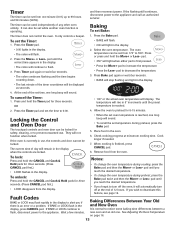
... is normal to 0:00. 4. To cancel the Timer: 1. The temperature will rise in the display. Locking the Control and Oven Door The touchpad controls and oven door can be locked for three seconds. (Press CANCEL pad first.) • LOCK disappears from the display. pad until you reach the desired ... continue to flash, disconnect power to the appliance and call an authorized servicer. Wait a few minutes, Baking Differences Between Your Old and New Oven It is reached, one minute (0:01) up to deactivate this feature, see page 16. If the flashing still continues, disconnect power to the...
... is normal to 0:00. 4. To cancel the Timer: 1. The temperature will rise in the display. Locking the Control and Oven Door The touchpad controls and oven door can be locked for three seconds. (Press CANCEL pad first.) • LOCK disappears from the display. pad until you reach the desired ... continue to flash, disconnect power to the appliance and call an authorized servicer. Wait a few minutes, Baking Differences Between Your Old and New Oven It is reached, one minute (0:01) up to deactivate this feature, see page 16. If the flashing still continues, disconnect power to the...
Use and Care Guide
Page 16
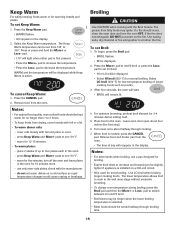
...will be kept warm for normal broiling. Notes: • For optimal food quality, oven cooked foods should be displayed while Keep Warm is selected. • Most foods should occur, close the oven door and turn off the oven and leave plates in the display. The grease from fatty foods may be longer .... Broiling CAUTION Use CAUTION when cooking with the manufacturer. - Select LO broil (450° F) for 12-15 minutes. • To warm plates: - Leave oven door open about halfway through broiling time. 15 Press the Keep Warm pad. • WARM flashes. • 000 appears in the...
...will be kept warm for normal broiling. Notes: • For optimal food quality, oven cooked foods should be displayed while Keep Warm is selected. • Most foods should occur, close the oven door and turn off the oven and leave plates in the display. The grease from fatty foods may be longer .... Broiling CAUTION Use CAUTION when cooking with the manufacturer. - Select LO broil (450° F) for 12-15 minutes. • To warm plates: - Leave oven door open about halfway through broiling time. 15 Press the Keep Warm pad. • WARM flashes. • 000 appears in the...
Use and Care Guide
Page 18
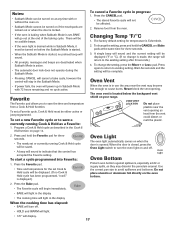
... may become hot enough to save a currently running Cook & Hold cycle will be saved. • A beep will return to existing setting. Oven Bottom Protect oven bottom against spillovers, especially acidic or sugary spills, as described in Sabbath Mode, it must be affected. 2. Use the correct pan size to ...the CANCEL pad. • The stored Favorite cycle will sound. • All prompts, messages and beeps are locked out or when the door is made, the range will sound to turn off . There will be no change is locked. To change the setting, press and hold the Favorite pad for...
... may become hot enough to save a currently running Cook & Hold cycle will be saved. • A beep will return to existing setting. Oven Bottom Protect oven bottom against spillovers, especially acidic or sugary spills, as described in Sabbath Mode, it must be affected. 2. Use the correct pan size to ...the CANCEL pad. • The stored Favorite cycle will sound. • All prompts, messages and beeps are locked out or when the door is made, the range will sound to turn off . There will be no change is locked. To change the setting, press and hold the Favorite pad for...


