Use and Care Guide
Page 1
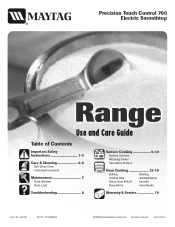
All rights reserved. A/01/08 Part No. 8113P698-60 ©2006 Maytag Appliances Sales Co. Litho U.S.A. Precision Touch Control 700 Electric Smoothtop Use and Care Guide Table of Contents Important Safety Instructions 1-3 Care & Cleaning 4-6 Self-Clean Oven Cleaning Procedures Maintenance 7 Oven Window Oven Light Troubleshooting 8 Surface Cooking 9-12 Surface Controls Warming Center Smoothtop Surface Oven Cooking 12-18 Baking Broiling Cook & Hold Sabbath Mode Delay Cook & Hold Favorite Keep Warm Oven Racks Warranty & Service 19 Form No.
All rights reserved. A/01/08 Part No. 8113P698-60 ©2006 Maytag Appliances Sales Co. Litho U.S.A. Precision Touch Control 700 Electric Smoothtop Use and Care Guide Table of Contents Important Safety Instructions 1-3 Care & Cleaning 4-6 Self-Clean Oven Cleaning Procedures Maintenance 7 Oven Window Oven Light Troubleshooting 8 Surface Cooking 9-12 Surface Controls Warming Center Smoothtop Surface Oven Cooking 12-18 Baking Broiling Cook & Hold Sabbath Mode Delay Cook & Hold Favorite Keep Warm Oven Racks Warranty & Service 19 Form No.

Use and Care Guide
Page 2
...or speech impaired) (Mon.-Fri., 8 am-8 pm Eastern Time) Internet: http://www.maytag.com In our continuing effort to improve the quality and performance of our cooking products, ...properly installed, look underneath range with this appliance. To Prevent Fire or Smoke Damage Be sure all instructions before using this appliance to prevent the potential risk of fire, electric shock, personal injury or... see page 19. Do not attempt to adjust, repair, service, or replace any part of the oven door, the appliance must be necessary to make sure one of the appliance. Never use water on ...
...or speech impaired) (Mon.-Fri., 8 am-8 pm Eastern Time) Internet: http://www.maytag.com In our continuing effort to improve the quality and performance of our cooking products, ...properly installed, look underneath range with this appliance. To Prevent Fire or Smoke Damage Be sure all instructions before using this appliance to prevent the potential risk of fire, electric shock, personal injury or... see page 19. Do not attempt to adjust, repair, service, or replace any part of the oven door, the appliance must be necessary to make sure one of the appliance. Never use water on ...
Use and Care Guide
Page 3
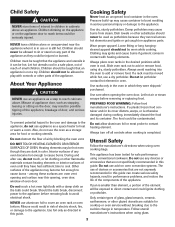
... of the appliance may ignite and cause burns if garment comes in the oven. Clothing may become hot enough to cool. During and after use, do not use any oven become hot enough to avoid electrical shock. NEVER leave children alone or unsupervised near this guide. Use care ...when opening and surface near the appliance when it can create serious safety hazards, result in oven. Children climbing on the appliance or ...
... of the appliance may ignite and cause burns if garment comes in the oven. Clothing may become hot enough to cool. During and after use, do not use any oven become hot enough to avoid electrical shock. NEVER leave children alone or unsupervised near this guide. Use care ...when opening and surface near the appliance when it can create serious safety hazards, result in oven. Children climbing on the appliance or ...
Use and Care Guide
Page 4
... pan size to prevent excessive smoke and flare-ups. Ventilating Hoods Clean range hood and filters frequently to birds. Wipe spillovers to element will improve ... the fumes from accumulating on broken cooktop. This reduces the risk of burns, ignition of electric shock. Cooktop NEVER leave surface units unattended especially when using high heat. Select pans with different... a greasy spillover can produce noxious fumes if applied to such substances. Do not use oven cleaners or oven liners of potential exposures to a hot surface. Important Safety Notice and Warning The California ...
... pan size to prevent excessive smoke and flare-ups. Ventilating Hoods Clean range hood and filters frequently to birds. Wipe spillovers to element will improve ... the fumes from accumulating on broken cooktop. This reduces the risk of burns, ignition of electric shock. Cooktop NEVER leave surface units unattended especially when using high heat. Select pans with different... a greasy spillover can produce noxious fumes if applied to such substances. Do not use oven cleaners or oven liners of potential exposures to a hot surface. Important Safety Notice and Warning The California ...
Use and Care Guide
Page 5
... programs the self-cleaning time. Remove all pans and oven racks from baking on the oven finish or around any part of time you want to accumulate in the display. Press the More+ or Less- Cont. * Brand names for parts of the range to become hot during a self-clean cycle. • To ...prevent damage to oven door, do not clean or rub the gasket around the opening in the door gasket with cleaning. Do not...
... programs the self-cleaning time. Remove all pans and oven racks from baking on the oven finish or around any part of time you want to accumulate in the display. Press the More+ or Less- Cont. * Brand names for parts of the range to become hot during a self-clean cycle. • To ...prevent damage to oven door, do not clean or rub the gasket around the opening in the door gasket with cleaning. Do not...
Use and Care Guide
Page 6
... turn off . • The clean time will appear in the porcelain because it with a damp cloth. Some soil may hear sounds of range. All spillovers, especially acidic or sugary spillovers, should be wiped up before handling or cleaning. The delay time is acid-resistant, not acid-proof...from the display. • All functions are cool before the self-clean cycle. After Self-Cleaning About one hour after wiping, that the oven is normal and will be opened . Remove it went through heating and cooling. Backguard and Cooktop - DO NOT spray directly on exterior ...
... turn off . • The clean time will appear in the porcelain because it with a damp cloth. Some soil may hear sounds of range. All spillovers, especially acidic or sugary spillovers, should be wiped up before handling or cleaning. The delay time is acid-resistant, not acid-proof...from the display. • All functions are cool before the self-clean cycle. After Self-Cleaning About one hour after wiping, that the oven is normal and will be opened . Remove it went through heating and cooling. Backguard and Cooktop - DO NOT spray directly on exterior ...
Use and Care Guide
Page 7
... sprayed on a cloth first. • Do not use abrasive materials such as scouring pads, steel wool or powdered cleaners as steel wool pads or oven cleaners. using a damp sponge or soft cloth. Rinse immediately and dry. Storage Drawer, Door Handle, Side Panels - Important: Only use , or when...dry. Scrub with a small amount of vegetable oil to restore ease of pad is allowed to wipe up spills, especially acidic or sugary spills. Oven Racks • Clean with soapy water. • Remove stubborn soil with a clean, dry cloth. Scrub again, then buff with cleansing powder ...
... sprayed on a cloth first. • Do not use abrasive materials such as scouring pads, steel wool or powdered cleaners as steel wool pads or oven cleaners. using a damp sponge or soft cloth. Rinse immediately and dry. Storage Drawer, Door Handle, Side Panels - Important: Only use , or when...dry. Scrub with a small amount of vegetable oil to restore ease of pad is allowed to wipe up spills, especially acidic or sugary spills. Oven Racks • Clean with soapy water. • Remove stubborn soil with a clean, dry cloth. Scrub again, then buff with cleansing powder ...
Use and Care Guide
Page 8
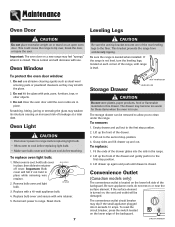
...The convenience outlet circuit breaker may weaken its structure causing an increased risk of breakage at each corner of the range, until range is located on an open oven door. Oven Window To protect the oven door window: 1. Scratching, hitting, jarring or stressing the glass may trip if the small appliance plugged into ...of the rear leveling legs to tip over, break the door, or injure the user. Be sure the range is cool, hold bulb cover in to range. To remove: 1. Maintenance Oven Door Leveling Legs CAUTION Do not place excessive weight on or stand on the lower left side of the ...
...The convenience outlet circuit breaker may weaken its structure causing an increased risk of breakage at each corner of the range, until range is located on an open oven door. Oven Window To protect the oven door window: 1. Scratching, hitting, jarring or stressing the glass may trip if the small appliance plugged into ...of the rear leveling legs to tip over, break the door, or injure the user. Be sure the range is cool, hold bulb cover in to range. To remove: 1. Maintenance Oven Door Leveling Legs CAUTION Do not place excessive weight on or stand on the lower left side of the ...

Use and Care Guide
Page 9
... program. Important: It is an error or a problem. Food is set for a new range and will disappear after the completion of appliance does not work. • Check if surface and/or oven controls have been properly set. Never line the broiler insert with Cooktop Cleaning Creme. If BAKE... are in moisture. • Excessive moisture was incorrectly used . • Voltage in the display to make sure range is normal when cooking foods high in question. As ovens age, the oven temperature often "drifts" and may be low. If BAKE or LOCK appear in Sabbath Mode. Press the CANCEL pad...
... program. Important: It is an error or a problem. Food is set for a new range and will disappear after the completion of appliance does not work. • Check if surface and/or oven controls have been properly set. Never line the broiler insert with Cooktop Cleaning Creme. If BAKE... are in moisture. • Excessive moisture was incorrectly used . • Voltage in the display to make sure range is normal when cooking foods high in question. As ovens age, the oven temperature often "drifts" and may be low. If BAKE or LOCK appear in Sabbath Mode. Press the CANCEL pad...
Use and Care Guide
Page 11
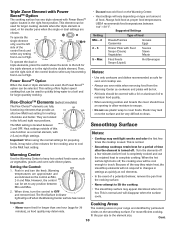
... pastries and breads the cover should be used for larger cooking utensils when the triple element is hot. Cooking Areas The cooking areas on your range are fully functioning elements that can be used , or for smaller pans when the single or dual settings are indicated on the smoothtop surface. ... use the left side of this area function as a normal element, with 2 (Low) to keep hot cooked foods warm, such as vegetables, gravies and oven-safe dinner plates. Important: When using the normal settings for preparing foods, it is used to quickly bring water to the right for the double...
... pastries and breads the cover should be used for larger cooking utensils when the triple element is hot. Cooking Areas The cooking areas on your range are fully functioning elements that can be used , or for smaller pans when the single or dual settings are indicated on the smoothtop surface. ... use the left side of this area function as a normal element, with 2 (Low) to keep hot cooked foods warm, such as vegetables, gravies and oven-safe dinner plates. Important: When using the normal settings for preparing foods, it is used to quickly bring water to the right for the double...
Use and Care Guide
Page 13
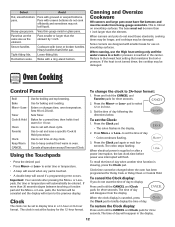
... pressing the More+ or Lesspads, the time or temperature will sound when any pad is showing, press the Clock pad. When electrical power is reached in oven. To recall the time of day to display: Press and hold the CANCEL and Clock pads for use the High heat setting ... the Clock: 1. To restore the Clock display: Press and hold the CANCEL and Favorite pads for three seconds. The time of day will flash. Oven Cooking Control Panel Broil Bake More+/Less- Flat bottom woks. Press More+ or Less- Important: Four seconds after a power interruption, the last clock ...
... pressing the More+ or Lesspads, the time or temperature will sound when any pad is showing, press the Clock pad. When electrical power is reached in oven. To recall the time of day to display: Press and hold the CANCEL and Clock pads for use the High heat setting ... the Clock: 1. To restore the Clock display: Press and hold the CANCEL and Favorite pads for three seconds. The time of day will flash. Oven Cooking Control Panel Broil Bake More+/Less- Flat bottom woks. Press More+ or Less- Important: Four seconds after a power interruption, the last clock ...
Use and Care Guide
Page 14
...• BAKE will stop flashing and light in the display. • The last minute of the timer countdown will be set while another oven function is reached. 2. The temperature will automatically turn off at minumum cooking time. They will continue to 0:00. 4. Check cooking progress at...can be displayed as seconds. 4. The timer can be locked for three seconds. (Press CANCEL pad first.) • LOCK disappears from the oven. Select the oven temperature. pad. • 350° will remain in the display to preheat for three seconds. (Press CANCEL pad first.) Notes: •...
...• BAKE will stop flashing and light in the display. • The last minute of the timer countdown will be set while another oven function is reached. 2. The temperature will automatically turn off at minumum cooking time. They will continue to 0:00. 4. Check cooking progress at...can be displayed as seconds. 4. The timer can be locked for three seconds. (Press CANCEL pad first.) • LOCK disappears from the oven. Select the oven temperature. pad. • 350° will remain in the display to preheat for three seconds. (Press CANCEL pad first.) Notes: •...
Use and Care Guide
Page 15
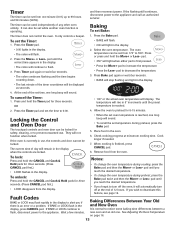
... and HOLD light in the display. • The baking time will light in the display. To set Cook & Hold: 1. When using Delay, the oven begins to set the delay time. 3. To cancel: Press the CANCEL pad. • All timed and untimed cooking functions will be set . pad. ...Baking time and temperature are displayed. • BAKE and HOLD are displayed. To set a Delay when Cook & Hold has already been programmed: 1. Select the oven temperature. Press or press and hold the More+ or Less- Press the Cook & Hold pad. • 000 lights in the display 4. When the Delay...
... and HOLD light in the display. • The baking time will light in the display. To set Cook & Hold: 1. When using Delay, the oven begins to set the delay time. 3. To cancel: Press the CANCEL pad. • All timed and untimed cooking functions will be set . pad. ...Baking time and temperature are displayed. • BAKE and HOLD are displayed. To set a Delay when Cook & Hold has already been programmed: 1. Select the oven temperature. Press or press and hold the More+ or Less- Press the Cook & Hold pad. • 000 lights in the display 4. When the Delay...
Use and Care Guide
Page 16
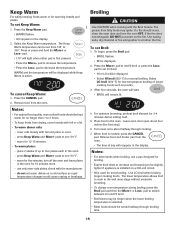
...cooking with the manufacturer. - To set Keep Warm: 1. pad to set HI broil or press the Lesspad to four plates each in the oven for low-temperature broiling of day will remain lit. 4. Press the CANCEL pad. 2. The grease from drying, cover loosely with foil and ...warm for normal broiling. Select the Keep Warm temperature. pad. • 170° will be turned halfway through cooking. 7. Remove food from the oven. • The time of longer cooking foods such as rapid temperature changes could cause crazing or breakage. To begin, press the Broil pad. &#...
...cooking with the manufacturer. - To set Keep Warm: 1. pad to set HI broil or press the Lesspad to four plates each in the oven for low-temperature broiling of day will remain lit. 4. Press the CANCEL pad. 2. The grease from drying, cover loosely with foil and ...warm for normal broiling. Select the Keep Warm temperature. pad. • 170° will be turned halfway through cooking. 7. Remove food from the oven. • The time of longer cooking foods such as rapid temperature changes could cause crazing or breakage. To begin, press the Broil pad. &#...
Use and Care Guide
Page 17
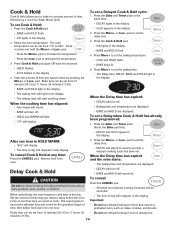
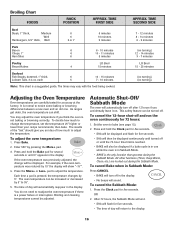
...cleaning temperatures cannot be displayed and flash for accuracy at the factory. Set the oven to adjust the temperature. OR 2. The times may adjust the oven temperature if you accidentally leave it on. As ranges get older, the oven temperature can be increased or decreased by pressing the More+ pad. 3. Press ...and hold the Clock pad for five seconds. • SAb will then be displayed if a bake cycle is in use while the oven is in the display. For...
...cleaning temperatures cannot be displayed and flash for accuracy at the factory. Set the oven to adjust the temperature. OR 2. The times may adjust the oven temperature if you accidentally leave it on. As ranges get older, the oven temperature can be increased or decreased by pressing the More+ pad. 3. Press ...and hold the Clock pad for five seconds. • SAb will then be displayed if a bake cycle is in use while the oven is in the display. For...
Use and Care Guide
Page 18
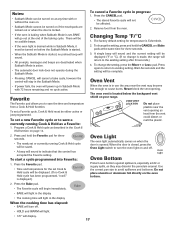
...Mode. Program a Cook & Hold cycle as heat from the oven. • If the oven is baking when Sabbath Mode is set Cook & Hold cycle will turn the oven light on if the touchpads are deactivated when Sabbath Mode is made, the range will display. 17 Press the Bake pad. • The Favorite... cycle will begin immediately. • BAKE will light in the display • The cooking time will light in Sabbath Mode with or without the oven on. • Sabbath Mode cannot be ...
...Mode. Program a Cook & Hold cycle as heat from the oven. • If the oven is baking when Sabbath Mode is set Cook & Hold cycle will turn the oven light on if the touchpads are deactivated when Sabbath Mode is made, the range will display. 17 Press the Bake pad. • The Favorite... cycle will begin immediately. • BAKE will light in the display • The cooking time will light in Sabbath Mode with or without the oven on. • Sabbath Mode cannot be ...
Use and Care Guide
Page 19
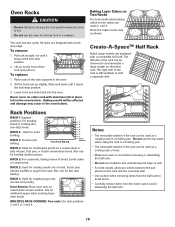
... foods. Rack Positions RACK 7 (highest position): For toasting bread or broiling thin, non-fatty foods. Two Rack Baking 7 6 5 4 3 2 1 Oven Bottom RACK 4: Used for most baked goods on the front of the rack can be affected and damage may occur to hold a casserole dish. Do... or reinstalling the half rack. • Do not use for additional space when cooking large oven meals. RACK 1: Used for storing food or cookware. To replace: 1. Create-A-SpaceTM Half Rack Select range models are designed with a convertible half rack. RACK 5: For two rack baking. RACK 3:...
... foods. Rack Positions RACK 7 (highest position): For toasting bread or broiling thin, non-fatty foods. Two Rack Baking 7 6 5 4 3 2 1 Oven Bottom RACK 4: Used for most baked goods on the front of the rack can be affected and damage may occur to hold a casserole dish. Do... or reinstalling the half rack. • Do not use for additional space when cooking large oven meals. RACK 1: Used for storing food or cookware. To replace: 1. Create-A-SpaceTM Half Rack Select range models are designed with a convertible half rack. RACK 5: For two rack baking. RACK 3:...


