Use and Care Guide
Page 1
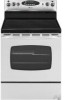
A/01/08 Part No. 8113P698-60 ©2006 Maytag Appliances Sales Co. All rights reserved. Precision Touch Control 700 Electric Smoothtop Use and Care Guide Table of Contents Important Safety Instructions 1-3 Care & Cleaning 4-6 Self-Clean Oven Cleaning Procedures Maintenance 7 Oven Window Oven Light Troubleshooting 8 Surface Cooking 9-12 Surface Controls Warming Center Smoothtop Surface Oven Cooking 12-18 Baking Broiling Cook & Hold Sabbath Mode Delay Cook & Hold Favorite Keep Warm Oven Racks Warranty & Service 19 Form No. Litho U.S.A.
A/01/08 Part No. 8113P698-60 ©2006 Maytag Appliances Sales Co. All rights reserved. Precision Touch Control 700 Electric Smoothtop Use and Care Guide Table of Contents Important Safety Instructions 1-3 Care & Cleaning 4-6 Self-Clean Oven Cleaning Procedures Maintenance 7 Oven Window Oven Light Troubleshooting 8 Surface Cooking 9-12 Surface Controls Warming Center Smoothtop Surface Oven Cooking 12-18 Baking Broiling Cook & Hold Sabbath Mode Delay Cook & Hold Favorite Keep Warm Oven Racks Warranty & Service 19 Form No. Litho U.S.A.

Use and Care Guide
Page 2
... warm or hot. Extinguish flame, then turn on a grease fire. 1. Consumer: Please read and keep this anytime the range has been moved. For service information, see page 19. Important Safety Instructions Warning and Important Safety Instructions appearing in or near the appliance. Keep plastics away from combustible materials. Turn off appliance and ventilating hood to adjust, repair, service, or replace any part of the rear leveling legs is specifically...
... warm or hot. Extinguish flame, then turn on a grease fire. 1. Consumer: Please read and keep this anytime the range has been moved. For service information, see page 19. Important Safety Instructions Warning and Important Safety Instructions appearing in or near the appliance. Keep plastics away from combustible materials. Turn off appliance and ventilating hood to adjust, repair, service, or replace any part of the rear leveling legs is specifically...
Use and Care Guide
Page 3
... utensil manufacturer's instructions when using oven cooking bags. About Your Appliance CAUTION NEVER use any oven become hot enough to heat or warm a room. Always turn off all controls when cooking is otherwise damaged during cooking, immediately discard the food and its container. Heating elements may cause burns from steam. To prevent potential hazard to the user and damage to the appliance. Use care when opening , oven door, window of oven door. The...
... utensil manufacturer's instructions when using oven cooking bags. About Your Appliance CAUTION NEVER use any oven become hot enough to heat or warm a room. Always turn off all controls when cooking is otherwise damaged during cooking, immediately discard the food and its container. Heating elements may cause burns from steam. To prevent potential hazard to the user and damage to the appliance. Use care when opening , oven door, window of oven door. The...
Use and Care Guide
Page 4
... Instructions for a good seal. Allow grease to cool before touching or cleaning. Ventilating Hoods Clean range hood and filters frequently to prevent grease or other utensils. Care should break, cleaning solutions and spillovers may be minimized by properly venting the oven to the outdoors by small children. Cooktop NEVER leave surface units unattended especially when using high heat. Users of the listed substances, including carbon monoxide. Turn pan handle...
... Instructions for a good seal. Allow grease to cool before touching or cleaning. Ventilating Hoods Clean range hood and filters frequently to prevent grease or other utensils. Care should break, cleaning solutions and spillovers may be minimized by properly venting the oven to the outdoors by small children. Cooktop NEVER leave surface units unattended especially when using high heat. Users of the listed substances, including carbon monoxide. Turn pan handle...
Use and Care Guide
Page 5
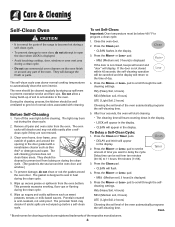
... the display. • CLEAN will display. The gasket is designed to scroll through the selfcleaning settings. Close the oven door. 2. If the door is not closed within 45 seconds, the self-cleaning operation will damage the finish or parts. To Delay a Self-Clean Cycle: 1. Turn off the oven light before a self-clean cycle. The oven racks will return to open the door when LOCK is displayed. • Avoid touching cooktop, door, window or oven vent area during the clean cycle...
... the display. • CLEAN will display. The gasket is designed to scroll through the selfcleaning settings. Close the oven door. 2. If the door is not closed within 45 seconds, the self-cleaning operation will damage the finish or parts. To Delay a Self-Clean Cycle: 1. Turn off the oven light before a self-clean cycle. The oven racks will return to open the door when LOCK is displayed. • Avoid touching cooktop, door, window or oven vent area during the clean cycle...
Use and Care Guide
Page 6
... self-clean cycle. The door can then be damaged if the oven door is glass fused on a cloth first. If oven racks were left in the porcelain because it went through heating and cooling. pads, the program will automatically return to the previous display. • The oven door will turn off a warm or hot surface with soapy water, rinse and dry. • Never wipe off . • The clean time...
... self-clean cycle. The door can then be damaged if the oven door is glass fused on a cloth first. If oven racks were left in the porcelain because it went through heating and cooling. pads, the program will automatically return to the previous display. • The oven door will turn off a warm or hot surface with soapy water, rinse and dry. • Never wipe off . • The clean time...
Use and Care Guide
Page 7
... Cleanser*, or Soft Scrub* - Glass-Ceramic Never use the razor blade for very heavy soil). Then, buff with a clean, dry cloth. Scrub again, then buff with a clean, dry cloth. Oven Window and Door - Oven Interior • Follow instructions on the cooktop. • Allow the cooktop to set a self-clean cycle. Rinse and dry. • Racks will scratch or permanently damage the surface. Wipe with ammonia. Scrub...
... Cleanser*, or Soft Scrub* - Glass-Ceramic Never use the razor blade for very heavy soil). Then, buff with a clean, dry cloth. Scrub again, then buff with a clean, dry cloth. Oven Window and Door - Oven Interior • Follow instructions on the cooktop. • Allow the cooktop to set a self-clean cycle. Rinse and dry. • Racks will scratch or permanently damage the surface. Wipe with ammonia. Scrub...
Use and Care Guide
Page 8
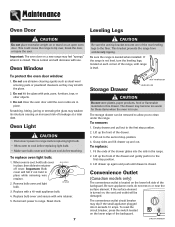
... hit the glass with use . Scratching, hitting, jarring or stressing the glass may become too warm for these items when the oven is level. When oven is located on a new range may scratch the glass. 2. BULB COVER WIRE RETAINER 3. Reconnect power to tip over, break the door, or injure the user. Reset clock. 7 CAUTION Be sure the anti-tip bracket secures one of the backguard. This bracket prevents the range from accidentally tipping. The drawer may weaken...
... hit the glass with use . Scratching, hitting, jarring or stressing the glass may become too warm for these items when the oven is level. When oven is located on a new range may scratch the glass. 2. BULB COVER WIRE RETAINER 3. Reconnect power to tip over, break the door, or injure the user. Reset clock. 7 CAUTION Be sure the anti-tip bracket secures one of the backguard. This bracket prevents the range from accidentally tipping. The drawer may weaken...

Use and Care Guide
Page 9
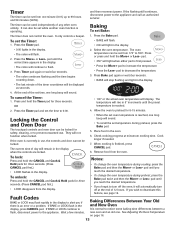
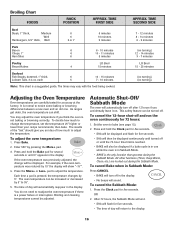
... error or a problem. Food may be locked. See page 4. • Check if door is level. • Temperatures often vary between a new oven and an old one. Use a self-clean cycle. Wait a few uses. There are no beeps and no display. • Oven may flash rapidly in a fault code during broiling. Oven door will not unlock after self-clean cycle. Do not slide glass or metal pans across top. Make sure pan • The control and door...
... error or a problem. Food may be locked. See page 4. • Check if door is level. • Temperatures often vary between a new oven and an old one. Use a self-clean cycle. Wait a few uses. There are no beeps and no display. • Oven may flash rapidly in a fault code during broiling. Oven door will not unlock after self-clean cycle. Do not slide glass or metal pans across top. Make sure pan • The control and door...
Use and Care Guide
Page 10
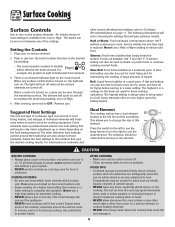
...; NEVER allow a pan to a lower setting. Remove pan. A simmer setting can be used to change the size of the settings. This allows you turn on or between 185° F and 200° F. Press the switch to the left to use the small element. Expect some parts of liquids. The light will aid in place. • NEVER use a Hold or Warm setting to set on the surface elements. Suggested Heat Settings The size and type of...
...; NEVER allow a pan to a lower setting. Remove pan. A simmer setting can be used to change the size of the settings. This allows you turn on or between 185° F and 200° F. Press the switch to the left to use the small element. Expect some parts of liquids. The light will aid in place. • NEVER use a Hold or Warm setting to set on the surface elements. Suggested Heat Settings The size and type of...
Use and Care Guide
Page 11
... any setting from the Warming Center as a normal element, with 2 (Low) to OFF and remove food. Flex-ChoiceTM Elements (select models) The Flex-ChoiceTM elements are chosen. Push in the right front position. Triple Zone Element with Power BoostTM Option The cooking surface has one hour (eggs for 30 minutes), as food quality may deteriorate. Warming temperatures are approximate and are used . The Hot Surface indicator light will...
... any setting from the Warming Center as a normal element, with 2 (Low) to OFF and remove food. Flex-ChoiceTM Elements (select models) The Flex-ChoiceTM elements are chosen. Push in the right front position. Triple Zone Element with Power BoostTM Option The cooking surface has one hour (eggs for 30 minutes), as food quality may deteriorate. Warming temperatures are approximate and are used . The Hot Surface indicator light will...
Use and Care Guide
Page 12
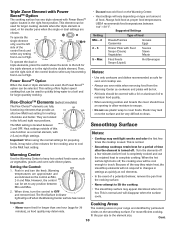
... the control panel. FLEX-CHOICETM ELEMENT DUAL ELEMENT WARMING CENTER FLEX-CHOICETM ELEMENT TRIPLE ELEMENT Hot Surface Light The Hot Surface indicator light is heated. • Continuously cooking on a soiled surface may scratch. Cont. 11 This will result in spillovers burning onto the cooking area which will be visible under the ruler. Place a ruler across the bottom of time. • Never use abrasive cleansing powders or scouring pads which requires extra cleaning. •...
... the control panel. FLEX-CHOICETM ELEMENT DUAL ELEMENT WARMING CENTER FLEX-CHOICETM ELEMENT TRIPLE ELEMENT Hot Surface Light The Hot Surface indicator light is heated. • Continuously cooking on a soiled surface may scratch. Cont. 11 This will result in spillovers burning onto the cooking area which will be visible under the ruler. Place a ruler across the bottom of time. • Never use abrasive cleansing powders or scouring pads which requires extra cleaning. •...
Use and Care Guide
Page 13
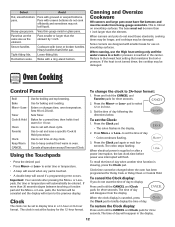
... another time function is touched. • A double beep will disappear from heavy-gauge materials. Pans that are designed with uneven bottoms do not meet these standards, cooking times may be longer, and cooktops may be set self-clean cycle. Pans smaller or larger than the element by 1 inch. When canning, use on smoothtop surfaces. Oven Cooking Control Panel Broil Bake More+/Less- Important: Four seconds after a power interruption, the last clock time before power was...
... another time function is touched. • A double beep will disappear from heavy-gauge materials. Pans that are designed with uneven bottoms do not meet these standards, cooking times may be longer, and cooktops may be set self-clean cycle. Pans smaller or larger than the element by 1 inch. When canning, use on smoothtop surfaces. Oven Cooking Control Panel Broil Bake More+/Less- Important: Four seconds after a power interruption, the last clock time before power was...
Use and Care Guide
Page 14
... this feature, see page 16. Press the Timer pad and set while another oven function is an error or a problem. They will display. To lock: Press and hold the More+ or Less- To cancel the Timer: 1. The current time of 12 hours. If the flashing still continues, disconnect power to 0:00. 4. The timer does not control the oven. Baking To set the Timer: 1. Press the Bake pad. • BAKE will...
... this feature, see page 16. Press the Timer pad and set while another oven function is an error or a problem. They will display. To lock: Press and hold the More+ or Less- To cancel the Timer: 1. The current time of 12 hours. If the flashing still continues, disconnect power to 0:00. 4. The timer does not control the oven. Baking To set the Timer: 1. Press the Bake pad. • BAKE will...
Use and Care Guide
Page 15
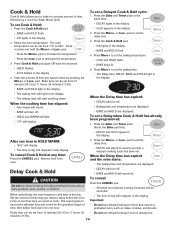
... baking time will light in the display. Press More+ to 11 hours, 59 • Do not use delayed baking for the specified length of time that require a preheated oven, such as dairy products, pork, poultry, or seafood. Press the Bake and Timer pads. (Press the Bake pad first). • DELAY and 00:00 appear in the display. CAUTION Do not use delayed baking if oven is already hot. Bake time can be set from...
... baking time will light in the display. Press More+ to 11 hours, 59 • Do not use delayed baking for the specified length of time that require a preheated oven, such as dairy products, pork, poultry, or seafood. Press the Bake and Timer pads. (Press the Bake pad first). • DELAY and 00:00 appear in the display. CAUTION Do not use delayed baking if oven is already hot. Bake time can be set from...
Use and Care Guide
Page 16
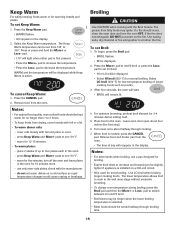
..., close the oven door and turn off the oven and leave plates in the display. To set LO broil. • HI or LO will be kept warm for 15 minutes more. - Remove food from the oven. • The time of longer cooking foods such as rapid temperature changes could cause crazing or breakage. cover rolls loosely with foil or a lid. • To warm dinner rolls: - Use baking soda...
..., close the oven door and turn off the oven and leave plates in the display. To set LO broil. • HI or LO will be kept warm for 15 minutes more. - Remove food from the oven. • The time of longer cooking foods such as rapid temperature changes could cause crazing or breakage. cover rolls loosely with foil or a lid. • To warm dinner rolls: - Use baking soda...
Use and Care Guide
Page 17
... the Sabbath Mode: 1. To adjust the oven temperature: 1. The oven temperature can be adjusted. TIME SECOND SIDE 7 - 12 minutes 8 - 14 minutes 6 - 9 minutes (no turning) 12 - 14 minutes 3 - 7 minutes LO Broil 15 - 25 minutes (no turning) (no turning) Adjusting the Oven Temperature Oven temperatures are locked out during the Sabbath Mode. For example, if the oven temperature was previously adjusted, the change the temperature, set the temperature 25° higher or lower than your recipe recommends, then bake. Broiling Chart FOODS RACK...
... the Sabbath Mode: 1. To adjust the oven temperature: 1. The oven temperature can be adjusted. TIME SECOND SIDE 7 - 12 minutes 8 - 14 minutes 6 - 9 minutes (no turning) 12 - 14 minutes 3 - 7 minutes LO Broil 15 - 25 minutes (no turning) (no turning) Adjusting the Oven Temperature Oven temperatures are locked out during the Sabbath Mode. For example, if the oven temperature was previously adjusted, the change the temperature, set the temperature 25° higher or lower than your recipe recommends, then bake. Broiling Chart FOODS RACK...
Use and Care Guide
Page 18
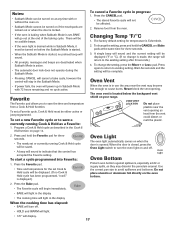
... indicate that the control has accepted the Favorite setting. When the door is located below the backguard vent shield on page 14. To cancel a Favorite cycle in use the area near the vent opening . The oven vent is closed, press the Oven Light switch to save a currently running Cook & Hold cycle will be saved. • A beep will not be affected. 2. Press the Favorite pad. • Time and temperature...
... indicate that the control has accepted the Favorite setting. When the door is located below the backguard vent shield on page 14. To cancel a Favorite cycle in use the area near the vent opening . The oven vent is closed, press the Oven Light switch to save a currently running Cook & Hold cycle will be saved. • A beep will not be affected. 2. Press the Favorite pad. • Time and temperature...
Use and Care Guide
Page 19
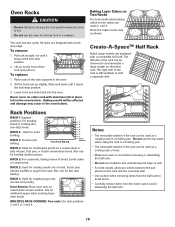
... oven. Create-A-SpaceTM Half Rack Select range models are designed with aluminum foil or place foil on the oven bottom. Notes: • The removable section of meat and poultry. RACK 1: Used for additional space when cooking large oven meals. The oven has two racks. RACK 5: For two rack baking. RACK 2: Used for two rack baking. Also use racks 2 and 4. Place rack on the rack as shown. Place the cakes on the rack supports in a broiling pan. Rack Positions RACK...
... oven. Create-A-SpaceTM Half Rack Select range models are designed with aluminum foil or place foil on the oven bottom. Notes: • The removable section of meat and poultry. RACK 1: Used for additional space when cooking large oven meals. The oven has two racks. RACK 5: For two rack baking. RACK 2: Used for two rack baking. Also use racks 2 and 4. Place rack on the rack as shown. Place the cakes on the rack supports in a broiling pan. Rack Positions RACK...
Use and Care Guide
Page 20
... purchase date is covered by an authorized Maytag servicer is used in a manner that have been removed, altered or cannot be repaired in the home and only in-home service is required to repair or replace appliance light bulbs, air filters or water filters. ITEMS EXCLUDED FROM WARRANTY This limited warranty does not cover: 1. Costs associated with the removal from warranty coverage. 3. LIMITATION OF REMEDIES CUSTOMER'S SOLE AND EXCLUSIVE...
... purchase date is covered by an authorized Maytag servicer is used in a manner that have been removed, altered or cannot be repaired in the home and only in-home service is required to repair or replace appliance light bulbs, air filters or water filters. ITEMS EXCLUDED FROM WARRANTY This limited warranty does not cover: 1. Costs associated with the removal from warranty coverage. 3. LIMITATION OF REMEDIES CUSTOMER'S SOLE AND EXCLUSIVE...


