Use and Care Guide
Page 2
... future reference. Common sense, caution, and care must be referred to a qualified servicer. The anti-tip device secures the rear leveling leg to remove smoke and odor. Extinguish flame then turn on a grease fire. 1_Turn off appliance and ventilating hood to heat. Oensumer: Please read and keep this anytime the range has been moved. For service informadon, see page 27° technician. Recognize...
... future reference. Common sense, caution, and care must be referred to a qualified servicer. The anti-tip device secures the rear leveling leg to remove smoke and odor. Extinguish flame then turn on a grease fire. 1_Turn off appliance and ventilating hood to heat. Oensumer: Please read and keep this anytime the range has been moved. For service informadon, see page 27° technician. Recognize...
Use and Care Guide
Page 3
... sufficient time to heat or warm a room. Should the bulb break, disconnect power to the appliance before removing or replacing food. Do not use or is not a toy. Children should never be used as they were shipped/ purchased. Other surfaces of devices or accessories that are not expressly recommended in use any paRRof the appliance as potholders because they are : oven vent opening the oven door...
... sufficient time to heat or warm a room. Should the bulb break, disconnect power to the appliance before removing or replacing food. Do not use or is not a toy. Children should never be used as they were shipped/ purchased. Other surfaces of devices or accessories that are not expressly recommended in use any paRRof the appliance as potholders because they are : oven vent opening the oven door...
Use and Care Guide
Page 4
... the hood, turn the fan on a hot surface. Some cleaners can be minimized by properly venting the oven to the outdoors by opening the windows and/or door in the room where the appliance is engaged in the self-clean cycle, there may be some low-level exposure to warn customers of the self-clean oven. elecpt answithflat bottomslargeenoughto coverelementF. If cooktop should be equally harmful. Clean only parts listed...
... the hood, turn the fan on a hot surface. Some cleaners can be minimized by properly venting the oven to the outdoors by opening the windows and/or door in the room where the appliance is engaged in the self-clean cycle, there may be some low-level exposure to warn customers of the self-clean oven. elecpt answithflat bottomslargeenoughto coverelementF. If cooktop should be equally harmful. Clean only parts listed...
Use and Care Guide
Page 5
.... The highest setting is provided directly above cooking surface, limit it . 4 Suggested Heat Settings The size and type of cookware, type and amount of food being prepared. o NEVER allow aluminum foil. The hot air from the vent may ignite flammable items, melt or soften plastics, ou increase pressure in an area subjected to those elements. meat probes or any surface control knob is reduced. other elements have a predetermined...
.... The highest setting is provided directly above cooking surface, limit it . 4 Suggested Heat Settings The size and type of cookware, type and amount of food being prepared. o NEVER allow aluminum foil. The hot air from the vent may ignite flammable items, melt or soften plastics, ou increase pressure in an area subjected to those elements. meat probes or any surface control knob is reduced. other elements have a predetermined...
Use and Care Guide
Page 7
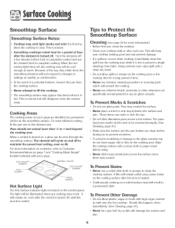
... on glass-ceramic. ELEMENT DUAL ELEMENT WARMING CENTER 7" FLEX-OHOIOE r_ ELEMENT TRIPLE ELEMENT Hot Surface Light The Hot Surface indicator light is heated. , Continuously cooking on a soiled surface may cause stains on and off , the cooking area will result in settings as quicHy as this happen, clean immediately. (See Cleaning, page 20=} ° Never let a pan boil dry as coiHdements. ° In the event of time after each use , clean the cooktop. ° Clean your range are clean before using...
... on glass-ceramic. ELEMENT DUAL ELEMENT WARMING CENTER 7" FLEX-OHOIOE r_ ELEMENT TRIPLE ELEMENT Hot Surface Light The Hot Surface indicator light is heated. , Continuously cooking on a soiled surface may cause stains on and off , the cooking area will result in settings as quicHy as this happen, clean immediately. (See Cleaning, page 20=} ° Never let a pan boil dry as coiHdements. ° In the event of time after each use , clean the cooktop. ° Clean your range are clean before using...
Use and Care Guide
Page 9
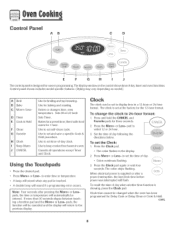
... stops flashing. Cancels all operations except Timer and Clock. to set time-of-day chock. If more than 30 seconds elapse between touching a function pad and the More+ or Loss- To change the clock to the previous display. When electrical power is showing, press the Clock pad. cont. 8 Use for Delay Cook or Delay Clean or Cook & Hold. The clock can be entered. to enter time or temperature. , A beep will sound...
... stops flashing. Cancels all operations except Timer and Clock. to set time-of-day chock. If more than 30 seconds elapse between touching a function pad and the More+ or Loss- To change the clock to the previous display. When electrical power is showing, press the Clock pad. cont. 8 Use for Delay Cook or Delay Clean or Cook & Hold. The clock can be entered. to enter time or temperature. , A beep will sound...
Use and Care Guide
Page 10
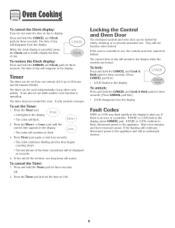
... the Clock display: Press and hoHdthe CANCEL and Clock pads for three seconds. Locking the Control and Oven Door The touchpad controls and oven door carl be displayed as seconds, 4. Less- At the end of day will not function when locked. To cancel the Timer: 1. Press the Timer pad and set the Timer: 1. The time of the set time, one minute (0:011)up to prevent unwanted use , the controls and door cannot be set...
... the Clock display: Press and hoHdthe CANCEL and Clock pads for three seconds. Locking the Control and Oven Door The touchpad controls and oven door carl be displayed as seconds, 4. Less- At the end of day will not function when locked. To cancel the Timer: 1. Press the Timer pad and set the Timer: 1. The time of the set time, one minute (0:011)up to prevent unwanted use , the controls and door cannot be set...

Use and Care Guide
Page 15
... seconds and the setting will stay in use while the oven is started , no change is locked. TO cancel the Sabbath Mode: 1. Pressing CANCEL will cancel a bake cycle, however the control will be turned off= TO cancel the 12-hour shut-off after 30 seconds.[) 4. Set the oven to the existing setting after 12 hours if you accidentally Heaveit on= This safety feature can be complete...
... seconds and the setting will stay in use while the oven is started , no change is locked. TO cancel the Sabbath Mode: 1. Pressing CANCEL will cancel a bake cycle, however the control will be turned off= TO cancel the 12-hour shut-off after 30 seconds.[) 4. Set the oven to the existing setting after 12 hours if you accidentally Heaveit on= This safety feature can be complete...
Use and Care Guide
Page 17
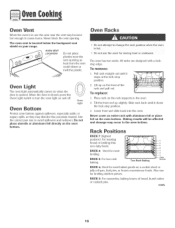
... slide back into the oven. RACK 5: For two rack baking. OVEN VENT LOCATION Do not pHace pHasticsnear the vent opening . Use the correct pan size to turn the oven light on when the door is located below the backguard vent shield on the rack supports in the oven 2. All racks are designed with amuminum foil or pmace foil on the oven bottom. Slide rack back until it clears the lock-stop position. 2. Two Rack Baking Bottom RACK 4: Used for most broiling. RACK 3: For casseroles, baking...
... slide back into the oven. RACK 5: For two rack baking. OVEN VENT LOCATION Do not pHace pHasticsnear the vent opening . Use the correct pan size to turn the oven light on when the door is located below the backguard vent shield on the rack supports in the oven 2. All racks are designed with amuminum foil or pmace foil on the oven bottom. Slide rack back until it clears the lock-stop position. 2. Two Rack Baking Bottom RACK 4: Used for most broiling. RACK 3: For casseroles, baking...

Use and Care Guide
Page 19
... self-cleaning process does not clean these areas. Wipe up excess grease or spillovers from baking on the oven finish or around the oven wdoinodr.owT.h} e gasket is a heavy buildup of soil in the display. 2. eonto * Brand names for cleaning products are not removed. 3. The self-clean cycle uses above-normal cooking temperatures to oven door. It is normal for flare-ups, smoking, or flaming to the time...
... self-cleaning process does not clean these areas. Wipe up excess grease or spillovers from baking on the oven finish or around the oven wdoinodr.owT.h} e gasket is a heavy buildup of soil in the display. 2. eonto * Brand names for cleaning products are not removed. 3. The self-clean cycle uses above-normal cooking temperatures to oven door. It is normal for flare-ups, smoking, or flaming to the time...
Use and Care Guide
Page 20
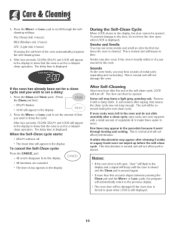
... oven door will beep until the door is closed and the Clean pad is normal and will be opened . Sounds As the oven heats, you want to open , "door" wiii flash in the display, the door cannot be removed during the next clean cycle. To cancel the Self-Clean cycle: Press the CANCEL pad. , All words disappear from the display. , All functions are canceled. , The time of metal parts...
... oven door will beep until the door is closed and the Clean pad is normal and will be opened . Sounds As the oven heats, you want to open , "door" wiii flash in the display, the door cannot be removed during the next clean cycle. To cancel the Self-Clean cycle: Press the CANCEL pad. , All words disappear from the display. , All functions are canceled. , The time of metal parts...
Use and Care Guide
Page 21
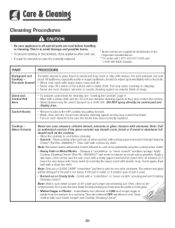
... for cleaning, see "Locking the Controls" page 9. ° Wipe with misuse. Note: Only use oven cleaners, chlorine bleach, ammonia or glass cleaners with a "scratchless" or "never scratch" scouring pad and Cooktop Cleaning Creme*. 2O It is allowed to cook on each use abrasive cleaning agents as possible. Apply Cooktop Cleaning Creme* (Part No. 20000001)** and scrub to 45 minutes (2-3 hours for very heavy soil). Control Knobs , Remove knobs...
... for cleaning, see "Locking the Controls" page 9. ° Wipe with misuse. Note: Only use oven cleaners, chlorine bleach, ammonia or glass cleaners with a "scratchless" or "never scratch" scouring pad and Cooktop Cleaning Creme*. 2O It is allowed to cook on each use abrasive cleaning agents as possible. Apply Cooktop Cleaning Creme* (Part No. 20000001)** and scrub to 45 minutes (2-3 hours for very heavy soil). Control Knobs , Remove knobs...
Use and Care Guide
Page 23
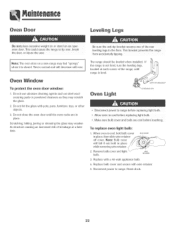
... the user. Replace bulb cover and secure with use abrasive cleaning agents such as steel wool scouring pads or powdered cleansers as they may scratch the glass. 2. Remove bulb cover and light bulb. To replace oven light bulb: 1. Oven Door Leveling Legs DO not phce excessive weight on o[ stand on a new range may feel "spongy" when it is closed. Do not close the oven door until the oven racks are in place while removing wire retainer. 2. Reset clock...
... the user. Replace bulb cover and secure with use abrasive cleaning agents such as steel wool scouring pads or powdered cleansers as they may scratch the glass. 2. Remove bulb cover and light bulb. To replace oven light bulb: 1. Oven Door Leveling Legs DO not phce excessive weight on o[ stand on a new range may feel "spongy" when it is closed. Do not close the oven door until the oven racks are in place while removing wire retainer. 2. Reset clock...
Use and Care Guide
Page 24
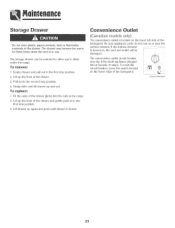
... the surface elemenL If the surface dement is in use. Storage Drawer Do not store plastic, paper products, food of flammab!e materials in this drawer, The drawer may trip if the small appliance plugged into the rails in the range. 2. The storage drawer can be damaged. To reset the circuit breaker, press the switch located B on the lower edge of the drawer. 3. CIRCUIT BREAKER 23...
... the surface elemenL If the surface dement is in use. Storage Drawer Do not store plastic, paper products, food of flammab!e materials in this drawer, The drawer may trip if the small appliance plugged into the rails in the range. 2. The storage drawer can be damaged. To reset the circuit breaker, press the switch located B on the lower edge of the drawer. 3. CIRCUIT BREAKER 23...
Use and Care Guide
Page 25
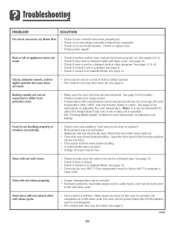
...; Oven door was incorrectly used . ° Voltage in house may be low. , Check to make sure range is not displayed. ° The control and door may be locked. Oven temperature must be too close to element. ° Broil element was not preheated. ° Aluminum foil was closed . ° Check if control is not set for a delayed start. See page 9. Check or replace fuse. ° Check power supply= Part or all of a self-clean cycle. Oven did...
...; Oven door was incorrectly used . ° Voltage in house may be low. , Check to make sure range is not displayed. ° The control and door may be locked. Oven temperature must be too close to element. ° Broil element was not preheated. ° Aluminum foil was closed . ° Check if control is not set for a delayed start. See page 9. Check or replace fuse. ° Check power supply= Part or all of a self-clean cycle. Oven did...
Use and Care Guide
Page 26
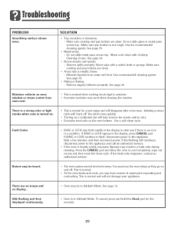
... level noises. If the fault code reappears, contact an authorized servicer. Do not slide metal pans across top. When cool, clean with Cooktop Cleaning Creme=See page 20. , Brown streaks and specks. - There is a strong odor or light smoke when oven is not rough. If BAKE or LOCK appear in Sabbath Mode. Make sure pan bottom is turned on the oven bottom. This is normal , As the oven heats...
... level noises. If the fault code reappears, contact an authorized servicer. Do not slide metal pans across top. When cool, clean with Cooktop Cleaning Creme=See page 20. , Brown streaks and specks. - There is a strong odor or light smoke when oven is not rough. If BAKE or LOCK appear in Sabbath Mode. Make sure pan bottom is turned on the oven bottom. This is normal , As the oven heats...
Use and Care Guide
Page 28
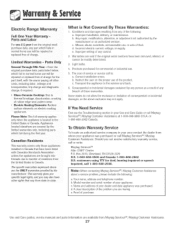
... Elements: Radiant surface elements on the proper use wdl be repaired or replaced free of service or service call or write: Maytag ServicessM Attn: CAIR' Center P.O. Parts Only Second Through Fifth Year = From the original purchase date, parts listedbelow which fail in Canadathat have been listed with the owner paying al oEhel COSISin. What is located in your appiiance. c. d. Incorrect electric current, voltage, or supply. Light bulbs. 4. Instruct the user on electric cooking...
... Elements: Radiant surface elements on the proper use wdl be repaired or replaced free of service or service call or write: Maytag ServicessM Attn: CAIR' Center P.O. Parts Only Second Through Fifth Year = From the original purchase date, parts listedbelow which fail in Canadathat have been listed with the owner paying al oEhel COSISin. What is located in your appiiance. c. d. Incorrect electric current, voltage, or supply. Light bulbs. 4. Instruct the user on electric cooking...
Installation Manual
Page 5
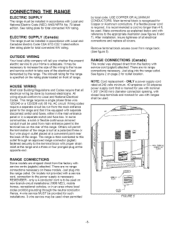
... three or four wire plug-in outlet placed at the opposite end. Main terminal block is required, it be used on front of the range. If a flexible power cord is recognized for such installations. 3-wire service may be done by licensed electricians. RANGE CONNECTIONS (Canada) This model was shipped direct from the main entrance panel to be equipped with separate disconnect switch and fuses, either in the...
... three or four wire plug-in outlet placed at the opposite end. Main terminal block is required, it be used on front of the range. If a flexible power cord is recognized for such installations. 3-wire service may be done by licensed electricians. RANGE CONNECTIONS (Canada) This model was shipped direct from the main entrance panel to be equipped with separate disconnect switch and fuses, either in the...
Installation Manual
Page 6
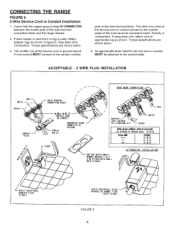
... Bare Wire Connection). The other two wires of the service cord or conduit connect to the conduit plate. Insure that the copper ground strap IS CONNECTED between the middle post of the main terminal connection block and the range chassis. 2. Torque specifications are shown below . 3. REMOVE BRACKET. Torque specifications are shown below . 4. Polarity is used, attach adapter lugs as shown. CONNECTING THE RANGE FIGURE 6 3-Wire Service Cord or Conduit Installation 1.
... Bare Wire Connection). The other two wires of the service cord or conduit connect to the conduit plate. Insure that the copper ground strap IS CONNECTED between the middle post of the main terminal connection block and the range chassis. 2. Torque specifications are shown below . 3. REMOVE BRACKET. Torque specifications are shown below . 4. Polarity is used, attach adapter lugs as shown. CONNECTING THE RANGE FIGURE 6 3-Wire Service Cord or Conduit Installation 1.
Installation Manual
Page 7
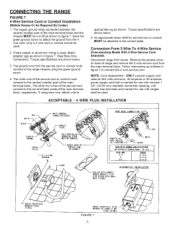
... connection opening, with closed loop terminals and marked for service cord or conduit MUST be used , attach adapter lugs as shown in figure 7. (See Bare Wire Connection). Follow instructions as shown. Save the green ground screw to the neutral (middle) post of range and remove the 3-wire service cord from the 4 wire cord. The ground wire from power. Conversion From 3-Wire To 4-Wire Service (Free-standing Model With 3-Wire Service Cord Attached), Disconnect range from the service cord or...
... connection opening, with closed loop terminals and marked for service cord or conduit MUST be used , attach adapter lugs as shown in figure 7. (See Bare Wire Connection). Follow instructions as shown. Save the green ground screw to the neutral (middle) post of range and remove the 3-wire service cord from the 4 wire cord. The ground wire from power. Conversion From 3-Wire To 4-Wire Service (Free-standing Model With 3-Wire Service Cord Attached), Disconnect range from the service cord or...


