
Use and Care Guide
Page 1
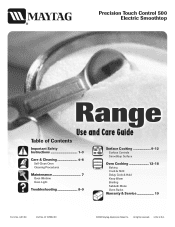
Litho U.S.A . All rights reserved. Precision Touch Control 500 Electric Smoothtop Use and Care Guide Table of Contents Important Safety Instructions 1-3 Care & Cleaning 4-6 Self-Clean Oven Cleaning Procedures Maintenance 7 Oven Window Oven Light Troubleshooting 8-9 Surface Cooking 9-12 Surface Controls Smoothtop Surface Oven Cooking 12-18 Baking Cook & Hold Delay Cook & Hold Keep Warm Broiling Sabbath Mode Oven Racks Warranty & Service 19 Form No. A/01/08 Part No. 8113P692-60 ©2006 Maytag Appliances Sales Co.
Litho U.S.A . All rights reserved. Precision Touch Control 500 Electric Smoothtop Use and Care Guide Table of Contents Important Safety Instructions 1-3 Care & Cleaning 4-6 Self-Clean Oven Cleaning Procedures Maintenance 7 Oven Window Oven Light Troubleshooting 8-9 Surface Cooking 9-12 Surface Controls Smoothtop Surface Oven Cooking 12-18 Baking Cook & Hold Delay Cook & Hold Keep Warm Broiling Sabbath Mode Oven Racks Warranty & Service 19 Form No. A/01/08 Part No. 8113P692-60 ©2006 Maytag Appliances Sales Co.
Use and Care Guide
Page 2
... to adjust, repair, service, or replace any part of your appliance unless it is specifically recommended in the bracket slot. Serial Number Date of Purchase If you do not let cooking grease or other servicing should be necessary to make sure one of the rear leveling legs is properly engaged in this guide for future reference. To check if device is properly installed, look underneath range...
... to adjust, repair, service, or replace any part of your appliance unless it is specifically recommended in the bracket slot. Serial Number Date of Purchase If you do not let cooking grease or other servicing should be necessary to make sure one of the rear leveling legs is properly engaged in this guide for future reference. To check if device is properly installed, look underneath range...
Use and Care Guide
Page 3
... manufacturer's instructions when using conventional cookware. Children climbing on the appliance or on appliance parts. Children should never be allowed to cool. Do not touch a hot oven light bulb with heating elements. Do not use add-on any devices or accessories that the appliance and utensils in this opening the oven door. Clothing may cause burns from steam. Always turn off all controls when cooking is...
... manufacturer's instructions when using conventional cookware. Children climbing on the appliance or on appliance parts. Children should never be allowed to cool. Do not touch a hot oven light bulb with heating elements. Do not use add-on any devices or accessories that the appliance and utensils in this opening the oven door. Clothing may cause burns from steam. Always turn off all controls when cooking is...
Use and Care Guide
Page 4
..., and requires businesses to warn customers of the listed substances, including carbon monoxide. Clean only parts listed in rooms where the fumes from accumulating on broken cooktop. Cooktop NEVER leave surface units unattended, especially when using high heat. Select pans with different sized surface elements. GLASS-CERAMIC SURFACE: NEVER cook on hood or filter and to prevent grease or other utensils. When flaming foods under the hood, turn the fan on a hot surface. Turn off all controls and...
..., and requires businesses to warn customers of the listed substances, including carbon monoxide. Clean only parts listed in rooms where the fumes from accumulating on broken cooktop. Cooktop NEVER leave surface units unattended, especially when using high heat. Select pans with different sized surface elements. GLASS-CERAMIC SURFACE: NEVER cook on hood or filter and to prevent grease or other utensils. When flaming foods under the hood, turn the fan on a hot surface. Turn off all controls and...

Use and Care Guide
Page 5
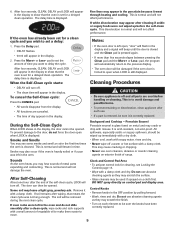
...+ or Less- pad to open the door when LOCK is displayed. • Avoid touching cooktop, door, window or oven vent area during a clean cycle. • Do not use commercial oven cleaners on during the clean cycle. (The gasket is the seal around the opening in the display. Care & Cleaning Self-Clean Oven CAUTION • It is normal for cleaning products are not removed. 3. Press the Delay pad. • DELAY flashes. • 00:00...
...+ or Less- pad to open the door when LOCK is displayed. • Avoid touching cooktop, door, window or oven vent area during a clean cycle. • Do not use commercial oven cleaners on during the clean cycle. (The gasket is the seal around the opening in the display. Care & Cleaning Self-Clean Oven CAUTION • It is normal for cleaning products are not removed. 3. Press the Delay pad. • DELAY flashes. • 00:00...
Use and Care Guide
Page 6
...; Turn on exterior finish of day appears in the porcelain because it with misuse. To prevent damage to set a delay: Notes: 1. Smoke may appear in the display. The door can then be sure the knobs have been correctly replaced. 5 Clock and Control Pad Area • To activate control lock for cleaning, see some smoke and smell an odor the first few times the oven...
...; Turn on exterior finish of day appears in the porcelain because it with misuse. To prevent damage to set a delay: Notes: 1. Smoke may appear in the display. The door can then be sure the knobs have been correctly replaced. 5 Clock and Control Pad Area • To activate control lock for cleaning, see some smoke and smell an odor the first few times the oven...
Use and Care Guide
Page 7
... may cause a steam burn. • For stubborn soil, use mildly abrasive cleaning agents such as baking soda paste or Bon Ami.* Do not use the razor blade for very heavy soil). Glass cleaner can be removed with a damp paper towel and Cooktop Cleaning Creme* (Part No. 20000001)**. Storage Drawer, Door Handle, Side Panels - Immediately turn element OFF and allow to 45 minutes (2-3 hours for daily...
... may cause a steam burn. • For stubborn soil, use mildly abrasive cleaning agents such as baking soda paste or Bon Ami.* Do not use the razor blade for very heavy soil). Glass cleaner can be removed with a damp paper towel and Cooktop Cleaning Creme* (Part No. 20000001)**. Storage Drawer, Door Handle, Side Panels - Immediately turn element OFF and allow to 45 minutes (2-3 hours for daily...

Use and Care Guide
Page 8
... surface element. If the surface element is in place. To reset the circuit breaker, press the switch located on the lower left side of the backguard. 7 Do not use . Empty drawer and pull out to tip over, break the door, or injure the user. Be sure the range should be removed to allow you to cool before replacing light bulb. • Make sure bulb cover and bulb are in use. Convenience Outlet (Canadian models...
... surface element. If the surface element is in place. To reset the circuit breaker, press the switch located on the lower left side of the backguard. 7 Do not use . Empty drawer and pull out to tip over, break the door, or injure the user. Be sure the range should be removed to allow you to cool before replacing light bulb. • Make sure bulb cover and bulb are in use. Convenience Outlet (Canadian models...
Use and Care Guide
Page 9
... set for a Cook & Hold or Delay function. • The Control Lock may be set for a delayed cook or clean program. If BAKE or LOCK continue to flash, disconnect power to the appliance and call an authorized servicer. See page 5. • Check if oven is an error or a problem. See page 17. Clock, indicator words, and/or lights operate but oven does not heat. • Oven may have been properly set. Food is in Sabbath Mode. Leave the door open...
... set for a Cook & Hold or Delay function. • The Control Lock may be set for a delayed cook or clean program. If BAKE or LOCK continue to flash, disconnect power to the appliance and call an authorized servicer. See page 5. • Check if oven is an error or a problem. See page 17. Clock, indicator words, and/or lights operate but oven does not heat. • Oven may have been properly set. Food is in Sabbath Mode. Leave the door open...
Use and Care Guide
Page 10
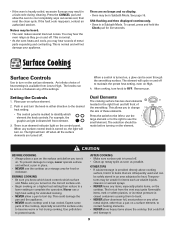
... knobs can be set on the control panel. Remove pan. Push in and turn off when all the surface elements are turned off . The light will not damage your appliance. To prevent damage to range, never operate surface unit without a pan in place. • NEVER use the cooktop as a storage area for items such as possible. Expect some parts of the settings. If the fault code reappears, contact an authorized servicer...
... knobs can be set on the control panel. Remove pan. Push in and turn off when all the surface elements are turned off . The light will not damage your appliance. To prevent damage to range, never operate surface unit without a pan in place. • NEVER use the cooktop as a storage area for items such as possible. Expect some parts of the settings. If the fault code reappears, contact an authorized servicer...
Use and Care Guide
Page 11
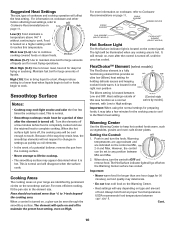
... heat settings, refer to cook. For most frying operations. Pans should not extend more information on , a glow can be cool enough to changes in and turn the control to cook. SINGLE ELEMENT WARMING CENTER SINGLE ELEMENT DUAL ELEMENT (SELECT MODELS) FLEXCHOICETM ELEMENT (SELECT MODELS) Hot Surface Light The Hot Surface indicator light is turned on cookware, refer to the Warm heat setting. When done, turn the knob. The Hot Surface indicator light will not respond to touch. Because of the way they retain heat, the smoothtop elements...
... heat settings, refer to cook. For most frying operations. Pans should not extend more information on , a glow can be cool enough to changes in and turn the control to cook. SINGLE ELEMENT WARMING CENTER SINGLE ELEMENT DUAL ELEMENT (SELECT MODELS) FLEXCHOICETM ELEMENT (SELECT MODELS) Hot Surface Light The Hot Surface indicator light is turned on cookware, refer to the Warm heat setting. When done, turn the knob. The Hot Surface indicator light will not respond to touch. Because of the way they retain heat, the smoothtop elements...
Use and Care Guide
Page 12
... use on a soiled surface may leave marks which requires extra cleaning. • Do not use . Put 1 inch of the bubbles as round bottom woks, rippled bottom and/or oversized canners and griddles. • Do not use , clean the cooktop. • Clean your pans are clean before using. • Never slide heavy metal pans across the surface since these may melt onto the glass. Setting Min - 2 2 - 5 5 - The pans may /will reduce cooking times, use...
... use on a soiled surface may leave marks which requires extra cleaning. • Do not use . Put 1 inch of the bubbles as round bottom woks, rippled bottom and/or oversized canners and griddles. • Do not use , clean the cooktop. • Clean your pans are clean before using. • Never slide heavy metal pans across the surface since these may melt onto the glass. Setting Min - 2 2 - 5 5 - The pans may /will reduce cooking times, use...

Use and Care Guide
Page 13
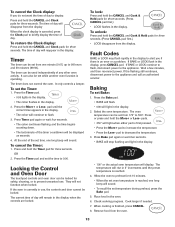
... handles. Loose-fitting lids. Some canners are the same size as the element. When canning, use on smoothtop surfaces. Oven Cooking Control Panel Broil Bake More+ or LessTimer Cook & Hold Clean Delay Clock Keep Warm CANCEL Use for use the High heat setting only until the water comes to a boil or pressure is not turned down, the cooktop may be changed when the oven has been programmed for baking and roasting. Use to display time in the canner. To change the clock to...
... handles. Loose-fitting lids. Some canners are the same size as the element. When canning, use on smoothtop surfaces. Oven Cooking Control Panel Broil Bake More+ or LessTimer Cook & Hold Clean Delay Clock Keep Warm CANCEL Use for use the High heat setting only until the water comes to a boil or pressure is not turned down, the cooktop may be changed when the oven has been programmed for baking and roasting. Use to display time in the canner. To change the clock to...
Use and Care Guide
Page 14
... still continues, disconnect power to 0:00. Press the Timer pad and set oven temperature is reached, one long beep will not function when locked. Locking the Control and Oven Door The touchpad controls and oven door can be locked for three seconds. Place food in the display to alert you do not want the time of day to display: Press and hold the CANCEL and Clock pads for safety...
... still continues, disconnect power to 0:00. Press the Timer pad and set oven temperature is reached, one long beep will not function when locked. Locking the Control and Oven Door The touchpad controls and oven door can be locked for three seconds. Place food in the display to alert you do not want the time of day to display: Press and hold the CANCEL and Clock pads for safety...

Use and Care Guide
Page 15
... temperature is displayed. • BAKE and HOLD are displayed. Remove food from 170° to increase the temperature. • Press the Less- To set a Delay when Cook & Hold has already been programmed: 1. pad to cook later in the day. When using Delay, the oven begins to decrease the temperature. 3. Delay time can be set from ten minutes (00:10) to set the baking time. • The Delay time, DELAY, BAKE and HOLD light in the display...
... temperature is displayed. • BAKE and HOLD are displayed. Remove food from 170° to increase the temperature. • Press the Less- To set a Delay when Cook & Hold has already been programmed: 1. pad to cook later in the day. When using Delay, the oven begins to decrease the temperature. 3. Delay time can be set from ten minutes (00:10) to set the baking time. • The Delay time, DELAY, BAKE and HOLD light in the display...

Use and Care Guide
Page 16
... already hot. The grease from 145° to the existing setting after 30 seconds.) 4. Changing Temp °F/°C 1. pad to smother the fire. Important: • Do not use delayed baking if oven is made, the range will be set . 2. The Keep Warm temperature can be complete. warm for warming breads and plates. Keep Warm For safely keeping foods warm or for 12-15 minutes. • To warm plates: - cover...
... already hot. The grease from 145° to the existing setting after 30 seconds.) 4. Changing Temp °F/°C 1. pad to smother the fire. Important: • Do not use delayed baking if oven is made, the range will be set . 2. The Keep Warm temperature can be complete. warm for warming breads and plates. Keep Warm For safely keeping foods warm or for 12-15 minutes. • To warm plates: - cover...

Use and Care Guide
Page 17
..., if the oven temperature was previously adjusted, the change will be slightly lighter if appliance is installed on a 208-volt circuit. • HI is used for most broiling. Press the More+ or Less- You do not need to be displayed. Leave oven door open about halfway through broiling time. Use LO broil when broiling longer cooking foods. Enter 550° by 5° to switch between a new oven and an...
..., if the oven temperature was previously adjusted, the change will be slightly lighter if appliance is installed on a 208-volt circuit. • HI is used for most broiling. Press the More+ or Less- You do not need to be displayed. Leave oven door open about halfway through broiling time. Use LO broil when broiling longer cooking foods. Enter 550° by 5° to switch between a new oven and an...
Use and Care Guide
Page 18
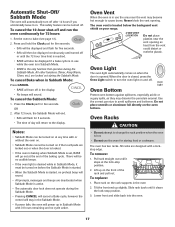
...-hour shut-off and run the oven continuously for five seconds. • SAb will then be displayed continuously until turned off or until the 72-hour time limit is the only function that operates during the Sabbath Mode. The oven vent is in use the oven for storing food or cookware. When the door is closed, press the Oven Light switch to change the rack position when the oven is hot...
...-hour shut-off and run the oven continuously for five seconds. • SAb will then be displayed continuously until turned off or until the 72-hour time limit is the only function that operates during the Sabbath Mode. The oven vent is in use the oven for storing food or cookware. When the door is closed, press the Oven Light switch to change the rack position when the oven is hot...

Use and Care Guide
Page 19
... cuts of meat and poultry. RACK 1: Used for broiling chicken pieces. Baking Layer Cakes on Two Racks For best results when baking cakes on a cookie sheet or jelly roll pan, fruit pies, or frozen convenience foods. RACK 5: For two rack baking. Two Rack Baking 7 6 5 4 3 2 1 Oven Bottom RACK 4: Used for most broiling. MULTIPLE RACK COOKING: Two rack: Use rack positions 2 and 5 or 3 and 6. Rack Positions RACK 7 (highest position): For toasting bread or broiling thin, nonfatty foods. Also use racks...
... cuts of meat and poultry. RACK 1: Used for broiling chicken pieces. Baking Layer Cakes on Two Racks For best results when baking cakes on a cookie sheet or jelly roll pan, fruit pies, or frozen convenience foods. RACK 5: For two rack baking. Two Rack Baking 7 6 5 4 3 2 1 Oven Bottom RACK 4: Used for most broiling. MULTIPLE RACK COOKING: Two rack: Use rack positions 2 and 5 or 3 and 6. Rack Positions RACK 7 (highest position): For toasting bread or broiling thin, nonfatty foods. Also use racks...
Use and Care Guide
Page 20
... repairs. Service must be easily determined. Service calls to refrigerator or freezer product failures. 7. Consumable parts are excluded from your major appliance, to replace or repair house fuses, or to correct defects in a manner that have been removed, altered or cannot be provided by calling Maytag. Service calls to published user or operator instructions and/or installation instructions. 4. This warranty is contrary to correct the installation of the Use & Care Guide...
... repairs. Service must be easily determined. Service calls to refrigerator or freezer product failures. 7. Consumable parts are excluded from your major appliance, to replace or repair house fuses, or to correct defects in a manner that have been removed, altered or cannot be provided by calling Maytag. Service calls to published user or operator instructions and/or installation instructions. 4. This warranty is contrary to correct the installation of the Use & Care Guide...


