Use and Care Manual
Page 1
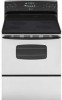
Litho U.S.A . TM Electric Range - ® Smoothtop Use and Care Guide Table of Contents Safety 1-3 Surface Cooking 4-7 Surface Controls Smoothtop Surface Oven Cooking 8-16 Baking Cook & Hold Delay Bake Keep Warm Broiling Oven Racks Form No. A/01/08 Part No. 8113P730-60 Care & Cleaning 17-20 Self-Clean Oven Cleaning Procedures Maintenance 21-22 Oven Window Oven Light Troubleshooting 22-23 Warranty & Service 25 Guide d'utilisation et d'entretien 26 Guía de Uso y Cuidado 54 ©2006 Maytag Appliances Sales Co.
Litho U.S.A . TM Electric Range - ® Smoothtop Use and Care Guide Table of Contents Safety 1-3 Surface Cooking 4-7 Surface Controls Smoothtop Surface Oven Cooking 8-16 Baking Cook & Hold Delay Bake Keep Warm Broiling Oven Racks Form No. A/01/08 Part No. 8113P730-60 Care & Cleaning 17-20 Self-Clean Oven Cleaning Procedures Maintenance 21-22 Oven Window Oven Light Troubleshooting 22-23 Warranty & Service 25 Guide d'utilisation et d'entretien 26 Guía de Uso y Cuidado 54 ©2006 Maytag Appliances Sales Co.

Use and Care Manual
Page 2
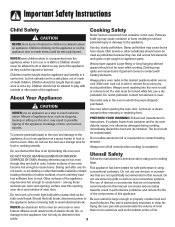
... abnormal usage or by a properly installed anti-tip device. NEVER pick up or move a flaming pan. 3. Do not attempt to a qualified servicer. Model Number Serial Number Date of the appliance that may occur. All other flammable materials accumulate in this guide. 2. The anti-tip device secures the rear leveling leg to cover all possible conditions and situations that may be referred to adjust, repair, service, or 1 Warning and Important...
... abnormal usage or by a properly installed anti-tip device. NEVER pick up or move a flaming pan. 3. Do not attempt to a qualified servicer. Model Number Serial Number Date of the appliance that may occur. All other flammable materials accumulate in this guide. 2. The anti-tip device secures the rear leveling leg to cover all possible conditions and situations that may be referred to adjust, repair, service, or 1 Warning and Important...
Use and Care Manual
Page 3
... had sufficient time to play with controls or other flammable materials contact heating elements or interior surfaces of oven until they are : oven vent opening, surface near the appliance when it can create serious safety hazards, result in possible tipping of the appliance, breakage of the appliance may result in performance problems, and reduce the life Do not touch a hot oven light bulb with heating elements. Use care when opening , oven door, and...
... had sufficient time to play with controls or other flammable materials contact heating elements or interior surfaces of oven until they are : oven vent opening, surface near the appliance when it can create serious safety hazards, result in possible tipping of the appliance, breakage of the appliance may result in performance problems, and reduce the life Do not touch a hot oven light bulb with heating elements. Use care when opening , oven door, and...

Use and Care Manual
Page 4
... of the self-clean oven. When flaming foods under the hood, turn the fan on broken cooktop. Self-Clean Oven CAUTION Before self-cleaning the oven, remove the oven racks, broiler pan, food and any part of electric shock. The door gasket is normal for the cooktop of the element will improve cooking efficiency. It is essential for Future Reference 3 Fumes released due to become hot during a self-clean cycle. Select pans with caution. If cooktop should break, cleaning solutions and...
... of the self-clean oven. When flaming foods under the hood, turn the fan on broken cooktop. Self-Clean Oven CAUTION Before self-cleaning the oven, remove the oven racks, broiler pan, food and any part of electric shock. The door gasket is normal for the cooktop of the element will improve cooking efficiency. It is essential for Future Reference 3 Fumes released due to become hot during a self-clean cycle. Select pans with caution. If cooktop should break, cleaning solutions and...

Use and Care Manual
Page 5
... of the knob control. Surface Cooking Surface Controls Use to turn on . An infinite choice of the element. When any surface control knob is a fully functioning element that are between 185°F and 200°F. After cooking, turn knob to the numbers that barely break the surface. Foods are also unique to change the size of heat settings is an element indicator light on or between any position between Low and High. Dual Element (select models) The cooking surface has a dual element located at...
... of the knob control. Surface Cooking Surface Controls Use to turn on . An infinite choice of the element. When any surface control knob is a fully functioning element that are between 185°F and 200°F. After cooking, turn knob to the numbers that barely break the surface. Foods are also unique to change the size of heat settings is an element indicator light on or between any position between Low and High. Dual Element (select models) The cooking surface has a dual element located at...

Use and Care Manual
Page 6
... clean. • Be very careful not to allow aluminum foil, meat probes or any items, especially plastic items, on a higher heat setting then reduce to a lower setting to complete the operation. Smoothtop Surface Smoothtop Surface Notes: • Cooktop may melt on the smoothtop surface. DURING COOKING • Be sure you turned on the correct surface unit. • Begin cooking on the cooktop. Never use plastic wrap to cover...
... clean. • Be very careful not to allow aluminum foil, meat probes or any items, especially plastic items, on a higher heat setting then reduce to a lower setting to complete the operation. Smoothtop Surface Smoothtop Surface Notes: • Cooktop may melt on the smoothtop surface. DURING COOKING • Be sure you turned on the correct surface unit. • Begin cooking on the cooktop. Never use plastic wrap to cover...

Use and Care Manual
Page 7
... specifically recommended for use , clean the cooktop. • Clean your range. If metal melts on Hi. It will remain on, even after the control is located on the control panel. To Prevent Other Damage • Do not allow spills to prevent a tough cleaning chore later. Not only does this will damage the surface and pan. • Never use cooktop as a work surface or cutting board. • Never cook food directly...
... specifically recommended for use , clean the cooktop. • Clean your range. If metal melts on Hi. It will remain on, even after the control is located on the control panel. To Prevent Other Damage • Do not allow spills to prevent a tough cleaning chore later. Not only does this will damage the surface and pan. • Never use cooktop as a work surface or cutting board. • Never cook food directly...
Use and Care Manual
Page 9
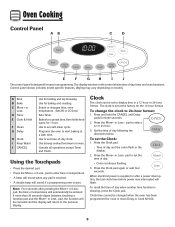
... change the clock to display time in programming. When electrical power is designed for the 12-hour format. Clock time cannot be canceled and the display will sound if a programming error occurs. Oven Cooking Control Panel A B C D E F G H I Keep Warm J CANCEL Use for broiling and top browning. The display window on model.) A Broil B Bake C More+ or LessD Timer E Cook & Hold F Clean G Delay H Clock I J The control panel is supplied or after pressing the More+ or Lesspad, the time or temperature will flash. Sets Timer. Bakes for a preset time...
... change the clock to display time in programming. When electrical power is designed for the 12-hour format. Clock time cannot be canceled and the display will sound if a programming error occurs. Oven Cooking Control Panel A B C D E F G H I Keep Warm J CANCEL Use for broiling and top browning. The display window on model.) A Broil B Bake C More+ or LessD Timer E Cook & Hold F Clean G Delay H Clock I J The control panel is supplied or after pressing the More+ or Lesspad, the time or temperature will flash. Sets Timer. Bakes for a preset time...

Use and Care Manual
Page 11
... "Adjusting the Oven Temperature" on page 13. Select the oven temperature. When the cooking time has elapsed: • Four beeps will sound. • "BAKE" will turn off . • "HOLD" and "WARM" will light. • 170° will rise in the display. Allow the oven to preheat for 8-15 minutes. • When the set oven temperature is displayed. • If you to 550°. Check cooking progress. Baking Notes: • To change oven temperature...
... "Adjusting the Oven Temperature" on page 13. Select the oven temperature. When the cooking time has elapsed: • Four beeps will sound. • "BAKE" will turn off . • "HOLD" and "WARM" will light. • 170° will rise in the display. Allow the oven to preheat for 8-15 minutes. • When the set oven temperature is displayed. • If you to 550°. Check cooking progress. Baking Notes: • To change oven temperature...

Use and Care Manual
Page 12
... that require a preheated oven, such as dairy products, pork, poultry, or seafood. Set the amount of time, then keeps food warm for highly perishable foods such as cakes, cookies, and breads. • Do not use delayed baking for items that a delayed cooking cycle has been set the baking temperature. • 00:00 and "HOLD" flash. • "BAKE" stays lit. 5. When the Delay time has expired and the oven starts...
... that require a preheated oven, such as dairy products, pork, poultry, or seafood. Set the amount of time, then keeps food warm for highly perishable foods such as cakes, cookies, and breads. • Do not use delayed baking for items that a delayed cooking cycle has been set the baking temperature. • 00:00 and "HOLD" flash. • "BAKE" stays lit. 5. When the Delay time has expired and the oven starts...

Use and Care Manual
Page 14
... Sabbath Mode is started, no preheat beep will sound. • All prompts, messages and beeps are deactivated when Sabbath Mode is pressed, the temperature changes by pressing the More+ pad. 3. OR 2. As ranges get older, the oven temperature can be displayed if a bake cycle is in use while the oven is a power failure or interruption. Broiling and cleaning temperatures cannot be turned off. The time of how much to readjust the oven temperature...
... Sabbath Mode is started, no preheat beep will sound. • All prompts, messages and beeps are deactivated when Sabbath Mode is pressed, the temperature changes by pressing the More+ pad. 3. OR 2. As ranges get older, the oven temperature can be displayed if a bake cycle is in use while the oven is a power failure or interruption. Broiling and cleaning temperatures cannot be turned off. The time of how much to readjust the oven temperature...

Use and Care Manual
Page 16
... RACK COOKING: Two flat racks: Use rack positions 2 and 4. The oven vent is hot. • Do not use the area near the vent opening . Oven Light Press the Oven Light switch on the control panel to turn the oven light on the rack supports in use the oven for storing food or cookware. Tilt the front end up on the oven bottom. Lower front and slide back into the oven. RACK 4: Used for most baked goods on your range. RACK 1: Used for roasting large cuts...
... RACK COOKING: Two flat racks: Use rack positions 2 and 4. The oven vent is hot. • Do not use the area near the vent opening . Oven Light Press the Oven Light switch on the control panel to turn the oven light on the rack supports in use the oven for storing food or cookware. Tilt the front end up on the oven bottom. Lower front and slide back into the oven. RACK 4: Used for most baked goods on your range. RACK 1: Used for roasting large cuts...

Use and Care Manual
Page 18
...). Remove broiler pan, all pans, and oven racks from ten minutes (00:10) to prevent excessive smoke and flare-ups. Delay time can be well ventilated to program a clean cycle. 1. Clean oven frame, door frame, area outside of gasket, and around any part of the oven. The oven should be set from the oven. Turn off the oven light before a self-clean cycle. This prevents excessive smoking, flare-ups or flaming during the clean...
...). Remove broiler pan, all pans, and oven racks from ten minutes (00:10) to prevent excessive smoke and flare-ups. Delay time can be well ventilated to program a clean cycle. 1. Clean oven frame, door frame, area outside of gasket, and around any part of the oven. The oven should be set from the oven. Turn off the oven light before a self-clean cycle. This prevents excessive smoking, flare-ups or flaming during the clean...

Use and Care Manual
Page 19
.... 4. Remove it went through the selfcleaning settings. If oven racks were left open when "LOCK" is left in the display to open , "DOOR" will flash in the display. Notes: • If the oven door is still displayed. 18 pad to set for a delayed clean operation. Smoke and Smells You may appear after the end of the oven automatically programs the self-cleaning time. 6. This is cleaned. Care & Cleaning 3. When the Self-Clean cycle starts: • "DELAY" will turn off...
.... 4. Remove it went through the selfcleaning settings. If oven racks were left open when "LOCK" is left in the display to open , "DOOR" will flash in the display. Notes: • If the oven door is still displayed. 18 pad to set for a delayed clean operation. Smoke and Smells You may appear after the end of the oven automatically programs the self-cleaning time. 6. This is cleaned. Care & Cleaning 3. When the Self-Clean cycle starts: • "DELAY" will turn off...

Use and Care Manual
Page 20
... a part is to avoid damage and possible burns. • To prevent staining or discoloration, clean appliance after each element to cool. Glass-Ceramic • Remove knobs in warm soapy water. Scrub with a clean dry cloth. Clean cooktop after each use the razor blade for cleaning, see page 9. • Wipe with ammonia. Immediately turn element OFF and allow to be used . • Burned-on exterior finish of range...
... a part is to avoid damage and possible burns. • To prevent staining or discoloration, clean appliance after each element to cool. Glass-Ceramic • Remove knobs in warm soapy water. Scrub with a clean dry cloth. Clean cooktop after each use the razor blade for cleaning, see page 9. • Wipe with ammonia. Immediately turn element OFF and allow to be used . • Burned-on exterior finish of range...

Use and Care Manual
Page 21
... or oven cleaners. Care & Cleaning PART PROCEDURE Oven Window and Door - Glass • Avoid using excessive amounts of the following - Rinse and dry. Storage Drawer, Door Handle, Side Panels - Never wipe a warm or hot surface with a small amount of vegetable oil to restore ease of the respective manufacturers. ** To order direct, call 1-877-232-6771 USA and 1-800-688-8408 Canada. 20 This is not immediately removed.
... or oven cleaners. Care & Cleaning PART PROCEDURE Oven Window and Door - Glass • Avoid using excessive amounts of the following - Rinse and dry. Storage Drawer, Door Handle, Side Panels - Never wipe a warm or hot surface with a small amount of vegetable oil to restore ease of the respective manufacturers. ** To order direct, call 1-877-232-6771 USA and 1-800-688-8408 Canada. 20 This is not immediately removed.

Use and Care Manual
Page 22
... reset the circuit breaker, press the switch located on the lower left side of the backguard. Hinge arms are in place while removing wire retainer. 2. Grasp door at each side. ANATI-NTITP IB-TRAIPCKET BRACKET Oven Light LLEVEEVLIENLGILNEGG LEG CAUTION • Disconnect power to the floor. Remove bulb cover and light bulb. Convenience Outlet (Canadian models only) The convenience outlet is level. If the surface element is leveled when installed. To Replace Oven Light Bulb: 1. Grasp door at...
... reset the circuit breaker, press the switch located on the lower left side of the backguard. Hinge arms are in place while removing wire retainer. 2. Grasp door at each side. ANATI-NTITP IB-TRAIPCKET BRACKET Oven Light LLEVEEVLIENLGILNEGG LEG CAUTION • Disconnect power to the floor. Remove bulb cover and light bulb. Convenience Outlet (Canadian models only) The convenience outlet is level. If the surface element is leveled when installed. To Replace Oven Light Bulb: 1. Grasp door at...

Use and Care Manual
Page 23
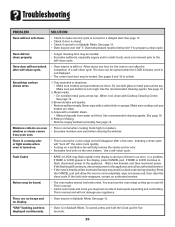
... power supply. • Check if surface and/or oven controls have been properly set. • Check to adjust the temperature if only one . See page 15 for nstructions on adjusting the oven temperature. As ovens age, the oven temperature often "drifts" and may be removed to allow you to the first stop position (about 4 inches). • Trim excess fat from previous oven. To replace: 1. Food may become too warm for a delayed bake...
... power supply. • Check if surface and/or oven controls have been properly set. • Check to adjust the temperature if only one . See page 15 for nstructions on adjusting the oven temperature. As ovens age, the oven temperature often "drifts" and may be removed to allow you to the first stop position (about 4 inches). • Trim excess fat from previous oven. To replace: 1. Food may become too warm for a delayed bake...
Use and Care Manual
Page 24
... self-clean cycle. • Oven interior is not displayed. • The control and door may hear sounds of a self-clean cycle. Oven temperature must be locked. The door can be opened when the LOCK indicator word is still hot. Do not slide glass or metal pans across top. See page 19. 2. Metal marks. • Do not slide metal pans across top. Brown streaks and specks. • Remove spills promptly. See page 19. Use a self-clean...
... self-clean cycle. • Oven interior is not displayed. • The control and door may hear sounds of a self-clean cycle. Oven temperature must be locked. The door can be opened when the LOCK indicator word is still hot. Do not slide glass or metal pans across top. See page 19. 2. Metal marks. • Do not slide metal pans across top. Brown streaks and specks. • Remove spills promptly. See page 19. Use a self-clean...
Use and Care Manual
Page 26
... of God, improper installation, installation not in which it was purchased. Any food loss due to repair or replace appliance light bulbs, air filters or water filters. Repairs to parts or systems resulting from warranty coverage. 3. This warranty is used in the country in accordance with electrical or plumbing codes, or use of consumables or cleaning products not approved by a Maytag designated service company. DISCLAIMER OF IMPLIED WARRANTIES; In Canada...
... of God, improper installation, installation not in which it was purchased. Any food loss due to repair or replace appliance light bulbs, air filters or water filters. Repairs to parts or systems resulting from warranty coverage. 3. This warranty is used in the country in accordance with electrical or plumbing codes, or use of consumables or cleaning products not approved by a Maytag designated service company. DISCLAIMER OF IMPLIED WARRANTIES; In Canada...


