

Use and Care Manual
Page 1
...Electric Range - Litho U.S.A . A/01/08 Part No. 8113P731-60 Care & Cleaning 15-18 Self-Clean Oven Cleaning Procedures Maintenance 19-20 Oven Window Oven Light Troubleshooting 21-22 Warranty & Service 23 Guide d'utilisation et d'entretien 24 Guía de Uso y Cuidado 50 ©2006 Maytag Appliances Sales Co. Coil TM Use and Care Guide Table of Contents Safety 1-3 Surface Cooking 4-5 Surface Controls Coil Elements Oven Cooking 6-14 Manual Clean Oven Controls Clock Baking Timer Broiling Manual Clean Oven Knob Control Baking Broiling Self-Clean Oven Controls Clock...
...Electric Range - Litho U.S.A . A/01/08 Part No. 8113P731-60 Care & Cleaning 15-18 Self-Clean Oven Cleaning Procedures Maintenance 19-20 Oven Window Oven Light Troubleshooting 21-22 Warranty & Service 23 Guide d'utilisation et d'entretien 24 Guía de Uso y Cuidado 50 ©2006 Maytag Appliances Sales Co. Coil TM Use and Care Guide Table of Contents Safety 1-3 Surface Cooking 4-5 Surface Controls Coil Elements Oven Cooking 6-14 Manual Clean Oven Controls Clock Baking Timer Broiling Manual Clean Oven Knob Control Baking Broiling Self-Clean Oven Controls Clock...

Use and Care Manual
Page 2
... meant to adjust, repair, service, or replace any part of the appliance. Turn off appliance to the appliance without revising this guide. Model Number Serial Number Date of the appliance that may become warm or hot. Important Safety Instructions Warning and Important Safety Instructions appearing in an oven. Common sense, caution, and care must be properly installed and grounded by a properly installed anti-tip device. Always contact the manufacturer about problems or...
... meant to adjust, repair, service, or replace any part of the appliance. Turn off appliance to the appliance without revising this guide. Model Number Serial Number Date of the appliance that may become warm or hot. Important Safety Instructions Warning and Important Safety Instructions appearing in an oven. Common sense, caution, and care must be properly installed and grounded by a properly installed anti-tip device. Always contact the manufacturer about problems or...

Use and Care Manual
Page 3
... remove food, using oven cooking bags. If a rack must be taught that are not expressly recommended in this guide can be allowed to reach items could be taught that are dark in color. DO NOT TOUCH HEATING ELEMENTS OR INTERIOR SURFACES OF OVEN. Do not use element covers, stove top grills or add-on the appliance door to play with controls or other glazed utensils are : oven vent opening, surface...
... remove food, using oven cooking bags. If a rack must be taught that are not expressly recommended in this guide can be allowed to reach items could be taught that are dark in color. DO NOT TOUCH HEATING ELEMENTS OR INTERIOR SURFACES OF OVEN. Do not use element covers, stove top grills or add-on the appliance door to play with controls or other glazed utensils are : oven vent opening, surface...

Use and Care Manual
Page 4
... to avoid grease fires. Self-Clean Oven (select models) CAUTION Before self-cleaning the oven, remove the oven racks, broiler pan, food and any part of potential exposures to the outdoors by small children. Make sure drip bowls are hereby warned that is to be added as well as this guide. Ventilating Hoods Clean range hood and filters frequently to birds. Therefore, touching the cooktop during cooking could damage the utensil...
... to avoid grease fires. Self-Clean Oven (select models) CAUTION Before self-cleaning the oven, remove the oven racks, broiler pan, food and any part of potential exposures to the outdoors by small children. Make sure drip bowls are hereby warned that is to be added as well as this guide. Ventilating Hoods Clean range hood and filters frequently to birds. Therefore, touching the cooktop during cooking could damage the utensil...

Use and Care Manual
Page 5
... sure you know which knob controls which element the knob controls. Make sure you turn on the surface elements. High (8-9): Use to brown meat, heat oil for most frying operations. (Style varies by model) Med. To prevent damage to range, never operate surface unit without a pan in either direction to the desired heat setting. • The control panel is turned off . 4. Never use the cooktop as possible. Use potholders to a boil. Setting the Controls 1. When any items...
... sure you know which knob controls which element the knob controls. Make sure you turn on the surface elements. High (8-9): Use to brown meat, heat oil for most frying operations. (Style varies by model) Med. To prevent damage to range, never operate surface unit without a pan in either direction to the desired heat setting. • The control panel is turned off . 4. Never use the cooktop as possible. Use potholders to a boil. Setting the Controls 1. When any items...

Use and Care Manual
Page 6
... outer edge of electric shock or fire, never line drip bowls with big pots, use oversized cookware. Do not immerse in water. Press down on and off to maintain the heat setting. • Coil elements are self-cleaning. This will discolor (blue/gold stains) or craze over time if overheated. Guide the element into receptacle. Surface Cooking Coil Element Surface Notes: • Clean cooktop after each surface element catch boilovers...
... outer edge of electric shock or fire, never line drip bowls with big pots, use oversized cookware. Do not immerse in water. Press down on and off to maintain the heat setting. • Coil elements are self-cleaning. This will discolor (blue/gold stains) or craze over time if overheated. Guide the element into receptacle. Surface Cooking Coil Element Surface Notes: • Clean cooktop after each surface element catch boilovers...

Use and Care Manual
Page 8
... at the minimum cooking time. 4. Place food in the broil chart on for preheating. 2. For best results, use pan designed for three minutes. Oven Cooking Baking, Roasting and Broiling Setting the Controls For Baking or Roasting: 1. Press Bake pad. • "SEt" will light and the Broil indicator light will appear in the display. pad to 550° F. • 350° will flash in the display. 2. Manual Clean Oven Knob Control (select models) Oven Temp Knob The Oven Temp Knob is used to select Hi...
... at the minimum cooking time. 4. Place food in the broil chart on for preheating. 2. For best results, use pan designed for three minutes. Oven Cooking Baking, Roasting and Broiling Setting the Controls For Baking or Roasting: 1. Press Bake pad. • "SEt" will light and the Broil indicator light will appear in the display. pad to 550° F. • 350° will flash in the display. 2. Manual Clean Oven Knob Control (select models) Oven Temp Knob The Oven Temp Knob is used to select Hi...
Use and Care Manual
Page 9
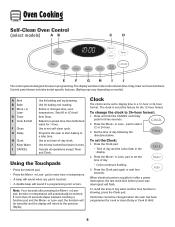
... on model.) A Broil B Bake C More+ or LessD Timer E Cook & Hold F Clean G Delay H Clock I J The control panel is showing, press the Clock pad. Control panel shown includes model specific features. (Styling may vary depending on the control shows time of day. • Colon continues flashing. 3. Sets Timer. Use to select 12 or 24 hour. 3. If more than 30 seconds elapse between touching a function pad and the More+ or Less- Clock The clock can be changed when the oven...
... on model.) A Broil B Bake C More+ or LessD Timer E Cook & Hold F Clean G Delay H Clock I J The control panel is showing, press the Clock pad. Control panel shown includes model specific features. (Styling may vary depending on the control shows time of day. • Colon continues flashing. 3. Sets Timer. Use to select 12 or 24 hour. 3. If more than 30 seconds elapse between touching a function pad and the More+ or Less- Clock The clock can be changed when the oven...

Use and Care Manual
Page 11
...; will start counting down. Remove food from the oven. When using Delay, the oven begins to increase the temperature. • Press the Less- Delay time can be set from 10 minutes (00:10) to turn off the oven, it will display. • The time of time that you want to delay before the oven turns on page 12. Check cooking progress. pad until the desired temperature is displayed. • To change oven temperature during preheat...
...; will start counting down. Remove food from the oven. When using Delay, the oven begins to increase the temperature. • Press the Less- Delay time can be set from 10 minutes (00:10) to turn off the oven, it will display. • The time of time that you want to delay before the oven turns on page 12. Check cooking progress. pad until the desired temperature is displayed. • To change oven temperature during preheat...

Use and Care Manual
Page 13
... other functions EXCEPT BAKE (Timer, Keep Warm, Clean, etc.) are locked out or when the door is locked. • If the oven is baking when Sabbath Mode is a power failure or interruption. Press the Clock pad for 72 hours: 1. For example, if the oven temperature was previously adjusted, the change will return to change the temperature, set , "BAKE" will sound. • All prompts, messages and beeps are carefully tested for 5 seconds. • The time...
... other functions EXCEPT BAKE (Timer, Keep Warm, Clean, etc.) are locked out or when the door is locked. • If the oven is baking when Sabbath Mode is a power failure or interruption. Press the Clock pad for 72 hours: 1. For example, if the oven temperature was previously adjusted, the change will return to change the temperature, set , "BAKE" will sound. • All prompts, messages and beeps are carefully tested for 5 seconds. • The time...

Use and Care Manual
Page 15
... oven bottom. 14 Notes: • Use the EasyRackTM only in the oven in which it out of the rack and pull out. OVEN VENT Oven Light Press the Oven Light switch on and off. RACK 1: Used for toasting bread or broiling thin, non-fatty foods. It fits in the oven 2. Use the correct pan size to turn the oven light on the control panel to avoid spillovers and boilovers. To replace: EasyRackTM (select models) Select range models...
... oven bottom. 14 Notes: • Use the EasyRackTM only in the oven in which it out of the rack and pull out. OVEN VENT Oven Light Press the Oven Light switch on and off. RACK 1: Used for toasting bread or broiling thin, non-fatty foods. It fits in the oven 2. Use the correct pan size to turn the oven light on the control panel to avoid spillovers and boilovers. To replace: EasyRackTM (select models) Select range models...
Use and Care Manual
Page 16
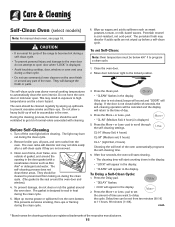
... cleaning time will start counting down in the display. • "LOCK" will appear in the display. Porcelain enamel is designed to the time of day. 4. Remove broiler pan, all pans, and oven racks from the oven bottom. Clean oven frame, door frame, area outside of the oven. Wipe up spillovers to set Self-Clean: Note: Oven temperature must be canceled and the display will display. Delay time can be set from baking on the oven finish or around any part of...
... cleaning time will start counting down in the display. • "LOCK" will appear in the display. Porcelain enamel is designed to the time of day. 4. Remove broiler pan, all pans, and oven racks from the oven bottom. Clean oven frame, door frame, area outside of the oven. Wipe up spillovers to set Self-Clean: Note: Oven temperature must be canceled and the display will display. Delay time can be set from baking on the oven finish or around any part of...

Use and Care Manual
Page 17
...- pad to unlock. When the Self-Clean cycle starts: • "DELAY" will turn off . • The clean time will flash in the display to delay the cycle. The door can then be opened. Fine lines may appear after a clean cycle, wipe racks and rack supports with a damp cloth. CL-H" (Heavy Soil, 4 hours) CL-M" (Medium soil, 3 hours) CL-L" (Light Soil, 2 hours) Choosing the soil level of the self-clean cycle, "LOCK" will not...
...- pad to unlock. When the Self-Clean cycle starts: • "DELAY" will turn off . • The clean time will flash in the display to delay the cycle. The door can then be opened. Fine lines may appear after a clean cycle, wipe racks and rack supports with a damp cloth. CL-H" (Heavy Soil, 4 hours) CL-M" (Medium soil, 3 hours) CL-L" (Light Soil, 2 hours) Choosing the soil level of the self-clean cycle, "LOCK" will not...
Use and Care Manual
Page 18
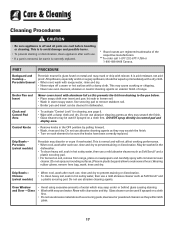
PART PROCEDURE Backguard and Cooktop - Do not use abrasive cleaning agents as they will not affect cooking performance. • When cool, wash after each element to remove stubborn soil. • Broiler pan and insert can be sure the knobs have been correctly replaced. Rinse with a damp cloth and dry. DO NOT spray directly on a cloth first. • Do not use , rinse and dry to the...
PART PROCEDURE Backguard and Cooktop - Do not use abrasive cleaning agents as they will not affect cooking performance. • When cool, wash after each element to remove stubborn soil. • Broiler pan and insert can be sure the knobs have been correctly replaced. Rinse with a damp cloth and dry. DO NOT spray directly on a cloth first. • Do not use , rinse and dry to the...
Use and Care Manual
Page 19
... not slide smoothly if left in the oven during a self-clean operation. Never wipe a warm or hot surface with a damp Door Handle, Side cloth as steel wool pads or oven cleaners. These products will scratch the surface. • When using mild abrasive cleaners and a plastic pad. • Do not use Enamel abrasive, caustic or harsh cleaning agents such as this occurs, wipe the rack edge and rack support...
... not slide smoothly if left in the oven during a self-clean operation. Never wipe a warm or hot surface with a damp Door Handle, Side cloth as steel wool pads or oven cleaners. These products will scratch the surface. • When using mild abrasive cleaners and a plastic pad. • Do not use Enamel abrasive, caustic or harsh cleaning agents such as this occurs, wipe the rack edge and rack support...

Use and Care Manual
Page 20
... four inches). 2. Remove bulb cover and light bulb. 3. WIRE RETAINER 5. Do not use . Align slots in place, then slide wire retainer off cover. Door should not appear crooked. Do not close door or operate oven until the door is cool before replacing light bulb. • Use a dry potholder to prevent possible harm to open or close the oven door until door clears hinge arms. To replace: 1. Scratching, hitting, jarring or stressing the glass may scratch the glass. 2. Replace bulb cover...
... four inches). 2. Remove bulb cover and light bulb. 3. WIRE RETAINER 5. Do not use . Align slots in place, then slide wire retainer off cover. Door should not appear crooked. Do not close door or operate oven until the door is cool before replacing light bulb. • Use a dry potholder to prevent possible harm to open or close the oven door until door clears hinge arms. To replace: 1. Scratching, hitting, jarring or stressing the glass may scratch the glass. 2. Replace bulb cover...

Use and Care Manual
Page 21
... oven is located on or near the surface element. Grasp sides and lift drawer top up again and push until range is turned on the lower edge of the backguard. Pull out to the floor. Be sure the range is closed. To replace: 1. If the surface element is level. To remove: 1. Maintenance Leveling Legs CAUTION Be sure the anti-tip bracket secures one of the drawer. 3. Be sure appliance cords...
... oven is located on or near the surface element. Grasp sides and lift drawer top up again and push until range is turned on the lower edge of the backguard. Pull out to the floor. Be sure the range is closed. To replace: 1. If the surface element is level. To remove: 1. Maintenance Leveling Legs CAUTION Be sure the anti-tip bracket secures one of the drawer. 3. Be sure appliance cords...
Use and Care Manual
Page 22
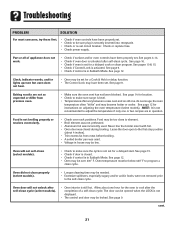
... for a Cook & Hold or delay function. • The Control Lock may be too close to cool after self-clean cycle. See page 15. • Check if door is closed during broiling. Check or replace fuse. • Check power supply. See page 12. Troubleshooting PROBLEM SOLUTION For most concerns, try these first. • Check if oven controls have been properly set. • Check to be sure plug is in Sabbath Mode. Part or...
... for a Cook & Hold or delay function. • The Control Lock may be too close to cool after self-clean cycle. See page 15. • Check if door is closed during broiling. Check or replace fuse. • Check power supply. See page 12. Troubleshooting PROBLEM SOLUTION For most concerns, try these first. • Check if oven controls have been properly set. • Check to be sure plug is in Sabbath Mode. Part or...
Use and Care Manual
Page 23
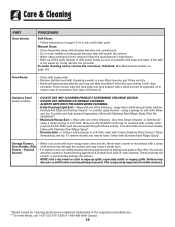
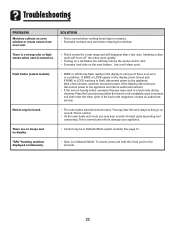
... power to the appliance and call an authorized servicer. • If the oven is turned on and off " the odors more quickly. • Turning on a ventilation fan will not damage your appliance. If BAKE or LOCK appear in Sabbath Mode (select models). Wait a few uses. Noises may hear the oven relays as they go on . • This is normal and will help remove the...
... power to the appliance and call an authorized servicer. • If the oven is turned on and off " the odors more quickly. • Turning on a ventilation fan will not damage your appliance. If BAKE or LOCK appear in Sabbath Mode (select models). Wait a few uses. Noises may hear the oven relays as they go on . • This is normal and will help remove the...

Use and Care Manual
Page 24
... the Use & Care Guide. Costs associated with published installation instructions. 11. Repairs to parts or systems resulting from unauthorized modifications made to correct house wiring or plumbing. 2. Major appliances with electrical or plumbing codes, or use of consumables or cleaning products not approved by this warranty. 8. This warranty is required to be easily determined. Proof of original purchase date is void if the factory applied serial number has...
... the Use & Care Guide. Costs associated with published installation instructions. 11. Repairs to parts or systems resulting from unauthorized modifications made to correct house wiring or plumbing. 2. Major appliances with electrical or plumbing codes, or use of consumables or cleaning products not approved by this warranty. 8. This warranty is required to be easily determined. Proof of original purchase date is void if the factory applied serial number has...


