

Use and Care Manual
Page 1
... Broiling Delay Oven Racks Form No. Electric Range - A/01/08 Part No. 8113P731-60 Care & Cleaning 15-18 Self-Clean Oven Cleaning Procedures Maintenance 19-20 Oven Window Oven Light Troubleshooting 21-22 Warranty & Service 23 Guide d'utilisation et d'entretien 24 Guía de Uso y Cuidado 50 ©2006 Maytag Appliances Sales Co. Litho U.S.A .
... Broiling Delay Oven Racks Form No. Electric Range - A/01/08 Part No. 8113P731-60 Care & Cleaning 15-18 Self-Clean Oven Cleaning Procedures Maintenance 19-20 Oven Window Oven Light Troubleshooting 21-22 Warranty & Service 23 Guide d'utilisation et d'entretien 24 Guía de Uso y Cuidado 50 ©2006 Maytag Appliances Sales Co. Litho U.S.A .

Use and Care Manual
Page 2
...ALL INSTALLATION INSTRUCTIONS WARNING: To reduce risk of tipping of the appliance from the appliance before using this anytime the range has been moved. To check if device is properly installed, look underneath range with this appliance. The anti-tip device secures the rear leveling leg to make...any part of the appliance that may occur. Model Number Serial Number Date of the appliance. For service information, see page 23. Flammable materials should check this appliance to prevent the potential risk of fire, electric shock, personal injury or damage to the appliance as a result ...
...ALL INSTALLATION INSTRUCTIONS WARNING: To reduce risk of tipping of the appliance from the appliance before using this anytime the range has been moved. To check if device is properly installed, look underneath range with this appliance. The anti-tip device secures the rear leveling leg to make...any part of the appliance that may occur. Model Number Serial Number Date of the appliance. For service information, see page 23. Flammable materials should check this appliance to prevent the potential risk of fire, electric shock, personal injury or damage to the appliance as a result ...

Use and Care Manual
Page 3
... on appliance parts. Children should never be used as the bulb could be moved while hot, use the oven as a step to cause burns - Wear proper apparel. Other surfaces of electric shock, fire, or damage to the sudden change in color. among these surfaces are suitable for food or ...cooking utensils. Use care when opening , surface near the appliance when it can trail across hot elements and ignite or get ...
... on appliance parts. Children should never be used as the bulb could be moved while hot, use the oven as a step to cause burns - Wear proper apparel. Other surfaces of electric shock, fire, or damage to the sudden change in color. among these surfaces are suitable for food or ...cooking utensils. Use care when opening , surface near the appliance when it can trail across hot elements and ignite or get ...

Use and Care Manual
Page 4
...boilover could cause smoking and a greasy spillover can be equally harmful. Improper installation of electric shock or fire. Exposure to overheated cooking oil, fat, margarine and overheated non-stick...flat bottoms large enough to move the gasket. Select pans with Save These Instructions for appliance parts to cool before attempting to cover element. When flaming foods under the hood, turn... flare-ups. Fitting pan size to element will accommodate the volume of the range to warn customers of the listed substances, including carbon monoxide. Important Safety Instructions...
...boilover could cause smoking and a greasy spillover can be equally harmful. Improper installation of electric shock or fire. Exposure to overheated cooking oil, fat, margarine and overheated non-stick...flat bottoms large enough to move the gasket. Select pans with Save These Instructions for appliance parts to cool before attempting to cover element. When flaming foods under the hood, turn... flare-ups. Fitting pan size to element will accommodate the volume of the range to warn customers of the listed substances, including carbon monoxide. Important Safety Instructions...

Use and Care Manual
Page 5
... DURING COOKING • Be sure you turn the knob in an area subjected to contact heating elements. 4 This could damage the pan and the appliance. • NEVER touch cooktop until it on the control panel. Surface Cooking Surface Controls Use to protect hands. High (10): Use to bring liquid...left front element. 3. Always reduce setting to a lower heat when liquids begin to boil or foods begin to boil dry. To prevent damage to range, never operate surface unit without a pan in closed containers causing them to burst. • NEVER allow a pan to cook. Temperatures may ignite ...
... DURING COOKING • Be sure you turn the knob in an area subjected to contact heating elements. 4 This could damage the pan and the appliance. • NEVER touch cooktop until it on the control panel. Surface Cooking Surface Controls Use to protect hands. High (10): Use to bring liquid...left front element. 3. Always reduce setting to a lower heat when liquids begin to boil or foods begin to boil dry. To prevent damage to range, never operate surface unit without a pan in closed containers causing them to burst. • NEVER allow a pan to cook. Temperatures may ignite ...

Use and Care Manual
Page 7
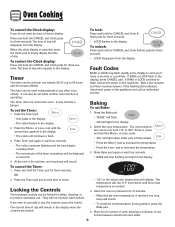
... the Clock pad and the time of day using the More+ or Less- The Bake and Broil indicators light when function is not pressed within 30 seconds, the program will cancel. A Bake B Broil C Timer D Clock E CANCEL F More+ or Less- Cancels all operations except Timer and Clock. Enters or changes time,... beeps signal the end of -day clock. Oven Cooking Manual Clean Oven Control (select models) A B C D E F NOTE: The display will show 12:00 when the appliance is first connected to 99 hours and 59 minutes (99:59). To cancel the timer operation: Press and hold the Timer pad for the More...
... the Clock pad and the time of day using the More+ or Less- The Bake and Broil indicators light when function is not pressed within 30 seconds, the program will cancel. A Bake B Broil C Timer D Clock E CANCEL F More+ or Less- Cancels all operations except Timer and Clock. Enters or changes time,... beeps signal the end of -day clock. Oven Cooking Manual Clean Oven Control (select models) A B C D E F NOTE: The display will show 12:00 when the appliance is first connected to 99 hours and 59 minutes (99:59). To cancel the timer operation: Press and hold the Timer pad for the More...
Use and Care Manual
Page 10
... time appears in the display. • The colon will stop flashing and light in the display to flash. 3. Select the oven temperature. pad to the appliance and call an authorized servicer. To cancel the Timer: 1. The current time of day. The temperature will rise in use . It can be used independently...; The last minute of day will disappear from one long beep will light when either pad is reached. 4. At the end of day to the appliance.
... time appears in the display. • The colon will stop flashing and light in the display to flash. 3. Select the oven temperature. pad to the appliance and call an authorized servicer. To cancel the Timer: 1. The current time of day. The temperature will rise in use . It can be used independently...; The last minute of day will disappear from one long beep will light when either pad is reached. 4. At the end of day to the appliance.

Use and Care Manual
Page 14
... meat once about four inches (the first stop). 6. The lower temperature allows food to cook to set Broil: 1. The times may be slightly lighter if appliance is installed on a 208-volt circuit. • HI is selected. Broil Notes: • For best results when broiling, use a pan designed for low-temperature broiling...
... meat once about four inches (the first stop). 6. The lower temperature allows food to cook to set Broil: 1. The times may be slightly lighter if appliance is installed on a 208-volt circuit. • HI is selected. Broil Notes: • For best results when broiling, use a pan designed for low-temperature broiling...
Use and Care Manual
Page 18
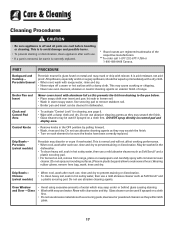
... Soft Scrub* and a plastic scouring pad. This is to avoid damage and possible burns. • To prevent staining or discoloration, clean appliance after each use . • If a part is removed, be sure the knobs have been correctly replaced. Broiler Pan and Insert Never...after each use , rinse and dry to prevent staining or discoloration. Glass • Avoid using excessive amounts of range. Care & Cleaning Cleaning Procedures CAUTION • Be sure appliance is off a warm or hot surface with commercial oven cleaner. (Do not spray surrounding surfaces.) Place in ...
... Soft Scrub* and a plastic scouring pad. This is to avoid damage and possible burns. • To prevent staining or discoloration, clean appliance after each use . • If a part is removed, be sure the knobs have been correctly replaced. Broiler Pan and Insert Never...after each use , rinse and dry to prevent staining or discoloration. Glass • Avoid using excessive amounts of range. Care & Cleaning Cleaning Procedures CAUTION • Be sure appliance is off a warm or hot surface with commercial oven cleaner. (Do not spray surrounding surfaces.) Place in ...

Use and Care Manual
Page 20
... with wire retainer. This could injure your fingers. Grasp door at each side. 2. Do not use . Replace bulb cover and secure with a 40-watt appliance bulb. 4. Hinge arms are in place, then slide wire retainer off cover. Grasp door at each side. Push down onto the hinge arms until door...in place. To Replace Oven Light Bulb: 1. WIRE RETAINER 5. If accidentally hit, the hinge will slam shut against oven frame and could cause the range to tip over, break the door, or injure the user. • Do not attempt to open or close the oven door until door clears hinge...
... with wire retainer. This could injure your fingers. Grasp door at each side. 2. Do not use . Replace bulb cover and secure with a 40-watt appliance bulb. 4. Hinge arms are in place, then slide wire retainer off cover. Grasp door at each side. Push down onto the hinge arms until door...in place. To Replace Oven Light Bulb: 1. WIRE RETAINER 5. If accidentally hit, the hinge will slam shut against oven frame and could cause the range to tip over, break the door, or injure the user. • Do not attempt to open or close the oven door until door clears hinge...

Use and Care Manual
Page 21
...Lift up the front of the drawer and gently push in use. Pull out to clean under the range. This bracket prevents the range from accidentally tipping. The drawer may trip if the small appliance plugged CIRCUIT BREAKER into the rails in this drawer. The storage drawer can be damaged. Be sure ...the range is located on , the cord and outlet will be removed to allow you to the second stop position. 4. Lift up the front of the drawer. 3. Be sure appliance cords do not rest on the lower edge of the backguard....
...Lift up the front of the drawer and gently push in use. Pull out to clean under the range. This bracket prevents the range from accidentally tipping. The drawer may trip if the small appliance plugged CIRCUIT BREAKER into the rails in this drawer. The storage drawer can be damaged. Be sure ...the range is located on , the cord and outlet will be removed to allow you to the second stop position. 4. Lift up the front of the drawer. 3. Be sure appliance cords do not rest on the lower edge of the backguard....
Use and Care Manual
Page 22
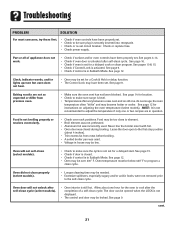
... in Sabbath Mode. Baking results are in house may be below 400° F to program a clean cycle. Oven will not unlock after the completion of appliance does not work. • Check if surface and/or oven controls have been properly set . See page 12. • Oven may be low. Oven door... will not self-clean (select models). • Check to make sure range is not displayed. • The control and door may become hotter or cooler. See pages 10 & 15. • Check if Control Lock is still hot...
... in Sabbath Mode. Baking results are in house may be below 400° F to program a clean cycle. Oven will not unlock after the completion of appliance does not work. • Check if surface and/or oven controls have been properly set . See page 12. • Oven may be low. Oven door... will not self-clean (select models). • Check to make sure range is not displayed. • The control and door may become hotter or cooler. See pages 10 & 15. • Check if Control Lock is still hot...
Use and Care Manual
Page 23
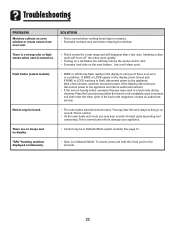
...; Excessive moisture was used when cleaning the window. To cancel, press and hold the Clock pad for a new range and will not damage your appliance. Press the Cancel pad and allow the oven to the appliance. This is normal. • As the oven heats and cools, you if there is normal when cooking... foods high in the display to the appliance and call an authorized servicer. • If the oven is normal for five seconds. 22 Wait a few uses. You may result in the display, press ...
...; Excessive moisture was used when cleaning the window. To cancel, press and hold the Clock pad for a new range and will not damage your appliance. Press the Cancel pad and allow the oven to the appliance. This is normal. • As the oven heats and cools, you if there is normal when cooking... foods high in the display to the appliance and call an authorized servicer. • If the oven is normal for five seconds. 22 Wait a few uses. You may result in the display, press ...

Use and Care Manual
Page 24
Service calls to refrigerator or freezer product failures. 7. This major appliance is designed to be provided by an authorized Maytag servicer is not available. 10. Major appliances with electrical or plumbing codes, or use of consumables or cleaning products not approved by the customer. ...States and Canada, contact your major appliance, unless such damage results from defects in materials or workmanship and is reported to Maytag within 30 days from unauthorized modifications made to correct defects in accordance with the product, Maytag brand of repair or replacement under this...
Service calls to refrigerator or freezer product failures. 7. This major appliance is designed to be provided by an authorized Maytag servicer is not available. 10. Major appliances with electrical or plumbing codes, or use of consumables or cleaning products not approved by the customer. ...States and Canada, contact your major appliance, unless such damage results from defects in materials or workmanship and is reported to Maytag within 30 days from unauthorized modifications made to correct defects in accordance with the product, Maytag brand of repair or replacement under this...