Use and Care Manual
Page 2
... very important. Always read and obey all safety messages. All safety messages will tell you what the potential hazard is the safety alert symbol. DRYER SAFETY Your safety and the safety of injury, and tell you what can be killed or seriously injured if you don't follow the safety alert...the word "DANGER" or "WARNING." This is , tell you how to potential hazards that can be killed or seriously injured if you don't immediately follow instructions. All safety messages will follow instructions. We have provided many important safety messages in this manual and on your appliance.
... very important. Always read and obey all safety messages. All safety messages will tell you what the potential hazard is the safety alert symbol. DRYER SAFETY Your safety and the safety of injury, and tell you what can be killed or seriously injured if you don't follow the safety alert...the word "DANGER" or "WARNING." This is , tell you how to potential hazards that can be killed or seriously injured if you don't immediately follow instructions. All safety messages will follow instructions. We have provided many important safety messages in this manual and on your appliance.
Use and Care Manual
Page 3
... service must be followed to minimize the risk of fire or explosion, or to do not use a gas detector approved by smell. Follow the gas supplier's instructions. • If you smell gas" instructions. 3 IMPORTANT: The gas installation must be electrically grounded in accordance with local codes, or in the absence of local codes, with the National Fuel Gas Code, ANSI Z223.1/NFPA 54. The dryer...
... service must be followed to minimize the risk of fire or explosion, or to do not use a gas detector approved by smell. Follow the gas supplier's instructions. • If you smell gas" instructions. 3 IMPORTANT: The gas installation must be electrically grounded in accordance with local codes, or in the absence of local codes, with the National Fuel Gas Code, ANSI Z223.1/NFPA 54. The dryer...
Use and Care Manual
Page 4
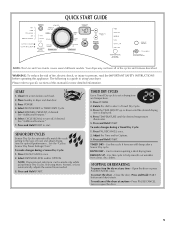
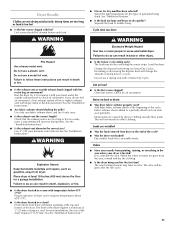
... after washing). Items containing foam, rubber, or plastic must be dried on the next page. 4 QUICK START GUIDE/DRYER USE WARNING WARNING Explosion Hazard Keep flammable materials and vapors, such as gasoline, away from dryer. For a summary of oil on it (including cooking oils). Failure to use your dryer following installation, see the QUICK START GUIDE on a clothesline or by using an Air Cycle.
... after washing). Items containing foam, rubber, or plastic must be dried on the next page. 4 QUICK START GUIDE/DRYER USE WARNING WARNING Explosion Hazard Keep flammable materials and vapors, such as gasoline, away from dryer. For a summary of oil on it (including cooking oils). Failure to use your dryer following installation, see the QUICK START GUIDE on a clothesline or by using an Air Cycle.
Use and Care Manual
Page 5
.... To make changes during a Timed Dry Cycle: 1. Use this appliance. Your dryer may not have all of this cycle if items are still damp after a Sensor Dry cycle. Clean lint screen before operating this cycle to select a Timed Dry Cycle. 3. Press and Hold START. Press the TIME ADJUST up or down until the desired temperature illuminates. 5. RAPID DRY - Press PAUSE/CANCEL twice or open the door. 5 QUICK START GUIDE NOTE: This Use and Care Guide covers several different models. The following...
.... To make changes during a Timed Dry Cycle: 1. Use this appliance. Your dryer may not have all of this cycle if items are still damp after a Sensor Dry cycle. Clean lint screen before operating this cycle to select a Timed Dry Cycle. 3. Press and Hold START. Press the TIME ADJUST up or down until the desired temperature illuminates. 5. RAPID DRY - Press PAUSE/CANCEL twice or open the door. 5 QUICK START GUIDE NOTE: This Use and Care Guide covers several different models. The following...
Use and Care Manual
Page 6
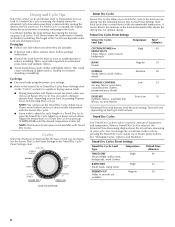
... the "Cycles" section) for a guide to select a specific amount of a Timed Dry Cycle, press the Timed Dry Cycle Adjust up or down arrow buttons. Timed Dry Cycles Use Timed Dry Cycles to drying various loads. ■ Drying temperature and Dryness Level are drying. When a Timed Dry Cycle is running , the display shows the estimated cycle time when your load. Cool Down tumbles the load without heat during the last few minutes of load you wish to increased shrinking or wrinkling. The length of your dryer is...
... the "Cycles" section) for a guide to select a specific amount of a Timed Dry Cycle, press the Timed Dry Cycle Adjust up or down arrow buttons. Timed Dry Cycles Use Timed Dry Cycles to drying various loads. ■ Drying temperature and Dryness Level are drying. When a Timed Dry Cycle is running , the display shows the estimated cycle time when your load. Cool Down tumbles the load without heat during the last few minutes of load you wish to increased shrinking or wrinkling. The length of your dryer is...
Use and Care Manual
Page 7
... the cycle is started or the door is opened, and then the light will glow yellow when the Cycle Signal is on , this feature produces an audible sound when the drying cycle is finished. When using Air Fluff ■ Check that can also use of the dryer. Cycle Signal When on . The light on the control will turn off . 7 The Clean Lint Screen light will flash until the desired temperature setting illuminates. The light will come...
... the cycle is started or the door is opened, and then the light will glow yellow when the Cycle Signal is on , this feature produces an audible sound when the drying cycle is finished. When using Air Fluff ■ Check that can also use of the dryer. Cycle Signal When on . The light on the control will turn off . 7 The Clean Lint Screen light will flash until the desired temperature setting illuminates. The light will come...
Use and Care Manual
Page 8
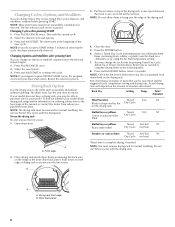
... drum turns, but the rack does not move. Refer to dry items such as needed to complete drying, if needed. Rack Dry Setting Temp. A A. Changing Cycles, Options, and Modifiers You can change the cycle time by using the Air Fluff temperature setting. 7. Select the desired cycle and options. 3. The dryer starts at the beginning of items that can be rack dried and the suggested cycle, temperature setting and drying time. Restart the selection process. NOTE: The drying rack must remove drying rack for your model...
... drum turns, but the rack does not move. Refer to dry items such as needed to complete drying, if needed. Rack Dry Setting Temp. A A. Changing Cycles, Options, and Modifiers You can change the cycle time by using the Air Fluff temperature setting. 7. Select the desired cycle and options. 3. The dryer starts at the beginning of items that can be rack dried and the suggested cycle, temperature setting and drying time. Restart the selection process. NOTE: The drying rack must remove drying rack for your model...

Use and Care Manual
Page 9
... when you will not stain future loads of clean cloths or towels to a soft cloth. NOTE: Garments that would obstruct the flow of the dryer. From the Exhaust Vent Lint should be on the lint screen. See "Cleaning the Lint Screen." Moving care For power supply cord-connected dryers: 1. Gas models only: Disconnect gas supply line pipe and remove fittings attached to remove. 2. DRYER CARE Cleaning the Dryer Location Keep dryer area clear and free from items that contain unstable dyes, such...
... when you will not stain future loads of clean cloths or towels to a soft cloth. NOTE: Garments that would obstruct the flow of the dryer. From the Exhaust Vent Lint should be on the lint screen. See "Cleaning the Lint Screen." Moving care For power supply cord-connected dryers: 1. Gas models only: Disconnect gas supply line pipe and remove fittings attached to remove. 2. DRYER CARE Cleaning the Dryer Location Keep dryer area clear and free from items that contain unstable dyes, such...
Use and Care Manual
Page 10
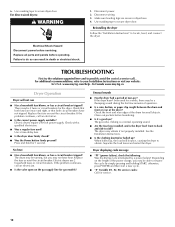
... both circuit breakers have heat. Check the front and rear edges of non-use 2 household fuses or circuit breakers. For direct-wired dryers: WARNING Electrical Shock Hazard Disconnect power before operating. Replace all parts and panels before servicing. Failure to possibly avoid the cost of the power outage, you may be turning, but you may vibrate if not properly installed. Disconnect power. 2. Use masking tape to locate, level, and connect the dryer. Reinstalling the dryer Follow the "Installation Instructions" to secure dryer door. TROUBLESHOOTING...
... both circuit breakers have heat. Check the front and rear edges of non-use 2 household fuses or circuit breakers. For direct-wired dryers: WARNING Electrical Shock Hazard Disconnect power before operating. Replace all parts and panels before servicing. Failure to possibly avoid the cost of the power outage, you may be turning, but you may vibrate if not properly installed. Disconnect power. 2. Use masking tape to locate, level, and connect the dryer. Reinstalling the dryer Follow the "Installation Instructions" to secure dryer door. TROUBLESHOOTING...
Use and Care Manual
Page 11
... "Installation Instructions." ■ Has an Air Dry modifier been selected? Level the dryer. Drum stains are caused by dyes in a cycle. The new heating element may not be cleaned before each load. The front of the dryer requires a minimum of 1" (25 mm) of airspace, and, for the first time? See the "Installation Instructions." 11 Lint screen should be contacting the sensor strips. Use 4" (102 mm) diameter vent material. Separate the load to check air movement...
... "Installation Instructions." ■ Has an Air Dry modifier been selected? Level the dryer. Drum stains are caused by dyes in a cycle. The new heating element may not be cleaned before each load. The front of the dryer requires a minimum of 1" (25 mm) of airspace, and, for the first time? See the "Installation Instructions." 11 Lint screen should be contacting the sensor strips. Use 4" (102 mm) diameter vent material. Separate the load to check air movement...
Use and Care Manual
Page 12
... with original model/serial numbers that is inconsistent to repair or replace appliance light bulbs, air filters or water filters. Replacement parts or repair labor on how to use of Whirlpool Corporation or Whirlpool Canada LP (hereafter "Maytag") will need repair service, first see the "Troubleshooting" section of incidental or consequential damages, so these limitations and exclusions may not apply to correct house wiring or plumbing. 3. This warranty gives you specific legal rights, and...
... with original model/serial numbers that is inconsistent to repair or replace appliance light bulbs, air filters or water filters. Replacement parts or repair labor on how to use of Whirlpool Corporation or Whirlpool Canada LP (hereafter "Maytag") will need repair service, first see the "Troubleshooting" section of incidental or consequential damages, so these limitations and exclusions may not apply to correct house wiring or plumbing. 3. This warranty gives you specific legal rights, and...
Parts Diagram
Page 1
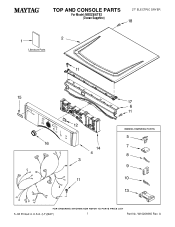
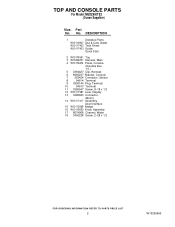
W10206965 Rev. TOP AND CONSOLE PARTS For Model: MEDZ600TE2 (Ocean Sapphire) 27" ELECTRIC DRYER 5−08 Printed in U.S.A. (LT)(BAY) 1 Part No. A
W10206965 Rev. TOP AND CONSOLE PARTS For Model: MEDZ600TE2 (Ocean Sapphire) 27" ELECTRIC DRYER 5−08 Printed in U.S.A. (LT)(BAY) 1 Part No. A
Parts Diagram
Page 2
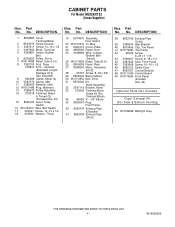
... Parts W10112937 Use & Care Guide W10117402 Tech Sheet W10117403 Guide, Quick Start 2 W10174561 Top 3 W10202231 Harness, Main 4 W10174674 Panel, Console (Includes Illus. 15.) 5 3394427 Clip, Harness 6 8565237 Bracket, Console 7 353424 Connector, Sensor 8 94614 Terminal 9 3936144 Plug, Terminal 10 94613 Terminal 11 3390647 Screw, 8−18 x 1/2 12 W10117387 Lens, Display 13 3395683 Connector, (Motor) 14 W10117417 Assembly, User Interface 15 W10112569 Badge 16 W10119050 Knob, Assembly 17 8574968 Channel, Water 18...
... Parts W10112937 Use & Care Guide W10117402 Tech Sheet W10117403 Guide, Quick Start 2 W10174561 Top 3 W10202231 Harness, Main 4 W10174674 Panel, Console (Includes Illus. 15.) 5 3394427 Clip, Harness 6 8565237 Bracket, Console 7 353424 Connector, Sensor 8 94614 Terminal 9 3936144 Plug, Terminal 10 94613 Terminal 11 3390647 Screw, 8−18 x 1/2 12 W10117387 Lens, Display 13 3395683 Connector, (Motor) 14 W10117417 Assembly, User Interface 15 W10112569 Badge 16 W10119050 Knob, Assembly 17 8574968 Channel, Water 18...
Parts Diagram
Page 4
... Ramp, Door 23 3398948 Wire, Jumper (Broken Belt Switch) 24 W10174559 Panel, Side (R.H.) 26 8565059 Panel, Rear 27 8538263 Motor, Assembly 60 HZ. 28 90767 Screw, 8−18 x 3/8 29 8565046 Base Cabinet 30 W10112954 Belt, Drive 31 8572546 Kit, Stack Assembly 32 3387118 Bracket, Motor 33 279393 Terminal Block Screw Kit (For Terminal Block) 34 49026 4" − 90 Elbow 35 8565043 Plug, Front Panel 36 8563747 Exhaust Pipe & Bracket 37 8563750 Exhaust Pipe (Short...
... Ramp, Door 23 3398948 Wire, Jumper (Broken Belt Switch) 24 W10174559 Panel, Side (R.H.) 26 8565059 Panel, Rear 27 8538263 Motor, Assembly 60 HZ. 28 90767 Screw, 8−18 x 3/8 29 8565046 Base Cabinet 30 W10112954 Belt, Drive 31 8572546 Kit, Stack Assembly 32 3387118 Bracket, Motor 33 279393 Terminal Block Screw Kit (For Terminal Block) 34 49026 4" − 90 Elbow 35 8565043 Plug, Front Panel 36 8563747 Exhaust Pipe & Bracket 37 8563750 Exhaust Pipe (Short...
Parts Diagram
Page 5
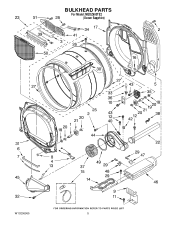
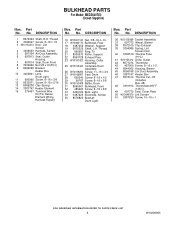
BULKHEAD PARTS For Model: MEDZ600TE2 (Ocean Sapphire) W10206965 5
BULKHEAD PARTS For Model: MEDZ600TE2 (Ocean Sapphire) W10206965 5
Parts Diagram
Page 6
... 2 3390647 Screw, 8−18 x 1/2 3 W10153413 Door, Lint Screen 4 3406653 Harness, Sensor 5 697354 Air Duct Assembly 6 697813 Seal, Outlet Housing 7 697814 Seal, Drum Front 8 3934666 Nut,3/8 x 16(R.H.) 9 8066099 Bracket, Heater Box 10 3402841 Lens, Drum Light 11 693995 Screw, 8−18 x 3/8 12 8533971 Screw, 8−18 x 5/16 13 8066208 Clip−Spring 14 3387747 Heater Element 15 279457 Terminal Wire Kit (For Heater Element Wiring Harness Repair) Illus. DESCRIPTION 16 W10001120 Nut, 3/8−...
... 2 3390647 Screw, 8−18 x 1/2 3 W10153413 Door, Lint Screen 4 3406653 Harness, Sensor 5 697354 Air Duct Assembly 6 697813 Seal, Outlet Housing 7 697814 Seal, Drum Front 8 3934666 Nut,3/8 x 16(R.H.) 9 8066099 Bracket, Heater Box 10 3402841 Lens, Drum Light 11 693995 Screw, 8−18 x 3/8 12 8533971 Screw, 8−18 x 5/16 13 8066208 Clip−Spring 14 3387747 Heater Element 15 279457 Terminal Wire Kit (For Heater Element Wiring Harness Repair) Illus. DESCRIPTION 16 W10001120 Nut, 3/8−...
Parts Diagram
Page 7
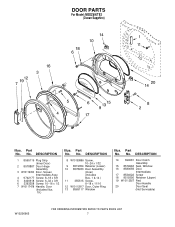
... 8565117 Window Illus. No. Part No. DESCRIPTION 14 690081 Door Catch Assembly 15 8579663 Seal, Window 16 8580059 Door, Intermediate 17 8534022 Screw 18 8519356 Retainer (Upper) 19 W10112927 Pad, Door Handle 20 Door Seal (Not Servicable) W10206965 7 Part No. No. DOOR PARTS For Model: MEDZ600TE2 (Ocean Sapphire) Illus. No. DESCRIPTION 1 8565119 Plug Strip (Inner Door) 2 8578887 Door Hinge Assembly 3 W10119053 Door, Screen Intermediate Assy. 4 9742177 Screw...
... 8565117 Window Illus. No. Part No. DESCRIPTION 14 690081 Door Catch Assembly 15 8579663 Seal, Window 16 8580059 Door, Intermediate 17 8534022 Screw 18 8519356 Retainer (Upper) 19 W10112927 Pad, Door Handle 20 Door Seal (Not Servicable) W10206965 7 Part No. No. DOOR PARTS For Model: MEDZ600TE2 (Ocean Sapphire) Illus. No. DESCRIPTION 1 8565119 Plug Strip (Inner Door) 2 8578887 Door Hinge Assembly 3 W10119053 Door, Screen Intermediate Assy. 4 9742177 Screw...
Parts Diagram
Page 8
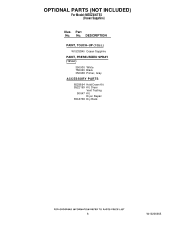
OPTIONAL PARTS (NOT INCLUDED) For Model: MEDZ600TE2 (Ocean Sapphire) Illus. Part No. DESCRIPTION PAINT, TOUCH−UP (1/2oz.) W10202940 Ocean Sapphire PAINT, PRESSURIZED SPRAY (12 oz.) 350930 White 786020 Black 350938 Primer, Gray ACCESSORY PARTS 8529894 Hold Down Kit 8522199 Kit, Dryer Vent Testing 80047 Kit, Dryer Repair 8563738 Dry Rack 8 W10206965 No.
OPTIONAL PARTS (NOT INCLUDED) For Model: MEDZ600TE2 (Ocean Sapphire) Illus. Part No. DESCRIPTION PAINT, TOUCH−UP (1/2oz.) W10202940 Ocean Sapphire PAINT, PRESSURIZED SPRAY (12 oz.) 350930 White 786020 Black 350938 Primer, Gray ACCESSORY PARTS 8529894 Hold Down Kit 8522199 Kit, Dryer Vent Testing 80047 Kit, Dryer Repair 8563738 Dry Rack 8 W10206965 No.
Dimensions
Page 1
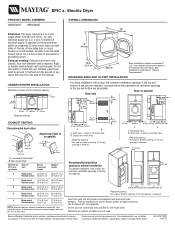
... commitment to change without notice. A time-delay fuse or circuit breaker is required. Exhaust venting: Exhaust your dryer to an individual branch circuit. W10112937 10-04-07 ® EPIC z™ Electric Dryer PRODUCT MODEL NUMBERS OVERALL DIMENSIONS MEDZ400T MEDZ600T Electrical: This dryer requires a 3 or 4 wire, single phase, 120/240 volt, 60 Hz., AC only electrical supply (or 3 or 4 wire, 120/208 volt electrical supply, if specified on the serial/rating plate) on a separate 30-amp circuit, fused on pedestal Dryer only...
... commitment to change without notice. A time-delay fuse or circuit breaker is required. Exhaust venting: Exhaust your dryer to an individual branch circuit. W10112937 10-04-07 ® EPIC z™ Electric Dryer PRODUCT MODEL NUMBERS OVERALL DIMENSIONS MEDZ400T MEDZ600T Electrical: This dryer requires a 3 or 4 wire, single phase, 120/240 volt, 60 Hz., AC only electrical supply (or 3 or 4 wire, 120/208 volt electrical supply, if specified on the serial/rating plate) on a separate 30-amp circuit, fused on pedestal Dryer only...


