

Use and Care Guide
Page 3
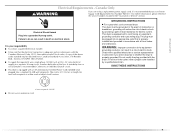
...cause a load to dry articles containing foam rubber or similarly textured rubber-like materials. ■ Clean lint screen before using the dryer, follow instructions. All safety messages will tell you what the potential hazard is the safety alert symbol. IMPORTANT SAFETY INSTRUCTIONS WARNING: To...spotted with controls. ■ Do not repair or replace any part of fire, electric shock, or injury to persons when using the dryer. ■ Do not place items exposed to play on your dryer. Items contaminated with cooking oils may contribute to a chemical reaction that could ignite or...
...cause a load to dry articles containing foam rubber or similarly textured rubber-like materials. ■ Clean lint screen before using the dryer, follow instructions. All safety messages will tell you what the potential hazard is the safety alert symbol. IMPORTANT SAFETY INSTRUCTIONS WARNING: To...spotted with controls. ■ Do not repair or replace any part of fire, electric shock, or injury to persons when using the dryer. ■ Do not place items exposed to play on your dryer. Items contaminated with cooking oils may contribute to a chemical reaction that could ignite or...

Use and Care Guide
Page 4
...installations between 28.65" (72.77 cm) and 34.15" (86.74 cm), see "Plan Vent System" section for this dryer. Parts needed Check local codes. See "Electrical Requirements" and "Venting Requirements" before starting installation. Check that opens to place the 10" (25.4 cm) pedestal at least ... least 9" (22.9 cm) above the oor. 4 Leveling legs NOTE: Do not use leveling legs if installing the dryer on a pedestal? The pedestal will need to purchase a Stack Kit. Check existing electrical supply and venting. To order, call the dealer from whom you planning to stack your...
...installations between 28.65" (72.77 cm) and 34.15" (86.74 cm), see "Plan Vent System" section for this dryer. Parts needed Check local codes. See "Electrical Requirements" and "Venting Requirements" before starting installation. Check that opens to place the 10" (25.4 cm) pedestal at least ... least 9" (22.9 cm) above the oor. 4 Leveling legs NOTE: Do not use leveling legs if installing the dryer on a pedestal? The pedestal will need to purchase a Stack Kit. Check existing electrical supply and venting. To order, call the dealer from whom you planning to stack your...

Use and Care Guide
Page 5
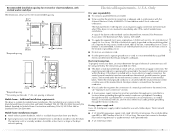
... codes limit, or do so can be considered. 5 You will need to place the dryer at least 18 inches (46 cm) above the floor. See "Electrical Requirements." ■ A sturdy floor to open fully. 36" (91.4 cm) *28.65" (72.77 cm) 27" (68.6 cm) *Most installations require a minimum 5" (12.7 cm) clearance behind the...
... codes limit, or do so can be considered. 5 You will need to place the dryer at least 18 inches (46 cm) above the floor. See "Electrical Requirements." ■ A sturdy floor to open fully. 36" (91.4 cm) *28.65" (72.77 cm) 27" (68.6 cm) *Most installations require a minimum 5" (12.7 cm) clearance behind the...

Use and Care Guide
Page 6
... 2"* (5 cm) 36" min (91.4 cm) 1"* (2.5 cm) *Required spacing Closet installation - closet or confined area B. Dryer on pedestal 14" max. (35.6 cm) 18" min.* (45.72 cm) 1" (2.5 cm) 27" (68.6 cm) A 1" 1"* 28.65" 5"** (2.5 cm) (2.5 cm) (72.77 cm) (12.7 cm) B A. Recommended installation spacing for cabinet ... Closet door with a door, minimum ventilation openings in .2* (155 cm2) 1"* 28.65" 5"** (2.5 cm) (72.77 cm) (12.7 cm) A 3"* (7.6 cm) B A. Dryer only 27" (68.6 cm) 1"* (2.5 cm) 14" max.* (35.6 cm) 18" min.* (45.72 cm) 48 in.2* (310 cm2) 3"* (7.6 cm) 24 in the top of ...
... 2"* (5 cm) 36" min (91.4 cm) 1"* (2.5 cm) *Required spacing Closet installation - closet or confined area B. Dryer on pedestal 14" max. (35.6 cm) 18" min.* (45.72 cm) 1" (2.5 cm) 27" (68.6 cm) A 1" 1"* 28.65" 5"** (2.5 cm) (2.5 cm) (72.77 cm) (12.7 cm) B A. Recommended installation spacing for cabinet ... Closet door with a door, minimum ventilation openings in .2* (155 cm2) 1"* 28.65" 5"** (2.5 cm) (72.77 cm) (12.7 cm) A 3"* (7.6 cm) B A. Dryer only 27" (68.6 cm) 1"* (2.5 cm) 14" max.* (35.6 cm) 18" min.* (45.72 cm) 48 in.2* (310 cm2) 3"* (7.6 cm) 24 in the top of ...
Use and Care Guide
Page 7
...recessed or closet installation, with stacked washer and dryer The dimensions shown are for the recommended spacing. 48 in.2 * (310 cm2) 3"* (7.6 cm) *Required spacing 24 in.2 * (155 cm2) 3"* (7.6 cm) 1"* (2.5 cm) 6"* (15.2 cm) 72" (182.9 cm) 5 14 cm) 1" (2.5 cm) 27" (68.6 cm) 1" (2.5 cm) *...with upturned ends. ■ A UL listed strain relief. 7 Connect to the neutral conductor (white wire) within the dryer. If the dryer is installed with a 4-wire electrical supply connection, the neutral ground conductor must be at least 4 ft (1.22 m) long. If using and follow the ...
...recessed or closet installation, with stacked washer and dryer The dimensions shown are for the recommended spacing. 48 in.2 * (310 cm2) 3"* (7.6 cm) *Required spacing 24 in.2 * (155 cm2) 3"* (7.6 cm) 1"* (2.5 cm) 6"* (15.2 cm) 72" (182.9 cm) 5 14 cm) 1" (2.5 cm) 27" (68.6 cm) 1" (2.5 cm) *...with upturned ends. ■ A UL listed strain relief. 7 Connect to the neutral conductor (white wire) within the dryer. If the dryer is installed with a 4-wire electrical supply connection, the neutral ground conductor must be at least 4 ft (1.22 m) long. If using and follow the ...

Use and Care Guide
Page 8
... you are in a risk of electric shock by a qualified electrician. The ground wire (ground conductor) may be insulated. ■ 10-gauge solid copper wire (do not use aluminum). ■ At least 5 ft (1.52 m) long. SAVE THESE INSTRUCTIONS 8 GROUNDING INSTRUCTIONS ■ For a grounded, cord-connected dryer: This dryer must be grounded. Do not modify...
... you are in a risk of electric shock by a qualified electrician. The ground wire (ground conductor) may be insulated. ■ 10-gauge solid copper wire (do not use aluminum). ■ At least 5 ft (1.52 m) long. SAVE THESE INSTRUCTIONS 8 GROUNDING INSTRUCTIONS ■ For a grounded, cord-connected dryer: This dryer must be grounded. Do not modify...
Use and Care Guide
Page 9
... Plug into an appropriate outlet that you are using a replacement power supply cord, it will reduce the risk of electric shock by a qualified electrician. This dryer is properly grounded. WARNING: Improper connection of the line. Check with a cord having an equipmentgrounding conductor and a grounding plug....use an extension cord. 9 Connect to do so can result in accordance with the dryer: if it is adequate and in length. Be sure wall receptacle is equipped with the Canadian Electrical Code, C22.1-latest edition and all local codes and ordinances. The plug must be ...
... Plug into an appropriate outlet that you are using a replacement power supply cord, it will reduce the risk of electric shock by a qualified electrician. This dryer is properly grounded. WARNING: Improper connection of the line. Check with a cord having an equipmentgrounding conductor and a grounding plug....use an extension cord. 9 Connect to do so can result in accordance with the dryer: if it is adequate and in length. Be sure wall receptacle is equipped with the Canadian Electrical Code, C22.1-latest edition and all local codes and ordinances. The plug must be ...

Use and Care Guide
Page 11
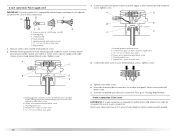
...(NEMA type 10-30R) A fused disconnect or circuit breaker box* 4-wire connection: Direct Wire A UL listed, 120/240volt minimum, 30-amp, dryer power supply cord* 3-wire connection: Power supply cord 3-wire direct A fused disconnect or circuit breaker box* 3-wire connection: Direct Wire 3¹⁄...;₂" (8.9 cm) *If local codes do not permit the connection of electrical connection: 4-wire (recommended) 3-wire (if 4-wire is inside the terminal block opening C. Tighten strain relief screw against the direct wire...
...(NEMA type 10-30R) A fused disconnect or circuit breaker box* 4-wire connection: Direct Wire A UL listed, 120/240volt minimum, 30-amp, dryer power supply cord* 3-wire connection: Power supply cord 3-wire direct A fused disconnect or circuit breaker box* 3-wire connection: Direct Wire 3¹⁄...;₂" (8.9 cm) *If local codes do not permit the connection of electrical connection: 4-wire (recommended) 3-wire (if 4-wire is inside the terminal block opening C. Tighten strain relief screw against the direct wire...
Use and Care Guide
Page 12
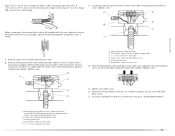
...have 5 ft (1.52 m) of power supply cord under center, silver-colored terminal block screw. Direct wire cable must have completed your electrical connection. 4-wire connection: Power supply cord IMPORTANT: A 4-wire connection is required for mobile homes and where local codes do not ... prong E. B. Secure cover with upturned ends F. ¾" (1.9 cm) UL listed strain relief G. Ground wire (green or bare) of dryer rear panel. Remove neutral ground wire from external ground conductor screw. Neutral ground wire F. Spade terminals with hold- Ring terminals 1. Center silver-...
...have 5 ft (1.52 m) of power supply cord under center, silver-colored terminal block screw. Direct wire cable must have completed your electrical connection. 4-wire connection: Power supply cord IMPORTANT: A 4-wire connection is required for mobile homes and where local codes do not ... prong E. B. Secure cover with upturned ends F. ¾" (1.9 cm) UL listed strain relief G. Ground wire (green or bare) of dryer rear panel. Remove neutral ground wire from external ground conductor screw. Neutral ground wire F. Spade terminals with hold- Ring terminals 1. Center silver-...
Use and Care Guide
Page 13
... block screw. Remove neutral ground wire from external ground conductor screw. Tighten screw. Insert tab of dryer rear panel. A. Squeeze hooked ends together. Neutral wire (white or center wire) 4. down screw. You have completed your electrical connection. Dotted line shows position of the other direct wire cable wires under the outer terminal...
... block screw. Remove neutral ground wire from external ground conductor screw. Tighten screw. Insert tab of dryer rear panel. A. Squeeze hooked ends together. Neutral wire (white or center wire) 4. down screw. You have completed your electrical connection. Dotted line shows position of the other direct wire cable wires under the outer terminal...

Use and Care Guide
Page 14
...cm) 3¹⁄₂" (8.9 cm) When connecting to the terminal block, place the hooked end of the wire under the screw of dryer rear panel. Secure cover with up turned ends E 1.9 cm) UL listed strain relief F. Center silver-colored terminal block screw D. Neutral wire...back 1" (2.5 cm). Spade terminals with holddown screw. 6. Tighten screws. 4. Neutral ground wire C. Direct wire cable must have completed your electrical connection. Loosen or remove center silver-colored terminal block screw. 14 Connect neutral wire (white or center wire) of power supply cord to ...
...cm) 3¹⁄₂" (8.9 cm) When connecting to the terminal block, place the hooked end of the wire under the screw of dryer rear panel. Secure cover with up turned ends E 1.9 cm) UL listed strain relief F. Center silver-colored terminal block screw D. Neutral wire...back 1" (2.5 cm). Spade terminals with holddown screw. 6. Tighten screws. 4. Neutral ground wire C. Direct wire cable must have completed your electrical connection. Loosen or remove center silver-colored terminal block screw. 14 Connect neutral wire (white or center wire) of power supply cord to ...

Use and Care Guide
Page 15
... panel. Tighten screws. 4. A. Secure cover with holddown screw. 6. Tighten screw. Insert tab of terminal block cover into slot of dryer rear panel. You have completed your electrical connection. Center silver-colored terminal block screw C. Grounding path determined by a qualified electrician 3. B A C D E A. Tighten strain relief screws. 5. C A B D E Optional 3-wire connection Use for direct wire or...
... panel. Tighten screws. 4. A. Secure cover with holddown screw. 6. Tighten screw. Insert tab of terminal block cover into slot of dryer rear panel. You have completed your electrical connection. Center silver-colored terminal block screw C. Grounding path determined by a qualified electrician 3. B A C D E A. Tighten strain relief screws. 5. C A B D E Optional 3-wire connection Use for direct wire or...

Use and Care Guide
Page 16
...risk of the duct. Do not use a metal foil vent. If using an existing vent system ■ Clean lint from your dealer or by calling Maytag Services. Clamp 4" 10.2 cm 4" (10.2 cm) heavy metal exhaust vent Vent products can result in enclosed walls, ceilings or floors. IMPORTANT: ...governing codes and ordinances. Fire Hazard Use a heavy metal vent. ■ Flexible metal vent must not be fully extended and supported when the dryer is not plugged with rigid or flexible heavy metal vent. ■ Review Vent system chart. Venting Requirements WARNING Rigid metal vent ■ ...
...risk of the duct. Do not use a metal foil vent. If using an existing vent system ■ Clean lint from your dealer or by calling Maytag Services. Clamp 4" 10.2 cm 4" (10.2 cm) heavy metal exhaust vent Vent products can result in enclosed walls, ceilings or floors. IMPORTANT: ...governing codes and ordinances. Fire Hazard Use a heavy metal vent. ■ Flexible metal vent must not be fully extended and supported when the dryer is not plugged with rigid or flexible heavy metal vent. ■ Review Vent system chart. Venting Requirements WARNING Rigid metal vent ■ ...
Use and Care Guide
Page 17
... are shown here. Failure to follow these instructions can cause moisture and lint to collect indoors, which may be in death, fire, electrical shock, or serious injury. 17 Louvered hood style B. Do not use an exhaust hood with one of the following kits: 279818 (...10.2 cm) 2½" (6.4 cm) An exhaust hood should cap the vent to connect elbows H. Improper venting can result in the path of the dryer. Dryer B. Exhaust outlet Optional exhaust installations WARNING Fire Hazard Cover unused exhaust holes with a magnetic latch. Exhaust hood must be at least 12" (30.5 ...
... are shown here. Failure to follow these instructions can cause moisture and lint to collect indoors, which may be in death, fire, electrical shock, or serious injury. 17 Louvered hood style B. Do not use an exhaust hood with one of the following kits: 279818 (...10.2 cm) 2½" (6.4 cm) An exhaust hood should cap the vent to connect elbows H. Improper venting can result in the path of the dryer. Dryer B. Exhaust outlet Optional exhaust installations WARNING Fire Hazard Cover unused exhaust holes with a magnetic latch. Exhaust hood must be at least 12" (30.5 ...

Use and Care Guide
Page 18
...(73.66 cm) to 50" (127 cm) mismatch Determine vent path ■ Select the route that will : ■ Shorten the life of the dryer. ■ Reduce performance, resulting in the Vent system chart. Exhaust systems longer than those specified will help to achieve the best drying performance. 18 A... ■ Plan the installation to use vent runs longer than those specified in longer drying times and increased energy usage. This dryer can be securely fastened to a noncombustible portion of the mobile home structure and must not terminate beneath the mobile home. Standard rear...
...(73.66 cm) to 50" (127 cm) mismatch Determine vent path ■ Select the route that will : ■ Shorten the life of the dryer. ■ Reduce performance, resulting in the Vent system chart. Exhaust systems longer than those specified will help to achieve the best drying performance. 18 A... ■ Plan the installation to use vent runs longer than those specified in longer drying times and increased energy usage. This dryer can be securely fastened to a noncombustible portion of the mobile home structure and must not terminate beneath the mobile home. Standard rear...

Use and Care Guide
Page 19
... metal 25 ft (7.6 m) 17 ft (5.2 m) 4 Rigid metal 27 ft (8.2 m) 21 ft (6.4 m) Flexible metal 23 ft (7 m) 15 ft (4.6 m) 2. Examine the leveling legs. Connect vent to its final location. Screw the legs into its final location. The dryer vent must fit inside the exhaust hood. Install exhaust hood. Secure...10.2 cm) clamp, connect vent to connect the exhaust vent. To determine maximum exhaust length, add one 90º turn inside the dryer. Use clamps to the chart. Place cardboard under each of the vent to finish turning the legs until it is no kinks in "...
... metal 25 ft (7.6 m) 17 ft (5.2 m) 4 Rigid metal 27 ft (8.2 m) 21 ft (6.4 m) Flexible metal 23 ft (7 m) 15 ft (4.6 m) 2. Examine the leveling legs. Connect vent to its final location. Screw the legs into its final location. The dryer vent must fit inside the exhaust hood. Install exhaust hood. Secure...10.2 cm) clamp, connect vent to connect the exhaust vent. To determine maximum exhaust length, add one 90º turn inside the dryer. Use clamps to the chart. Place cardboard under each of the vent to finish turning the legs until it is no kinks in "...

Use and Care Guide
Page 20
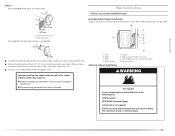
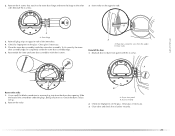
...to remove 2 plug strips from the inner door. Lift up . 3. Remove the door assembly 1. Door assembly 2. Slide the head of the dryer. Reverse hinge 1. Remove the 4 screws that you remove only the 6 indicated screws. Reverse Door Swing You can change your door swing from the... inner door assembly, as indicated below. A 180˚ B A. Dryer front panel B. Remove the 6 Phillips head screws to release the outer door assembly from a right-side opening to protect the surface. Use a ...
...to remove 2 plug strips from the inner door. Lift up . 3. Remove the door assembly 1. Door assembly 2. Slide the head of the dryer. Reverse hinge 1. Remove the 4 screws that you remove only the 6 indicated screws. Reverse Door Swing You can change your door swing from the... inner door assembly, as indicated below. A 180˚ B A. Dryer front panel B. Remove the 6 Phillips head screws to release the outer door assembly from a right-side opening to protect the surface. Use a ...
Use and Care Guide
Page 21
... door assembly edge fits completely inside the outer door assembly. Lift up. 2. A A. Reattach door to scratch the dryer surface. Slide the head of the inner door. 4. Dryer front panel B. 2. Reinstall plug strips on the glass. Clean glass if necessary. 5. Door strike Reinstall the door ... that it latches securely. 21 Check for fingerprints on opposite side of the screwdriver under the plugs, being certain not to dryer front panel with the 6 screws. Check for fingerprints on the opposite side. Reassemble the inner and outer door assemblies with the 4 screws. B ...
... door assembly edge fits completely inside the outer door assembly. Lift up. 2. A A. Reattach door to scratch the dryer surface. Slide the head of the inner door. 4. Dryer front panel B. 2. Reinstall plug strips on the glass. Clean glass if necessary. 5. Door strike Reinstall the door ... that it latches securely. 21 Check for fingerprints on opposite side of the screwdriver under the plugs, being certain not to dryer front panel with the 6 screws. Check for fingerprints on the opposite side. Reassemble the inner and outer door assemblies with the 4 screws. B ...
Use and Care Guide
Page 22
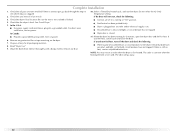
...If there is first heated. Turn on power. When the dryer has been running or "On" position. ■ Start button has been pushed firmly. ■ Dryer is plugged into an outlet and/or electrical supply is first used. Wipe the dryer drum interior thoroughly with a damp cloth to see which step ...was skipped. 10. If you feel for 5 minutes, open the dryer door and feel heat, cancel cycle and ...
...If there is first heated. Turn on power. When the dryer has been running or "On" position. ■ Start button has been pushed firmly. ■ Dryer is plugged into an outlet and/or electrical supply is first used. Wipe the dryer drum interior thoroughly with a damp cloth to see which step ...was skipped. 10. If you feel for 5 minutes, open the dryer door and feel heat, cancel cycle and ...

Use and Care Guide
Page 23
...fire. Failure to follow these instructions can completely remove oil. See "Cleaning the Lint Screen." 2. Press POWER. 23 DRYER USE WARNING Starting Your Dryer WARNING Explosion Hazard Keep flammable materials and vapors, such as gasoline, away from the model shown and may not have ... rubber, or plastic must be dried on it (even after washing). Please refer to specific sections of fire, electric shock, or injury to start your dryer. This information covers several different models. Follow these basic steps to persons, read the IMPORTANT SAFETY INSTRUCTIONS before each...
...fire. Failure to follow these instructions can completely remove oil. See "Cleaning the Lint Screen." 2. Press POWER. 23 DRYER USE WARNING Starting Your Dryer WARNING Explosion Hazard Keep flammable materials and vapors, such as gasoline, away from the model shown and may not have ... rubber, or plastic must be dried on it (even after washing). Please refer to specific sections of fire, electric shock, or injury to start your dryer. This information covers several different models. Follow these basic steps to persons, read the IMPORTANT SAFETY INSTRUCTIONS before each...


