Use & Care Guide
Page 5
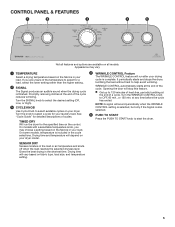
...at the end of a cycle. Turn the knob to select a cycle for your dryer. Turn the WRINKLE CONTROL knob to help avoid wrinkling. TIMED DRY Will run after your dryer model. It periodically starts and stops the dryer, tumbling the load without heat to OFF, 60 min., or 120 min. On ...some models, temperature is finished. Turn the SIGNAL knob to select the desired setting (Off, Low...
...at the end of a cycle. Turn the knob to select a cycle for your dryer. Turn the WRINKLE CONTROL knob to help avoid wrinkling. TIMED DRY Will run after your dryer model. It periodically starts and stops the dryer, tumbling the load without heat to OFF, 60 min., or 120 min. On ...some models, temperature is finished. Turn the SIGNAL knob to select the desired setting (Off, Low...
Use & Care Guide
Page 6
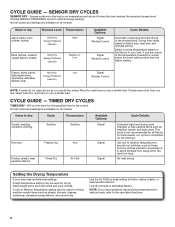
... on the fabrics in the load or air temperature and shuts off when the load reaches the selected dryness level. Senses moisture in your dryer has multiple heat settings: A High temperature setting may be used for optimal energy savings. If you dry a similar load. If loads .... This cycle is not recommended for the specified time on fabric type, load size, and dryness setting. For best results, run the dryer for all models. Setting the Drying Temperature If your load. A Low to help sanitize items such as towels and work clothes, towels Dryness Level: Temperature...
... on the fabrics in the load or air temperature and shuts off when the load reaches the selected dryness level. Senses moisture in your dryer has multiple heat settings: A High temperature setting may be used for optimal energy savings. If you dry a similar load. If loads .... This cycle is not recommended for the specified time on fabric type, load size, and dryness setting. For best results, run the dryer for all models. Setting the Drying Temperature If your load. A Low to help sanitize items such as towels and work clothes, towels Dryness Level: Temperature...
Use & Care Guide
Page 7
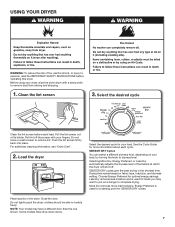
...cloth to complete drying. More Dry removes more information about each load. clothes should be able to remove lint. Before using your dryer, wipe the dryer drum with your fingers. Push the lint screen firmly back into place. Choose Energy Preferred for more load moisture. Clean the ...remove dust from storing and shipping. 1. Some models have a different door than the one shown. Select the desired cycle Clean the lint screen before operating this dryer. Do not rinse or wash screen to tumble freely. Load the dryer Select the desired cycle for loads you may ...
...cloth to complete drying. More Dry removes more information about each load. clothes should be able to remove lint. Before using your dryer, wipe the dryer drum with your fingers. Push the lint screen firmly back into place. Choose Energy Preferred for more load moisture. Clean the ...remove dust from storing and shipping. 1. Some models have a different door than the one shown. Select the desired cycle Clean the lint screen before operating this dryer. Do not rinse or wash screen to tumble freely. Load the dryer Select the desired cycle for loads you may ...

Use & Care Guide
Page 10
... should: 1. Remove the cover. Disconnect wiring. 3. Use tape to dryer pipe. 4. Open the dryer door. Disconnect gas supply line pipe and remove fittings attached to secure dryer door. Reinstalling the Dryer Follow the "Installation Instructions" to gas supply line. 3. If you will be on some models) 1. Clean lint screen. Unplug the power supply cord. 2. Make...
... should: 1. Remove the cover. Disconnect wiring. 3. Use tape to dryer pipe. 4. Open the dryer door. Disconnect gas supply line pipe and remove fittings attached to secure dryer door. Reinstalling the Dryer Follow the "Installation Instructions" to gas supply line. 3. If you will be on some models) 1. Clean lint screen. Unplug the power supply cord. 2. Make...
Installation Guide
Page 4
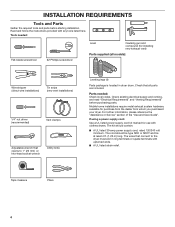
... power supply cord: Use a UL listed power supply cord kit marked for purchase from the dealer from whom you purchased your dryer. The wires that all models): Wire stripper (direct wire installations) Tin snips (new vent installations) 1/4" nut driver (recommended) Vent clamps Adjustable wrench that opens... to the dryer must end in dryer drum. The kit should be type SRD or SRDT and be at least 4 ft. (1.22 m) ...
... power supply cord: Use a UL listed power supply cord kit marked for purchase from the dealer from whom you purchased your dryer. The wires that all models): Wire stripper (direct wire installations) Tin snips (new vent installations) 1/4" nut driver (recommended) Vent clamps Adjustable wrench that opens... to the dryer must end in dryer drum. The kit should be type SRD or SRDT and be at least 4 ft. (1.22 m) ...
Installation Guide
Page 15
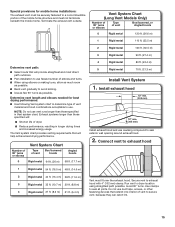
...mm) Install exhaust hood and use duct tape, screws, or other fastening devices that extend into interior of dryer. ■■ Reduce performance, resulting in Vent system chart. Run vent to dryer location using elbows or making turns, allow as much room as possible. ■■ Bend vent gradually ...Chart Number of 90° turns or elbows Type of elbows and turns. ■■ When using straightest path possible. Vent System Chart (Long Vent Models Only) Number of 90° turns or elbows Type of vent Box/louvered, or Angled hoods 0 Rigid metal 120 ft. (36.6 m) 1 Rigid...
...mm) Install exhaust hood and use duct tape, screws, or other fastening devices that extend into interior of dryer. ■■ Reduce performance, resulting in Vent system chart. Run vent to dryer location using elbows or making turns, allow as much room as possible. ■■ Bend vent gradually ...Chart Number of 90° turns or elbows Type of elbows and turns. ■■ When using straightest path possible. Vent System Chart (Long Vent Models Only) Number of 90° turns or elbows Type of vent Box/louvered, or Angled hoods 0 Rigid metal 120 ft. (36.6 m) 1 Rigid...


