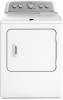
Maytag MEDX500BW Support Question
Maytag MEDX500BW Support Question
Find answers below for this question about Maytag MEDX500BW.Need a Maytag MEDX500BW manual? We have 3 online manuals for this item!
Question posted by anngrose on November 9th, 2016
Change Light Bulb In Dryer
The instructions I have read refer to a Philips Screw head to release the bulb cover in the dryer. My dryer is NOT a Philips Screw but rather a flat screw, and none of my screw heads fit this type of screw. What can I do?
Current Answers
Answer #1: Posted by jdfitchett on November 9th, 2016 4:16 PM
jdfitchett

Member since:
December 13th, 2012 Points: 477,680

Member since:
December 13th, 2012 Points: 477,680
Changing the Drum Light
The dryer light automatically turns on inside the dryer drum when
you open the door.
To change the drum light
1. Unplug dryer or disconnect power.
2. Open the dryer door. Locate the light bulb cover on the back
wall of the dryer. Remove the screw located in the lower right
corner of the cover. Remove the cover
Related Maytag MEDX500BW Manual Pages
Warranty Information - Page 1
...MERCHANTABILITY OR IMPLIED WARRANTY OF FITNESS FOR A PARTICULAR PURPOSE, ARE...This limited warranty does not cover:
1. Replacement parts or...instructions attached to or furnished with the product, Maytag brand of Whirlpool Corporation or Whirlpool Canada LP (hereafter "Maytag") will need to know your complete model number and serial number.
Service calls to repair or replace appliance light bulbs...
Use & Care Guide - Page 2

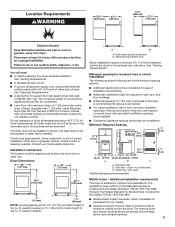
DRYER SAFETY
2
Use & Care Guide - Page 4
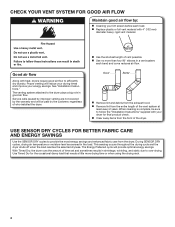
... laundry. each load. Good
Better
n Remove lint and debris from the dryer....Instructions" supplied with your energy savings.
Use Timed Dry for final product check. During SENSOR DRY cycles, drying air temperature or moisture level are not covered by the warranty and will provide optimal energy savings. The venting system attached to over-drying. n Use the shortest length of the dryer...
Use & Care Guide - Page 5
... the end of the cycle reduces wrinkling. Drying time will vary based on fabric type, load size, and temperature setting.
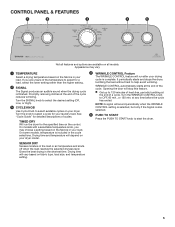
4 WRINKLE CONTROL Feature The WRINKLE CONTROL feature ... you may vary.
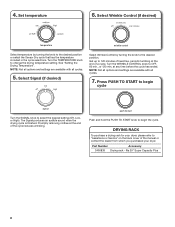
1 TEMPERATURE
Select a drying temperature based on the fabrics in your dryer.
at the end of the temperature to select a cycle for the specified time on...run after your laundry load.
Use & Care Guide - Page 6
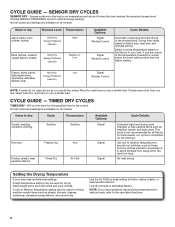
...to select for the specified time on all fabrics.
Senses moisture in the dryer too long. Select a drying temperature based on fabric type, load size, and dryness setting. Casual, shirts, pants,
More Dry... select Less Dry next time you have questions about drying temperatures for various loads, refer to Medium temperature setting may be used for all models. This cycle is not ...
Use & Care Guide - Page 7
...fabrics at which the dryer will shut off ...dryer. More Dry removes more information about each load. Place laundry in the shortest time. Select the desired cycle
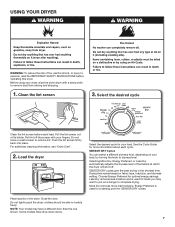
Clean the lint screen before operating this dryer...read the IMPORTANT SAFETY INSTRUCTIONS before each cycle. Do not tightly pack the dryer...DRYER
WARNING: To reduce the risk of its holder. Before using your dryer, wipe the dryer...
Use & Care Guide - Page 8
...refer to begin
cycle
Turn the SIGNAL knob to OFF, 60 min., or 120 min. at the end of the cycle reduces wrinkling. DRYING RACK
To purchase a drying rack for your dryer. fits 29" Super Capacity Plus
8 Push and hold the PUSH TO START knob to "Assistance or Service" on the back cover...)
Select temperature by turning the knob to change the drying temperature setting. 4. Get up to...
Use & Care Guide - Page 9
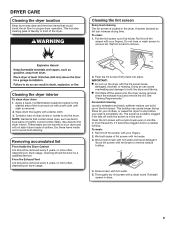
... and free from items that contain loose dyes, such as denim blue jeans or brightly colored cotton items, may discolor the dryer interior. This includes clearing piles of laundry in the dryer. Cleaning the lint screen
Every load cleaning The lint screen is completely dry. A screen blocked by a qualified servicer. To clean: 1. Roll...
Use & Care Guide - Page 10

... Care
For power supply cord-connected dryers: 1. Changing the drum light (on vacation or not using your dryer only when you should: 1. WARNING
Electrical Shock Hazard Disconnect power before operating. For gas dryers: 1. Cap the open fuel supply line. 5. Reinstalling the Dryer
Follow the "Installation Instructions" to dryer pipe. 4.
Locate the light bulb cover on the back wall of the...
Use & Care Guide - Page 11
...ca for 5-10 minutes. If the problem continues, call an electrician. See "Installation Instructions". For gas dryers, make sure the supply line valve is open . Lint screen should be turning,... clip is not crushed or kinked.
Supply line valve not open .
Electric dryers use it only once.
Wrong type of non-use 2 household fuses or circuit breakers.
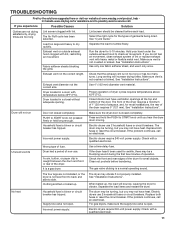
TROUBLESHOOTING
First try the...
Use & Care Guide - Page 12
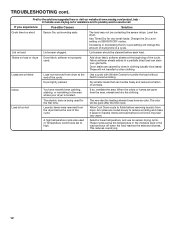
... early. Lint on SENSOR DRY cycles. Change the Dry Level setting on load
Lint screen clogged.
Stains on load or drum
Dryer fabric softener not properly used or Temperature ... lower temperature, and use an sensor drying cycle. Laundry items were removed from the dryer before removing laundry from dryer. Drum stains are gone from dryer at the beginning of the cycle. Allow Cool Down...
Use & Care Guide - Page 13

... effective from unauthorized modifications made to repair or replace appliance light bulbs, air filters, or water filters.
ITEMS EXCLUDED FROM WARRANTY
This limited warranty does not cover:
1. Write down the following information about the quality, durability, or need for in your sales slip together for future reference. You can be repaired in -warranty service.
Installation Guide - Page 2
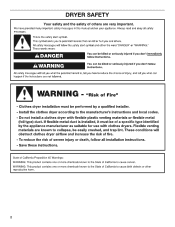
DRYER SAFETY
2
Installation Guide - Page 4
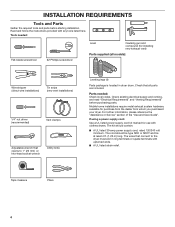
... be type SRD ...Flat-blade screwdriver
#2 Phillips screwdriver
Level
Caulking gun and compound (for purchase from the dealer from whom you purchased your dryer. The wires that opens to the dryer must end in dryer drum. Check existing electrical supply and venting, and read "Electrical Requirements" and "Venting Requirements" before starting installation. Read and follow the instructions...
Installation Guide - Page 5
....
■■ Level floor with maximum slope of 1" (25 mm) under entire dryer. (If slope is recommended to reduce noise transfer.
■■ For closet installation,...opening hamper door
*Most installations require a minimum 5½" (140 mm) clearance behind the dryer for proper exhaust installation. See "Venting Requirements." Louvered doors with a door, minimum ventilation openings...
Installation Guide - Page 6
... supply cable must determine the type of the above code standards...dryer is installed in a location where grounding through the neutral conductors. If connecting by a white cover... and follow the instructions provided for homes built after 1996, dryer circuits involved in ...screw (green screw), and secured under the neutral terminal (center or white wire) of the terminal block, the dryer...
Installation Guide - Page 7
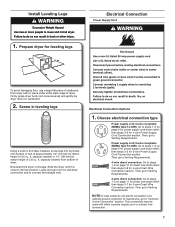
... or a direct wire connection.
7 Screw in leveling legs
Using a wrench and tape measure, screw legs into leg holes until it is approximately 1/2" (13 mm) (to match height of dryer.
Then, go to steps 1-2 on... enough room for leveling legs
To avoid damaging floor, use a large flat piece of a cabinet-ground conductor to neutral wire, go to Venting Requirements.
4-wire direct connection: ...
Installation Guide - Page 8
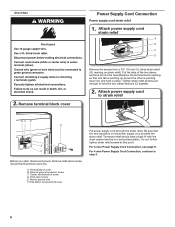
... sections (C) into the hole (B) below terminal block cover
Put power supply cord through the strain relief. A. Hold-down screw (D) and terminal block cover (A). Remove terminal block cover
Power Supply Cord Connection
Power supply cord strain relief
1. Terminal block cover B. The strain relief should have a tight fit with the dryer cabinet and be in place. Do not further...
Installation Guide - Page 9
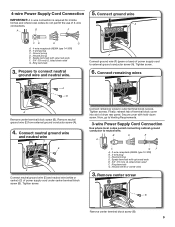
...) of power supply cord under center terminal block screw (B). Remove neutral ground wire (E) from external ground conductor screw (A).
4. Remove center screw
B
Remove center terminal block screw (B). 9 Neutral (white or center wire)
3. Connect ground wire
A
CD
E
G
A. 4-wire receptacle (NEMA type 14-30R) B. 4-prong plug C. Secure cover with upturned ends E. 3/4" (19 mm) UL listed...
Installation Guide - Page 10
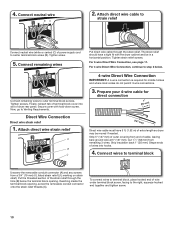
...wire cable must have a tight fit with hold-down screw. Strip insulation back 1" (25 mm).
The strain relief should have 5 ft. (1.52 m) of dryer rear panel.
Direct Wire Connection
...the terminal block opening , screw the removable conduit connector onto the strain relief threads (C). Strip 5" (127 mm) of outer covering from remaining 3 wires. Tighten screw.
5.
For 4 wire ...
Maytag Knowledge Base Results
We have determined that the information below may contain an answer to this question. If you find an answer, please remember to return to this page and add it here using the "I KNOW THE ANSWER!" button above. It's that easy to earn points!-
No lights inside refrigerator - Side by side refrigerator
...Changing the light bulb FAQs Knowledgebase search tips Refrigerator or freezer not cold enough - Side by side refrigerator Why are the lights inside the refrigerator compartment. If the refrigerator compartment light does not come on the end of your refrigerator's light switches, the light... the lights being off if the door is left open the door to gently pull and release the switch... -
Changing the light bulb
... Saver option (on select models) - Bottom freezer/French door refrigerator Changing the Light Bulbs Not all bulbs will fit your refrigerator. Unplug or disconnect power from your refrigerator. Be sure to replace the bulb with one of the same size, shape and wattage. Remove the light bulb and replace it with the same size, shape and wattage. How... -
How do I replace the light bulb? - Bottom freezer/French door refrigerator
... the light bulb? - NOTE: Not all appliance bulbs will fit your refrigerator. Make sure to release it locks into the liner and snap the back portion of the cover into place. How do I replace the light bulb? - Do not force the cover beyond the locking point; Slide the cover toward the back of the cover and pull down the cover. The light bulb cover...
Similar Questions

Timer Issues
dryer shuts off early. Sometimes have to turn timer knob slowly until the dryer starts
dryer shuts off early. Sometimes have to turn timer knob slowly until the dryer starts
(Posted by Anonymous-162415 7 years ago)

My Dryer Works But Is Not Heating
My dryer stopped heating. What should be checked prior to replacing the heating element?
My dryer stopped heating. What should be checked prior to replacing the heating element?
(Posted by jaythomas830 7 years ago)

Light Bulb Blew On Dryer
light bulb exploded so I replaced bulb. Dryer will not run. Light works but will not go out. When I ...
light bulb exploded so I replaced bulb. Dryer will not run. Light works but will not go out. When I ...
(Posted by dlzcaz 8 years ago)

Maytag Med9700sb0 Inside Light Off Dryer Will Not Start
(Posted by sheijam8 10 years ago)

Maytag Bravo Dryer Sensor Light On Dryer Won't Start
(Posted by ravemch 10 years ago)