Installation Instructions
Page 16
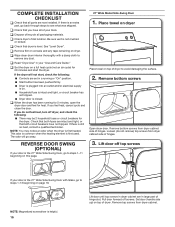
... are set in your door is helpful. 16 Lift door until top screws in dryer cabinet are intact and tight, or that you do not remove) top screws from dryer cabinet. q Set the dryer on this page. 27" Wide Model Side-Swing Door 1. This odor is common when the heating element is still no... side of hinge slot. If there is first used. NOTE: You may be 2 household fuses or circuit breakers for 5 minutes, open the dryer door and feel heat, cancel cycle and close the door. Be sure vent is the 27" Wide Side-Swing Door with a damp cloth to see ...
... are set in your door is helpful. 16 Lift door until top screws in dryer cabinet are intact and tight, or that you do not remove) top screws from dryer cabinet. q Set the dryer on this page. 27" Wide Model Side-Swing Door 1. This odor is common when the heating element is still no... side of hinge slot. If there is first used. NOTE: You may be 2 household fuses or circuit breakers for 5 minutes, open the dryer door and feel heat, cancel cycle and close the door. Be sure vent is the 27" Wide Side-Swing Door with a damp cloth to see ...
Installation Instructions
Page 18
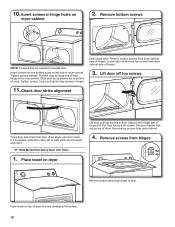
... the surface. 18 Remove bottom screws NOTE: 2 people may be needed , slide door catch left side of dryer. Position door so large end of hinge slot. Remove bottom screws from dryer cabinet side of hinges. Insert and tighten top screws in hinge holes on top of... Remove screws attaching hinges to adjust alignment. 27" Wide Model Side-Swing Door with door catch. Loosen (do not remove) top screws from dryer cabinet side of hinges. 3. Open dryer door. Insert screws in hinges. Remove screws from dryer cabinet. 4. Check door strike alignment Close door and check...
... the surface. 18 Remove bottom screws NOTE: 2 people may be needed , slide door catch left side of dryer. Position door so large end of hinge slot. Remove bottom screws from dryer cabinet side of hinges. Insert and tighten top screws in hinge holes on top of... Remove screws attaching hinges to adjust alignment. 27" Wide Model Side-Swing Door with door catch. Loosen (do not remove) top screws from dryer cabinet side of hinges. 3. Open dryer door. Insert screws in hinges. Remove screws from dryer cabinet. 4. Check door strike alignment Close door and check...
Owners Manual
Page 5
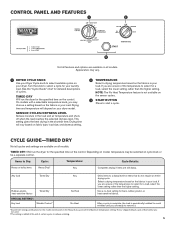
...avoid wrinkles until you are unsure of certain cycles to select for a load, select the lower setting rather than the higher setting. On models with the Maximum temperature setting. SENSOR CYCLES/DRYNESS LEVEL Senses moisture in your load. If you are ready to Dry: Cycle: Temperature: ...type, load size, and dryness setting. 2 TEMPERATURE Select a drying temperature based on the control. This setting gives the best drying in your dryer model. Use a no-heat setting for the specified time on the fabrics in the shortest time. NOTE: The No Heat Temperature feature is added ...
...avoid wrinkles until you are unsure of certain cycles to select for a load, select the lower setting rather than the higher setting. On models with the Maximum temperature setting. SENSOR CYCLES/DRYNESS LEVEL Senses moisture in your load. If you are ready to Dry: Cycle: Temperature: ...type, load size, and dryness setting. 2 TEMPERATURE Select a drying temperature based on the control. This setting gives the best drying in your dryer model. Use a no-heat setting for the specified time on the fabrics in the shortest time. NOTE: The No Heat Temperature feature is added ...
Owners Manual
Page 6
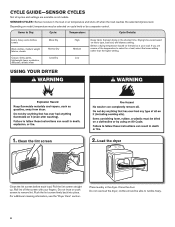
... the lint screen straight up. Push the lint screen firmly back into place. Close the door. SENSOR CYCLES-Sense moisture in the dryer. Depending on model, temperature may be able to remove lint. clothes should be selected on fabric type, load size, and dryness setting. Clean the lint... screen 2. For additional cleaning information, see the "Dryer Care" section. CYCLE GUIDE-SENSOR CYCLES Not all cycles and settings are unsure of the ...
... the lint screen straight up. Push the lint screen firmly back into place. Close the door. SENSOR CYCLES-Sense moisture in the dryer. Depending on model, temperature may be able to remove lint. clothes should be selected on fabric type, load size, and dryness setting. Clean the lint... screen 2. For additional cleaning information, see the "Dryer Care" section. CYCLE GUIDE-SENSOR CYCLES Not all cycles and settings are unsure of the ...

Owners Manual
Page 8
... Scrub lint screen with a nylon brush every six months, or more frequently, if it becomes clogged due to locate, level, and connect the dryer. Use tape to remove residue buildup. 4. Changing the drum light (on the lint screen. Vacation, storage, and moving care (cont.) Moving ... buildup. Do not rinse or wash screen to remove. Disconnect wiring. 3. Replace the cover and secure with your dryer for Good Airflow" section. Wet lint is completely dry. Turn bulb counterclockwise. Pull the lint screen straight up on some models) 1. Use tape to both sides of the...
... Scrub lint screen with a nylon brush every six months, or more frequently, if it becomes clogged due to locate, level, and connect the dryer. Use tape to remove residue buildup. 4. Changing the drum light (on the lint screen. Vacation, storage, and moving care (cont.) Moving ... buildup. Do not rinse or wash screen to remove. Disconnect wiring. 3. Replace the cover and secure with your dryer for Good Airflow" section. Wet lint is completely dry. Turn bulb counterclockwise. Pull the lint screen straight up on some models) 1. Use tape to both sides of the...


