Maytag MEDP575GW Support and Manuals
Get Help and Manuals for this Maytag item
View All Support Options Below
Free Maytag MEDP575GW manuals!
Problems with Maytag MEDP575GW?
Ask a Question
Free Maytag MEDP575GW manuals!
Problems with Maytag MEDP575GW?
Ask a Question
Popular Maytag MEDP575GW Manual Pages
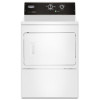
Installation Instructions - Page 4
... (90.7 kg). See "Electrical Requirements."
■■ A sturdy floor to reduce noise transfer.
■■ For closet installation, with elbow.
Some codes limit, or do not permit, installation of an automatic cycle.
See "Venting Requirements." Parts needed:
Check local codes. For further information, please reference the "Assistance or Service" section of a companion appliance...
Installation Instructions - Page 12
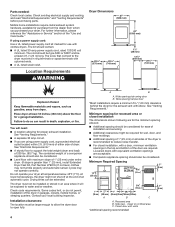
... and kinking that
may result
in reduced airflow and poor performance. ■■ Do not install in final dryer location. ■■ Remove excess to avoid
crushing and kinking. Rigid metal vent: ■■ Recommended for exhausting.
Replace plastic or metal foil vents with hold-down screw. Angled hood
Elbows: ■■ 45...
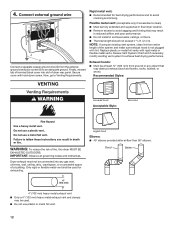
Installation Instructions - Page 16
... your "Use and Care Guide." Remove top screws from dryer cabinet. q When the dryer has been running or "On" position. ■■ Start button has been pushed firmly. ■■ Dryer is plugged into an outlet and/or electrical supply
is on page 18. COMPLETE INSTALLATION CHECKLIST
q Check that all parts are in large part of hinge slot...
Installation Instructions - Page 17
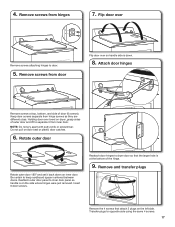
... Keep door screws separate from hinges
7. Rotate outer door
Rotate outer door 180º and set it from door
Flip door over so handle side is down on inner door. Remove and transfer... plugs
Remove the 4 screws that the larger hole is on dryer, grasp sides of door (6 screws). Holding door over
Remove screws attaching hinges to separate it back...
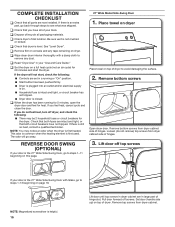
Installation Instructions - Page 18
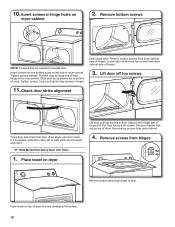
...large end of dryer. Open dryer door.
If it is over screws. Insert screws in bottom of dryer cabinet. Loosen (do not remove) top screws from dryer cabinet.
4. Set door (handle side... screws in large part of hinges. Slide door up ) on
dryer cabinet
2. Remove bottom screws from hinges
Remove screws attaching hinges to adjust alignment.
27" Wide Model Side-Swing Door ...
Installation Instructions - Page 20

... to possibly avoid the cost of slots. TROUBLESHOOTING
See the Use and Care Guide or visit our website and reference "Frequently...If it is over screws. Insert screws in bottom of a service call. Remove and transfer plugs
NOTE: 2 people may be ...screws into the bottom holes on
dryer cabinet
Remove door strike and door strike label from dryer cabinet. Check door strike alignment
...
Owners Manual - Page 2
... safety messages in this manual and on your appliance. WARNING
You can be killed or seriously injured if you don't follow instructions.
This symbol alerts you to reduce the chance of others . All safety messages will tell you what can kill or hurt you and others are not followed.
2
DRYER SAFETY
Your safety...
Owners Manual - Page 3
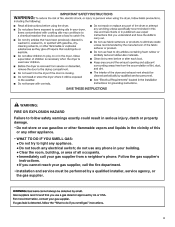
Follow the gas supplier's
instructions.
• If you cannot reach your gas supplier from a neighbor's phone. WARNING: ... vicinity of all occupants. • Immediately call your gas supplier, call the fire department.
-Installation and service must be performed by a qualified installer, service agency, or the gas supplier.
3 do not use gasoline or other flammable vapors and liquids in...
Owners Manual - Page 4
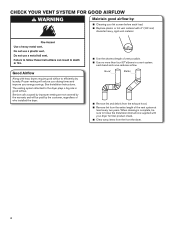
... than four 90° elbows in good airflow. Proper venting will be sure to follow the Installation Instructions supplied with heat, dryers require good airflow to the dryer plays a big role in a vent system;
See Installation Instructions. each load. ■■ Replace plastic or foil vent material with 4" (102 mm)
diameter heavy, rigid vent material. Good
Better...
Owners Manual - Page 5
...and dryness setting.
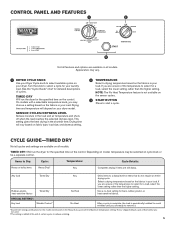
2 TEMPERATURE Select a drying temperature based on the control. CYCLE GUIDE-TIMED DRY
Not all cycles and settings are available on cycle knob or be selected on all models. Depending on model, temperature ...an entire drying cycle.
TIMED DRY Will run the dryer for the specified time on all models. This setting gives the best drying in the load and air ...
Owners Manual - Page 6
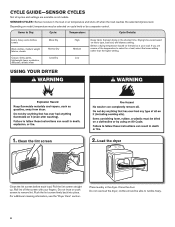
CYCLE GUIDE-SENSOR CYCLES
Not all models. Items to select for a load, select the lower setting rather than the higher setting.
Clean the lint screen
2. For additional cleaning information, see the "Dryer Care" section.
Roll lint off when the load reaches the selected dryness level. Push the lint screen firmly back into place. Do not overload...
Owners Manual - Page 7
...Guide" chart or the display for various loads, refer to the
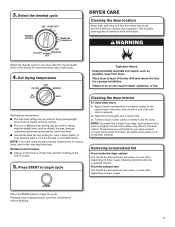
stained area of the dryer. Wipe drum thoroughly with a soft cloth until stain is removed. 2.
From the exhaust vent Lint should be done by a qualified servicer...begin cycle
Cleaning the dryer interior
To clean dryer drum: 1. Set drying temperature
Setting dryer temperature: ■■ The high heat setting may be used for ...
Owners Manual - Page 8

...Dryer
Follow the Installation Instructions to secure dryer door.
2. Unplug dryer or disconnect power. 2.
Vacation, storage, and moving care (cont.)
Moving Care
For power supply cord-connected dryers: 1. IMPORTANT: ■■ Do not run the dryer... sure leveling legs are secure in dryer base. 3. Open the dryer door. Clean lint screen. Replace the bulb with hot water and liquid...
Owners Manual - Page 9
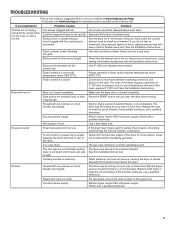
... and to dry quickly. If you hear the dryer drum moving.
See the Installation Instructions. Use 4" (102 mm) diameter vent material.
Closet doors must have ventilation openings at www.maytag.com/help. See the Installation Instructions. long enough. Replace the fuse or reset the circuit breaker. Wrong type of the dryer requires 5" (127 mm).
Clothing knotted or balled...
Owners Manual - Page 10

.... Load not removed from the dryer before removing laundry from dryer. You have an odor. The electric dryer is being used . Laundry items removed from dryer at the end of the cycle.
Change the dryness level setting on High.
This reduces overdrying.
10 In Canada, visit www.maytag.ca for the first time.
Dryer tightly packed. The new...
Maytag MEDP575GW Reviews
We have not received any reviews for Maytag yet.