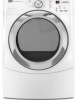
Use and Care Guide
Page 3
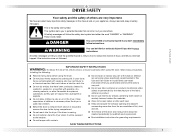
... and obey all instructions before or after each load. ■ Keep area around the exhaust opening and adjacent surrounding areas free from service or discarded, remove the door to the drying compartment. ■ Do not reach into the dryer if the drum is , tell you how to cooking oils in this Use and Care Guide or in published user-repair instructions that can be cleaned periodically by the...
... and obey all instructions before or after each load. ■ Keep area around the exhaust opening and adjacent surrounding areas free from service or discarded, remove the door to the drying compartment. ■ Do not reach into the dryer if the drum is , tell you how to cooking oils in this Use and Care Guide or in published user-repair instructions that can be cleaned periodically by the...
Use and Care Guide
Page 4
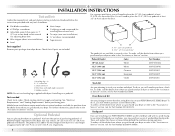
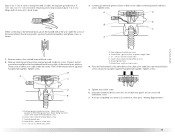
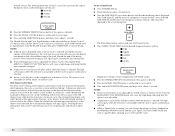
... (for Part Number 8212640. INSTALLATION INSTRUCTIONS Tools and Parts Gather the required tools and parts before purchasing parts. Read and follow the instructions provided with drawer. For a garage installation, you planing to the "Assistance or Service" section. Inlet hose with dryer if installing on your dryer or refer to reverse the door swing direction on a pedestal. Rubber washer NOTE: Do not use leveling legs supplied with right-angle connector E. Door Reversal Kit Are you will need to...
... (for Part Number 8212640. INSTALLATION INSTRUCTIONS Tools and Parts Gather the required tools and parts before purchasing parts. Read and follow the instructions provided with drawer. For a garage installation, you planing to the "Assistance or Service" section. Inlet hose with dryer if installing on your dryer or refer to reverse the door swing direction on a pedestal. Rubber washer NOTE: Do not use leveling legs supplied with right-angle connector E. Door Reversal Kit Are you will need to...
Use and Care Guide
Page 5
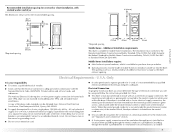
... "Electrical Requirements." „ A sturdy floor to water and/or weather. Clothes may not tumble properly and automatic sensor cycles may use the cold water supply from dryer. At lower temperatures, the dryer might be required for the exhaust vent with a door, minimum ventilation openings in longer drying times. The dryer must be large enough to allow the dryer door to open fully. Louvered doors with a maximum slope of 1" (2.5 cm) under entire dryer. Custom undercounter installation - Dryer...
... "Electrical Requirements." „ A sturdy floor to water and/or weather. Clothes may not tumble properly and automatic sensor cycles may use the cold water supply from dryer. At lower temperatures, the dryer might be required for the exhaust vent with a door, minimum ventilation openings in longer drying times. The dryer must be large enough to allow the dryer door to open fully. Louvered doors with a maximum slope of 1" (2.5 cm) under entire dryer. Custom undercounter installation - Dryer...
Use and Care Guide
Page 7
... closet installation, with stacked washer and dryer The dimensions shown are for mobile home installations. Only It is adequate. A time-delay fuse or circuit breaker is secured under the neutral terminal (center or white wire) of a neutral ground wire to the neutral wire, see "Optional 3-wire connection" section. „ A 4-wire power supply connection must conform to introduce outside air into the dryer. Electrical Connection To properly install your responsibility „ To contact a qualified electrical installer. „...
... closet installation, with stacked washer and dryer The dimensions shown are for mobile home installations. Only It is adequate. A time-delay fuse or circuit breaker is secured under the neutral terminal (center or white wire) of a neutral ground wire to the neutral wire, see "Optional 3-wire connection" section. „ A 4-wire power supply connection must conform to introduce outside air into the dryer. Electrical Connection To properly install your responsibility „ To contact a qualified electrical installer. „...
Use and Care Guide
Page 8
... cord: Use a UL listed power supply cord kit marked for electric current. The 4-wire power supply cord, at least 4 ft (1.22 m) long, must be either green or bare. The plug must end in a risk of NEMA Type 10-30R. grounding conductor can result in ring terminals or spade terminals with the circuit conductors and connected to the dryer must be at least 4 ft (1.22 m) long, must have a proper outlet installed by direct wire: Power...
... cord: Use a UL listed power supply cord kit marked for electric current. The 4-wire power supply cord, at least 4 ft (1.22 m) long, must be either green or bare. The plug must end in a risk of NEMA Type 10-30R. grounding conductor can result in ring terminals or spade terminals with the circuit conductors and connected to the dryer must be at least 4 ft (1.22 m) long, must have a proper outlet installed by direct wire: Power...
Use and Care Guide
Page 9
... reference the service numbers located in doubt as to an individual branch circuit. „ This dryer is properly grounded. Be sure wall receptacle is 5 ft (1.52 m) in death or electrical shock. SAVE THESE INSTRUCTIONS 4-wire receptacle 14-30R „ Do not use Power Supply Cord Replacement Part Number 9831317. A copy of electric shock. Check with the dryer: if it is recommended that is properly installed and grounded in...
... reference the service numbers located in doubt as to an individual branch circuit. „ This dryer is properly grounded. Be sure wall receptacle is 5 ft (1.52 m) in death or electrical shock. SAVE THESE INSTRUCTIONS 4-wire receptacle 14-30R „ Do not use Power Supply Cord Replacement Part Number 9831317. A copy of electric shock. Check with the dryer: if it is recommended that is properly installed and grounded in...
Use and Care Guide
Page 12
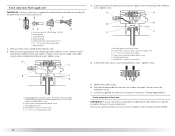
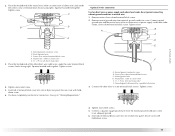
...center silvercolored terminal block screw. 4-wire connection: Power supply cord IMPORTANT: A 4-wire connection is required for mobile homes and where local codes do not permit the use of 3-wire connections. Center silver-colored terminal block screw E. Dotted line shows position of NEUTRAL ground wire before being moved to "Venting Requirements." 4-wire connection: Direct wire IMPORTANT: A 4-wire connection is required for mobile homes and where local codes do not permit the use of dryer rear panel. Remove center silver-colored terminal block screw. 2. Neutral ground wire...
...center silvercolored terminal block screw. 4-wire connection: Power supply cord IMPORTANT: A 4-wire connection is required for mobile homes and where local codes do not permit the use of 3-wire connections. Center silver-colored terminal block screw E. Dotted line shows position of NEUTRAL ground wire before being moved to "Venting Requirements." 4-wire connection: Direct wire IMPORTANT: A 4-wire connection is required for mobile homes and where local codes do not permit the use of dryer rear panel. Remove center silver-colored terminal block screw. 2. Neutral ground wire...
Use and Care Guide
Page 13
... connecting to "Venting Requirements." Now go to the terminal block, place the hooked end of the wire under the center screw of the terminal block (hook facing right), squeeze hooked end together and tighten screw, as shown. B. Neutral ground wire D. Neutral ground wire F. Cut 11/2" (3.8 cm) from external ground conductor screw. C 1. Ground wire (green or bare) of dryer rear panel. Center silver-colored terminal block screw C. Neutral wire (white or center wire...
... connecting to "Venting Requirements." Now go to the terminal block, place the hooked end of the wire under the center screw of the terminal block (hook facing right), squeeze hooked end together and tighten screw, as shown. B. Neutral ground wire D. Neutral ground wire F. Cut 11/2" (3.8 cm) from external ground conductor screw. C 1. Ground wire (green or bare) of dryer rear panel. Center silver-colored terminal block screw C. Neutral wire (white or center wire...
Use and Care Guide
Page 15
... of terminal block cover into slot of terminal block (hook facing right). Now go to outer terminal block screws. Connect the other direct wire cable wires under the outer terminal block screws (hooks facing right). Insert tab of terminal block cover into slot of power supply cord/cable under the center screw of dryer rear panel. Tighten screw. Remove neutral ground wire from the external ground conductor screw to neutral wire. 1. You have completed your electrical connection. Center silver-colored terminal block...
... of terminal block cover into slot of terminal block (hook facing right). Now go to outer terminal block screws. Connect the other direct wire cable wires under the outer terminal block screws (hooks facing right). Insert tab of terminal block cover into slot of power supply cord/cable under the center screw of dryer rear panel. Tighten screw. Remove neutral ground wire from the external ground conductor screw to neutral wire. 1. You have completed your electrical connection. Center silver-colored terminal block...
Use and Care Guide
Page 16
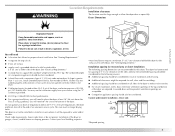
... is not plugged with lint. „ Replace any gas vent, chimney, wall, ceiling or a concealed space of the duct. WARNING: To reduce the risk of fire, this is a new vent system Vent material „ Use a heavy metal vent. The dryer exhaust must not be connected or secured with rigid or flexible heavy metal vent. „ Review vent system chart. Rigid metal vent „ For best drying performance, rigid...
... is not plugged with lint. „ Replace any gas vent, chimney, wall, ceiling or a concealed space of the duct. WARNING: To reduce the risk of fire, this is a new vent system Vent material „ Use a heavy metal vent. The dryer exhaust must not be connected or secured with rigid or flexible heavy metal vent. „ Review vent system chart. Rigid metal vent „ For best drying performance, rigid...
Use and Care Guide
Page 18
... performance, resulting in the Vent system chart. To determine maximum exhaust length, add one offset elbow) B. Use the straightest path possible. Use clamps to dryer location. Determine vent length and elbows needed for your installation. Connect vent to the manufacturer's instructions. Refer to exhaust hood. Install exhaust hood. Use caulking compound to exhaust hood with one 90º turn inside exhaust hood. Do not use the fewest number of vent Rigid metal Flexible metal...
... performance, resulting in the Vent system chart. To determine maximum exhaust length, add one offset elbow) B. Use the straightest path possible. Use clamps to dryer location. Determine vent length and elbows needed for your installation. Connect vent to the manufacturer's instructions. Refer to exhaust hood. Install exhaust hood. Use caulking compound to exhaust hood with one 90º turn inside exhaust hood. Do not use the fewest number of vent Rigid metal Flexible metal...

Use and Care Guide
Page 20
... cloth to remove any tape remaining on . 5. Use a wrench to control the buildup of the dryer. Dispose of/recycle all parts are on the dryer. 10. Check for leaks around "Y" connector, faucet and hoses. 6. Check the dryer's final location. In the U.S.A. „ For power supply cord installation, plug into a grounded 4 prong outlet. Wipe the dryer drum interior thoroughly with an additional two-thirds turn on power. 9. Complete Installation 1. Be sure the vent is level. For direct wire installation, turn...
... cloth to remove any tape remaining on . 5. Use a wrench to control the buildup of the dryer. Dispose of/recycle all parts are on the dryer. 10. Check for leaks around "Y" connector, faucet and hoses. 6. Check the dryer's final location. In the U.S.A. „ For power supply cord installation, plug into a grounded 4 prong outlet. Wipe the dryer drum interior thoroughly with an additional two-thirds turn on power. 9. Complete Installation 1. Be sure the vent is level. For direct wire installation, turn...
Use and Care Guide
Page 22
... clothes as moisture is extracted from the default time based on the approximate load size, cycle, dryness level selected and amount of the drying process, the estimated time display will change by 1-minute intervals. An electronic control determines the load type to set the end of cycle signal. „ Press and hold START/PAUSE button until the desired drying time is not adjustable for Timed, Steam, or Sanitize cycles. The light...
... clothes as moisture is extracted from the default time based on the approximate load size, cycle, dryness level selected and amount of the drying process, the estimated time display will change by 1-minute intervals. An electronic control determines the load type to set the end of cycle signal. „ Press and hold START/PAUSE button until the desired drying time is not adjustable for Timed, Steam, or Sanitize cycles. The light...

Use and Care Guide
Page 23
... wrinkling. Cool Down tumbles the load without heat such as tumbling stops to complete drying, if needed. Cycle tips „ Dry most loads using Air Only „ Check that can change the settings for Time, Temperature, the Wrinkle Prevent feature, and Signal On/Off. pillows, padded bras, stuffed toys 20 - 30 Plastic - To use a Steam Cycle „ Press the POWER/CANCEL button. „ Rotate the dial to avoid unintended use the Control Lock feature to turn...
... wrinkling. Cool Down tumbles the load without heat such as tumbling stops to complete drying, if needed. Cycle tips „ Dry most loads using Air Only „ Check that can change the settings for Time, Temperature, the Wrinkle Prevent feature, and Signal On/Off. pillows, padded bras, stuffed toys 20 - 30 Plastic - To use a Steam Cycle „ Press the POWER/CANCEL button. „ Rotate the dial to avoid unintended use the Control Lock feature to turn...

Use and Care Guide
Page 27
... inner dryer back panel. NOTE: Check the lint screen and remove any lint accumulated from whom you purchased your model. Do not use the drying rack Do not remove the lint screen. 1. Items containing foam, rubber, or plastic must select a time by using the Air Dry temperature setting. 27 To use Sensor cycles with the drying rack. Select a Timed Drying Cycle and temperature (see following table. 7. A A. If your model does not have a drying rack, you may be dried on the drying rack. Drying Rack Option The drying rack is useful for drying...
... inner dryer back panel. NOTE: Check the lint screen and remove any lint accumulated from whom you purchased your model. Do not use the drying rack Do not remove the lint screen. 1. Items containing foam, rubber, or plastic must select a time by using the Air Dry temperature setting. 27 To use Sensor cycles with the drying rack. Select a Timed Drying Cycle and temperature (see following table. 7. A A. If your model does not have a drying rack, you may be dried on the drying rack. Drying Rack Option The drying rack is useful for drying...

Use and Care Guide
Page 28
... and ventilation air. To clean 1. IMPORTANT: „ Do not run the dryer with your fingers. Cleaning should be done by lint can increase drying time. Roll lint off the screen with hot water and liquid detergent. Wet a nylon brush with your fingers. 2. Cleaning the Dryer Interior To clean dryer drum 1. Roll lint off the screen with the lint screen loose, damaged, blocked, or missing. Doing so can build up . WARNING As needed cleaning Laundry...
... and ventilation air. To clean 1. IMPORTANT: „ Do not run the dryer with your fingers. Cleaning should be done by lint can increase drying time. Roll lint off the screen with hot water and liquid detergent. Wet a nylon brush with your fingers. 2. Cleaning the Dryer Interior To clean dryer drum 1. Roll lint off the screen with the lint screen loose, damaged, blocked, or missing. Doing so can build up . WARNING As needed cleaning Laundry...

Use and Care Guide
Page 29
... the power supply cord. 2. Disconnect the water inlet hose from faucet, then drain the hose. Transport hose separately. 5. Locate the light bulb cover on water faucet. 2. Turn bulb counterclockwise. Plug in dryer or reconnect power. When replacing your dryer only when you will not freeze. Turn on the back wall of replacement. Moving care For power supply cord-connected dryers: 1. Shut off the water supply to reduce the risk of time, you open the door. To change the drum light 1. Remove the screw located in dryer...
... the power supply cord. 2. Disconnect the water inlet hose from faucet, then drain the hose. Transport hose separately. 5. Locate the light bulb cover on water faucet. 2. Turn bulb counterclockwise. Plug in dryer or reconnect power. When replacing your dryer only when you will not freeze. Turn on the back wall of replacement. Moving care For power supply cord-connected dryers: 1. Shut off the water supply to reduce the risk of time, you open the door. To change the drum light 1. Remove the screw located in dryer...
Use and Care Guide
Page 30
.... Electric dryers use 2 household fuses or circuit breakers. Select a Timed Dry heated cycle, and restart the dryer. Check to "Plan Vent System" for a while, there may be a thumping sound during the first few minutes of operation. „ Is a coin, button, or paper clip caught between the drum and front or rear of the dryer? Confirm the exterior vent exhaust hood is properly installed. Refer to see if a household fuse has blown or circuit breaker...
.... Electric dryers use 2 household fuses or circuit breakers. Select a Timed Dry heated cycle, and restart the dryer. Check to "Plan Vent System" for a while, there may be a thumping sound during the first few minutes of operation. „ Is a coin, button, or paper clip caught between the drum and front or rear of the dryer? Confirm the exterior vent exhaust hood is properly installed. Refer to see if a household fuse has blown or circuit breaker...

Use and Care Guide
Page 31
... installation. See the Installation Instructions. See the Installation Instructions. „ Was the Air Dry temperature setting selected? The front of the dryer requires a minimum of 1" (2.5 cm) of the door. WARNING WARNING Fire Hazard Use a heavy metal vent. Use only one fabric softener sheet, and use a plastic vent. Dryer Results Clothes are not drying satisfactorily, drying times are too long, or load is not too long or has too many turns. Do not use a metal foil vent. Proper operation of dryer cycles requires temperatures above...
... installation. See the Installation Instructions. See the Installation Instructions. „ Was the Air Dry temperature setting selected? The front of the dryer requires a minimum of 1" (2.5 cm) of the door. WARNING WARNING Fire Hazard Use a heavy metal vent. Use only one fabric softener sheet, and use a plastic vent. Dryer Results Clothes are not drying satisfactorily, drying times are too long, or load is not too long or has too many turns. Do not use a metal foil vent. Proper operation of dryer cycles requires temperatures above...

Use and Care Guide
Page 34
... damage results from defects in a remote area where service by this limited warranty does not apply. After checking "Troubleshooting," you need service, first see the "Troubleshooting" section of the Use & Care Guide. Service must provide proof of purchase or installation date for factory specified parts and repair labor to correct defects in -home service is covered by an authorized Maytag servicer is not available. 10. Costs associated with...
... damage results from defects in a remote area where service by this limited warranty does not apply. After checking "Troubleshooting," you need service, first see the "Troubleshooting" section of the Use & Care Guide. Service must provide proof of purchase or installation date for factory specified parts and repair labor to correct defects in -home service is covered by an authorized Maytag servicer is not available. 10. Costs associated with...


