Owners Manual
Page 5
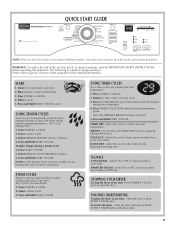
... UP - USING SENSOR CYCLES Sensor Cycles automatically match the cycle setting to set a drying time and temperature. 1. Select a Sensor Cycle. 3. Press START • PAUSE. 2. Press and Hold START • PAUSE. AIR DRY - QUICK DRY - To restart the dryer - Clean lint screen before operating this manual for items requiring drying without heat. Press POWER • CANCEL. 4. See "Cycle Setting Chart." 1. Press and Hold START • PAUSE. Use Air Dry with TIMED DRY for more details. 1. Select ON or OFF, to reduce wrinkles and odors in dryer and shut door...
... UP - USING SENSOR CYCLES Sensor Cycles automatically match the cycle setting to set a drying time and temperature. 1. Select a Sensor Cycle. 3. Press START • PAUSE. 2. Press and Hold START • PAUSE. AIR DRY - QUICK DRY - To restart the dryer - Clean lint screen before operating this manual for items requiring drying without heat. Press POWER • CANCEL. 4. See "Cycle Setting Chart." 1. Press and Hold START • PAUSE. Use Air Dry with TIMED DRY for more details. 1. Select ON or OFF, to reduce wrinkles and odors in dryer and shut door...
Owners Manual
Page 6
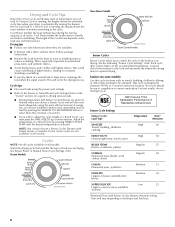
... TIMED CYCLES TEMP until the desired temperature is designed to eliminate 99.9% of energy. Drying tips ■ Follow care label directions when they are drying. Follow package instructions. ■ Remove the load from the dryer as soon as towels, bedding, children's clothing, or other items needing to be run to completion to ensure sanitization. Steam Models Non-Steam Model Cycle Control knobs Sensor Cycles Sensor Cycles allow you to match the cycle to handle and reduces wrinkling...
... TIMED CYCLES TEMP until the desired temperature is designed to eliminate 99.9% of energy. Drying tips ■ Follow care label directions when they are drying. Follow package instructions. ■ Remove the load from the dryer as soon as towels, bedding, children's clothing, or other items needing to be run to completion to ensure sanitization. Steam Models Non-Steam Model Cycle Control knobs Sensor Cycles Sensor Cycles allow you to match the cycle to handle and reduces wrinkling...
Owners Manual
Page 7
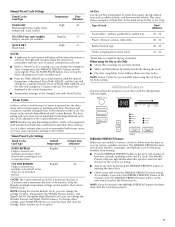
... change by pressing the WRINKLE PREVENT feature or opening the dryer door. ■ Other cycles will continue to get up or down period. 7 The heat setting and cycle time are unable to remove a load of Load Time* (Minutes) Foam rubber - To change the settings for the Rapid Refresh cycle, but can form. Foam rubber pillows are not available when using Air Dry or Air Only ■ Check that require drying without . Steam Preset Cycle Settings Timed Cycles Load Type Default Temperature* Default Time...
... change by pressing the WRINKLE PREVENT feature or opening the dryer door. ■ Other cycles will continue to get up or down period. 7 The heat setting and cycle time are unable to remove a load of Load Time* (Minutes) Foam rubber - To change the settings for the Rapid Refresh cycle, but can form. Foam rubber pillows are not available when using Air Dry or Air Only ■ Check that require drying without . Steam Preset Cycle Settings Timed Cycles Load Type Default Temperature* Default Time...
Owners Manual
Page 8
... lock your clothes are removed, or the WRINKLE PREVENT feature is not adjustable for Timed, Steam, or Sanitize cycles. ■ Sensor Cycles Dryness is finished. NOTE: The Damp Dry Signal works only with Sensor Cycles. It is useful when drying bedsheets/linens in a Sensor Cycle. ■ The dryer enters the cool down part of a timed cycle. The light on . If you to turn on and the selected cycle continues. NOTES: ■ A default time is displayed when a Sensor Cycle...
... lock your clothes are removed, or the WRINKLE PREVENT feature is not adjustable for Timed, Steam, or Sanitize cycles. ■ Sensor Cycles Dryness is finished. NOTE: The Damp Dry Signal works only with Sensor Cycles. It is useful when drying bedsheets/linens in a Sensor Cycle. ■ The dryer enters the cool down part of a timed cycle. The light on . If you to turn on and the selected cycle continues. NOTES: ■ A default time is displayed when a Sensor Cycle...
Owners Manual
Page 9
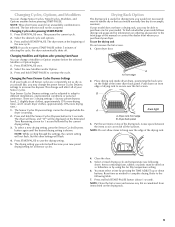
... items so air can reach all Sensor cycles. Reset time as you would like, you would not necessarily want to the following chart). The last selection will flash. 4. NOTE: If you purchased your model. Press and hold the Sensor Cycles Dryness button for example, sweaters). To select a new drying setting, press the Sensor Cycles Dryness button again until the desired drying setting is running. 2. A A. Dryer rack front edge B. Dryer back panel 3. NOTE...
... items so air can reach all Sensor cycles. Reset time as you would like, you would not necessarily want to the following chart). The last selection will flash. 4. NOTE: If you purchased your model. Press and hold the Sensor Cycles Dryness button for example, sweaters). To select a new drying setting, press the Sensor Cycles Dryness button again until the desired drying setting is running. 2. A A. Dryer rack front edge B. Dryer back panel 3. NOTE...

Owners Manual
Page 10
... purchase a Stack Kit. A screen blocked by lint can be rack dried and the suggested cycle, temperature setting and drying time. Clean the lint screen before each load. 10 To order, call the dealer from whom you are available in the door opening of the dryer. NOTE: You must remove drying rack for Part Number 8212640. You may purchase a pair of washer/dryer backguards. These will need to avoid having loose items fall behind the machines during operation. A B A. 10...
... purchase a Stack Kit. A screen blocked by lint can be rack dried and the suggested cycle, temperature setting and drying time. Clean the lint screen before each load. 10 To order, call the dealer from whom you are available in the door opening of the dryer. NOTE: You must remove drying rack for Part Number 8212640. You may purchase a pair of washer/dryer backguards. These will need to avoid having loose items fall behind the machines during operation. A B A. 10...
Owners Manual
Page 11
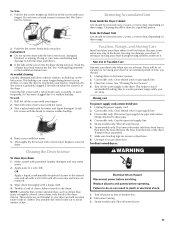
... done by a qualified person. Clean lint screen. Moving care For power supply cord-connected dryers: 1. See "Venting Requirements" in gas supply line. 3. Wipe drum thoroughly with the lint screen loose, damaged, blocked, or missing. Because some water may discolor the dryer interior. Unplug dryer or disconnect power. 2. See "Cleaning the Lint Screen." 4. Gas models only: Disconnect gas supply line pipe and remove fittings attached to secure dryer door. Disconnect wiring. 3. Pull the lint screen straight up on dryer usage. As needed cleaning Laundry detergent and fabric...
... done by a qualified person. Clean lint screen. Moving care For power supply cord-connected dryers: 1. See "Venting Requirements" in gas supply line. 3. Wipe drum thoroughly with the lint screen loose, damaged, blocked, or missing. Because some water may discolor the dryer interior. Unplug dryer or disconnect power. 2. See "Cleaning the Lint Screen." 4. Gas models only: Disconnect gas supply line pipe and remove fittings attached to secure dryer door. Disconnect wiring. 3. Pull the lint screen straight up on dryer usage. As needed cleaning Laundry detergent and fabric...
Owners Manual
Page 12
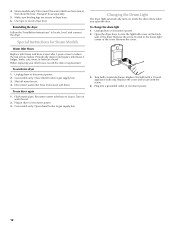
... valve in dryer or reconnect power. 3. Plug in gas supply line. 3. To change the drum light 1. Locate the light bulb cover on the back wall of replacement. Replace the bulb with the screw. 4. Transport hose separately. 5. Gas models only: Open shutoff valve in the lower right corner of the cover. Turn bulb counterclockwise. Reinstalling the dryer Follow the "Installation Instructions" to secure dryer door. Disconnect water inlet hose from faucet, then drain the hose. To use to faucet. Use tape to locate, level, and connect the dryer. Shut off water...
... valve in dryer or reconnect power. 3. Plug in gas supply line. 3. To change the drum light 1. Locate the light bulb cover on the back wall of replacement. Replace the bulb with the screw. 4. Transport hose separately. 5. Gas models only: Open shutoff valve in the lower right corner of the cover. Turn bulb counterclockwise. Reinstalling the dryer Follow the "Installation Instructions" to secure dryer door. Disconnect water inlet hose from faucet, then drain the hose. To use to faucet. Use tape to locate, level, and connect the dryer. Shut off water...
Owners Manual
Page 13
... www.maytag.ca Dryer Operation Dryer will continue to run when this diagnostic code is free of non-use? Electric dryers require 120-volt power supply and gas dryers require 240-volt power supply. If the dryer hasn't been used ? See "Installation Instructions." ■ Is the clothing knotted or balled up , the load will turn, but you are using. The dryer will continue to run from turning on. Try the following: Check to "Electrical Connection" for details. Replace the fuse or reset the circuit breaker...
... www.maytag.ca Dryer Operation Dryer will continue to run when this diagnostic code is free of non-use? Electric dryers require 120-volt power supply and gas dryers require 240-volt power supply. If the dryer hasn't been used ? See "Installation Instructions." ■ Is the clothing knotted or balled up , the load will turn, but you are using. The dryer will continue to run from turning on. Try the following: Check to "Electrical Connection" for details. Replace the fuse or reset the circuit breaker...
Owners Manual
Page 14
... where your dryer is located? Loads are wrinkled ■ Was the load removed from dryer at the beginning of lint or replace exhaust vent with heavy metal or flexible metal vent. Odors ■ Have you do not feel air movement, clean exhaust system of the cycle. Lint screen should be contacting the sensor strips. Separate the load to dry quickly? See "Installation Instructions." ■ Are fabric softener sheets blocking the grille? Level the dryer. Lint on Sensor Cycles. Check for...
... where your dryer is located? Loads are wrinkled ■ Was the load removed from dryer at the beginning of lint or replace exhaust vent with heavy metal or flexible metal vent. Odors ■ Have you do not feel air movement, clean exhaust system of the cycle. Lint screen should be contacting the sensor strips. Separate the load to dry quickly? See "Installation Instructions." ■ Are fabric softener sheets blocking the grille? Level the dryer. Lint on Sensor Cycles. Check for...
Owners Manual
Page 15
... the installation of your complete model number and serial number. This major appliance is intended to know your major appliance, to instruct you also may not apply to resolve the problem after checking "Troubleshooting," additional help you obtain assistance or service if you . Expenses for travel and transportation for factory specified parts and repair labor to province. This warranty gives you specific legal rights, and...
... the installation of your complete model number and serial number. This major appliance is intended to know your major appliance, to instruct you also may not apply to resolve the problem after checking "Troubleshooting," additional help you obtain assistance or service if you . Expenses for travel and transportation for factory specified parts and repair labor to province. This warranty gives you specific legal rights, and...
Installation Instructions
Page 2
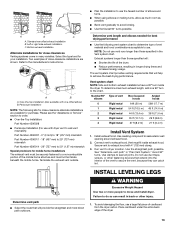
... and parts before purchasing parts. Read and follow the instructions provided with any tools listed here. ■ Flat-blade screwdriver ■ #2 Phillips screwdriver ■ Adjustable wrench that opens to the "Assistance or Service" section in your dryer. Check that all parts are included. NOTE: Do not use leveling legs supplied with dryer if installing on a pedestal. 4 Leveling legs Remove parts package from dryer drum. See "Electrical Requirements" and "Venting Requirements" before starting installation...
... and parts before purchasing parts. Read and follow the instructions provided with any tools listed here. ■ Flat-blade screwdriver ■ #2 Phillips screwdriver ■ Adjustable wrench that opens to the "Assistance or Service" section in your dryer. Check that all parts are included. NOTE: Do not use leveling legs supplied with dryer if installing on a pedestal. 4 Leveling legs Remove parts package from dryer drum. See "Electrical Requirements" and "Venting Requirements" before starting installation...
Installation Instructions
Page 3
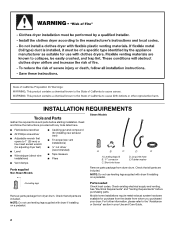
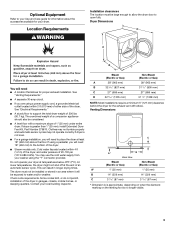
... mm), install Extended Dryer Feet Kit, Part Number 279810. Location Requirements Installation clearances The location must not be installed or stored in an area where it will need to your Use and Care guide for information about the accessories available for your washer using a pedestal, you will need ■ A location that allows for the exhaust vent with a maximum slope of the dryer in longer drying times. Dryer Dimensions D A B C You will need 18" (460 mm) to water and/or...
... mm), install Extended Dryer Feet Kit, Part Number 279810. Location Requirements Installation clearances The location must not be installed or stored in an area where it will need to your Use and Care guide for information about the accessories available for your washer using a pedestal, you will need ■ A location that allows for the exhaust vent with a maximum slope of the dryer in longer drying times. Dryer Dimensions D A B C You will need 18" (460 mm) to water and/or...
Installation Instructions
Page 5
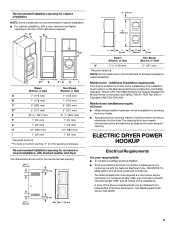
... that the electrical connection is suitable for recessed or closet installation, with the National Electrical Code, ANSI/NFPA 70latest edition and all mobile home installations. ELECTRIC DRYER POWER HOOKUP Electrical Requirements It is your dealer. ■ Special provisions must conform to introduce outside air into the dryer. Additional installation requirements This dryer is adequate and in remodeling after 1996, dryer circuits involved in conformance with stacked washer and dryer The dimensions shown are...
... that the electrical connection is suitable for recessed or closet installation, with the National Electrical Code, ANSI/NFPA 70latest edition and all mobile home installations. ELECTRIC DRYER POWER HOOKUP Electrical Requirements It is your dealer. ■ Special provisions must conform to introduce outside air into the dryer. Additional installation requirements This dryer is adequate and in remodeling after 1996, dryer circuits involved in conformance with stacked washer and dryer The dimensions shown are...

Installation Instructions
Page 6
... neutral or grounding circuit. ■ Do not use an extension cord. ■ If codes permit and a separate ground wire is used when the appliance is prohibited. A timedelay fuse or circuit breaker is permanently connected to remaining 2 terminals (gold). The kit should be type SRD or SRDT and be either green or bare. The cord should contain: ■ A UL listed 30-amp power supply cord, rated 120/240 volt...
... neutral or grounding circuit. ■ Do not use an extension cord. ■ If codes permit and a separate ground wire is used when the appliance is prohibited. A timedelay fuse or circuit breaker is permanently connected to remaining 2 terminals (gold). The kit should be type SRD or SRDT and be either green or bare. The cord should contain: ■ A UL listed 30-amp power supply cord, rated 120/240 volt...
Installation Instructions
Page 10
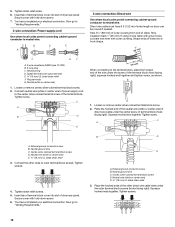
... "Venting Requirements." 3-wire connection: Power supply cord Use where local codes permit connecting cabinet-ground conductor to the terminal block, place the hooked end of the wire under the center screw of extra length so dryer can be moved if needed. Now go to outer terminal block screws. Spade terminals with outer covering. Tighten screw. Strip insulation back 1" (25 mm). Tighten screw. Tighten strain relief screws. 5. You have completed your electrical connection. Direct wire...
... "Venting Requirements." 3-wire connection: Power supply cord Use where local codes permit connecting cabinet-ground conductor to the terminal block, place the hooked end of the wire under the center screw of extra length so dryer can be moved if needed. Now go to outer terminal block screws. Spade terminals with outer covering. Tighten screw. Strip insulation back 1" (25 mm). Tighten screw. Tighten strain relief screws. 5. You have completed your electrical connection. Direct wire...
Installation Instructions
Page 11
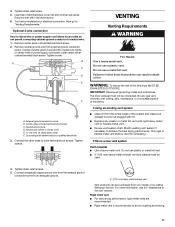
... of terminal block cover into any plastic or metal foil vent with hold-down screw. 6. Secure cover with rigid heavy metal vent or flexible metal vent. ■ Review vent system chart. Remove neutral ground wire from your electrical connection. Connect the other wires to achieve the best drying performance. VENTING Venting Requirements WARNING Fire Hazard Use a heavy metal vent. Do not use a plastic vent. Only rigid or flexible metal vent shall be used for direct wire or power supply cord...
... of terminal block cover into any plastic or metal foil vent with hold-down screw. 6. Secure cover with rigid heavy metal vent or flexible metal vent. ■ Review vent system chart. Remove neutral ground wire from your electrical connection. Connect the other wires to achieve the best drying performance. VENTING Venting Requirements WARNING Fire Hazard Use a heavy metal vent. Do not use a plastic vent. Only rigid or flexible metal vent shall be used for direct wire or power supply cord...
Installation Instructions
Page 13
... dryer. Secure vent to exhaust hood. Two examples of the mobile home structure and must not terminate beneath the mobile home. A B A. Please see the "Assistance or Service" section to order. ■ Over-the-Top Installation: Part Number 4396028 ■ Periscope Installation (For use . Run vent to a noncombustible portion of close clearances Venting systems come in longer drying times and increased energy usage. Use clamps to achieve the best drying performance...
... dryer. Secure vent to exhaust hood. Two examples of the mobile home structure and must not terminate beneath the mobile home. A B A. Please see the "Assistance or Service" section to order. ■ Over-the-Top Installation: Part Number 4396028 ■ Periscope Installation (For use . Run vent to a noncombustible portion of close clearances Venting systems come in longer drying times and increased energy usage. Use clamps to achieve the best drying performance...
Installation Instructions
Page 15
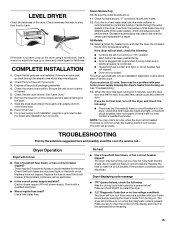
... a circuit breaker tripped? If the problem continues, call ... The dryer will go back through the water system in a running for 5 minutes, open the dryer door and feel heat, cancel cycle and close the door. If there is first heated. See "Level Dryer." 6. Read "Dryer Use." 9. Electric dryers use of the dryer. COMPLETE INSTALLATION 1. The odor will continue to see which will turn on . Dryer Operation Dryer will not start, check the following : Was the drying cycle interrupted by a power failure? Check...
... a circuit breaker tripped? If the problem continues, call ... The dryer will go back through the water system in a running for 5 minutes, open the dryer door and feel heat, cancel cycle and close the door. If there is first heated. See "Level Dryer." 6. Read "Dryer Use." 9. Electric dryers use of the dryer. COMPLETE INSTALLATION 1. The odor will continue to see which will turn on . Dryer Operation Dryer will not start, check the following : Was the drying cycle interrupted by a power failure? Check...
Installation Instructions
Page 16
... long, or load is properly installed. Long venting will continue to run cleaned. ■ "E" Variable (E1, E2, E3) service codes: Call for 5-10 minutes. Select a Timed Dry heated cycle, and restart the dryer. If the message persists, have ventilation openings at the top and bottom of the dryer requires 5" (127 mm). Try the following : ■ Clean lint screen. ■ Check to see if a household fuse has blown or circuit breaker has tripped. Refer to check air...
... long, or load is properly installed. Long venting will continue to run cleaned. ■ "E" Variable (E1, E2, E3) service codes: Call for 5-10 minutes. Select a Timed Dry heated cycle, and restart the dryer. If the message persists, have ventilation openings at the top and bottom of the dryer requires 5" (127 mm). Try the following : ■ Clean lint screen. ■ Check to see if a household fuse has blown or circuit breaker has tripped. Refer to check air...


