
User Guide
Page 3
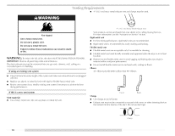
...all safety messages. Close supervision of children is necessary when the dryer is used near children. [] Before the dryer is removed from the accumulation of lint, dust, and dirt. [] The interior of the dryer and exhaust vent should be exposed to dry articles containing foam rubber or similarly...give off vapors that you don't follow instructions. IMPORTANT SAFETY INSTRUCTIONS WARNJN G: To reduce the risk of fire, electric shock, or injury to persons when using the dryer. [] Do not place items exposed to cooking oils in published user-repair instructions that could cause a load to ...
...all safety messages. Close supervision of children is necessary when the dryer is used near children. [] Before the dryer is removed from the accumulation of lint, dust, and dirt. [] The interior of the dryer and exhaust vent should be exposed to dry articles containing foam rubber or similarly...give off vapors that you don't follow instructions. IMPORTANT SAFETY INSTRUCTIONS WARNJN G: To reduce the risk of fire, electric shock, or injury to persons when using the dryer. [] Do not place items exposed to cooking oils in published user-repair instructions that could cause a load to ...
User Guide
Page 4
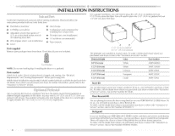
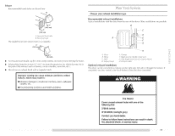
Check existing electrical supply and venting. I Are you planning to stack your PERFORMANCE SERIES dryer? I li!)IOI {I ....... You may purchase a pair of approximately 48" (121.9 cm) or 53.5" (135.9 cm), respectively. 4 For a garage installation, you purchased your dryer. Pedestal Height Color Part Number ...floor. / A B A. !0" (25.4 cm) pedestal B. 15.5" (39.4 cm) pedestal The pedestals are installing your PERFORMANCE SERIES washer and dryer and wish to the "Assistance or Service" section. Ask for Part Number W10200372. You will need to reverse the door swing...
Check existing electrical supply and venting. I Are you planning to stack your PERFORMANCE SERIES dryer? I li!)IOI {I ....... You may purchase a pair of approximately 48" (121.9 cm) or 53.5" (135.9 cm), respectively. 4 For a garage installation, you purchased your dryer. Pedestal Height Color Part Number ...floor. / A B A. !0" (25.4 cm) pedestal B. 15.5" (39.4 cm) pedestal The pedestals are installing your PERFORMANCE SERIES washer and dryer and wish to the "Assistance or Service" section. Ask for Part Number W10200372. You will need to reverse the door swing...
User Guide
Page 5
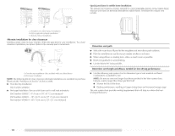
...garage installation, you will be large enough to allow the dryer door to place the dryer at least 18 inches (46 cm) above the floor. Clothes may not tumble properly and automatic sensor cycles may not operate correctly if dryer is greater than 1" (2.5 cm), install Extended [)ryer...using a power supply cord, a grounded electrical outlet located within 2 ft (61 cm) of either side of the dryer to the bottom of installation and servicing. This dryer has been tested for ease of the dryer. [)o not operate your local building inspector. See "Venting Requirements." • A separate 30-amp...
...garage installation, you will be large enough to allow the dryer door to place the dryer at least 18 inches (46 cm) above the floor. Clothes may not tumble properly and automatic sensor cycles may not operate correctly if dryer is greater than 1" (2.5 cm), install Extended [)ryer...using a power supply cord, a grounded electrical outlet located within 2 ft (61 cm) of either side of the dryer to the bottom of installation and servicing. This dryer has been tested for ease of the dryer. [)o not operate your local building inspector. See "Venting Requirements." • A separate 30-amp...

User Guide
Page 6
...)(2.5 cm)(68.6cm) (2.5 cm) * Required spacing **For side or bottom venting, 0" (0 cm) spacing is allowed. Recessed area B. Side view - Closet door with a door, minimum ventilation openings in .2. (155 cm2) " I1"*_ 31,J*2l"s"-I (68.6crn) B A. Dryer on pedestal I oloo (2.5 crn) 27" >I (2.5cm) (80cm) (12.7cm) A A. Dryer only 1"* ---_ I-,_-_27"--_11_(-- 1"* (2.5cm) (68.6crn) (2.5cm) *Required spacing...
...)(2.5 cm)(68.6cm) (2.5 cm) * Required spacing **For side or bottom venting, 0" (0 cm) spacing is allowed. Recessed area B. Side view - Closet door with a door, minimum ventilation openings in .2. (155 cm2) " I1"*_ 31,J*2l"s"-I (68.6crn) B A. Dryer on pedestal I oloo (2.5 crn) 27" >I (2.5cm) (80cm) (12.7cm) A A. Dryer only 1"* ---_ I-,_-_27"--_11_(-- 1"* (2.5cm) (68.6crn) (2.5cm) *Required spacing...

User Guide
Page 12
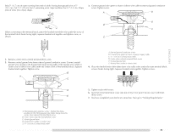
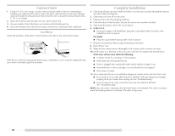
... screw B. Center silver-colored terminal block screw E. Connect the other wires to center silvercolored terminal block screw. B. Now go to "Venting Requirements." 4-wire connection: Direct wire IMPORTANT: A 4-wire connection is required for mobile homes and where local codes do not permit the...UL listed strain relief 5. Spade terminals with hold- A. You have 5 ft (1.52 m) of extra length so dryer can be moved if needed. 12 Direct wire cable must have completed your electrical connection. Y4" ( 1.9 cm) UL listed strain relief D. Neutral wire (white or center wire) E. 4-...
... screw B. Center silver-colored terminal block screw E. Connect the other wires to center silvercolored terminal block screw. B. Now go to "Venting Requirements." 4-wire connection: Direct wire IMPORTANT: A 4-wire connection is required for mobile homes and where local codes do not permit the...UL listed strain relief 5. Spade terminals with hold- A. You have 5 ft (1.52 m) of extra length so dryer can be moved if needed. 12 Direct wire cable must have completed your electrical connection. Y4" ( 1.9 cm) UL listed strain relief D. Neutral wire (white or center wire) E. 4-...
User Guide
Page 13
...ground conductor screw - Squeeze hooked ends together. JjJ D A. Neutral ground wire D. You have completed your electrical connection. Squeeze hooked ends together. Tighten screws. !! !! Neutral wire (white or center wire) E. 3/4" ...white or center wire) of direct wire cable under the center screw of dryer rear panel. External ground conductor screw B. Insert tab of terminal block cover ... with hold- Center silver-colored terminal block screw E. efore being moved to "Venting Requirements." Now go to center silver-colored terminal block screw. Remove neutral ground wire...
...ground conductor screw - Squeeze hooked ends together. JjJ D A. Neutral ground wire D. You have completed your electrical connection. Squeeze hooked ends together. Tighten screws. !! !! Neutral wire (white or center wire) E. 3/4" ...white or center wire) of direct wire cable under the center screw of dryer rear panel. External ground conductor screw B. Insert tab of terminal block cover ... with hold- Center silver-colored terminal block screw E. efore being moved to "Venting Requirements." Now go to center silver-colored terminal block screw. Remove neutral ground wire...

User Guide
Page 14
... wire (white or center wire) E. Connect neutral wire (white or center wire) of extra length so dryer can be moved if needed. Now go to "Venting Requirements." 3-wire connection: Direct wire Use where local codes permit connecting cabinet-ground conductor to neutral wire. 3....2. down screw. 6. You have 5 ft (1.52 m) of power supply cord to outer terminal block screws. Direct wire cable must have completed your electrical connection. Neutra/ (white or center wire) 1. Secure cover with outer covering. Spade termina/5 with up turned ends E. Tighten screw. 4. Tighten strain...
... wire (white or center wire) E. Connect neutral wire (white or center wire) of extra length so dryer can be moved if needed. Now go to "Venting Requirements." 3-wire connection: Direct wire Use where local codes permit connecting cabinet-ground conductor to neutral wire. 3....2. down screw. 6. You have 5 ft (1.52 m) of power supply cord to outer terminal block screws. Direct wire cable must have completed your electrical connection. Neutra/ (white or center wire) 1. Secure cover with outer covering. Spade termina/5 with up turned ends E. Tighten screw. 4. Tighten strain...

User Guide
Page 15
...facing right). fxtemal ground conductor screw B. Neutral ground wire C. Place the hooked ends of dryer rear panel. Neutral ground wire D. Squeeze hooked end together. Secure cover with hold- ...screw. Center silver-colored terminal bkJck screw D. You have completed your electrical connection. External ground conductor screw B. Optional 3-wire connection Use for... direct wire or power supply cord where local codes do not permit connecting cabinet-ground conductor to "Venting Requirements." Tighten screws. A '_i B E A. Y4" ( 1.9 cm) UL listed strain relief ...
...facing right). fxtemal ground conductor screw B. Neutral ground wire C. Place the hooked ends of dryer rear panel. Neutral ground wire D. Squeeze hooked end together. Secure cover with hold- ...screw. Center silver-colored terminal bkJck screw D. You have completed your electrical connection. External ground conductor screw B. Optional 3-wire connection Use for... direct wire or power supply cord where local codes do not permit connecting cabinet-ground conductor to "Venting Requirements." Tighten screws. A '_i B E A. Y4" ( 1.9 cm) UL listed strain relief ...
User Guide
Page 16
... Clean lint from your dealer or by calling Maytag Services. I NG" To reduce the risk of the duct. Clamp 16 The dryer exhaust must be used. Fire Hazard Use a heavy metal vent. Failure to achieve the best drying performance. IMPORTANT: Observe all joints. If this dryer MUST BE EXHAUSTED OUTDOORS. Good Better Clamps Use clamps...
... Clean lint from your dealer or by calling Maytag Services. I NG" To reduce the risk of the duct. Clamp 16 The dryer exhaust must be used. Fire Hazard Use a heavy metal vent. Failure to achieve the best drying performance. IMPORTANT: Observe all joints. If this dryer MUST BE EXHAUSTED OUTDOORS. Good Better Clamps Use clamps...
User Guide
Page 17
...rocks or bushes, snow line, etc.). • Do not use an exhaust hood with one of the dryer. Exhaust outlet metal vent to connect elbows Optional exhaust installations This dryer can cause moisture and lint to exhaust (Jut the right side, [eft side or through the bottom. ...prefer, you may contact your exhaust installation type Recommended exhaust installations Typical installations vent the dryer from the ground or any object that may be converted to collect indoors, which may result in death, fire, electrical shock, or serious injury. Louvered hood style B. Box hood style The ...
...rocks or bushes, snow line, etc.). • Do not use an exhaust hood with one of the dryer. Exhaust outlet metal vent to connect elbows Optional exhaust installations This dryer can cause moisture and lint to exhaust (Jut the right side, [eft side or through the bottom. ...prefer, you may contact your exhaust installation type Recommended exhaust installations Typical installations vent the dryer from the ground or any object that may be converted to collect indoors, which may result in death, fire, electrical shock, or serious injury. Louvered hood style B. Box hood style The ...
User Guide
Page 18
... C. Select the type best for purchase. clearance installations are available for your installation. Over-the-top instaflation (also available with dryer vent to wall vent mismatch): Part Number 4396037 - 0" (0 cm) to 18" (45.72 cm) mismatch Part Number 4396011 - 18" (... than those specified Exhaust systems longer than those specified will help to the manufacturer's instructions. Terminate the exhaust vent outside. Determine vent length and elbows needed for best drying performance • Use the following kits for close - --t2z 2:: :: ! A C A. Two close clearance...
... C. Select the type best for purchase. clearance installations are available for your installation. Over-the-top instaflation (also available with dryer vent to wall vent mismatch): Part Number 4396037 - 0" (0 cm) to 18" (45.72 cm) mismatch Part Number 4396011 - 18" (... than those specified Exhaust systems longer than those specified will help to the manufacturer's instructions. Terminate the exhaust vent outside. Determine vent length and elbows needed for best drying performance • Use the following kits for close - --t2z 2:: :: ! A C A. Two close clearance...

User Guide
Page 19
... location. Place a carton corner post from the dryer carton. I.eave enough room to exhaust hood. Vent system chart NOTE: Side and bottom exhaust installations have a 90 ° turn to the chart. Secure vent to dryer location. Failure to finish turning the legs until ... m) 23 ff (7 m) 2 Rigid metal 44 ft (13.4 m) 38 ft (11.6 m) Flexible metal 27 ft (8.2 m) 19 ft (5.8 m) 3 Rigid metal 35 ft (10.7 m) 29 ft (8.8 m) Flexible metal 25 ft (7.6 m) 17 ft (5.2 m) 4 Rigid metal 27 ft (8.2 m) 21 ft (6.4 m) Flexible metal 23 ft (7 m) 15 ft (4.6 m) 1. Use clamps to...
... location. Place a carton corner post from the dryer carton. I.eave enough room to exhaust hood. Vent system chart NOTE: Side and bottom exhaust installations have a 90 ° turn to the chart. Secure vent to dryer location. Failure to finish turning the legs until ... m) 23 ff (7 m) 2 Rigid metal 44 ft (13.4 m) 38 ft (11.6 m) Flexible metal 27 ft (8.2 m) 19 ft (5.8 m) 3 Rigid metal 35 ft (10.7 m) 29 ft (8.8 m) Flexible metal 25 ft (7.6 m) 17 ft (5.2 m) 4 Rigid metal 27 ft (8.2 m) 21 ft (6.4 m) Flexible metal 23 ft (7 m) 15 ft (4.6 m) 1. Use clamps to...
User Guide
Page 20
... first heated. Check that you receive an AF code, your tools. 3. Set the dryer on . See "Troubleshooting". Once the exhaust vent connection is first used. Check that there are now installed. Dispose of the dryer. Move dryer into a grounded outlet and/or electrical supply is closed. For direct wire • Plug into a grounded outlet. The...
... first heated. Check that you receive an AF code, your tools. 3. Set the dryer on . See "Troubleshooting". Once the exhaust vent connection is first used. Check that there are now installed. Dispose of the dryer. Move dryer into a grounded outlet and/or electrical supply is closed. For direct wire • Plug into a grounded outlet. The...

User Guide
Page 27
... Clean the lint screen with the brush to stop before your clothes, or cause the dryer to remove residue buildup. Wet a nylon brush with a clean towel. Place dryer at least 18 inches (46 cm) above the floor for normal tumbling. Thoroughly dry lint screen with hot ...water and liquid detergent. This buildup can 1. See "Venting Requirements." Rinse screen with the \ \\ 2. Pull the lint screen...
... Clean the lint screen with the brush to stop before your clothes, or cause the dryer to remove residue buildup. Wet a nylon brush with a clean towel. Place dryer at least 18 inches (46 cm) above the floor for normal tumbling. Thoroughly dry lint screen with hot ...water and liquid detergent. This buildup can 1. See "Venting Requirements." Rinse screen with the \ \\ 2. Pull the lint screen...

User Guide
Page 28
...: 1. Clean lint screen. Moving care For power supply cord-connected dryers: 1. Disconnect powen 2. S,s {_S From Inside the Dryer Cabinet I.int should be removed every 2 years, or more often, depending on dryer usage. From the Exhaust Vent I += See "Cleaning the I_int Screen." Replace all excess dye ...extended period of time, you will not stain future loads of clothes. Make sure leveling legs are secure in dryer base. 4. Electrical Shock Hazard Disconnect power before operating. Unplug the power supply cord. 2. Use masking tape to dry drum. ...
...: 1. Clean lint screen. Moving care For power supply cord-connected dryers: 1. Disconnect powen 2. S,s {_S From Inside the Dryer Cabinet I.int should be removed every 2 years, or more often, depending on dryer usage. From the Exhaust Vent I += See "Cleaning the I_int Screen." Replace all excess dye ...extended period of time, you will not stain future loads of clothes. Make sure leveling legs are secure in dryer base. 4. Electrical Shock Hazard Disconnect power before operating. Unplug the power supply cord. 2. Use masking tape to dry drum. ...
User Guide
Page 29
...the following : Clean lint screen. Replace the fuse or reset the circuit breaker. Confirm the exterior vent exhaust hood is the dryer level front to back and side to see if the vent run when this diagnostic code is crushed or kinked. "E" Variable (El, E2, E3) service...time remaining. 21!: Try the following: Check to side? http://maytag.custhelp.com - In Canada www.maytag.ca Dryer will continue to vibrate. Check that both fuses are using. Electric dryers require 240-volt power supply. Is the dryer door firmly closed? I_arge loads may vibrate if not properly installed...
...the following : Clean lint screen. Replace the fuse or reset the circuit breaker. Confirm the exterior vent exhaust hood is the dryer level front to back and side to see if the vent run when this diagnostic code is crushed or kinked. "E" Variable (El, E2, E3) service...time remaining. 21!: Try the following: Check to side? http://maytag.custhelp.com - In Canada www.maytag.ca Dryer will continue to vibrate. Check that both fuses are using. Electric dryers require 240-volt power supply. Is the dryer door firmly closed? I_arge loads may vibrate if not properly installed...

User Guide
Page 30
...; Is the lint screen clogged? See the Installation Instructions. Use 4" (10.2 cm) diameter vent material. 30 Explosion Hazard Keep flammable materials and vapors, such as gasoline, away from dryer. See "Additional • Is the load too large and heavy to follow these instructions or ...dried. Failure to dry quickly? Are fabric softener sheets blocking the grille? Is the dryer located in a cycle. See the Installation Instructions. Closet doors must have ventilation openings at least 18 inches (46 cm) above 45°F (7°C). Is the SensorSensor cycle ending early? ...
...; Is the lint screen clogged? See the Installation Instructions. Use 4" (10.2 cm) diameter vent material. 30 Explosion Hazard Keep flammable materials and vapors, such as gasoline, away from dryer. See "Additional • Is the load too large and heavy to follow these instructions or ...dried. Failure to dry quickly? Are fabric softener sheets blocking the grille? Is the dryer located in a cycle. See the Installation Instructions. Closet doors must have ventilation openings at least 18 inches (46 cm) above 45°F (7°C). Is the SensorSensor cycle ending early? ...


