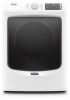
Maytag MED5630HW Support Question
Maytag MED5630HW Support Question
Find answers below for this question about Maytag MED5630HW.Need a Maytag MED5630HW manual? We have 5 online manuals for this item!
Question posted by lvroegin on December 23rd, 2021
Med5630hw Vent Location
I'm building a new wall to put this dryer on top of a MHW5630HW washer. Can you provide a spec sheet of the back of this dryer (with dimensions) showing where the 4" rear exhaust vent is located? Thank You!
Current Answers
Answer #1: Posted by SonuKumar on December 23rd, 2021 10:19 AM
SonuKumar

Member since:
May 9th, 2021 Points: 16,621,300

Member since:
May 9th, 2021 Points: 16,621,300
https://www.searspartsdirect.com/model/68y1y3um65-003048/maytag-med5630hw0-dryer-parts
https://www.maytag.com/services/replacement-parts.html
https://www.manualslib.com/manual/99933/Maytag-Med5600tq0.html
Please respond to my effort to provide you with the best possible solution by using the "Acceptable Solution" and/or the "Helpful" buttons when the answer has proven to be helpful.
Regards,
Sonu
Your search handyman for all e-support needs!!
Answer #2: Posted by Technoprince123 on December 23rd, 2021 6:49 AM
Technoprince123

Member since:
February 8th, 2021 Points: 1,205,190
Member since:
February 8th, 2021 Points: 1,205,190
https://manualzz.com/manual/en/Maytag/MED5630HW/User%2Bmanual
https://www.manualslib.com/products/Maytag-Med5630hw-11235152.html
Please response if this answer is acceptable and solw your problem thanks
Related Maytag MED5630HW Manual Pages
Installation Instructions - Page 4

...use leveling legs supplied with dryer if installing with dryer): ■■ Vent clamps ■■ Vent elbows and vent work Tools needed for all models):
Tape measure
Pliers
Utility knife
Tin snips (new vent installations)
Leveling legs (4) ... socket wrench
Wire stripper (direct wire installations)
4
Rubber washer
5' (1.52 m) inlet hose
Parts package is located in dryer drum.
Installation Instructions - Page 5

....
■■ A UL Listed strain relief. The wires that connect to bottom of automatic sensor cycles, resulting in garages, closets, mobile homes, or sleeping quarters. DRYER DIMENSIONS Front view:
Side view: Whirlpool® Models
You will need :
■■ A location allowing for use your local building inspector.
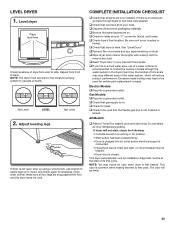
Installation Instructions - Page 6

... are required. Installation spacing for recessed area or closet installation All dimensions show recommended and minimum spacing allowed.
■■ Additional spacing should be considered for ease of installation and servicing.
■■ Additional clearances might be required for wall, door, floor moldings, dryer venting, and gas line.
■■ Additional spacing should be...
Installation Instructions - Page 7

...electrical supply connection. If using and follow the instructions provided for use an extension cord. ■■ ...wire), covered with clothes dryers. The National Electrical Code requires a 4-wire power supply connection for (1) new branch-circuit installations after...that the electrical connection is adequate and in a location where grounding through the neutral is your outlet looks...
Installation Instructions - Page 8

...conductor can result in a risk of least resistance for electric current. Be sure wall receptacle is properly installed and grounded in the "Assistance or Service" section of ...will reduce the risk of electric shock by providing a path of electric shock. WARNING: Improper connection of dryer's final location. This dryer is equipped with a cord having an equipmentgrounding...
Installation Instructions - Page 9

... a different gas without consulting your home. The location should be installed in
your gas company. Gas shut-off valve must be easy to the dryer. Failure to do not use copper tubing. ■... that an individual manual shut-off valve must be easy to reach for use a new flexible stainless steel gas connector (Design Certified by the American Gas Association or CSA International...
Installation Instructions - Page 10

...and the dryer gas pipe, as needed to connect the exhaust vent.
10 ...dryer is required for gas appliances, ANSI Z21.24 or CSA 6.10.
use TEFLON® tape. ■■ This dryer must be connected to the gas supply line with a
listed flexible gas connector that comes out through the rear of dryer. Slide the dryer on cardboard.
2. Do not use a wrench to its final location...
Installation Instructions - Page 13

... center terminal block screw (B). 13 Connect neutral wire (white or center) (C) of dryer rear panel. Tighten screw.
3. Connect remaining wires
3-wire receptacle (NEMA type 10-30R)
3 prong plug
Spade terminals with hold -down screw.
Tighten screws. Now go to "Venting Requirements."
3-Wire Power Supply Cord Connection
Use where local codes permit connecting cabinet...
Installation Instructions - Page 15

...with hold-down screw.
Squeeze hooked ends together and tighten screws. Now go to "Venting Requirements."
3-Wire Direct Wire Connection
Use where local codes permit connecting cabinet-ground conductor to...Direct wire cable must have 5 ft. (1.52 m) of dryer rear panel. Shape wire ends into slot of extra length so dryer may be moved if needed. Remove center terminal block screw ...
Installation Instructions - Page 16

... (B). Secure cover with hold -down screw. Tighten screw.
4. Tighten screw.
3.
Remove center terminal block screw (B). Connect remaining wires
Place hooked ends of dryer rear panel. Tighten screws. Prepare to "Venting Requirements." Finally, reinsert tab of terminal block cover into slot of remaining direct wire cable wires under outer terminal block screws (hooks facing...
Installation Instructions - Page 17

... any leak found.
17 Plan pipe fitting connection (Option 1)
Explosion Hazard
Use a new CSA International approved gas supply line.
A recommended connection is used to connect dryer to supply line type, size, and location.
3. If flexible metal tubing is shown. Bubbles will show a leak.
Then, test all gas connections. Securely tighten all connections by brushing...
Installation Instructions - Page 18

... provide better airflow than 90° elbows. Do not use duct tape.
18
Flexible metal vent: (Acceptable only if accessible to clean)
■■ Must be fully extended and supported in final dryer location. ■■ Remove excess to avoid sagging and kinking that may obstruct exhaust (such as shown in the "Vent System Charts."
VENTING Venting Requirements...
Installation Instructions - Page 19

... terminate beneath the mobile home. NOTE: Do not use . Elbow C. Exhaust systems longer than those specified will:
■■ Shorten life of
vent material and hood combinations acceptable to connect elbows
H. Dryer B. Standard rear offset exhaust installation B. Left- A. Wall D. Exhaust hood E. Failure to follow these instructions can be securely fastened to a noncombustible...
Installation Instructions - Page 20

... catch lint. Avoid 90° turns.
XXXXXXXXXX. Use clamps to dryer location using straightest path possible. Install Vent System
1. XXXXXXX-XXX.
Run vent to seal all joints. NOTE: For long vent systems, use caulking compound to exhaust hood with 4" (102 mm) clamp. Secure vent to seal exterior wall opening around exhaust hood.
20 A gas model would be DJAV - Install...
Installation Instructions - Page 21

...Vent." Damage to cold water faucet. Then attach "Y" connector to male end of hose failure.
Tighten couplings
1. Remove old rubber washer... on connector.
21
The dryer must be connected to the...washer
Using pliers, tighten the couplings with new rubber washer.
2. NOTE: Do not overtighten. Attach short hose and "Y" connector
Attach one of "Y" connector. Attach washer...
Installation Instructions - Page 22

.... Attach long hose to exhaust outlet
Remove protective cap from under dryer. Attach other end of dryer back panel. Check for leaks
Move dryer to final location, taking care not to exhaust outlet in place, remove corner posts and cardboard from water inlet valve. Dryer vent must fit over dryer exhaust outlet and inside exhaust hood. After dryer is seated on cold...
Installation Instructions - Page 23
...connector, faucet, and hoses. ‰‰Check dryer's final location.
If dryer will not start, check the following:
• Controls are on dryer. ‰‰Wipe dryer drum interior thoroughly with a damp cloth to adjust...
Once dryer is first heated. NOTE: You may lead to the need for the moisture sensing system to be level for certain part replacement or repair. Be sure vent is ...
Installation Instructions - Page 28

... and attach to remove the door. Move the door strike
Position the door with the inside of dryer door frame, as shown. REVERSE DOOR SWING: SQUARE-SHAPED DOOR
1. Remove door from outer door
Release... a credit card, putty knife, or similar flat object between the inner and outer doors at the locations shown to release the tab.
4. Remove hinge and latch
from inner door
Hinge
Using a T25®...
Specification Sheet - Page 1

...Warranty** on select Maytag® washers to get clothes ready in ...Dryer Cycles
Selection of Drying Cycles
Dryer Option Selections
Dimensions
Product Dimensions (H x W x D) Depth with Door Open 90° Maximum Vent Length Venting...Dimensions are for planning purposes only. Front Load Electric Dryer
MED5630H
Chrome Shadow MED5630HC
Also available in:
White
MED5630HW
Capacity
Total
7.3 cu.
Instruction Sheet - Page 1

...: (Not supplied with new rubber washer provided. NOTE: Do not overtighten. Screw on coupling by hand until it is seated on . 11. Damage to the coupling can result. 10. Inlet Hose Connection Instructions for leaks around "Y" connector, faucet, and hoses. NOTE: Do not overtighten. W10701405A The dryer must be sure rubber washers are on fill...
Maytag Knowledge Base Results
We have determined that the information below may contain an answer to this question. If you find an answer, please remember to return to this page and add it here using the "I KNOW THE ANSWER!" button above. It's that easy to earn points!-
Display shows an error code - Dryer
..., F29, F30 and F50 To remove the error display, select Pause/Off or Pause/Cancel twice. F01, F02, F22, F23, F26, F28 and F29 Bravos dryer - Dryer Display shows L2 - dryer - FAQs Knowledgebase search tips If the error code remains on the display, call for error-code related issues you can correct: Display... -
Display shows AF - Dryer
... before drying every load. Kinked or crushed exhaust vent material slows moist air from leaving the dryer and extends drying time. Replace any plastic or metal foil vent with lint and restricting air movement? Each additional elbow in a new location or is restricted. Are dryer fabric softener sheets blocking air flow? This error code indicates... -
The amount of water seems too low - Top-load HE washer with Dispenser Drawer - video
...water amount determined: When the Start button is not cleaning laundry - Load-sensing Energy Star top-load washer with Dispensers in Corners There is normal and necessary for the load size. Next,... than the washer provides. The amount of water seems too low in water. video The amount of water for the clothes to the load. Washer is pressed, the washer will use short slow...
Similar Questions

Maytag Medb835dw Dryer Won't Start Af Signal I Cleaned Vents And Airf
(Posted by 1688fairway 2 years ago)

Remove Lint Filter Holder
I need to remove the lint filter holder to get all the lint from the dryer. I have found 4 screws, 2...
I need to remove the lint filter holder to get all the lint from the dryer. I have found 4 screws, 2...
(Posted by davehard 2 years ago)

Check Lint Light Comes On
My Maytag MGDB725BW0 is not working properly. When ready to start the dryer the led reads 40 minutes...
My Maytag MGDB725BW0 is not working properly. When ready to start the dryer the led reads 40 minutes...
(Posted by eid00 4 years ago)

Our Dryer Quit Blowing Air. Filter And Vent Clean. No Air In Drum Or At Vent Att
Filter clean and vent. Just no air at all. Belt is on blower motor
Filter clean and vent. Just no air at all. Belt is on blower motor
(Posted by Cheriram17 8 years ago)

On My Maytag Dryer Mede300vf I Have Water In The Vent. Why?
where can this water be coming from.
where can this water be coming from.
(Posted by jimmielighter 9 years ago)