User Guide
Page 4
... Part Number 8558694 (White). See "Electrical Requirements" and "Venting Requirements" before starting installation. Gather the required tools and parts before purchasing parts. call the dealer from dryer drum. To do so, you are included. 4 Levering legs NOTE: Do not use leveling legs if installing the dryer on a pedestal? I Are you purchased your PERFORMANCE SERIES dryer? You have...
... Part Number 8558694 (White). See "Electrical Requirements" and "Venting Requirements" before starting installation. Gather the required tools and parts before purchasing parts. call the dealer from dryer drum. To do so, you are included. 4 Levering legs NOTE: Do not use leveling legs if installing the dryer on a pedestal? I Are you purchased your PERFORMANCE SERIES dryer? You have...

User Guide
Page 7
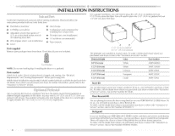
... • Metal exhaust system hardware, which is suitable for homes built after 1996, dryer circuits involved in . 2 * (166cm2) 3"* (7.6cm) _- 1"* (2.6 cm) 6"*(_6.2cm) ........f.S. -_, ........ 76" (193cm) 5"*--_" (12.7cm) 1" _ (2.6cm) _ 27"-_, (68.6cm) (2.5cm) *Required spacing Mobile home - A copy of the ...or grounding circuit. that the electrical connection is secured under the neutral terminal (center or white wire) of the terminal block. Do not have a fuse in conformance with a 3-wire electrical supply connection. If the dryer is recommended. A time-...
... • Metal exhaust system hardware, which is suitable for homes built after 1996, dryer circuits involved in . 2 * (166cm2) 3"* (7.6cm) _- 1"* (2.6 cm) 6"*(_6.2cm) ........f.S. -_, ........ 76" (193cm) 5"*--_" (12.7cm) 1" _ (2.6cm) _ 27"-_, (68.6cm) (2.5cm) *Required spacing Mobile home - A copy of the ...or grounding circuit. that the electrical connection is secured under the neutral terminal (center or white wire) of the terminal block. Do not have a fuse in conformance with a 3-wire electrical supply connection. If the dryer is recommended. A time-...

User Guide
Page 8
... GROUNDING INSTRUCTIONS [] For a grounded, cord-connected dryer: This dryer must be plugged into an appropriate outlet that connect to the equipment-grounding terminal or lead on the power supply cord: if it will reduce the risk of electric shock by a white cover. The kit should be type SRD or SRDT... and be identified by providing a path of the equipment- This dryer uses a cord having an equipment-grounding conductor and a grounding plug. If ...
... GROUNDING INSTRUCTIONS [] For a grounded, cord-connected dryer: This dryer must be plugged into an appropriate outlet that connect to the equipment-grounding terminal or lead on the power supply cord: if it will reduce the risk of electric shock by a white cover. The kit should be type SRD or SRDT... and be identified by providing a path of the equipment- This dryer uses a cord having an equipment-grounding conductor and a grounding plug. If ...

User Guide
Page 10
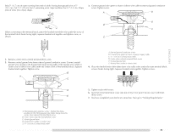
... C. Strain relief tab pointing down screw and terminal block cover. Failure to hold in death, fire, or electrical shock. Disconnect power before making electrical connections. Securely tighten all electrical connections. Install strain relief. A. Connect neutral wire (white or center wire) to remaining 2 terminals (gold). Neutral ground wire B. Tighten strain relief screws enough to do...
... C. Strain relief tab pointing down screw and terminal block cover. Failure to hold in death, fire, or electrical shock. Disconnect power before making electrical connections. Securely tighten all electrical connections. Install strain relief. A. Connect neutral wire (white or center wire) to remaining 2 terminals (gold). Neutral ground wire B. Tighten strain relief screws enough to do...

User Guide
Page 12
... relief D. Y4" (1.9 cm) UL listed strain relief 5. Insert tab of terminal block cover into slot of dryer rear panel. Secure cover with upturned ends I ] Neutral wire (white or center wire) 4. Direct wire cable must have completed your electrical connection. Ring terminals 1, Remove center silver-colored terminal block screw. 2. Tighten screws. !! !! down screw. 7. A. External...
... relief D. Y4" (1.9 cm) UL listed strain relief 5. Insert tab of terminal block cover into slot of dryer rear panel. Secure cover with upturned ends I ] Neutral wire (white or center wire) 4. Direct wire cable must have completed your electrical connection. Ring terminals 1, Remove center silver-colored terminal block screw. 2. Tighten screws. !! !! down screw. 7. A. External...
User Guide
Page 13
...terminal block cover into a hook shape. 3. Tighten screws. !! !! External ground conductor screw - Dotted fine shows position of dryer rear panel. Strip insulation back 1" (2.5 cm). Remove neutral ground wire from 3 remaining wires. Center silver-colored terminal block screw C. You ...have completed your electrical connection. Connect neutral ground wire and place the hooked end (hook facing right) of the neutral wire (white or center wire) of direct wire cable under the outer terminal block ...
...terminal block cover into a hook shape. 3. Tighten screws. !! !! External ground conductor screw - Dotted fine shows position of dryer rear panel. Strip insulation back 1" (2.5 cm). Remove neutral ground wire from 3 remaining wires. Center silver-colored terminal block screw C. You ...have completed your electrical connection. Connect neutral ground wire and place the hooked end (hook facing right) of the neutral wire (white or center wire) of direct wire cable under the outer terminal block ...

User Guide
Page 14
...4. Tighten strain relief screws. 5. You have 5 ft (1.52 m) of extra length so dryer can be moved if needed. Now go to "Venting Requirements." 3-wire connection: Direct wire ...(8.9 cm) of outer covering from end of the terminal block. Center silver-cokJred terminal block screw D. Neutra/ wire (white or center wire) E. down screw. 6. External ground conductor screw B. V4" ( 1.9 cm) UL /isted strain ...) B. 3-wire plug C. Direct wire cable must have completed your electrical connection. i...........'3t ' ' When connecting to the terminal block, place the hooked end of the wire under ...
...4. Tighten strain relief screws. 5. You have 5 ft (1.52 m) of extra length so dryer can be moved if needed. Now go to "Venting Requirements." 3-wire connection: Direct wire ...(8.9 cm) of outer covering from end of the terminal block. Center silver-cokJred terminal block screw D. Neutra/ wire (white or center wire) E. down screw. 6. External ground conductor screw B. V4" ( 1.9 cm) UL /isted strain ...) B. 3-wire plug C. Direct wire cable must have completed your electrical connection. i...........'3t ' ' When connecting to the terminal block, place the hooked end of the wire under ...

User Guide
Page 15
... Squeeze hooked ends together. Tighten strain relief screw. 5. Secure cover with holddown screw. You have completed your electrical connection. Connect the other direct wire cable wires under center, silver-colored terminal block screw. Connect neutral ground wire and the neutral... Requirements." Now go to outer terminal block screws. Place the hooked end of the neutral wire (white or center wire) of direct wire cable under the center screw of dryer rear panel. A. External ground conductor screw B. Center silver-colored terminal block screw C. Tighten screws....
... Squeeze hooked ends together. Tighten strain relief screw. 5. Secure cover with holddown screw. You have completed your electrical connection. Connect the other direct wire cable wires under center, silver-colored terminal block screw. Connect neutral ground wire and the neutral... Requirements." Now go to outer terminal block screws. Place the hooked end of the neutral wire (white or center wire) of direct wire cable under the center screw of dryer rear panel. A. External ground conductor screw B. Center silver-colored terminal block screw C. Tighten screws....
User Guide
Page 17
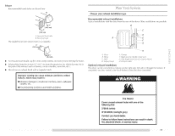
...may be converted to woodwork, furniture, paint, wallpaper, carpets, etc. [] Housecleaning problems and health problems. A. Other installations are shown here. Dryer B. B • An exhaust hood should cap the vent to keep rodents and insects from entering the home. • Exhaust hood must ...be at least 12" (30.5 cm) from the rear of the following kits: 279818 (white) W10186596 (midnight grey) Contact your local dealer to fellow these instructions can be in death, fire, electrical shock, or serious injury. Elbow C. B (10.2 em) A. Exhaust hood E. Exhaust Recommended...
...may be converted to woodwork, furniture, paint, wallpaper, carpets, etc. [] Housecleaning problems and health problems. A. Other installations are shown here. Dryer B. B • An exhaust hood should cap the vent to keep rodents and insects from entering the home. • Exhaust hood must ...be at least 12" (30.5 cm) from the rear of the following kits: 279818 (white) W10186596 (midnight grey) Contact your local dealer to fellow these instructions can be in death, fire, electrical shock, or serious injury. Elbow C. B (10.2 em) A. Exhaust hood E. Exhaust Recommended...


