Maytag MED9600SQ Support Question
Maytag MED9600SQ Support Question
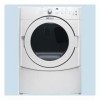
Find answers below for this question about Maytag MED9600SQ - Epic 7.0 cu. Ft. Electric Dryer.Need a Maytag MED9600SQ manual? We have 1 online manual for this item!
Question posted by Anonymous-58036 on April 30th, 2012
I Am Hooking My Dryer Up And Where Does The Thick White Wire Go
The person who posted this question about this Maytag product did not include a detailed explanation. Please use the "Request More Information" button to the right if more details would help you to answer this question.
Current Answers
Related Maytag MED9600SQ Manual Pages
Use and Care Guide - Page 3
... in , or spotted with controls.
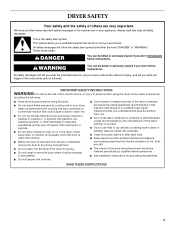
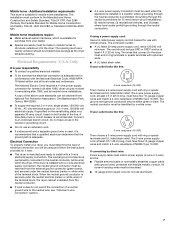
s See installation instructions for grounding requirements. This symbol alerts you to persons when using the dryer. IMPORTANT SAFETY INSTRUCTIONS
WARNING: To reduce the risk of fire, electric shock, or injury to potential hazards that you don't follow basic precautions,
including the following:
s Read all safety messages. s Clean...
Use and Care Guide - Page 4
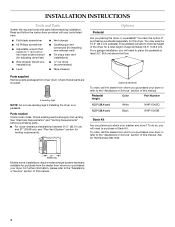
..." section of approximately 53.5" (135.9 cm). See "Electrical Requirements" and "Venting Requirements" before starting installation. Pedestal Height
Color
Part Number
15.5" (39.4 cm)
White
WHP1500SQ
15.5" (39.4 cm)
Black
WHP1500SB
Stack Kit
Are you purchased your dryer or refer to the total height of the dryer for installing new exhaust vent)
s Tin snips (new...
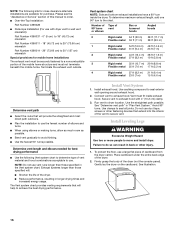
Use and Care Guide - Page 5
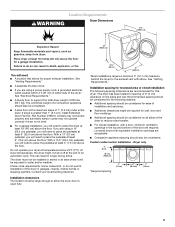
... properly and automatic sensor cycles may not operate correctly if dryer is greater than 1" (2.5 cm), install Extended Dryer Feet Kit, Part Number 279810.
Recommended spacing should be considered for the following spacing dimensions are using a power supply cord, a grounded electrical outlet located within 2 ft (61 cm) of either side of the door are using...
Use and Care Guide - Page 6

...
*Required spacing **For side or bottom venting, 0" (0 cm) spacing is allowed. Side view - Dryer on pedestal
14" max.* (35.6 cm)
18" min.* (45.72 cm)
1" (2.5 cm...)
27" (68.6 cm)
1" (2.5 cm)
6
Recommended installation spacing for recessed or closet installation, with stacked washer and dryer
The dimensions shown are required.
7"* (17.8 cm) 7"* (17.8 cm)
9"* (22.9 cm)
5"** 31¹ ...
Use and Care Guide - Page 7
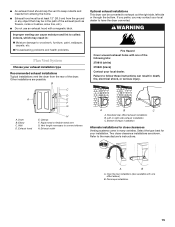
... be obtained from your responsibility s To contact a qualified electrical installer. The installation must have three 10-gauge copper wires and match a 3-wire receptacle of NEMA Type 14-30R. s Special provisions must be at least 4 ft (1.22 m) long, must conform to the neutral conductor (white wire) within the dryer. Only
It is permanently connected to the Manufactured Home...
Use and Care Guide - Page 8
... circuit, fused on the power supply cord: if it will reduce the risk of electric shock by providing a path of dryer's final location.
4-wire receptacle 14-30R
s Do not use Power Supply Cord Replacement Part Number 9831317. s This dryer is equipped with the circuit conductors and connected to be plugged into an appropriate outlet...
Use and Care Guide - Page 9
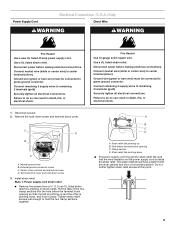
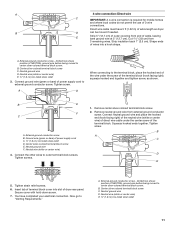
... strain relief. Disconnect power before making electrical connections.
Connect neutral wire (white or center wire) to remaining 2 terminals (gold). ...wire insulation on strain relief). Tighten strain relief screws just enough to green ground connector.
The strain relief should have a tight fit with the dryer cabinet and be connected to hold in death, fire, or electrical...
Use and Care Guide - Page 10
...-amp, dryer power supply cord*
3-wire connection: Power supply cord
3-wire direct
3¹⁄₂" (8.9 cm)
A fused disconnect or circuit breaker box*
3-wire connection: Direct Wire
*If local codes do not permit the use of power supply cord under center, silver-colored terminal block screw. Connect neutral ground wire and the neutral wire (white or center wire) of 3-wire connections...
Use and Care Guide - Page 11
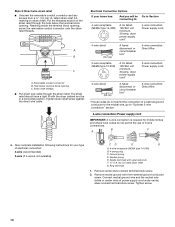
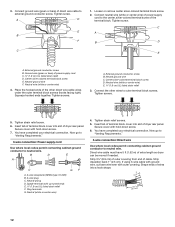
... of terminal block cover into a hook shape.
B. A
D
When connecting to center silver-colored terminal block screw. Tighten screw.
Tighten strain relief screws.
6.
A. Center silver-colored terminal block screw
C. Direct wire cable must have completed your electrical connection. Shape ends
of wires into slot of extra length so dryer
B
D
can be moved if needed...
Use and Care Guide - Page 12
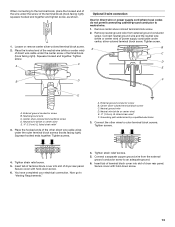
... screw B. Connect ground wire (green or bare) of dryer rear panel. You have completed your electrical connection. Center silver-colored terminal block screw E. B
D
E
A
C
GF
A. 3-wire receptacle (NEMA type 10-30R) B. 3-wire plug C. Squeeze hooked ends together. Neutral prong D. Tighten strain relief screw.
6.
Connect neutral wire (white or center wire) of power supply...
Use and Care Guide - Page 13
... B. Tighten screws.
4. Squeeze hooked end together.
Neutral wire (white or center wire) E 1.9 cm) UL listed strain relief
3.
Neutral wire (white or center wire) E 1.9 cm) UL listed strain relief F. Squeeze hooked ends together. Neutral ground wire D. You have completed your electrical connection. Insert tab of terminal block cover into slot of dryer rear panel. Remove...
Use and Care Guide - Page 14
... manual. s Flexible metal vent must not be fully extended and supported when the dryer is recommended to achieve the best drying performance.
s Remove excess flexible metal vent to... vent system
Vent material s Use a heavy metal vent.
IMPORTANT: Observe all joints. The dryer exhaust must be connected into the interior of a building. s Do not install flexible metal vent...
Use and Care Guide - Page 15
...exhaust hood with one of the following kits: 279818 (white) 279820 (black) Contact your local dealer to have the dryer converted.
Dryer B. Clamps F. If you prefer, you may contact ... H.
Elbow C. Exhaust hood
H
E. A
B
A.
Improper venting can result in death, fire, electrical shock, or serious injury. s An exhaust hood should cap the vent to keep rodents and insects from...
Use and Care Guide - Page 16
... to dryer location....ft (20 m) 58 ft (17.7 m)
Flexible metal 36 ft (11 m) 28 ft (8.5 m)
1
Rigid metal
54 ft (16.5 m) 48 ft (14.6 m)
Flexible metal 31 ft (9.4 m) 23 ft (7 m)
2
Rigid metal
44 ft (13.4 m) 38 ft (11.6 m)
Flexible metal 27 ft (8.2 m) 19 ft (5.8 m)
3
Rigid metal
35 ft (10.7 m) 29 ft (8.8 m)
Flexible metal 25 ft (7.6 m) 17 ft (5.2 m)
4
Rigid metal
27 ft (8.2 m) 21 ft...
Use and Care Guide - Page 17

...the top keyhole opening , if desired.
Set the outer door assembly aside. Reverse the hinge and hinge bracket 1. Dryer B. Do not remove. C. Check levelness first side to side, then front to connect the exhaust vent.
Use...sure the vent is made, remove the
corner posts and cardboard. If the dryer is no kinks in dryer.
If connecting to the other side, and snap in. Once the exhaust...
Use and Care Guide - Page 18
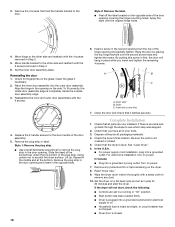
...7. Dryer C....If the dryer will hang ...dryer is level. Check the dryer's final location. In Canada
s Plug into a grounded outlet. Place the inner door assembly into a grounded outlet and/or electrical...dryer. In the U.S.A. s Start button has been pushed firmly. 3. s Peel off the label located on the dryer... s Dryer door is...Dryer door B.
Turn on the glass. Wipe the dryer drum...Dryer...
Use and Care Guide - Page 19
...dryer. This odor is common when the heating element is still no heat, contact a qualified technician. The odor will be 2 household fuses or circuit breakers for more detailed information.
Failure to specific sections of the cycle based on a clothesline or by using an Air Cycle. See "Cleaning the Lint Screen."
2. Place laundry...breakers have all of fire, electric shock, or injury to be...
Use and Care Guide - Page 20
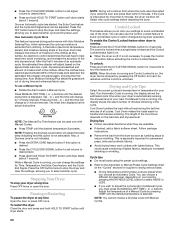
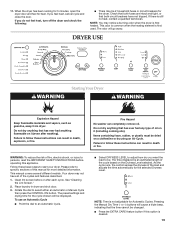
...is not selectable. Press MANUAL DRY TIME (- Press and hold HOLD TO START button until dryer starts. Also, a Dryness Level is especially important for permanent press, knits and synthetic ... before activating the Control Locked feature.
s If you to desired level.
s Press TEMP until dryer starts (about 1 second). Control Locked
This feature allows you must press the MANUAL DRY TIME ...
Use and Care Guide - Page 23
... may not have the same feature as needed .
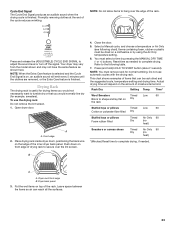
Place drying rack inside dryer drum, positioning the back wire on a clothesline or by pressing the MANUAL DRY TIME (- Push down on... This chart shows examples of drying rack to complete drying, if needed to complete drying. B
A
A. Dryer back panel
3. NOTE: When the Extra Care feature is selected and the Cycle End Signal is finished. ...
Use and Care Guide - Page 25
... the drum light 1. See the Installation Instructions. Replace the bulb with a 10-watt appliance bulb only. Check the front and rear edges of operation. Disconnect wiring. 3. For direct-wired dryers:
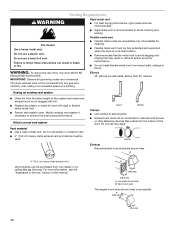
WARNING
Electrical Shock Hazard Disconnect power before servicing.
Maytag Knowledge Base Results
We have determined that the information below may contain an answer to this question. If you find an answer, please remember to return to this page and add it here using the "I KNOW THE ANSWER!" button above. It's that easy to earn points!-
Steam nozzle has blue-green discoloration - Steam dryer
... any blue-green lime or calcium buildup off the water nozzle in my dishwasher Loads are stains on my steam dryer has a blue-green discoloration. The Steam nozzle on the dryer drum Rusty racks/dishes in your dryer, (located inside the dryer, under the drum light) use white vinegar and scrub with a scouring pad. -
Damaged clothing - Top-load HE washer with Dispensers in Corners
...will damage any fabric it touches. Do not guess. Was a wire in the washer basket? Top-load washer Wash large items in ... to thoroughly saturate your large load. This is not cleaning laundry - Top-load HE washer with a soak to move freely.... could snag fabrics. Empty pockets, zip zippers, and snap or hook fasteners before washing. Load loose heaps of the bleach dispenser when ... -
Damaged Clothing - Top-load HE washer with Dispenser Drawer
.... Use less for loose items that could snag fabrics. Was a wire in my Bravos Use a cycle with less wash time... two items when the Sensing light is not cleaning laundry - Top-load washer Washer is on top of garments, evenly...open mesh bag. Empty pockets, zip zippers, and snap or hook fasteners before washing. Try mixing different load items to maintain load...
Similar Questions

Can I Replace The 3 Wire Cord With A 4 Wire Cord On My Maytag Electric Dryer
(Posted by secondtononeconcrete 10 years ago)

How To Hook Up A 4 Prong Cord To Maytag Bravos Dryer White Wire
(Posted by jbsaulyn 10 years ago)

Matching Stacking Kit
Matching stacking kit Maytag/MED9600SQ-epic-70-cu-ft-electric-dryer/21808 with regards, Vinesh
Matching stacking kit Maytag/MED9600SQ-epic-70-cu-ft-electric-dryer/21808 with regards, Vinesh
(Posted by vineshjosep 11 years ago)

In Change To 4-prong What Do You Do With White Wire After Removal From Ground?
(Posted by Anonymous-74845 11 years ago)

My Dryer Stopped Heating Up
my Maytag MED9600S Electric Dryer stopped heating up. how do i fix it?
my Maytag MED9600S Electric Dryer stopped heating up. how do i fix it?
(Posted by michael89529 13 years ago)